Tài liệu Web Programming with HTML, XHTML, and CSS- P10 ppt
Bạn đang xem bản rút gọn của tài liệu. Xem và tải ngay bản đầy đủ của tài liệu tại đây (554.21 KB, 50 trang )
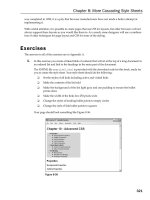
4. Save this example as ch11_eg4.html and open it in your browser. Then roll your mouse over
the image (without clicking it). You should see something like Figure 11-5 with the mouse
over the image.
Figure 11-5
How It Works
When the user rolls over the image, the onmouseover event fires, and when the user moves off it again
the
onmouseout event fires. This is why there are separate attributes that correspond to each of these
events, and when one of these two events fires, the script held as a value for the corresponding attribute
is executed.
The script in the
onmouseover and onmouseout event handler attributes tells the browser to change the
src attribute of the image, and therefore a different image is displayed to the user.
The first (
onmouseover) indicates what should happen when the mouse is placed over the image; the
second (
onmouseout) indicates what should be done when the mouse is moved off the image.
You can see in the code for
ch11_eg04.html that when the user puts the mouse over an image, the src
property of the image inside the link — named using the notation document.images.link — is changed.
<a href=””
onmouseover=”document.images.button.src=’click_red.gif’;”
onmouseout=”document.images.button.src=’click_green.gif’”>
<img src=”click_green.gif” width=”100” height=”50” border=”0”
name=”button”>
</a>
The <img /> element must have a name attribute so that the image can be referenced in this way in the
link (otherwise you would have to use its index in the images collection). It is generally best to use the
name in situations like this, rather than the index of that image in the images collection, because if you
were to add another image into the document before this one the whole script would need changing.
Note that if no event indicated what should happen when the user takes the mouse off the image, it would
remain red rather than turning back to green. An image rollover script is a good example of changing or
setting that property rather than just reading it.
You learn about a more complex version of the image rollover in Chapter 12, which shows you how to
create a function that can change several images within the same document; this is particularly helpful
if you are using rollovers in a navigation bar.
421
Chapter 11: Learning JavaScript
59313c11.qxd:WroxPro 3/23/08 1:21 PM Page 421
Please purchase PDF Split-Merge on www.verypdf.com to remove this watermark.
Different Types of Objects
You will come across several types of objects in JavaScript, each of which is responsible for a related set
of functionalities. For example, the document object has methods and properties that relate to the docu-
ment; the forms collection, which is part of the document object, deals with information regarding forms;
and so on. As you are about to see, there can be lots of different objects, each of which deals with a differ-
ent set of functionalities and properties.
So, here are some of the types of objects you are likely to come across:
❑ W3C DOM objects: These are like those covered already in this chapter, although in more recent
browsers there are several more objects that are made available to allow you more control over a
document. There are also additional objects in each different level of the DOM released by the W3C.
❑ Built-in objects: Several objects are part of the JavaScript language itself. These include the date
object, which deals with dates and times, and the math object, which provides mathematical
functions. You will be learning more about these built-in objects later in the chapter.
❑ Custom objects: If you start to write advanced JavaScript you might even start creating your own
JavaScript objects that contain related functionality; for example, you might have a validation object
that you have written just to use to validate your forms.
While it is not possible to cover the creation of custom objects in this chapter, you learn about the built-in
objects later in this chapter.
Starting to Program with JavaScript
Having learned about the DOM, you can see how it allows you to access a document in a web browser.
However, it is JavaScript that introduces real programming concepts. You know that the DOM allows
you to retrieve and set properties, and that methods can be used to evoke actions such as writing new
content to a page. Now it is time to look at how you use these values and properties in scripts to create
more powerful documents.
As I mentioned earlier, a programming language mainly performs calculations. So here are the key concepts
you need to learn about in order to perform different types of calculations:
❑ A variable is used to store some information; it’s like a little bit of memory where you can store
numbers, strings (which are a series of characters), or references to objects. You can then per-
form calculations to alter the data held in variables within your code.
❑ Operators allow you to do things to variables or references to. There are different types of opera-
tors. For example:
❑ Arithmetic operators enable you to do things such as add (
+) numbers together, or sub-
tract (
-) one from another (providing they are numbers).
❑ Comparison operators enable you to compare two strings and see if one is the same as
the other, or different (for example, whether x is equal to y).
❑ Functions are related bits of code containing rules that you create to perform an operation. For
example, you could have a function that calculates loan repayments when you pass it variables
422
Chapter 11: Learning JavaScript
59313c11.qxd:WroxPro 3/23/08 1:21 PM Page 422
Please purchase PDF Split-Merge on www.verypdf.com to remove this watermark.
indicating an amount of money to be borrowed, the number of years the loan will last, and
the interest rate the loan should be paid back at. (Functions are very similar to things called
methods, except in JavaScript, methods belong to objects, whereas functions are written by
the programmer.)
Conditional statements allow you to specify a condition using variables and operators. For example, a
condition might be whether a variable called
varTimeNow (which contains the current time) has a
value greater than 12. If the condition is met and the current time has a value greater than 12, then
something can happen based upon this condition — perhaps the document says “Good afternoon.”
Otherwise, if it is earlier than noon the document might say “Good morning.”
❑ Loops can be set up so that a block of code runs a specified number of times or until a condition
is met. For example, you can use a loop to get a document to write your name 100 times.
❑ There are also several built in JavaScript objects that have methods that are of practical use. For
example, in the same way that the document object of the DOM has methods that allowed you
to write to the document, the built-in JavaScript date object can tell you the date, time, or day of
the week.
The following section looks at these key concepts in more detail.
Variables
Variables are used to store data. To store information in a variable, you can give the variable a name and
put an equal sign between it and the value you want it to have. For example, here is a variable that con-
tains a username:
userName = “Bob Stewart”
The variable is called userName and the value is Bob Stewart. If no value is given, then its value is unde-
fined. (Note that when you are writing out the value of the variable in the code, the value is given in quo-
tation marks.)
When you first use a variable, you are creating it. The process of creating a variable is referred to as declaring
the variable. You can declare a variable with the
var statement, like so:
var userName = “Bob Stewart”
I should note here that you need to use the var keyword only if you are creating a variable inside a
function that has the same name as a global variable — although to understand this point you need
to understand functions and global and local variables, which are covered later.
A variable’s value can be recalled or changed by the script, and when you want to do either of these you
use its name.
There are a few rules you must remember about variables in JavaScript:
❑ Variable names are case-sensitive.
❑ They must begin with a letter or the underscore character.
423
Chapter 11: Learning JavaScript
59313c11.qxd:WroxPro 3/23/08 1:21 PM Page 423
Please purchase PDF Split-Merge on www.verypdf.com to remove this watermark.
❑ Avoid giving two variables the same name within the same document as one might override the
value of the other, creating an error.
❑ Try to use descriptive names for your variables. This makes your code easier to understand (and
will help you debug your code if there is a problem with it).
Assigning a Value to a Variable
When you want to give a value to a variable, you put the variable name first, then an equal sign, and then
on the right the value you want to assign to the variable. You have already seen values being assigned to
these variables when they were declared a moment ago. So, here is an example of a variable being assigned
a value and then the value being changed:
var userName = “Bob Stewart”
userName = “Robert Stewart”
userName is now the equivalent of Robert Stewart.
Lifetime of a Variable
When you declare a variable in a function it can be accessed only in that function. (As promised, you will
learn about functions shortly.) After the function has run, you cannot call the variable again. Variables in
functions are called local variables.
Because a local variable works only within a function, you can have different functions that contain vari-
ables of the same name (each is recognized by that function only).
If you declare a variable outside a function, all the functions on your page can access it. The lifetime of
these variables starts when they are declared and ends when the page is closed.
Local variables take up less memory and resources than page-level variables because they require only
the memory during the time that the function runs, rather than having to be created and remembered
for the life of the whole page.
Operators
The operator itself is a keyword or symbol that does something to a value when used in an expression. For
example, the arithmetic operator
+ adds two values together.
The symbol is used in an expression with either one or two values and performs a calculation on the values
to generate a result. For example, here is an expression that uses the
x operator:
area = (width x height)
An expression is just like a mathematical expression. The values are known as operands. Operators that
require only one operand (or value) are sometimes referred to as unary operators, while those that require
two values are sometimes called binary operators.
424
Chapter 11: Learning JavaScript
59313c11.qxd:WroxPro 3/23/08 1:21 PM Page 424
Please purchase PDF Split-Merge on www.verypdf.com to remove this watermark.
The different types of operators you will see in this section are:
❑ Arithmetic operators
❑ Assignment operators
❑ Comparison operators
❑ Logical operators
❑ String operators
You will see lots of examples of the operators in action both later in this chapter and in the next chapter.
First, however, it’s time to learn about each type of operator.
Arithmetic Operators
Arithmetic operators perform arithmetic operations upon operands. (Note that in the examples in the
following table, x = 10.)
Assignment Operators
The basic assignment operator is the equal sign, but do not take this to mean that it checks whether two
values are equal. Rather, it’s used to assign a value to the variable on the left of the equal sign, as you
have seen in the previous section that introduced variables.
The assignment operator can be combined with several other operators to allow you to assign a
value to a variable and perform an operation in one step. For example, with the arithmetic operators,
the assignment operators can be used to create shorthand versions of operators, as in the following
statement:
total = total - profit
Symbol Description Example (x = 10) Result
+
Addition
x+5
15
-
Subtraction
x-2
8
*
Multiplication
x*3
30
/
Division
x/2
15
%
Modulus (division remainder)
x%3
1
++
Increment (increments the variable by 1 — this
technique is often used in counters)
x++
11
Decrement (decreases the variable by 1)
x
9
425
Chapter 11: Learning JavaScript
59313c11.qxd:WroxPro 3/23/08 1:21 PM Page 425
Please purchase PDF Split-Merge on www.verypdf.com to remove this watermark.
This can be reduced to the following statement:
total -= profit
While it might not look like much, this kind of shorthand can save a lot of code if you have a lot of calcu-
lations such as this (see table below) to perform.
Comparison Operators
As you can see in the table that follows, comparison operators compare two operands and then return
either
true or false based on whether the comparison is true or not.
Note that the comparison for checking whether two operands are equal is two equal signs (a single equal
sign would be an assignment operator).
Operator Description Example
== Equal to 1==2 returns false
3==3 returns true
!= Not equal to 1!=2 returns true
3!=3 returns false
> Greater than 1>2 returns false
3>3 returns false
3>2 returns true
< Less than 1<2 returns true
3<3 returns false
3<1 returns false
>= Greater than or equal to 1>=2 returns false
3>=2 returns true
3>=3 returns true
<= Less than or equal to 1<=2 returns true
3<=3 returns true
3<=4 returns false
Symbol Example Using Shorthand Equivalent Without Shorthand
+= x+=y x=x+y
-= x-=y x=x-y
*= x*=y x=x*y
/= x/=y x=x/y
%= x%=y x=x%y
426
Chapter 11: Learning JavaScript
59313c11.qxd:WroxPro 3/23/08 1:21 PM Page 426
Please purchase PDF Split-Merge on www.verypdf.com to remove this watermark.
Logical or Boolean Operators
Logical or Boolean operators return one of two values: true or false. They are particularly helpful
because they allow you to evaluate more than one expression at a time.
The two operands in a logical or Boolean operator evaluate to either
true or false. For example, if x=1
and y=2, then x<2 is true and y>1 is true. So the following expression:
(x<2 && y>1)
returns true because both of the operands evaluate to true.
String Operator
You can also add text to strings using the + operator. For example, here the + operator is being used to
add two variables that are strings together:
firstName = “Bob”
lastName = “Stewart”
name = firstName + lastName
The value of the name variable would now be Bob Stewart. The process of adding two strings together
is known as concatenation.
You can also compare strings using the comparison operators you just met. For example, you could check
whether a user has entered a specific value into a text box. (You will see more about this topic when you
look at conditional statements shortly.)
Functions
At last we come to the function, which has been mentioned several times already. A function is some
code that is executed when an event fires or a call to that function is made, and typically a function con-
tains several lines of code. Functions are either written in the
<head> element and can be reused in sev-
eral places within the page, or in an external file that is linked from inside the
<head> element.
Operator Name Description Example (where x=1 and y=2)
&&
And Allows you to check if both of
two conditions are met
(x < 2 && y > 1)
Returns
true (because both
conditions are met)
??
Or Allows you to check if one of two
conditions are met
(x < 2 ??y < 2)
Returns
true (because the first
condition is met)
!
Not Allows you to check if something
is not the case
! (x > y)
Returns
true (because x is not
more than y)
427
Chapter 11: Learning JavaScript
59313c11.qxd:WroxPro 3/23/08 1:21 PM Page 427
Please purchase PDF Split-Merge on www.verypdf.com to remove this watermark.
How to Define a Function
There are three parts to creating or defining a function:
❑ Define a name for it.
❑ Indicate any values that might be required as arguments.
❑ Add statements.
For example, if you want to create a function to calculate the area of a rectangle, you might name the
function
calculateArea() (remembering a function name should be followed by parentheses). Then
in order to calculate the area, you need to know the rectangle’s width and height, so these would be
passed in as arguments (arguments are the information the function needs to do its job). Inside the func-
tion between the curly braces are the statements, which indicate that area is equal to the width multi-
plied by the height (both of which have been passed into the function). The area is then returned.
function calculateArea(width, height) {
area = width * height
return area
}
If a function has no arguments it should still have parentheses after its name; for example, logOut().
How to Call a Function
The calculateArea() function does nothing sitting on its own in the head of a document; it has to be
called. In this example, you can call the function from a simple form using the
onclick event, so that
when the user clicks the Submit button the area will be calculated.
Here you can see that the form contains two text inputs for the width and height, and these are passed
as arguments to the function like so (
ch11_eg05.html):
<form name=”frmArea” action=””>
Enter the width and height of your rectangle to calculate the size:<br />
Width: <input type=”text” name=”txtWidth” size=”5” /><br />
Height: <input type=”text” name=”txtHeight” size=”5” /><br />
<input type=”button” value=”Calculate area”
onclick=”alert(calculateArea(document.frmArea.txtWidth.value,
document.frmArea.txtHeight.value))” />
</form>
Take a closer look at what is happening when the onclick event fires. First a JavaScript alert is being
called, and then the
calculateArea() function is being called inside the alert, so that the area is the
value that is written to the alert box. Inside the parentheses where the
calculateArea() function is
being called, the two parameters being passed are the values of the width text box and the height text
box using the dot notation you learned early in the section on the DOM.
Note that if your function has no arguments you still need to use the parentheses at the end of the func-
tion name when you call it; for example, you might have a function that will run without any extra infor-
mation passed as an argument:
<input type=”submit” onClick=”exampleFunction()” />
428
Chapter 11: Learning JavaScript
59313c11.qxd:WroxPro 3/23/08 1:21 PM Page 428
Please purchase PDF Split-Merge on www.verypdf.com to remove this watermark.
The Return Statement
Functions that return a result must use the return statement. This statement specifies the value that will
be returned to where the function was called. The
calculateArea() function, for example, returned
the area of the rectangle:
function calculateArea(width, height) {
area = width * height
return area
}
Some functions simply return true or false values. When you look at events later in the chapter,
you will see how a function that returns
false can stop an action from occurring. For example, if the
function associated with an
onsubmit event on a form returns false, the form is not submitted to
the server.
Conditional Statements
Conditional statements allow you to take different actions depending upon different statements. There
are three types of conditional statement you will learn about here:
❑
if statements, which are used when you want the script to execute if a condition is true
❑
if else statements, which are used when you want to execute one set of code if a condition
is true and another if it is false
❑
switch statements, which are used when you want to select one block of code from many
depending on a situation
if Statements
if statements allow code to be executed when the condition specified is true; if the condition is true then
the code in the curly braces is executed. Here is the syntax for an
if statement:
if (condition)
{
code to be executed if condition is true
}
For example, you might want to start your home page with the text “Good Morning” if the time is in the
morning. You could achieve this using the following script (
ch11_eg06.html):
<script type=”text/JavaScript”>
date = new Date();
time = date.getHours();
if (time < 12) {
document.write(‘Good Morning’);
}
</script>
429
Chapter 11: Learning JavaScript
59313c11.qxd:WroxPro 3/23/08 1:21 PM Page 429
Please purchase PDF Split-Merge on www.verypdf.com to remove this watermark.
If you are executing only one statement (as we are here), the curly braces are not strictly required, so the
following would do exactly the same job (although it is good practice to include them anyway as we did
previously).
<script type=”text/JavaScript”>
date = new Date();
time = date.getHours();
if (time < 12)
document.write(‘Good Morning’);
</script>
This example first creates a date object (which you learn about later in the chapter) and then calls the
getHours() method of the date object to find the time in hours (using the 24-hour clock). If the time in
hours is less than 12, then the script writes
Good Morning to the page (if it is after 12 you will see a blank
page because nothing is written to it).
if . . . else Statements
When you have two possible situations and you want to react differently for each, you can use an
if else statement. This means: “If the conditions specified are met, run the first block of code;
otherwise run the second block.” The syntax is as follows:
if (condition)
{
code to be executed if condition is true
}
else
{
code to be executed if condition is false
}
Returning to the previous example, you can write Good Morning if the time is before noon, and Good
Afternoon
if it is after noon (ch11_eg07.html).
<script type=”text/JavaScript”>
date = new Date();
time = date.getHours();
if (time < 12) {
document.write(‘Good Morning’);
}
else {
document.write(‘Good Afternoon’);
}
</script>
As you can imagine there are a lot of possibilities for using conditional statements. Indeed, you will see
examples in Chapter 12 that include several such statements to create some very powerful and complex
examples.
430
Chapter 11: Learning JavaScript
59313c11.qxd:WroxPro 3/23/08 1:21 PM Page 430
Please purchase PDF Split-Merge on www.verypdf.com to remove this watermark.
A switch Statement
A switch statement allows you to deal with several results of a condition. You have a single expression,
which is usually a variable. This is evaluated immediately. The value of the expression is then compared
with the values for each case in the structure. If there is a match, the block of code will execute.
Here is the syntax for a
switch statement:
switch (expression)
{
case option1:
code to be executed if expression is what is written in option1
break;
case option2:
code to be executed if expression is what is written in option2
break;
case option3:
code to be executed if expression is what is written in option3
break;
default:
code to be executed if expression is different from option1, option2,
and option3
}
You use the break to prevent code from running into the next case automatically. For example, you might
be checking what type of animal a user has entered into a text box, and you want to write out different
things to the screen depending upon what kind of animal is in the text input. Here is a form that appears
on the page. When the user has entered an animal and clicks the button, the
checkAnimal() function con-
tained in the head of the document is called (
ch11_eg08.html):
<p>Enter the name of your favorite type of animal that stars in a cartoon:</p>
<form name=”frmAnimal”>
<input type=”text” name=”txtAnimal” /><br />
<input type=”button” value=”Check animal” onclick=”checkAnimal()” />
</form>
Here is the function that contains the switch statement:
function checkAnimal() {
switch (document.frmAnimal.txtAnimal.value){
case “rabbit”:
alert(“Watch out, it’s Elmer Fudd!”)
break;
case “coyote”:
alert(“No match for the road runner - meep meep!”)
break;
case “mouse”:
alert(“Watch out Jerry, here comes Tom!”)
break;
default : alert(“Are you sure you picked an animal from a cartoon?”);
}
}
431
Chapter 11: Learning JavaScript
59313c11.qxd:WroxPro 3/23/08 1:21 PM Page 431
Please purchase PDF Split-Merge on www.verypdf.com to remove this watermark.
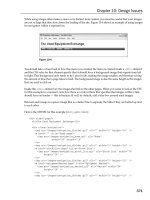
The final option — the default — is shown if none of the cases are met. You can see what this would look
like when the user has entered rabbit into the text box in Figure 11-6.
Note that, should the user enter text in a different case, it will not match the options in the
switch state-
ment. Because JavaScript is case-sensitive, if the letter’s case does not match the value of the case in the
switch statement, it will not be a match. You can solve this by making the text all lowercase in the first
place before checking it using the
toLowerCase() method of the built-in JavaScript string object, which
you meet later in the chapter.
Figure 11-6
Conditional (or Ternary) Operator
A conditional operator (also known as the ternary operator) assigns a value to a variable based upon a
condition:
variablename=(condition)?value1:value2
For example, say you have a variable called instruction and a variable called color. If the value of
color is red, then you want the variable to be STOP; otherwise you want it to be CONTINUE.
instruction=(color==”red”)?”STOP”:”CONTINUE”
Looping
Looping statements are used to execute the same block of code a specified number of times:
❑ A
while loop runs the same block of code while or until a condition is true.
432
Chapter 11: Learning JavaScript
59313c11.qxd:WroxPro 3/23/08 1:21 PM Page 432
Please purchase PDF Split-Merge on www.verypdf.com to remove this watermark.
❑ A do while loop runs once before the condition is checked. If the condition is true, it will con-
tinue to run until the condition is false. (The difference between the
do and do while loops is
that
do while runs once whether or not the condition is met.)
❑ A
for loop runs the same block of code a specified number of times.
while
In a while loop, a code block is executed if a condition is true and for as long as that condition remains
true. The syntax is as follows:
while (condition)
{
code to be executed
}
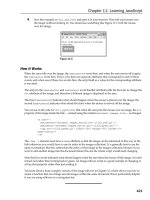
In the following example, you can see a while loop that shows the multiplication table for the number 3.
This works based on a counter called
i; every time the while script loops, the counter increments by one
(this uses the
++ arithmetic operator, as you can see from the line that says i++). So, the first time the script
runs the counter is 1, and the loop writes out the line 1 × 3 = 3; the next time it loops around the counter is
2, so the loop writes out 2 × 3 = 6. This continues until the condition — that i is no longer less than 11 — is
true (
ch11_eg09.html):
<script type=”text/JavaScript”>
i = 1
while (i < 11) {
document.write(i + “ x 3 = “ + (i * 3) + “<br />” );
i ++
}
</script>
You can see the result of this example in Figure 11-7.
Figure 11-7
433
Chapter 11: Learning JavaScript
59313c11.qxd:WroxPro 3/23/08 1:21 PM Page 433
Please purchase PDF Split-Merge on www.verypdf.com to remove this watermark.
do . . . while
A do while loop executes a block of code once and then checks a condition. For as long as the con-
dition is true it continues to loop. So, whatever the condition, the loop runs at least once (as you can see
the condition is after the instructions). Here is the syntax:
do
{
code to be executed
}
while (condition)
For example, here is the example with the 3 multiplication table again — the counter is set with an initial
value of 12, which is higher than required in the condition, so you will see the sum 12 × 3 = 36 once, but
nothing after that (because when it comes to the condition, it has been met):
<script type=”text/JavaScript”>
i = 12
do {
document.write(i + “ x 3 = “ + (i * 3) + “<br />” );
i ++
}
while (i < 11)
</script>
Now, if you changed the value of the initial counter to 1 you would see that the script loops through the
multiplication table as it did in the last example until it gets to 11.
for
The for statement executes a block of code a specified number of times; you use it when you know how
many times you want the code to be executed (rather than running while a particular condition is true/
false). First, here is the syntax:
for (a; b; c)
{
code to be executed
}
Now you need to look at what a, b, and c represent:
❑
a evaluates before the loop is run, and is only evaluated once. It is ideal for assigning a value to
a variable; for example you might use it to set a counter to 0 using
i=0.
❑
b should be a condition that indicates whether the loop should be run again; if it returns true the
loop runs again. For example, you might use this to check whether the counter is less than 11.
❑
c is evaluated after the loop has run and can contain multiple expressions separated by a comma
(for example
i++, j++;). For example, you might use it to increment the counter.
434
Chapter 11: Learning JavaScript
59313c11.qxd:WroxPro 3/23/08 1:21 PM Page 434
Please purchase PDF Split-Merge on www.verypdf.com to remove this watermark.
So if you come back to the 3 multiplication table example again, it would be written something like this:
for (i=0; i<11; i++) {
document.write(i + “ x 3 = “ + (i * 3) + “<br />” );
}
The a is where the counter is assigned to have a value of 0, b is where the condition is saying that the
loop should run if the value of the counter is less than 11, and
c is where the counter is incremented by 1
every time the loop runs. The assignment of the counter variable, the condition, and the incrementing of
the counter all appear in the parentheses after the keyword
for.
You can also assign several variables at once in the part corresponding to the letter
a if you separate them
with a comma. For example,
i=0,j=5;.
Infinite Loops and the break Statement
Note that, if you have an expression that always evaluates to true in any loop, you end up with something
known as an infinite loop. These can tie up system resources and can even crash the computer, although some
browsers try to detect infinite loops and will usually stop the loop.
You can, however, add a
break statement to stop an infinite loop; here it is set to 100 (ch11_eg12.html):
for (i=0; /* no condition here */ ; i++) {
document.write(i + “ x 3 = “ + (i * 3) + “<br />” );
if (i == 100) {
break;
}
}
When the script gets to a break statement it simply stops running. This effectively prevents a loop from
running too many times.
Events
You have already seen event handlers used as attributes on XHTML elements — such as the onclick
and onsubmit event handlers. An event occurs when something happens. There are two types of events
that can be used to trigger scripts:
❑ Window events, which occur when something happens to a window. For example, a page loads
or unloads (is replaced by another page or closed) or focus is being moved to or away from a
window or frame
❑ User events, which occur when the user interacts with elements in the page using a mouse (or
other pointing device) or a keyboard.
There is a set of events known as intrinsic events, which all browsers are expected to support. Intrinsic events
are associated with an element or set of elements, and in the markup they are used on the element just like
435
Chapter 11: Learning JavaScript
59313c11.qxd:WroxPro 3/23/08 1:21 PM Page 435
Please purchase PDF Split-Merge on www.verypdf.com to remove this watermark.
an attribute. The value of the attribute is the script that should be executed when the event occurs on that
element (this could call a function in the
<head> of the document).
For example, the
onmouseover and onmouseout events can be used to change an image’s source attribute
and create a simple image rollover, as you saw earlier in the chapter:
<a href=””
onmouseover=”document.images.link.src=’images/click_red.gif’;”
onmouseout=”document.images.link.src=’images/click_green.gif’”>
<img src=”images/click_green.gif” width=”100” height=”50” border=”0”
name=”link”>
</a>
The table that follows provides a recap of the most common events you are likely to come across.
Event Purpose Applies To
onload
Document has finished loading (if used in a
frameset, all frames have finished loading).
<body> <frameset>
onunload
Document is unloaded, or removed, from a
window or frameset.
<body> <frameset>
onclick
Button on mouse (or other pointing device)
has been clicked over the element.
Most elements
ondblclick
Button on mouse (or other pointing device)
has been double-clicked over the element.
Most elements
onmousedown
Button on mouse (or other pointing device)
has been depressed (but not released) over
the element.
Most elements
onmouseup
Button on mouse (or other pointing device)
has been released over the element.
Most elements
onmouseover
Button on mouse (or other pointing device)
has been moved onto the element.
Most elements
onmousemove
Button on mouse (or other pointing device)
has been moved while over the element.
Most elements
onmouseout
Button on mouse (or other pointing device)
has been moved off the element.
Most elements
onkeypress
A key is pressed and released over the
element.
Most elements
onkeydown
A key is held down over an element. Most elements
onkeyup
A key is released over an element. Most elements
436
Chapter 11: Learning JavaScript
59313c11.qxd:WroxPro 3/23/08 1:21 PM Page 436
Please purchase PDF Split-Merge on www.verypdf.com to remove this watermark.
You will see examples of these events used throughout this and the next chapter. You can also check which
elements support which methods in Chapters 1 through 6 as those elements are discussed; almost every
element can be associated with an event.
Built-in Objects
You learned about the document object at the beginning of the chapter and now it is time to see some of
the objects that are built-in JavaScript objects. You will see the methods that allow you to perform actions
upon data, and properties that tell you something about the data.
String
The string object allows you to deal with strings of text. Before you can use a built-in object you need to cre-
ate an instance of that object. You create an instance of the string object by assigning it to a variable like so:
myString = new String(‘Here is some big text’)
The string object now contains the words “Here is some big text.” Once you have this object in a variable
you can write the string to the document or perform actions upon it. For example, the following method
writes the string as if it were in a
<big> element:
document.write(myString.big())
All of the properties and methods in this section are supported in Netscape 2 and IE3
or higher browsers unless otherwise stated.
Event Purpose Applies To
onfocus
Element receives focus either by mouse (or
other pointing device) clicking it, tabbing
order giving focus to that element, or code
giving focus to the element.
<a> <area> <button>
<input> <label>
<select> <textarea>
onblur
Element loses focus. <a> <area> <button>
<input> <label>
<select> <textarea>
onsubmit
A form is submitted.
<form>
onreset
A form is reset.
<form>
onselect
User selects some text in a text field. <input> <textarea>
onchange
A control loses input focus and its value has
been changed since gaining focus.
<input> <select>
<textarea>
437
Chapter 11: Learning JavaScript
59313c11.qxd:WroxPro 3/23/08 1:21 PM Page 437
Please purchase PDF Split-Merge on www.verypdf.com to remove this watermark.
Note that if you viewed the source of this element, it would not actually have the <big> element in it;
rather you would see the JavaScript, so that a user who did not have JavaScript enabled would not see
these words at all.
You can check the length of this property like so:
alert(myString.length)
Before you can use the string object, remember you first have to create it and then give it a value.
Properties
The following table shows the main property for the String object and its purpose.
Methods
The following table lists the methods for the String object and their purposes.
Method Purpose
anchor(name)
Creates an anchor element (an <a> element with a name or id
attribute rather than an href attribute).
big()
Displays text as if in a <big> element.
bold()
Displays text as if in a <bold> element.
charAt(index)
Returns the character at a specified position (for example, if
you have a string that says “banana” and your method reads
charAt(2) then you will end up with the letter n — remember
that indexes start at 0).
fixed()
Displays text as if in a <tt> element.
fontcolor(color)
Displays text as if in a <font> element with a color attribute.
fontsize(fontsize)
Displays text as if in a <font> element with a size attribute.
indexOf(searchValue,
[fromindex])
Returns the position of the first occurrence of the specified string
searchValue inside another string. For example, if you have the
word “banana” as your string, and you want to find the first
occurrence of the letter
n, you use indexOf(n).
If the
fromIndex argument is used, the search will begin at that
index. For example, you might want to start after the fourth
character.
The method returns
-1 if the string being searched for never occurs.
Property Purpose
length
Returns the number of characters in a string
438
Chapter 11: Learning JavaScript
59313c11.qxd:WroxPro 3/23/08 1:21 PM Page 438
Please purchase PDF Split-Merge on www.verypdf.com to remove this watermark.
Try It Out Using the String Object
In this example, you see a subsection of a string collected and turned into all uppercase letters. From the
text “Learning about Built-in Objects is easy,” this example will just collect the words “Built-in objects”
and turn them into uppercase characters.
1. Create a skeleton XHTML document, like so:
<?xml version=”1.0” ?>
<!DOCTYPE html PUBLIC “-//W3C//DTD XHTML 1.0 Transitional//EN”
“ /><html xmlns=” lang=”en” xml:land=”en”>
<head>
<title>String Object</title>
</head>
<body>
</body>
</html>
2. Because the code in this example is going to be run in only one place, the script can be added inside
the body of the document, so add the
<script> element and inside it write the following code:
<script type=”text/JavaScript”>
Method Purpose
italics()
Displays text as if in an <i> element.
lastIndexOf(searchValue,
[fromIndex])
Same as indexOf() method, but runs from right to left.
link(targetURL)
Creates a link in the document.
small()
Displays text as if in a <small> element.
strike()
Displays text as if in a <strike> element.
sub()
Displays text as if in a <sub> element.
substr(start}, [length]) Returns the specified characters. 14,7 returns 7 characters, from
the 14
th
character (starts at 0).
Note that this works only in IE4 and Netscape 4 and later versions.
substring(startPosition,
endPosition)
Returns the specified characters between the start and end
index points. 7,14 returns all characters from the 7
th
up to but
not including the 14
th
(starts at 0).
sup()
Displays text as if in a <sup> element.
toLowerCase()
Converts a string to lowercase.
toUpperCase()
Converts a string to uppercase.
439
Chapter 11: Learning JavaScript
59313c11.qxd:WroxPro 3/23/08 1:21 PM Page 439
Please purchase PDF Split-Merge on www.verypdf.com to remove this watermark.
myString = new String(‘Learning about Built-in Objects is easy’)
myString = myString.substring(15, 31)
myString = myString.toUpperCase()
document.write(myString)
</script>
3. Save this file as ch11_eg14.html and when you open it in the browser, you should see the text
shown in Figure 11-8.
Figure 11-8
How It Works
The script for this example can sit in the body of the document because it is to be used for this example
only (it need not be a function, because it will not be called several times in the page and the script will
not be used by other pages).
The interesting part is what is going on inside the
<script> element. First you have to create an instance
of the string object, which is assigned to the variable
myString:
myString = new String(‘Learning about Built-in Objects is easy’)
As it has been created, the string object has been made to hold the words Learning about Built-in
Objects is easy
. But, the idea of this exercise was just to select the words “Built-in Objects” so you
use the
substring() method. The syntax is as follows:
substring(startPosition, endPosition)
So you select the string object (which is in the variable myString) and make its value the new substring
you want (this is reassigning the value with the substring we want):
myString = myString.substring(15, 32)
This selects the string from the 16
th
character to the 33
rd
character — because it starts at position 0.
Next you must convert the string to uppercase using the
toUpperCase() method:
myString = myString.toUpperCase()
And finally you can write it to the document like so:
document.write(myString)
The result looks quite simple, but when you consider the original string was Learning about Built-in
Objects is easy
it now looks substantially different.
440
Chapter 11: Learning JavaScript
59313c11.qxd:WroxPro 3/23/08 1:21 PM Page 440
Please purchase PDF Split-Merge on www.verypdf.com to remove this watermark.
Date
The date object helps you work with dates and times. You create a new date object using the date con-
structor like so:
new Date()
You can create a date object set to a specific date or time, in which case you need to pass it one of four
parameters:
❑
milliseconds: This value should be the number of milliseconds since 01/01/1970.
❑
dateString: Can be any date in a format recognized by the parse() method.
❑
yr_num, mo_num, day_num: Represents year, month, and day.
❑
yr_num, mo_num, day_num, hr_num, min_num, seconds_num, ms_num: Represents the years,
days, hours, minutes, seconds, and milliseconds.
Here are some examples; the first uses milliseconds and will read
Thu Nov 27 05:33:20 UTC 1975:
var birthDate = new Date(8298400000)
document.write(birthDate)
The second uses a dateString, and will read Wed Apr 16 00:00:00 UTC+0100 1975:
var birthDate = new Date(“April 16, 1975”)
document.write(birthDate)
The third uses yr_num, mo_num, and day_num, and will read Mon May 12 00:00:00 UTC+0100 1975:
var birthDate = new Date(1975, 4, 28)
document.write(birthDate)
There are a few things to watch out for:
❑ The first confusing thing you might notice here is that the number 4 corresponds to the month
of May! That makes January 0. Similarly, when working with days Sunday is treated as 0.
❑ You might find that you get different time zones than I do. I am based in London, so I run on
Greenwich Mean Time (GMT) or Coordinated Universal Time (UTC). All the date object’s work-
ings are performed using UTC, even though your computer may display a time that is consis-
tent with your time zone.
❑ While you can add or subtract dates, your result will end up in milliseconds. For example, if I
wanted to find out the number of days until the end of the year, I might use something like this:
var today = new Date()
var newYear = new Date(2008,11,31)
var daysRemaining = (newYear - today)
document.write(daysRemaining)
The problem with this is that you end up with a result that is very long (either plus if you read this in
2008 or minus if you read it after 2008). With 86,400,000 milliseconds in each day, you are likely to see a
very large figure.
441
Chapter 11: Learning JavaScript
59313c11.qxd:WroxPro 3/23/08 1:21 PM Page 441
Please purchase PDF Split-Merge on www.verypdf.com to remove this watermark.
So, you need to divide the daysRemaining by 86400000 to find the number of days:
var today = new Date()
var newYear = new Date(2008,11,31)
var daysRemaining = (newYear - today)
daysRemaining = daysRemaining/86400000
document.write(daysRemaining)
Bearing in mind that a user’s computer clock may well be inaccurate and the fact that different users will
be in different time zones, using the
date object can quickly become very complicated. Calculating the
number of days before an event can result in an inaccurate answer if the time you provide and the time
zone of the user’s computer are different.
If you’re able to, it is better to use a server-side scripting language to provide things like time to visitors.
However it can be useful when dates are specified via user input or via the server when the date format
can be controlled.
The following table shows some commonly used methods of the date object.
Method Purpose
date()
Returns a Date object.
getDate()
Returns the date of a Date object (from 1 to 31).
getDay()
Returns the day of a Date object (from 0 to 6; 0=Sunday,
1=Monday, and so on).
getMonth()
Returns the month of a Date object (from 0 to 11; 0=January,
1=February, and so on).
getFullYear()
Returns the year of a Date object (four digits) only in Netscape
4 and IE4 and later versions.
getYear()
Returns the year of a Date object using only two digits (from 0
to 99).
You should use
getFullYear() instead because it provides the
four-digit year.
getHours()
Returns the hour of a Date object (from 0 to 23).
getMinutes()
Returns the minute of a Date object (from 0 to 59).
getSeconds()
Returns the second of a Date object (from 0 to 59).
getTime()
Returns the number of milliseconds since midnight 1/1/1970.
getTimezoneOffset()
Returns the time difference between the user’s computer
and GMT.
parse()
Returns a string date value that holds the number of millisec-
onds since January 01 1970 00:00:00.
442
Chapter 11: Learning JavaScript
59313c11.qxd:WroxPro 3/23/08 1:21 PM Page 442
Please purchase PDF Split-Merge on www.verypdf.com to remove this watermark.
Many of the methods in the table that follows were then added again in version 4 browsers offering sup-
port for the universal (UTC) time, which takes the format
Day Month Date, hh,mm,ss UTC Year.
Continued
Method Purpose
getUTCDate()
Returns the date of a Date object in universal (UTC) time.
getUTCDay()
Returns the day of a Date object in universal time.
getUTCMonth()
Returns the month of a Date object in universal time.
getUTCFullYear()
Returns the four-digit year of a Date object in universal time.
getUTCHours()
Returns the hour of a Date object in universal time.
getUTCMinutes()
Returns the minutes of a Date object in universal time.
getUTCSeconds()
Returns the seconds of a Date object in universal time.
getUTCMilliseconds()
Returns the milliseconds of a Date object in universal time.
setUTCDate()
Sets the date in the Date object in universal time (from 1 to 31).
Method Purpose
setDate()
Sets the date of the month in the Date object (from 1 to 31).
setFullYear()
Sets the year in the Date object (four digits). Works in Netscape 4
and IE4 and later versions only.
setHours()
Sets the hour in the Date object (from 0 to 23).
setMinutes()
Sets the minute in the Date object (from 0 to 59).
setMonth()
Sets the month in the Date object (from 0 to 11; 0=January,
1=February).
setSeconds()
Sets the second in the Date object (from 0 to 59).
setTime()
Sets the milliseconds after 1/1/1970.
setYear()
Sets the year in the Date object (00 to 99).
toGMTString()
Converts the Date object to a string, set to GMT time zone.
toLocaleString()
Converts the Date object to a string, set to the current time zone.
toString()
Converts the Date object to a string. Works in Netscape 2 and
IE4 and later versions.
443
Chapter 11: Learning JavaScript
59313c11.qxd:WroxPro 3/23/08 1:21 PM Page 443
Please purchase PDF Split-Merge on www.verypdf.com to remove this watermark.
Math
The math object helps in working with numbers; it does not require a constructor. It has properties for
mathematical constants such as pi and the natural logarithm of 10 (approximately 2.3026) and methods
representing mathematical functions such as the Tangent or Sine functions.
For example, the following sets a variable called
numberPI to hold the constant of pi and then write it to
the screen (
ch11_eg16.html):
numberPI = Math.PI
document.write (numberPI)
The following example rounds pi to the nearest whole number (integer) and writes it to the screen:
numberPI = Math.PI
numberPI = Math.round(numberPI)
document.write (numberPI)
Properties
The following table lists the properties of the Math object.
Property Purpose
E
Returns the base of a natural logarithm.
LN2
Returns the natural logarithm of 2.
LN10
Returns the natural logarithm of 10.
Method Purpose
setUTCDay()
Sets the day in the Date object in universal time (from 0 to 6;
Sunday=0, Monday=1, and so on).
setUTCMonth()
Sets the month in the Date object in universal time (from 0 to 11;
0=January, 1=February).
setUTCFullYear()
Sets the year in the Date object in universal time (four digits).
setUTCHour()
Sets the hour in the Date object in universal time (from 0 to 23).
setUTCMinutes()
Sets the minutes in the Date object in universal time (from 0
to 59).
setUTCSeconds()
Sets the seconds in the Date object in universal time (from 0
to 59).
setUTCMilliseconds()
Sets the milliseconds in the Date object in universal time (from
0 to 999).
444
Chapter 11: Learning JavaScript
59313c11.qxd:WroxPro 3/23/08 1:21 PM Page 444
Please purchase PDF Split-Merge on www.verypdf.com to remove this watermark.
Methods
The following table lists the methods for the Math object.
Method Purpose
abs(x)
Returns the absolute value of x.
acos(x)
Returns the arccosine of x.
asin(x)
Returns the arcsine of x.
atan(x)
Returns the arctangent of x.
atan2(y,x)
Returns the angle from the x-axis to a point.
ceil(x)
Returns the nearest integer greater than or equal to x.
cos(x)
Returns the cosine of x.
exp(x)
Returns the value of E raised to the power of x.
floor(x)
Returns the nearest integer less than or equal to x.
log(x)
Returns the natural log of x.
max(x,y)
Returns the number with the highest value of x and y.
min(x,y)
Returns the number with the lowest value of x and y.
pow(x,y)
Returns the value of the number x raised to the power of y.
random()
Returns a random number between 0 and 1.
round(x)
Rounds x to the nearest integer.
sin(x)
Returns the sine of x.
sqrt(x)
Returns the square root of x.
tan(x)
Returns the tangent of x.
Property Purpose
LOG2E
Returns the base-2 logarithm of E.
LOG10E
Returns the base-10 logarithm of E.
PI
Returns pi.
SQRT1_2
Returns 1 divided by the square root of 2.
SQRT2
Returns the square root of 2.
445
Chapter 11: Learning JavaScript
59313c11.qxd:WroxPro 3/23/08 1:21 PM Page 445
Please purchase PDF Split-Merge on www.verypdf.com to remove this watermark.