Ebook Android application development for dummies: Part 2
Bạn đang xem bản rút gọn của tài liệu. Xem và tải ngay bản đầy đủ của tài liệu tại đây (9.19 MB, 158 trang )
Part III
Creating a
Feature-Rich
Application
I
In this part . . .
n Part III, I expand on the knowledge that you acquire in
Part II by demonstrating how you can build a featurerich application. I don’t trudge through every detail as I do
in Part II, but I expand on the details that you need to know
to become a master Android application developer. I also
mention a few advanced topics that can help bridge the gap
between beginner and advanced Android developer.
In this part, I showcase how and why you would create certain features to enhance users’ experiences with your application. At the end of Part III, you will have a fully-functioning
advanced application that interacts with a local database
and custom preferences.
Chapter 9
Designing the Task
Reminder Application
In This Chapter
▶ Listing the application’s requirements
▶ Developing multiple screens
▶ Building a list activity
▶ Working with intents
B
uilding Android applications is fun, but building truly in-depth applications is exciting because you dive into the real guts of the Android
platform. In this chapter, I introduce you to the Task Reminder application,
which will be built from end to end over the next couple of chapters.
The Task Reminder application allows users to create a list of items that have
a reminder time associated with each individual item.
Reviewing the Basic Requirements
The Task Reminder application has a few basic requirements to fulfill what is
expected of it:
✓ It must be able to accept user input — having a personalized task
application that does not allow user input would be silly!
✓ The tasks must be easy to manage.
✓ Each task must have a reminder date and time in which the user will be
reminded of the task.
✓ The user must be notified of the task when the reminder time has arrived.
✓ Users must be able to delete tasks.
✓ Users must be able to not only add tasks but to edit them.
212
Part III: Creating a Feature-Rich Application
You see a lot of interaction happening with the user and the Android system
in this application. Throughout the development of this application, you are
introduced to various facets of Android development that can help you in
your career. I wish I would have known some of these things when I started;
it would have saved me a lot of time!
That’s alarming!: Scheduling
a reminder script
For the Task Reminder application to truly work, you need to implement
some sort of reminder-based system. As a fellow developer, the first thing
that comes to mind is a scheduled task or cron job. In the Windows operating system, developers can create a scheduled task to handle the execution of
code/scripts at a given time. In the UNIX/Linux world, developers can use cron
(short for chronos — Greek for time) to schedule scripts or applications.
Because Android is running the Linux 2.6 kernel, it would be normal to
assume that Android has a crontab you could edit. Cron is driven by
crontab, which is a configuration file that specifies the commands to
run at a given time. Unfortunately Android does not have cron; however,
Android has the AlarmManager class, which achieves the same thing. The
AlarmManager class allows you to specify when your application should
start in the future. Alarms can be set as a single-use alarm or as a repeating
alarm. The Task Reminder application utilizes the AlarmManager to remind
users of their tasks.
Storing data
You will be exposed to many new features and tools in this application, and
a big question that may be lingering in your head is, where am I going to put
the activities, the task data, the alarms, and so on. These items will be stored
in the following locations:
✓ Activities and broadcast receivers: In one Java package
✓ Task data: SQLite database
✓ Alarm info: Pulled from the SQLite database and placed in the
AlarmManager via the intent system
Chapter 9: Designing the Task Reminder Application
Distracting the user (nicely)
After an alarm fires, you need to notify the user of the alarm. The Android
platform provides mechanisms to bring your activity to the foreground
when the alarm fires, but that is not an optimal notification method because
it steals focus from what the user was doing. Imagine if the user was typing
a phone number or answering a phone call and an alarm fired that brought
an activity to the foreground. Not only would the user be irritated, he most
likely would be confused because an activity started that he did not initiate
manually. Therefore, you have various ways in which you can grab the user’s
attention without stealing the main focus away from his current activity.
These mechanisms include the following:
✓ Toasts: A toast is a small view that contains a quick message for the user.
This message does not persist because it is usually available for only a
few seconds at most. A toast never receives focus. I won’t use a toast for
reminding the user, but instead I use a toast to notify the user when her
activity has been saved so that she knows something happened.
✓ Notification Manager: The NotificationManager class is used to notify
a user that an event or events have taken place. These events can be
placed in the status bar, which is located at the top of the screen. The notification items can contain various views and are identified by icons that
you provide. The user can slide the screen down to view the notification.
✓ Dialog boxes: A final, not-so-popular method to grab a user’s attention
is to open a dialog window that can immediately steal focus from the
user’s currently running app and direct it to a dialog window. While this
may indeed work as a method for grabbing the attention of the user,
the user may get irritated because your app is stealing focus (possibly
on a constant basis if the user has a lot of reminders) from his current
actions in another application.
I will be using the NotificationManager class to handle the alarms for the
Task Reminder application.
Creating the Application’s Screens
The Task Reminder application will have two different screens that perform
all the basic CRUD (Create, Read, Update, and Delete) functions. The first
view is a list view that lists all the current tasks in the application, by name.
213
214
Part III: Creating a Feature-Rich Application
This view also allows you to delete a task by long-pressing the item. The
second view allows you to view (Read), add (Create), or edit (Update) a task.
Each screen eventually interacts with a database for changes to be persisted
over the long-term use of the application.
Starting the new project
To get started, Open Eclipse and create a new Android project with a Build
Target of Android 2.2 and a MinSDKVersion of 4. Provide it with a valid
name, package, and activity. The settings I have chosen are shown in Table 9-1.
You may also choose to open the example Android project for Chapter 9 provided by the online source code download. This provides you with a starting
point that has the same settings as my project.
Table 9-1
New Project Settings
Property
Value
Project Name
Task Reminder
Build Target
Android 2.2 (API Level 8)
Application Name
Task Reminder
Package Name
com.dummies.android.
taskreminder
Create Activity
ReminderListActivity
Min SDK Version
4
Note the Create Activity property value — ReminderListActivity. Normally
I give the first activity in an application the name of MainActivity; however,
the first screen that the user will see is a list of current tasks. Therefore,
this activity is actually an instance of a ListActivity; hence the name —
ReminderListActivity.
Creating the task list
When working with ListActivity classes, I like to have my layout file contain the word list. This makes it easy to find when I open the res/layout
directory. I’m going to rename the main.xml file located in the res/layout
directory to reminder_list.xml. To rename the file in Eclipse, you can
either right-click the file and choose Refactor➪Rename or select the file and
press Shift+Alt+R.
Chapter 9: Designing the Task Reminder Application
After you change the filename, you need to update the name of the file in the
setContentView() call inside the ReminderListActivity.java file.
Open the file and change the reference to the new filename you chose.
The ReminderListActivity class also needs to inherit from the
ListActivity class instead of the regular base activity. Make that change
as well. My new ReminderListActivity class looks like Listing 9-1.
Listing 9-1: The ReminderListActivity Class
public class ReminderListActivity extends ListActivity {
/** Called when the activity is first created. */
@Override
public void onCreate(Bundle savedInstanceState) {
super.onCreate(savedInstanceState);
setContentView(R.layout.reminder_list);
}
}
Your ReminderListActivity references the reminder_list layout
resource that currently contains the default code that was generated when
you created the project. To work with a ListActivity, you need to update
this layout with new code, as shown in Listing 9-2.
Listing 9-2: The reminder_list.xml Contents
<?xml version=”1.0” encoding=”utf-8”?>
<LinearLayout xmlns:android=” />android:layout_width=”wrap_content”
android:layout_height=”wrap_content”>
android:layout_height=”fill_parent”/>
android:layout_height=”wrap_content”
android:text=”@string/no_reminders”/>
</LinearLayout>
➝5
➝8
➝ 11
This code is briefly explained as follows:
➝5
Defines a ListView, which is an Android view that is used to
show a list of vertically scrolling items. The ID of the ListView
must be @id/android:list or @+id/android:list.
➝8
Defines the empty state of the list. If the list is empty, this is the
view that will be shown. When this view is present, the ListView
will automatically be hidden because there is no data to display.
This view must have an ID of @id/android:empty or @+id/
android:empty.
215
216
Part III: Creating a Feature-Rich Application
➝ 11
This line uses a string resource called no_reminders to inform
the user that no reminders are currently in the system. You need
to add a new string resource to the res/values/strings.xml
file with the name of no_reminders. The value I’m choosing is
“No Reminders Yet.”
Creating and editing task activities
The Task Reminder application needs one more screen that allows the user
to edit a task and its information. This screen will be all-inclusive, meaning
that one single activity can allow users to create, read, and update tasks.
In Eclipse, create a new activity that can handle these roles. I’m choosing
to call mine ReminderEditActivity by right-clicking the package name
in the src folder and choosing New➪Class or by pressing Shift+Alt+N and
then choosing Class. In the new Java class window, set the superclass to
android.app.Activity and choose Finish.
A blank activity class now opens, and inside this class, type the following
lines that are boldface:
public class ReminderEditActivity extends Activity {
@Override
protected void onCreate(Bundle savedInstanceState) {
super.onCreate(savedInstanceState);
setContentView(R.layout.reminder_edit);
}
}
In line 5 of the preceding code, I am setting the layout of the activity to the
reminder_edit resource, which is defined in the next section. This layout
contains the various fields of the task in which the user can edit or create.
You also need to inform the Android platform about the existence of this
activity by adding it to the Android Manifest. You can do so by adding it
to the Application element of the ApplicationManifest.xml file, as
shown here in boldface:
<application android:icon=”@drawable/icon” android:label=”@string/app_name”>
<intent-filter>
<action android:name=”android.intent.action.MAIN” />
<category android:name=”android.intent.category.LAUNCHER” />
</intent-filter>
</activity>
</application>
Chapter 9: Designing the Task Reminder Application
If you do not add the activity to the ApplicationManifest.xml file, you
receive a run-time exception informing you that Android cannot find the class
(the activity).
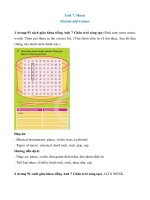
Creating the adding/editing layout
The layout for adding and editing is fairly simple because the form contains
very few fields. These fields are as follows:
✓ Title: The title of the task as it will show in the list view.
✓ Body: The body of the task. This is where the user would type in
the details.
✓ Reminder Date: The date on which the user should be reminded of
the task.
✓ Reminder Time: The time at which the user should be reminded on the
reminder date.
When complete and running on a device or emulator, the screen looks like
Figure 9-1.
Figure 9-1:
The Add/
Edit Task
Reminder
screen.
To create this layout, create a layout file in the res/layout directory with
an appropriate name — I’m using reminder_edit.xml. To create this file,
perform the following steps:
217
218
Part III: Creating a Feature-Rich Application
1. Right-click the res/layout directory and choose New➪Android
XML File.
2. Provide the name in the File field.
3. Leave the default type of resource selected — Layout.
4. Leave the folder set to res/layout.
5. Set the root element to ScrollView.
6. Click the Finish button.
You now need to provide all the view definitions to build the screen that you
see in Figure 9-1. To do this, type the code shown in Listing 9-3.
Listing 9-3: The reminder_edit.xml File
<?xml version=”1.0” encoding=”utf-8”?>
android:layout_height=”fill_parent”>
android:layout_width=”fill_parent”
android:layout_height=”fill_parent”>
android:text=”@string/title” />
android:layout_height=”wrap_content” />
android:layout_height=”wrap_content”
android:text=”@string/body” />
android:layout_height=”wrap_content”
android:minLines=”5”
android:scrollbars=”vertical”
android:gravity=”top” />
android:text=”@string/date” />
android:layout_height=”wrap_content”
android:layout_width=”wrap_content”/>
android:text=”@string/time” />
➝5
➝6
➝7
➝ 12
➝ 15
➝ 18
➝ 24
➝ 27
➝ 31
➝ 34
Chapter 9: Designing the Task Reminder Application
android:layout_height=”wrap_content”
android:layout_width=”wrap_content” />
android:text=”@string/confirm”
android:layout_width=”wrap_content”
android:layout_height=”wrap_content” />
</LinearLayout>
</ScrollView>
➝ 38
➝ 42
A brief explanation of the code in Listing 9-3 is as follows:
➝5
The parent view is a ScrollView, which creates a scroll bar and
allows the view to be scrolled when the contents of the view are too
big for the screen. The screen shown in Figure 9-1 is shown in portrait mode. However, if the device is rotated 90 degrees, the view
flips and over half of the view is cut off. The parent ScrollView
allows the remaining contents of the screen to be scrollable.
Therefore, the user can fling his finger upward on the screen to
scroll the contents up and see the remainder of the view.
➝6
A ScrollView can only have one child — in this case, it’s the
main LinearLayout that houses the rest of the layout.
➝7
The orientation of the linear layout is set to vertical to signify that
the views inside this layout should be stacked on top of one another.
➝ 12
The label for the Title field.
➝ 15
The EditText that allows the user to provide a title for the task.
➝ 18
The label for the Body field.
➝ 24
The EditText that defines the Body field. The EditText view
has set the minLines property to 5 and the gravity property
to top. This informs the Android platform that the EditText is
at least five lines tall, and when the user starts typing, the text
should be bound to the top of the view (the gravity).
➝ 27
The reminder date label. This label also uses a string resource.
You will need to add a string resource with the name of “date”
and a value of “Reminder Date”.
➝ 31
The reminder date button. When this button is clicked, a
DatePickerDialog is launched — this allows the user to choose
a date with a built-in Android date picker. When the date is set via
the DatePicker, the value of the date is set as the button text.
➝ 34
The reminder time label. This label uses a string resource. You
will need to add a string resource with the name of “time” and
a value of “Time”.
➝ 38
The time reminder button. When this button is clicked, a
TimePicker is launched — this allows the user to choose a time
with a built-in Android time picker. When the time is set via the
TimePickerDialog, the value of the time is set as the button text.
219
Download from Wow! eBook <www.wowebook.com>
220
Part III: Creating a Feature-Rich Application
➝ 42
The confirmation button that will save the values of the form
when clicked.
Creating Your First List Activity
The ListActivity class displays a list of items by binding to a data source
such as an array or cursor, and exposes callback methods when the user
selects an item. However, to build a list of items to display in a list, you
need to add a layout that defines what each row will look like.
A cursor provides random read and write access to the result set that is
returned by a database query.
Add a new layout to the res/layout directory with a root element of
TextView and give it a proper name for a row type of item — I’m choosing
to use reminder_row.xml as the name. Inside this view, type the code as
shown in Listing 9-4.
Listing 9-4: The reminder_row.xml File
<?xml version=”1.0” encoding=”utf-8”?>
android:layout_width=”fill_parent”
android:layout_height=”fill_parent”
android:padding=”10dip”/>
This code simply defines a row in which text values can be placed with a padding of ten density-independent pixels. Line 4 defines the ID of the view that I
will reference when loading the list with data.
The view you just added is actually provided out of the box in the Android
system. If you look at the Android documentation under Android.R.layout
under simple_list_item_1 and inspect it via the Android source control
repository, you can see virtually the same XML definition. That source can be
found here:
/>res/layout/simple_list_item_1.xml;h=c9c77a5f9c113a9d331d5e11a6016a
aa815ec771;hb=HEAD
A shortened version can be found at />The ListActivity requires that an adapter fill the contents of the list view.
Various adapters are available, but because I have not built a data store yet
Chapter 9: Designing the Task Reminder Application
(built with an SQLite database in Chapter 12), I create fake data so that I can
see the list in action. After I have the fake data, I set the ListActivity’s
adapter with a call to setListAdapater(). But before I can do that, I need
some fake/stub data to work with.
Getting stubby with fake data
Inside the onCreate() method of the ReminderListActivity.java file,
after the call to setContentView(), add the following code:
String[] items = new String[] { “Foo”, “Bar”, “Fizz”, “Bin” };
➝1
ArrayAdapter<String> adapter =
new ArrayAdapter<String>(this, R.layout.reminder_row, R.id.text1, items);
setListAdapter(adapter);
d
➝4
➝5
A brief explanation of the code is as follows:
➝1
An array of string items are being created. These are the items
that will eventually be displayed in the list.
➝4
The creation of a new ArrayAdapter of string types. An
ArrayAdapter manages a ListView backed by an arbitrary
number of arbitrary objects — in this case, a simple string array.
This code is using Java generics, which allow the developer to specify the type of object that the ArrayAdapter will be working with.
The constructor of the ArrayAdapter contains the following:
• this: The current context (Because the activity is an implementation
of the Context class, I can use the current instance as the context.)
• R.layout.reminder_row: The row layout that should be used
for each row in the ListView
• R.id.text1: The ID of the TextView inside R.layout.
reminder_row in which to place the values from the array
• items: The array of strings to load into the ListView
➝5
The call to setListAdapter() that informs the ListActivity
how to fill the ListView. In this case, I am using the ArrayAdapter
created on line 4 to load the ListView.
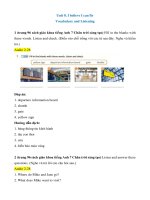
Start the Android application by choosing Run➪Run or by pressing Ctrl+F11.
The screen you should see should look similar to Figure 9-2.
The previous code and example illustrate how to use a static data source
for the ListActivity. In Chapter 12, I remove this code loading the
ListActivity from an SQLite database.
221
222
Part III: Creating a Feature-Rich Application
Figure 9-2:
The Task
Reminder
running
with fake/
stubbed
data.
Handling user click events
The items in the list expose click events that allow the user to interact with
each item. Android View objects have two main types of click events:
✓ Click: The user taps a view such as a button.
✓ Long click: The user taps and holds his finger on a button for a
few moments.
Each view and/or activity can intercept these events via various methods.
In the following section, I show you how to respond to each type of event
in a ListActivity. In Chapter 11, I demonstrate responding to Button
click events.
Short clicks
The ListActivity in Android does a lot of the event-handling heavy lifting for
you — which is good because programming shouldn’t be a physical exercise!
After the onCreate() method, type this method:
@Override
protected void onListItemClick(ListView l, View v, int position, long id) {
super.onListItemClick(l, v, position, id);
}
Chapter 9: Designing the Task Reminder Application
This code overrides the default implementation of onListItemClick() that
is provided by the ListActivity. When a list item is clicked, this method is
called and the following parameters are passed into the call:
✓ l: The ListView where the click happened
✓ v: The item that was clicked with the ListView
✓ position: The position of the clicked item in the list
✓ id: The row ID of the item that was clicked
Using these variables, you can determine which item was clicked and then
perform an action based on that information. When an item is clicked in this
list, I will be starting an intent that opens the ReminderEditActivity to
allow me to edit the item, as shown in the section “Starting new activities
with intents,” later in this chapter.
Long clicks
Long clicks, also known as long presses, occur when a user presses a view
for an extended period of time. To handle the list item’s long-click event
in a ListActivity, add the following line of code at the end of the
onCreate() method:
registerForContextMenu(getListView());
The outer method, registerForContextMenu(), is responsible for registering a context menu to be shown for a given view — multiple views can show
a context menu; it’s not just limited to a single view. This means that each list
item is eligible to create a context menu. The registerForContextMenu()
accepts a View object as a parameter that the ListActivity should register
as eligible for the context menu creation. The inner method, getListView(),
returns a ListView object that is used for the registration. The call,
getListView(), is a member of the ListActivity class.
Now that you’ve registered the ListView to be eligible to create a context
menu, you need to respond to the long-click event on any given item. When an
item is long-clicked in the ListView, the registerForContextMenu() recognizes this and calls the onCreateContextMenu() method when the context
menu is ready to be created. In this method, you set up your context menu.
At the end of the class file, type the following method:
@Override
public void onCreateContextMenu(ContextMenu menu, View v, ContextMenuInfo
menuInfo) {
super.onCreateContextMenu(menu, v, menuInfo);
}
223
224
Part III: Creating a Feature-Rich Application
This method is called with the following parameters:
✓ menu: The context menu that is being built.
✓ v: The view for which the context is being built (the view you
long-clicked on).
✓ menuInfo: Extra information about the item for which the context
menu should be shown. This can vary depending on the type of
view in the v parameter.
Inside this method, you can modify the menu that will be presented to the
user. For example, when a user long-presses an item in the task list, I want to
allow her to delete it. Therefore, I need to present her with a Delete context
menu option. I add the Delete item to the context menu in Chapter 10.
Identifying Your Intent
Most applications are no run-of-the-mill introduction applications! Though
some applications have only two screens (such as the Task Reminder application), a lot is happening behind the scenes. One such notable interaction
that happens between the application and the user is the introduction of new
screens as the user utilizes various features of the application. As with any
application with a rich feature set, the user can interact with each screen independently. Therefore the big question arises: “How do I open another screen?”
Screen interaction is handled through Android’s intent system. I have covered
the intent system in detail in Chapter 7, but I have not covered an example of
how to navigate from one screen to the next using an intent. Thankfully, it’s a
simple process — and I bet you’re happy about that!
Starting new activities with intents
Activities are initiated through the Android intent framework. An Intent is a
class that represents a message that is placed on the Android intent system
(similar to a message-bus type of architecture), and whoever can respond
to the intent lets the Android platform know, resulting in either an activity
starting or a list of applications to choose from (this is known as a chooser,
explained shortly). One of the best ways to think of an intent is to think of it
as an abstract description of an operation.
Starting a particular activity is easy. In your ReminderListActivity, type
the following code into the onListItemClick() method:
Chapter 9: Designing the Task Reminder Application
@Override
protected void onListItemClick(ListView l, View v, int position, long id) {
super.onListItemClick(l, v, position, id);
Intent i = new Intent(this, ReminderEditActivity.class);
i.putExtra(“RowId”, id);
startActivity(i);
}
➝4
➝5
➝6
A brief explanation of each line is as follows:
➝4
This line is creating a new intent using the Intent constructor that
accepts the current context, which is this (the current running
activity), as well as a class that the Intent system should attempt
to start — the Reminder Edit activity.
➝5
This line places some extra data into the Intent object. In this
instance, I’m placing a key/value pair into the intent. The key
is RowId, and the value is the ID of the view that was clicked.
This value is placed into the intent so that the receiving activity (the ReminderEditActivity) can pull this data from the
Intent object and use it to load the information about the intent.
Right now, I’m providing fake/stub data; therefore, nothing displays. However, after Chapter 12, you see data flowing into the
ReminderEditActivity.
➝6
This line starts the activity from within the current activity. This
call places the intent message onto the Android intent system and
allows Android to decide how to open that screen for the user.
Retrieving values from previous activities
Sometimes, activities are simply started, and that’s the end of it. No extra
data is passed among various activities. However, in some instances, you
need to be able to pull data out of the incoming intent to figure out what to
do. As demonstrated in the section “Starting new activities with intents,” earlier in this chapter, you provided some extra data with the intent. This is the
RowId. In Chapter 12, you use this RowId on the ReminderEditActivity
to pull the data from the SQLite database and display it to the user.
To pull the data out of an incoming intent, type the following at the end
of the destination activity’s onCreate() method — which would be the
ReminderEditActivity:
if(getIntent() != null) {
Bundle extras = getIntent().getExtras();
int rowId = extras != null ? extras.getInt(“RowId”) : -1;
// Do stuff with the row id here
}
➝1
➝2
➝3
225
226
Part III: Creating a Feature-Rich Application
A brief explanation of each line of code is as follows:
➝1
The getIntent() method is provided by the Activity base
class. This method retrieves any incoming intent to the activity.
On this line, I am making sure that it is not null so that I know it’s
safe to work with.
➝2
The bundle is retrieved from the intent via the getExtras()
call. A bundle is a simple key/value pair data structure.
➝3
On this line, I am using the ternary operator to identify whether
the bundle is null. If the bundle is not null, I retrieve the RowId
that is contained in the intent that was sent from the previous
activity through the getInt() method. Although I am not doing
anything with it in this instance, in Chapter 12, I use this row ID to
query the SQLite database to retrieve the Task record to edit.
When the SQLite database is in place (which is done in Chapter 12), the
record will be retrieved from the database and the various values of the task
will be presented to the user on the screen via an editable form so that the
user can edit the task.
Creating a chooser
At some point in your Android development career, you will run into a particular instance where you need to provide the user with a list of applications
that can handle a particular intent. A common example of this would be to
share some data with a friend via a common networking tool such as e-mail,
SMS, Twitter, Facebook, Google Latitude, or any other similar tool.
The Android Intent system was built to handle these types of situations.
Though not used in the Task Reminder application, this is something that can
come in very handy — which is why I’m including it here. The code to display
various available options to the user is shown in Listing 9-5.
Listing 9-5: Creating an Intent Chooser
Intent i = new Intent(Intent.ACTION_SEND);
i.setType(“text/plain”);
i.putExtra(Intent.EXTRA_TEXT, “Hey Everybody!”);
i.putExtra(Intent.EXTRA_SUBJECT, “My Subject”);
Intent chooser = Intent.createChooser(i, “Who Should Handle this?”);
startActivity(chooser);
➝1
➝2
➝3
➝4
➝5
➝6
Chapter 9: Designing the Task Reminder Application
A brief explanation of each line in Listing 9-5 is as follows:
➝1
The creation of a new intent that informs the Intent system that
you would like to send something — think of this as something
you want to mail to another person. You are intending to send
something to someone else.
➝2
The content type of the message — this can be set to any explicit
MIME type. MIME types are case-sensitive, unlike RFC MIME types,
and should always be typed in lowercase letters. This specifies the
type of the intent; therefore, only applications that can respond to
this type of intent will show up in the chooser.
➝3
Placing extra data into the intent. This will be the body of the message that the application will use. If an e-mail client is chosen, this
will end up as the e-mail body. If Twitter is chosen, it will be the
message of the tweet. Each application that responds to the intent
can handle the extra data in its own special manner. Do not expect
the data to be handled as you might think it should in the destination application. The developer of such an application determines
how the application should handle the extra data.
➝4
Similar to line 3, but this time the subject extra is provided. If an
e-mail client responds, this normally ends up as the subject of
the e-mail.
➝5
Creating the chooser. The Intent object has a static helper method
that helps you create a chooser. The chooser is an intent itself. You
simply provide the target intent (what you’d like to happen) as well
as a title for the pop-up chooser that is shown.
➝6
Starting the intent. This creates the chooser for you to choose an
application from.
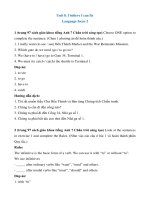
The chooser that is created from Listing 9-5 is shown in Figure 9-3.
If the Intent system cannot find any valid applications to handle the intent,
the chooser is created with a message informing the user that no applications could perform the action, as shown in Figure 9-4.
227
228
Part III: Creating a Feature-Rich Application
Figure 9-3:
The new
chooser
that was
created.
Figure 9-4:
A chooser
informing
the user that
Android
could not
find a
matching
application
to handle
the intent.
Chapter 9: Designing the Task Reminder Application
Choosers are a great way to increase the interoperability of your application.
However, if you simply called startActivity() without creating a chooser,
your application might crash. Starting an activity without the chooser in Listing
9-5 would be as such — startActivity(i) instead of startActivity
(chooser). The application would crash because Android is giving you full
reign on what you can do. This means that Android assumes you know what
you’re doing. Therefore, by not including a chooser, you’re assuming that the
destination device actually has at least one application to handle the intent. If
this is not the case, Android will throw an exception (which is visible through
DDMS) informing you that no class can handle the intent. To the end user, this
means your app has crashed.
To provide a great user experience, always provide an intent chooser when
firing off intents that are meant for interoperability with other applications.
It provides a smooth and consistent usability model that the rest of Android
already provides.
229
230
Part III: Creating a Feature-Rich Application
Chapter 10
Going a la Carte with Your Menu
In This Chapter
▶ Knowing great menus from bad ones
▶ Building an options menu
▶ Building a context menu
S
ure, I wish I were down at my favorite Mexican restaurant, ordering some
excellent chips and salsa; alas, I’m not. I’m not talking about menus with
regard to food; I’m talking about menus inside an Android application!
Android provides a simple mechanism for you to add menus to your
applications. You find the following types of menus:
✓ Options menu: The options menu is the most common type of menu
that you will most likely be working with because it is the primary menu
for an activity. This is the menu that is presented when a user presses
the Menu key on the device. Within the options menu are two groups:
• Icon: These are the menu options that are available at the bottom
of the screen. The device supports up to six menu items, and they
are the only menu items that support the use of icons. They do not
support check boxes or radio buttons.
• Expanded: The expanded menu is a list of menu items that goes
beyond the original six menu items that are present in the Icon
menu. This menu is presented by the More menu icon that is automatically placed on-screen when the user places more than six
items on the Icon menu. This menu is comprised of the sixth and
higher menu items.
✓ Context menu: A floating list of menu items that is presented when a
user long-presses a view.
✓ Submenu: A floating list of menu items that the user opens by clicking a
menu item on the Options menu or on a context menu. A submenu item
cannot support nested submenus.
You will be a creating an options menu as well as a context menu in this
chapter. Feel free to grab the full application source code from the
companion site if you happen to get lost.
232
Part III: Creating a Feature-Rich Application
Seeing What Makes a Menu Great
If you have an Android device and you’ve downloaded a few applications
from the Android Market, I’m sure that you’ve encountered a few bad menu
implementations. What does a bad menu implementation look like?
A bad menu is a menu that provides very little (if any) helpful text in the menu
description and provides no icon. A few common menu faux pas include
✓ A poor menu title
✓ A menu without an icon
✓ No menu
✓ A menu that does not do what it states it will
While all these issues above indicate a bad menu, the biggest faux pas of the
list is the lack of a menu icon. This may sound a bit odd, but think about it for
a second. If a menu does not have an icon, that means the developer has not
taken the time to provide a good user interface and a good user experience to
the user. A good menu should have a visual as well as a textual appeal to the
end user. The appearance of a menu icon shows that the developer actually
thought through the process of creating the menu and deciding which icon
best suits the application. This mental process provides some insight into
how the menu was designed. Please note: Just because an application has
menu icons does not mean that the menu is great.
I use the menu icon paradigm as a way to initially judge the usefulness of the
menu. A menu without an icon is less useful to me than one with an icon.
Creating Your First Menu
You can create a menu through code or you can create it through an XML file
that is provided in the res/menu directory. The preferred method of creating
menus is to define menus through XML and then inflate them into a programmable object that you can interact with. This helps separate the menu
definition from the actual application code.
Defining the XML file
To define an XML menu, follow these steps:
Download from Wow! eBook <www.wowebook.com>
Chapter 10: Going a la Carte with Your Menu
1. Create a menu folder in the res directory.
2. Add a file by the name of list_menu.xml to the menu directory.
3. Type the code from Listing 10-1 into the list_menu.xml file.
Listing 10-1: Menu for the ReminderListActivity
<?xml version=”1.0” encoding=”utf-8”?>
android:title=”@string/menu_insert” />
</menu>
Notice that a new string resource is included. You need to create that
(which you do in Step 4). The android:icon value is a built-in Android
icon. You do not have to provide this bitmap in your drawable resources.
The ldpi, mdpi, and hdpi versions of this icon are all built into the
Android platform. To view other resources available to you, view the
android.R.drawable documentation here: http://developer.
android.com/reference/android/R.drawable.html.
All resources in the android.R class are available for you to use in
your application and are recommended because they give your application a common and consistent user interface and user experience with
the Android platform.
4. Create a new string resource with the name menu_insert with the
value of “Add Reminder” in the strings.xml resource file.
5. Open the ReminderListActivity class and type the following code
into the file:
@Override
public boolean onCreateOptionsMenu(Menu menu) {
super.onCreateOptionsMenu(menu);
MenuInflater mi = getMenuInflater();
mi.inflate(R.menu.list_menu, menu);
return true;
}
On line 4, I obtain a MenuInflater that is capable of inflating menus
from XML resources. After the inflater is obtained, the menu is inflated
into an actual menu object on line 5. The existing menu is the menu
object that is passed into the onCreateOptionsMenu() method.
6. Install the application in the emulator, and click the Menu button.
You should see what’s shown in Figure 10-1.
233