windows 7 for dummies quick reference (isbn - 0470489618)
Bạn đang xem bản rút gọn của tài liệu. Xem và tải ngay bản đầy đủ của tài liệu tại đây (6.35 MB, 227 trang )
Windows
®
7
Making Everything Easier!
™
• Navigate the desktop, open folders, and
create files
• Connect to the Internet, search the Web,
and add favorites
• Send and receive e-mail and print
documents
• Use Windows Media Player
®
and
Internet Explorer
®
8
Learn to:
Greg Harvey
Bestselling author of all editions of
Windows For Dummies Quick Reference
Go to Dummies.com
®
for videos, step-by-step photos,
how-to articles, or to shop!
Open the book and find:
• What’s new in Windows 7
• How to find documents
• How to use the Action Center to keep
your computer safe from cyberattacks
• How to manage your devices more
efficiently
• Network setup advice
• Super search techniques
• How to use cool accessories like
gadgets and Sticky Notes
• Tips on using Windows Media Center
Windows 7 is loaded with new features. This handy,
portable guide puts all the must-know information at
your fingertips, making it easy to find the answers you’re
looking for. Need to know how to create a shortcut? What
your security status is? How to play an Internet radio
station? What you can do with a homegroup? Find those
solutions and hundreds more, right here.
• Navigate the taskbar — learn how the new taskbar
helps you organize your work and move back and forth
between programs
• It’s the network — set up a network and view all networks
to which you can connect with a single click
• Start exploring — take advantage of all the innovations
in Explorer 8 that help you make better use of the Internet
• Safety first — secure your PC, manage user accounts,
make backups, and learn to restore your system
• About the Essentials — install and use Windows Live
™
Mail, Photo Gallery, and other Windows Live
™ Essentials
Here’s your fast and easy
guide to the nuts and
bolts of Windows 7
Operating Systems/Windows
$16.99 US / $19.99 CN / £13.99 UK
ISBN 978-0-470-48961-1
Greg Harvey is President of Mind Over Media, Inc.
and the author of several bestselling books, including
all editions of Excel All-in-One For Dummies and Excel
Workbook For Dummies. He has extensive experience
as an educator.
Welcome to Windows 7 For Dummies Quick Reference. Keep this book within
arm’s reach to find quick answers to your questions.
As you use this book, the following icons help you along
the way:
Alerts you to nerdy discussions that you may well want to
skip (or read when no one else is around).
Alerts you to a procedure that must be performed by a user
whose account is rated Administrator. Whenever this icon
appears in steps, you know Windows 7 will display a User
Account Control panel in which you must click the Continue
button in order to complete the step.
Alerts you to an alternative method for performing the
discussed task. Many times this alternative requires the use
of the Classic menus, which are often hidden in Windows 7.
Alerts you to shortcuts or other valuable hints related to the
topic at hand.
Alerts you to information to keep in mind if you want to meet
with a modicum of success.
Alerts you to information to keep in mind if you want to avert
complete disaster.
Here are the conventions used in the text:
✓ Windows 7 command sequences are separated by the D symbol. For
example, StartDAll ProgramsDWindows DVD Maker is a sequence of
commands that opens the Windows DVD Maker application on your
Windows 7 desktop.
✓ The names of all dialog box options use title capitalization, meaning
that the initial letters of all major words are uppercased, no matter
how the options are actually capitalized in the dialog box.
ISBN 978-0-470-48961-1
by Greg Harvey
Windows
®
7
FOR
DUMmIES
‰
QUICK REFERENCE
01_489611-ffirs.indd i01_489611-ffirs.indd i 8/10/09 7:16 PM8/10/09 7:16 PM
Windows
®
7 For Dummies
®
Quick Reference
Published by
Wiley Publishing, Inc.
111 River Street
Hoboken, NJ 07030-5774
Copyright © 2009 by Wiley Publishing, Inc., Indianapolis, Indiana
Published by Wiley Publishing, Inc., Indianapolis, Indiana
Published simultaneously in Canada
No part of this publication may be reproduced, stored in a retrieval system or transmitted in any form or by any means,
electronic, mechanical, photocopying, recording, scanning or otherwise, except as permitted under Sections 107 or 108 of
the 1976 United States Copyright Act, without either the prior written permission of the Publisher, or authorization through
payment of the appropriate per-copy fee to the Copyright Clearance Center, 222 Rosewood Drive, Danvers, MA 01923, (978)
750-8400, fax (978) 646-8600. Requests to the Publisher for permission should be addressed to the Permissions Department,
John Wiley & Sons, Inc., 111 River Street, Hoboken, NJ 07030, (201) 748-6011, fax (201) 748-6008, or online at http://www.
wiley.com/go/permissions.
Trademarks: Wiley, the Wiley Publishing logo, For Dummies, the Dummies Man logo, A Reference for the Rest of Us!, The
Dummies Way, Dummies Daily, The Fun and Easy Way, Dummies.com, and related trade dress are trademarks or registered
trademarks of John Wiley & Sons, Inc. and/or its affiliates in the United States and other countries, and may not be used
without written permission. Windows is a registered trademark of Microsoft Corporation in the United States and/or other
countries. All other trademarks are the property of their respective owners. Wiley Publishing, Inc., is not associated with
any product or vendor mentioned in this book.
LIMIT OF LIABILITY/DISCLAIMER OF WARRANTY: THE PUBLISHER AND THE AUTHOR MAKE NO REPRESENTATIONS
OR WARRANTIES WITH RESPECT TO THE ACCURACY OR COMPLETENESS OF THE CONTENTS OF THIS WORK AND
SPECIFICALLY DISCLAIM ALL WARRANTIES, INCLUDING WITHOUT LIMITATION WARRANTIES OF FITNESS FOR A
PARTICULAR PURPOSE. NO WARRANTY MAY BE CREATED OR EXTENDED BY SALES OR PROMOTIONAL MATERI-
ALS. THE ADVICE AND STRATEGIES CONTAINED HEREIN MAY NOT BE SUITABLE FOR EVERY SITUATION. THIS
WORK IS SOLD WITH THE UNDERSTANDING THAT THE PUBLISHER IS NOT ENGAGED IN RENDERING LEGAL,
ACCOUNTING, OR OTHER PROFESSIONAL SERVICES. IF PROFESSIONAL ASSISTANCE IS REQUIRED, THE SERVICES
OF A COMPETENT PROFESSIONAL PERSON SHOULD BE SOUGHT. NEITHER THE PUBLISHER NOR THE AUTHOR
SHALL BE LIABLE FOR DAMAGES ARISING HEREFROM. THE FACT THAT AN ORGANIZATION OR WEBSITE IS
REFERRED TO IN THIS WORK AS A CITATION AND/OR A POTENTIAL SOURCE OF FURTHER INFORMATION DOES
NOT MEAN THAT THE AUTHOR OR THE PUBLISHER ENDORSES THE INFORMATION THE ORGANIZATION OR
WEBSITE MAY PROVIDE OR RECOMMENDATIONS IT MAY MAKE. FURTHER, READERS SHOULD BE AWARE THAT
INTERNET WEBSITES LISTED IN THIS WORK MAY HAVE CHANGED OR DISAPPEARED BETWEEN WHEN THIS WORK
WAS WRITTEN AND WHEN IT IS READ.
For general information on our other products and services or to obtain technical support, please contact our Customer
Care Department within the U.S. at 877-762-2974, outside the U.S. at 317-572-3993, or fax 317-572-4002.
Wiley also publishes its books in a variety of electronic formats. Some content that appears in print may not be available in
electronic books.
Library of Congress Control Number: 2009933371
ISBN: 978-0-470-48961-1
Manufactured in the United States of America
10 9 8 7 6 5 4 3 2 1
01_489611-ffirs.indd ii01_489611-ffirs.indd ii 8/10/09 10:18 PM8/10/09 10:18 PM
About the Author
Greg Harvey, the author of a slew of For Dummies books running the gamut
from Excel For Dummies to The Origins of Tolkien’s Middle-earth For Dummies,
has had a long career of teaching business people the use of IBM PC, Windows,
and Macintosh software. From 1983 to 1988, he conducted hands-on computer
software training for corporate business users with a variety of training compa-
nies (including his own, PC Teach). From 1988 to 1992, he taught university
classes in Lotus 1-2-3 and Introduction to Database Management Technology
(using dBASE) in the Department of Information Systems at Golden Gate
University in San Francisco.
In mid-1993, Greg started a new multimedia publishing venture, Mind over
Media, Inc. As a multimedia developer and computer book author, he hopes to
enliven his future online computer books by making them into true interactive
learning experiences that will vastly enrich and improve the training of users of
all skill levels. In 2006, he received his PhD in Comparative Philosophy and
Religion with a concentration on Asian Studies from the California Institute of
Integral Studies in San Francisco, California. When he isn’t busy writing, Dr. Greg
works as a Healing Harp intern at Marin General Hospital with the Institute for
Health and Healing and as a complimentary care volunteer playing harp for
patients with the Hospice By The Bay in Larkspur, California.
01_489611-ffirs.indd iii01_489611-ffirs.indd iii 8/10/09 7:16 PM8/10/09 7:16 PM
01_489611-ffirs.indd iv01_489611-ffirs.indd iv 8/10/09 7:16 PM8/10/09 7:16 PM
Dedication
To my alma mater, the University of Illinois at Urbana-Champaign, Illinois, birth-
place of NCSA (National Center for Supercomputing Applications) Mosaic, the
great-granddaddy of Microsoft Internet Explorer 8.
Thanks for helping me gain the analytical, language, and writing skills that all
came into play in the creation of this work.
Author’s Acknowledgments
Special thanks to my business and life partner, Christopher Aiken, at Mind over
Media for all his help and support with this revision of Windows Quick Reference.
Also, I want to thank the following people at Wiley Publishing, Inc. who have
worked so hard to make this book a reality: Katie Feltman for her consistent and
inspiring help in getting this revision off the ground; Paul Levesque for his
humor and editorial expertise; and the amazing layout folks in Composition
Services. Thanks, too, to Jim Kelly for the technical review.
Last, but never least, I want to acknowledge my indebtedness to Dan Gookin,
whose vision, sardonic wit, and (sometimes) good humor produced DOS For
Dummies, the “mother” of all For Dummies books. Thanks for the inspiration and
the book that made it all possible, Dan.
Greg Harvey
San Rafael, California
01_489611-ffirs.indd v01_489611-ffirs.indd v 8/10/09 7:16 PM8/10/09 7:16 PM
Publisher’s Acknowledgments
We’re proud of this book; please send us your comments at . For other
comments, please contact our Customer Care Department within the U.S. at 877-762-2974, outside the U.S. at
317-572-3993, or fax 317-572-4002.
Some of the people who helped bring this book to market include the following:
Acquisitions, Editorial, and Media Development
Senior Project Editor: Paul Levesque
Acquisitions Editor: Katie Feltman
Copy Editor: Virginia Sanders
Technical Editor: Jim Kelly
Editorial Manager: Leah Cameron
Media Development Supervisor: Richard Graves
Composition Services
Project Coordinator: Patrick Redmond
Layout and Graphics: Carl Byers, Ronald Terry,
Christine Williams
Proofreaders: Laura Albert, Melissa Cossell,
Toni Settle
Indexer: Broccoli Information Management
Publishing and Editorial for Technology Dummies
Richard Swadley, Vice President and Executive Group Publisher
Andy Cummings, Vice President and Publisher
Mary Bednarek, Executive Acquisitions Director
Mary C. Corder, Editorial Director
Publishing for Consumer Dummies
Diane Graves Steele, Vice President and Publisher
Composition Services
Debbie Stailey, Director of Composition Services
01_489611-ffirs.indd vi01_489611-ffirs.indd vi 8/10/09 7:16 PM8/10/09 7:16 PM
Contents at a Glance
Part 1: The Windows 7 User Experience 1
Part 2: Computer Management 29
Part 3: Networking 61
Part 4: Communications 79
Part 5: System and Security 117
Part 6: Entertainment 145
Part 7: Accessories 165
Part 8: Windows Live Essentials 177
Appendix: Windows Logo Key Shortcuts 199
Index 201
02_489611-ftoc.indd vii02_489611-ftoc.indd vii 8/10/09 7:18 PM8/10/09 7:18 PM
02_489611-ftoc.indd viii02_489611-ftoc.indd viii 8/10/09 7:18 PM8/10/09 7:18 PM
Table of Contents
Part 1: The Windows 7 User Experience 1
Desktop 2
Displaying additional desktop icons 2
Creating desktop shortcuts 3
Flip and Flip 3-D 4
Gadgets 6
Adding new gadgets to your desktop 7
Customizing the contents of a gadget 8
Changing the opacity of a gadget 9
Resizing gadgets and repositioning them on the desktop 9
Getting Started 10
Help and Support 11
Taskbar 15
The Start menu 18
Customizing the taskbar 19
Customizing the Start menu 21
Pinning icons to the taskbar 22
Adding other toolbars to the taskbar 23
Creating new toolbars 24
The notification area 24
Customizing the notification area 25
Arranging windows on the desktop 25
Using the Task Manager 26
Part 2: Computer Management 29
Disk Management 30
Opening folders on drives in the Computer window 31
Formatting a disk 31
Mapping a network folder as a local drive 32
File, Folder, and Library Management 34
Assigning filenames 35
Creating new files, folders, and libraries 36
Customizing a window’s folder options 37
Changing how you select and open items 38
Changing how items are displayed in a folder 38
Creating compressed (zipped) folders 40
Extracting files from a compressed folder 41
Selecting files and folders 41
Copying (and moving) files and folders 42
Deleting files and folders 46
02_489611-ftoc.indd ix02_489611-ftoc.indd ix 8/10/09 7:18 PM8/10/09 7:18 PM
x Windows 7 For Dummies Quick Reference
Renaming files and folders 48
Searching for files 48
Program Management 52
Removing or repairing a program 52
Changing the program defaults 52
Restart, Sleep/Hibernate, Lock, Log Off, and Shut Down 54
Windows Explorer 55
Changing the display of an Explorer window 56
Sorting and filtering items in an Explorer window 58
Part 3: Networking 61
Connect to a Network 62
Change Adapter Settings 63
Manage Wireless Networks 64
Modifying the order in which Windows 7 automatically
connects to wireless networks 64
Manually adding a new wireless network 65
Removing an unused network from the list 67
Network Access 67
Turning on File Sharing, Network Discovery,
and Public folder sharing 68
Network and Sharing Center 73
Network Map 74
Set Up a New Connection or Network 75
Part 4: Communications 79
Internet Explorer 8 80
Connecting to the Internet 80
Launching Internet Explorer 8 81
Adding and changing home pages 82
Browsing the Web 82
Bookmarking Web sites as favorites 90
Opening favorites 92
Organizing favorites 93
Using Internet Explorer 8 tabs 95
Saving Web graphics 97
Saving Web pages 97
Printing Web pages 98
Working offline 101
Searching from the Live Search text box 102
Autosearching from the address bar 103
Adding a search provider to Internet Explorer 8 104
No phishing allowed 105
Pop-ups anyone? 106
Subscribing to RSS feeds 106
02_489611-ftoc.indd x02_489611-ftoc.indd x 8/10/09 7:18 PM8/10/09 7:18 PM
Table of Contents xi
Speech Recognition 109
Setting up Speech Recognition 110
Changing Speech Recognition settings 111
Modifying the Text to Speech Settings 113
Windows Fax and Scan 114
Sending and receiving faxes 115
Scanning documents 115
Part 5: System and Security 117
Backup and Restore 118
Setting up the backup 118
Restoring backed up files 120
Control Panel 121
System and Security 124
User Accounts 125
Hardware and Sound 129
Devices and Printers 131
AutoPlay 134
Sound 134
Clock, Language, and Region 135
Ease of Access 138
Windows Update 141
Part 6: Entertainment 145
Games 146
Media Center 147
When it’s TV time 150
Playing your favorite tunes 153
Playing your movies on DVD 154
Viewing your preferred photos and videos 154
Windows DVD Maker 155
Windows Media Player 157
Using the Windows Media Player in Library view 159
Ripping and burning CDs 161
Synching up with a portable MP3 player 162
Part 7: Accessories 165
Calculator 166
Command Prompt 167
Notepad 168
Paint 169
Run 170
Snipping Tool 171
Sound Recorder 172
Sticky Notes 173
WordPad 174
02_489611-ftoc.indd xi02_489611-ftoc.indd xi 8/10/09 7:18 PM8/10/09 7:18 PM
xii Windows 7 For Dummies Quick Reference
Part 8: Windows Live Essentials 177
Mail 178
Creating a new e-mail account 179
Composing and sending messages 180
Adding recipients to the Contact List 181
Reading e-mail 183
Organizing e-mail 186
Deleting e-mail 187
Messenger 187
Customizing Windows Live Messenger 189
Adding contacts to Windows Live Messenger 189
Instant messaging with Windows Live Messenger 190
Movie Maker 191
Importing still and video clips into your movie 192
Arranging the clips in your movie 193
Adjusting the duration of your clips 193
Adding special effects to clips 194
Adding transitions 194
Adding text to a movie clip 194
Publishing the final movie 195
Photo Gallery 196
Appendix: Windows Logo Key Shortcuts 199
Index 201
02_489611-ftoc.indd xii02_489611-ftoc.indd xii 8/10/09 7:18 PM8/10/09 7:18 PM
The Windows 7
User Experience
When fully utilized, the Windows 7 desktop, as shown in the following figure,
offers an extremely rich, visual user experience. However, as you find out in this
part, the Windows 7 desktop is much more than just a pretty face. Indeed,
Windows 7 is also Microsoft’s most powerful and usable personal computer
interface to date (and this statement is coming from someone who really liked
Windows XP — and Vista not so much).
In this part . . .
✓ Getting Acquainted with the Windows 7 Desktop
✓ Adding Gadgets to Your Desktop
✓ Using the Getting Started Option and Windows Help and Support
✓ Personalizing the Windows 7 Desktop
✓ Using the Windows 7 Taskbar
Part 1
03_489611-ch01.indd 103_489611-ch01.indd 1 8/10/09 7:18 PM8/10/09 7:18 PM
2 Part 1: The Windows 7 User Experience
Desktop
The Windows 7 desktop (see Figure 1-1) consists of the taskbar (see “Taskbar”
later in this part) that normally appears along the bottom of the screen, a back-
ground image (or color) that fills the rest of the screen (see “Personalize” later
in this part), any gadgets you display on the screen (see “Gadgets” later in this
part), and whatever desktop icons and desktop shortcuts you then choose to
place on this background.
Figure 1-1
Desktop background image GadgetsRecycle Bin desktop icon
Taskbar
Displaying additional desktop icons
The Windows 7 desktop starts with just a single Recycle Bin desktop icon
(where you drop any files, folders, and desktop shortcuts you want deleted from
the system). In addition to the Recycle Bin icon, you can add the following icons
to your Windows 7 desktop:
✓ Computer: To open your Computer window (same as choosing Start➪
Computer from the taskbar), which shows all the drives and compo-
nents connected to your computer (including drives that you’ve mapped
onto a drive letter).
03_489611-ch01.indd 203_489611-ch01.indd 2 8/10/09 7:18 PM8/10/09 7:18 PM
Desktop 3
✓ User’s Files: To open your Documents window (same as choosing
Start➪Documents from the taskbar), which shows all the document files
on your computer. (See “Windows Explorer” in Part 2.)
✓ Network: To open the Network window (same as choosing Start➪Network),
which shows all the computers on your local area network. (See Part 3.)
✓ Control Panel: To open the Control Panel (same as Start➪Control Panel),
which enables you to customize all sorts of computer settings. (See
“Control Panel” in Part 5.)
To add any or all of these desktop icons, follow these steps:
1. Right-click somewhere on the desktop background (not on any icon) and
then choose Personalize from the shortcut menu that appears.
2. In the Personalization window that appears, click the Change Desktop
Icons link in the Navigation pane to open the Desktop Icon Settings
dialog box.
3. Click the check boxes for all the desktop icons (Computer through
Control Panel) you want to appear on the Windows 7 desktop.
4. Click OK to close the Desktop Icons Settings dialog box and then click the
Close button in the upper-right corner of the Personalization window.
After adding a desktop icon to the desktop, you can open its window by double-
clicking the icon or right-clicking it and then choosing Open from its shortcut
menu.
Creating desktop shortcuts
You can create desktop shortcuts to launch applications you’ve installed as well
as to open drives, folders, documents on your computer system, and Web pages
on the Internet.
To create a desktop shortcut, you need to do just two things:
1. Locate the icon for the program, drive, folder, or document for which you
want to create the shortcut on the Start menu or in the Computer,
Network, or Documents window. (To create a shortcut to a Web page,
right-click the page in the Internet Explorer, click the Create Shortcut
option on its shortcut menu, and click OK in the alert dialog box that asks
whether you want the shortcut on your desktop.)
2. Right-click the program, folder, or document icon and then choose
Send To➪Desktop (Create Shortcut) on the icon’s shortcut menu.
03_489611-ch01.indd 303_489611-ch01.indd 3 8/10/09 7:18 PM8/10/09 7:18 PM
4 Part 1: The Windows 7 User Experience
In the case of a Web page, choose File➪Send➪Shortcut to Desktop in Internet
Explorer when the Classic pull-down menus are displayed.
Note that to create a desktop shortcut to a drive on your computer system, you
must right-click the drive and choose the Create Shortcut item from its shortcut
menu (there is no Send To item). Windows 7 then displays an alert dialog box
indicating that it can’t create a shortcut in the same window and asking whether
you want the shortcut placed on the desktop instead. Click the Yes button.
You can also use a wizard to create a desktop shortcut by following these few
steps:
1. Right-click anywhere on the desktop (but not on an existing desktop item)
and then choose New➪Shortcut from the shortcut menu that appears.
2. Enter the location of the item to which you want to create the shortcut
either by entering its path and filename or URL (Web) address or by click-
ing the Browse button and locating the item in the Browse for Files or
Folders dialog box before you click OK.
3. Click the Next button and then, if you want, edit the name for the shortcut
in the Type a Name for This Shortcut text box. Wrap up by clicking Finish.
After you create a desktop shortcut, you can open the program, drive, folder,
document, or Web page associated with it by double-clicking the shortcut icon
or by right-clicking it and then choosing Open from its shortcut menu.
To change the size of all desktop icons, to disable the automatic arrangement of
the icons and alignment to an invisible grid, or even to temporarily remove the
display of all icons, right-click any open space on the desktop, choose View from
the shortcut menu that appears, and then choose the appropriate option. To
change the order in which your desktop shortcuts appear in columns across the
desktop, use the options (Name, Size, Item Type, and Date Modified) on the Sort
By shortcut menu, which you can access by right-clicking any open space on the
desktop.
Flip and Flip 3-D
When you have many windows open in Windows 7, the Flip and Flip 3-D (also
known as the Window Switcher) features provide you with two quick methods
for activating the window you want to work by displaying it on the top of the
others.
To use the Flip feature (see Figure 1-2), hold down Alt+Tab. Windows 7 displays
a panel in the middle of the desktop showing thumbnails of each open window
in the order in which they were opened with the name of the window that’s cur-
rently selected. To activate a new window in the panel, press Tab as you hold
03_489611-ch01.indd 403_489611-ch01.indd 4 8/10/09 7:18 PM8/10/09 7:18 PM
Flip and Flip 3-D 5
down the Alt key until the thumbnail of that window is highlighted and its name
appears. Then release the Alt key along with Tab to hide the panel display.
Figure 1-2
If you hold the Ctrl key down while you press the Alt and Tab key, Windows 7
opens a panel with thumbnails of all open windows, and this panel remains dis-
played even after you release these three keys. You can then flip through the
panel by pressing the → or ← (to move forward or backward). When the thumb-
nail of the window you want to access is highlighted in the panel, press Enter to
close the panel and display the selected window on the desktop.
To use the Flip 3D feature, hold down the Windows logo key (the key with pic-
ture of a waving flag divided into four parts, Q) and then press the Tab key.
Windows 7 then displays all open windows in 3-D cascading arrangement (see
Figure 1-3). You can then flip through the cascading thumbnails by continuing to
the press the Tab key until the thumbnail of the window you want displayed is
at the front of the stack. If your mouse has a center wheel, you can then flip
through the 3-D stack by turning the wheel. (Turn the wheel forward to flip back-
ward through the stack and backward to flip forward.)
As soon as you’ve brought the thumbnail of the window you want displayed on
the desktop to the front of the 3-D stack, release the Windows logo key.
Windows 7 then closes the cascading 3-D stack while at the same time display-
ing the selected window on the desktop.
If you hold the Ctrl key down while you press the Windows logo key and the Tab
key, Windows 7 opens a 3-D stack of all open windows that remains displayed on
your desktop even after you release these three keys. You can then flip through
the 3-D stack by pressing the → or ← (to move forward and backward). When
the thumbnail of the window you want to access is at the front of the stack, you
can press Enter to close the stack and display its window on top of the desktop.
When all the open windows in Windows 7 are minimized as Quick Launch but-
tons (see “Taskbar” later in this part) on the taskbar — which happens after you
click the Show the Desktop icon on the taskbar’s shortcut menu or you press
Q+D — remember that you can position the mouse pointer over each minimized
button to display a thumbnail of its window. Then, when you see the image of
the window you want to activate, you can position the mouse pointer on the
thumbnail to temporarily display its window on the Windows 7 desktop either
full screen or in its previous position and size. You can then click its Quick
Launch button on the taskbar or displayed thumbnail to keep the window open
on the desktop.
03_489611-ch01.indd 503_489611-ch01.indd 5 8/10/09 7:18 PM8/10/09 7:18 PM
6 Part 1: The Windows 7 User Experience
Figure 1-3
Gadgets
Gadgets are mini-applications (applets) for the Windows 7 desktop that give you
access to frequently changing information, such as the current time, weather,
stock quotes, news feeds, computer usage, and the like. Figure 1-4 shows you my
desktop with the Gadgets Gallery window displayed. (See “Adding new gadgets
to your desktop” later in this part.)
My desktop currently holds the following items:
✓ Clock, which shows an analog clock with the current time for any time
zone you select.
✓ Slide Show, which displays a continuous slide show of the images that are
stored in your Pictures library.
✓ Calendar, which shows the current day and date.
✓ Weather, which shows the current temperature (and when enlarged,
weather conditions) for a selected town or city.
✓ Feed Headlines, which shows you news headlines for the RSS feed you
select. (See “Internet Explorer 8” in Part 4 for details on RSS feeds and how
to subscribe to them.)
03_489611-ch01.indd 603_489611-ch01.indd 6 8/10/09 7:18 PM8/10/09 7:18 PM
Gadgets 7
Figure 1-4
CloseClose
Drag Gadget
Larger size
Options
Adding new gadgets to your desktop
You can easily add gadgets to your Windows desktop. Not only can you select
new gadgets from among those that are automatically shipped with the Windows 7
operating system, but you can always download gadgets from an ever-expanding
online library. When you add new gadgets, Windows automatically displays them
sequentially down a single column on the far right of your desktop (although,
you can then move them anywhere you want on the desktop — see “Resizing
gadgets and repositioning them on the desktop” later in this part).
To add gadgets to the desktop from among those that are included with
Windows 7, follow these few steps:
1. Right-click the desktop and then choose Gadgets from the shortcut menu.
Windows 7 opens the Gadget Gallery window that displays all the gadgets
on your computer, similar to the one shown in Figure 1-4.
03_489611-ch01.indd 703_489611-ch01.indd 7 8/10/09 7:18 PM8/10/09 7:18 PM
8 Part 1: The Windows 7 User Experience
2. Double-click the icon of the gadget you want to add to the desktop or
right-click it and then click the Add option on the shortcut menu.
Windows adds the gadget to the right side of the Windows desktop.
3. When you finish adding gadgets, click the Close button in the Gadget
Gallery window.
To download more gadgets from the Internet, open the Gadgets Gallery window as
described in Step 1 and then click the Get More Gadgets Online link. Windows 7
then opens the Personalize Your PC Web page in the Internet Explorer. This page
offers not only gadget news and instructions on how to download new gadgets,
but also information on how to build your own gadgets, if you’re so inclined.
To remove a gadget from the desktop, position the mouse pointer in the upper-
right corner of the gadget you want to remove and then click the X that appears.
Note that removing a gadget from the desktop doesn’t delete it from your
computer — to do that, you need to open the Gadgets Gallery window, right-
click the gadget’s thumbnail, and then choose Uninstall from its shortcut menu.
To restore a gadget that you’ve removed from the desktop, just repeat the pre-
ceding steps for adding a new gadget.
Customizing the contents of a gadget
Many of the gadgets you add to the desktop are generic and need to be custom-
ized. For example, you can customize the Clock gadget by selecting a new clock
face, giving it a name, and selecting a time zone other than your own. (By
default, this analog clock automatically displays the same time as the digital
time display in the notification area of the Windows 7 taskbar.) You also need to
customize the Feed Headlines gadget so that it displays news headlines for a
particular RSS feed to which you’ve subscribed. (See “Internet Explorer 8” in
Part 4 for details on how to subscribe to an RSS feed.)
To customize the contents of a gadget, position the mouse pointer in the upper-
right corner of the gadget and then click the wrench icon that appears immedi-
ately beneath the X. Alternatively, you can also right-click its icon and then
choose Options from the shortcut menu. Windows 7 then opens a dialog box
specific to the gadget that enables you to customize its display.
For example, if you open the settings dialog box for the Clock gadget (see Figure
1-5), you can then select a new clock face by clicking either the Next or Previous
button (the ones with the triangles pointing right and left, respectively), and
entering a clock name (such as London or Beijing) in the Clock Name text box.
Next, select the appropriate time zone for the clock from the Time Zone drop-
down list. In addition, this dialog box contains a Show the Second Hand check
box that you can select if you want the Clock gadget to display a moving red
second hand.
03_489611-ch01.indd 803_489611-ch01.indd 8 8/10/09 7:18 PM8/10/09 7:18 PM
Gadgets 9
Figure 1-5
Changing the opacity of a gadget
In addition to customizing what information appears in a gadget (as in the RSS
feed headlines shown in the Feed Headlines gadget), you can also customize the
overall opacity of a gadget. Any gadget you add to the Windows 7 desktop is
automatically displayed at 100-percent opacity (making it as opaque and non-
see-through as possible). You can, however, lighten up any of your gadgets —
making them more see-through — by changing the gadget’s opacity.
To modify the opacity of a gadget, right-click the gadget and then highlight the
Opacity item on its shortcut menu. Windows then displays a submenu where
you can click the new opacity percentage item you want to use (20%, 40%, 60%,
or 80%). The lower the percentage, the more transparent the gadget is.
Resizing gadgets and repositioning them on the desktop
Some gadgets have a Larger Size option that you can use to increase its display
size on the desktop. To use this option, position the mouse pointer somewhere
on the gadget and then click the Larger Size button (with an arrow pointing diag-
onally up to the right) that appears between the Close and Options buttons on
the right size of the gadget (when the gadget offers this resizing option).
Immediately after you increase the display size of a gadget, the Larger Size
button changes into a Smaller Size button that you can click whenever you want
to return the gadget to its original display size on the desktop.
Windows 7 also enables you to reposition any gadget on the desktop by moving
it out of its original position on the far right of the desktop. To relocate a gadget,
position the mouse pointer on its Drag Gadget button (the one whose icon
sports a grid of dots) that appears immediately beneath the Options button (the
one with the wrench icon) on the right side of the gadget. Then, drag and drop
the gadget in its new position on the Windows desktop just as you would any
other desktop icon or the title bar of any open window.
03_489611-ch01.indd 903_489611-ch01.indd 9 8/10/09 7:18 PM8/10/09 7:18 PM
10 Part 1: The Windows 7 User Experience
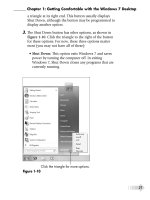
Getting Started
The Windows 7 comes with a Getting Started window (shown in Figure 1-6), that
you can open by clicking the Start button followed by the Getting Started option.
The Getting Started window has links to an overview of the new Windows 7
operating system as well as help in dealing with common tasks associated with
setting up your Windows 7 PC:
✓ Discover Windows 7: Opens the Windows 7 Home page on the Microsoft
Web site in the Internet Explorer, where you can get the latest information
about this latest and greatest version of the PC’s favorite operating system.
✓ Personalize Windows: Enables you to select a new desktop background
image, window colors, sounds, and screen saver as part of your personal
Windows 7 settings. (See “Personalize” later in this part for details.)
✓ Transfer Your Files: Enables you to transfer your files, folders, e-mail, and
other personal settings from another older computer running an earlier
version of Windows to the current computer running Windows 7.
✓ Share with a Homegroup: Enables you to set up a new homegroup or join
your computer to an existing one so that you can easily share files and
resources such as printers and scanners. (See “Connect to a Network” in
Part 3 for more on homegroups.)
✓ Change UAC Settings: Enables you to change the User Account Control
settings that determine when you’re notified about changes that programs
are about to make to your computer. (See “Modifying User Account set-
tings” in Part 5 for more.)
✓ Get Windows Live Essentials: Opens the Windows Live Essentials page in
the Internet Explorer. On this page, you can get more information about
the various Windows Live application programs, including Messenger,
Mail, Writer, and Photo Gallery. The page also provides a convenient link
for downloading the entire Live Essentials package.
✓ Back Up Your Files: Enables you to back up the files on your PC as well as
restore files saved in a previous backup. (See “Backup and Restore” in Part
5 for details.)
✓ Add New Users: Enables you to make changes to your own user account
as well as add new users to your computer. (See “Modifying User Account
settings” in Part 5 for details.)
✓ Change Text Size: Enables you to increase the size of the text and icons
displayed on the Windows 7 desktop.
To display information about the function of a particular option in the top sec-
tion of the Getting Started window, click its icon and text description. To open
03_489611-ch01.indd 1003_489611-ch01.indd 10 8/10/09 7:18 PM8/10/09 7:18 PM
Help and Support 11
the dialog box or window associated with a particular option, double-click its
icon in the Getting Started window.
You can also access any of the options displayed in the Getting Started window
directly from the Windows Start menu. Simply click Start and then position the
mouse pointer on the Getting Started option (rather than clicking it) at the top
of the Start menu. Windows then displays a submenu with each of the nine get-
ting started options on it.
Figure 1-6
Help and Support
Windows 7 has an extensive help system that you can use not only to get gen-
eral and detailed information on how to use Windows, but also to get answers
from Microsoft on specific problems that you’re experiencing. To open the
Windows Help and Support window (see Figure 1-7), choose Start➪Help and
Support.
The Windows Help and Support window contains three main links in the Not
Sure Where to Start section:
✓ How to Get Started with Your Computer displays a list of links to topics
ranging from Protecting Your Computer to Installing Programs.
✓ Learn About Windows Basics displays a list of links to basic topics
divided into the following six main categories: Learn about Your Computer;
03_489611-ch01.indd 1103_489611-ch01.indd 11 8/10/09 7:18 PM8/10/09 7:18 PM