delphi 7 - tutorial - creating a clx database application
Bạn đang xem bản rút gọn của tài liệu. Xem và tải ngay bản đầy đủ của tài liệu tại đây (263.72 KB, 22 trang )
Tutorial: Creating a CLX
Database Application
Borland Software Corporation
100 Enterprise Way, Scotts Valley, CA 95066-3249
www.borland.com
Borland
®
Delphi
™
7
for Windows
™
COPYRIGHT © 2001–2002 Borland Software Corporation. All rights reserved. All Borland brand and product names
are trademarks or registered trademarks of Borland Software Corporation in the United States and other countries.
All other marks are the property of their respective owners.
D7-DB-0802
iii
Creating a CLX database application
Overview of database architecture. . . . . . . . . 1
Creating a new project. . . . . . . . . . . . . . . . 2
Setting up data access components . . . . . . . . 3
Setting up the database connection. . . . . . . 3
Setting up the unidirectional dataset. . . . . . 5
Setting up the provider, client dataset,
and data source . . . . . . . . . . . . . . . . . 5
Designing the user interface . . . . . . . . . . . . 6
Creating the grid and navigation bar . . . . . 6
Adding support for a menu . . . . . . . . . . . 8
Adding a menu . . . . . . . . . . . . . . . . . . 10
Adding a button . . . . . . . . . . . . . . . . . 11
Displaying a title and an image . . . . . . . . . . 12
Writing an event handler. . . . . . . . . . . . . . 13
Writing the Update Now! command
event handler. . . . . . . . . . . . . . . . . . 13
Writing the Exit command event handler . . 14
Writing the FormClose event handler. . . . . 15
Index
Contents
iv
Creating a CLX database application
1
1
Chapter1
Creating a CLX database application
This tutorial guides you through the creation of a cross-platform application that lets
you view and update a sample employee database. Cross-platform applications use
CLX, the Borland Component Library for Cross-Platform. Designed to compile and
run on different platforms, CLX applications require a minimum of changes between
Windows and Linux ports.
This tutorial assumes you are familiar with Windows and have read the introduction
to Delphi programming and the IDE in the Quick Start.
Note
This tutorial requires the Professional or Enterprise editions of Delphi, which include
database components. You must also have InterBase installed to successfully
complete this tutorial.
Overview of database architecture
The architecture of a database application may seem complicated at first, but the use
of multiple components simplifies the development and maintenance of actual
database applications.
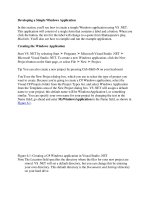
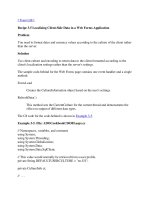
Database applications include three main parts: the user interface, a set of data access
components, and the database itself. In this tutorial, you will create a dbExpress
database application. Other database applications have a similar architecture.
The user interface includes data-aware controls such as a grid so that users can edit
and post data to the database. The data access components include the data source,
the client dataset, the data provider, a unidirectional dataset, and a connection
component. The data source acts as a conduit between the user interface and a client
dataset. The client dataset is the heart of the application because it contains a set of
records from the underlying database which are buffered in memory. The provider
transfers the data between the client dataset and the unidirectional dataset, which
2
Tutorial
Creating a new project
fetches data directly from the database. Finally, the connection component
establishes a connection to the database. Each type of unidirectional dataset uses a
different type of connection component.
For more information on database development, see “Designing database
applications” in the Developer’s Guide or online Help.
Creating a new project
Before you begin the tutorial, create a folder to hold the source files. Then create and
save a new project.
1
Create a folder called Tutorial to hold the project files you’ll create while working
through this tutorial.
2
Begin a new CLX project. Choose File|New|CLX Application to create a new
cross-platform project. (When you start Delphi, it creates a new project for a VCL
application; be sure to follow this step to create a CLX application.)
3
Choose File|Save All to save your files to disk. When the Save dialog appears,
navigate to your Tutorial folder and save each file using its default name.
Later on, you can save your work at any time by choosing File|Save All. If you
decide not to complete the tutorial in one sitting, you can open the saved version
by choosing File|Reopen and selecting the tutorial from the list.
Database application
Data module
Client dataset
UI
Data source
Unidirectional
dataset
Connection
component
Provider
Database server
Creating a CLX database application
3
Setting up data access components
Setting up data access components
Data access components represent both data (datasets) and the components that
connect the datasets to other parts of your application. Each of these data access
components points to the next lower component. For example, the data source points
to the client dataset, the client dataset points to the provider, and so forth. When you
set up the data access components, you’ll add the lowest component first.
In the following sections, you’ll add the database components to create the database
connection, unidirectional dataset, provider, client dataset, and data source.
Afterwards, you’ll create the user interface for the application. These components are
located on the dbExpress, Data Access, and Data Controls pages of the Component
palette.
Tip
It is a good idea to isolate your user interface on its own form and place the data
access components in a data module. However, to make things simpler for this
tutorial, you’ll place the user interface and all the components on the same form.
Setting up the database connection
The dbExpress page contains a set of components that provide fast access to SQL
database servers.
You need to add a connection component so that you can connect to a database. The
type of connection component you use depends on what type of dataset component
you use. In this tutorial you will use the TSQLConnection and TSQLDataSet
components.
To add a dbExpress connection component:
1
Click the dbExpress page on the Component palette and double-click the
TSQLConnection component to place it on the form. To find the TSQLConnection
component, point at an icon on the palette for a moment; a Help hint shows the
name of the component. The component is called SQLConnection1 by default.
The TSQLConnection component is nonvisual, so it doesn’t matter where you put
it. However, for this tutorial, line up all the nonvisual components at the top of the
form.
Tip
To display the captions for the nonvisual components on a form, choose Tools|
Environment Options|Designer and click Show component captions.
2
In the Object Inspector, set its ConnectionName property to IBConnection (it’s on
the drop-down list).
3
Set the LoginPrompt property to False. (By setting this property to False, you won’t
be prompted to log on every time you access the database.)
4
Tutorial
Setting up data access components
4
Double-click the TSQLConnection component to display the Connection Editor.
You use the Connection Editor to select a connection configuration for the
TSQLConnection component or edit the connections stored in the
dbxconnections.ini file. Any changes you make in the dialog are written to that file
when you click OK. In addition, when you click OK, the selected connection is
assigned as the value of the SQL Connection component’s ConnectionName
property.
5
In the Connection Editor, specify the pathname of the database file called
employee.gdb on your system. In this tutorial you will connect to a sample
InterBase database, employee.gdb, that is provided with Delphi. By default, the
InterBase installation places employee.gdb in C:\Program Files\Common Files\
Borland Shared\Data.
6
Check the User_Name and Password fields for acceptable values. If you have not
altered the default values, you do not need to change the fields. If database access
is administered by someone else, you may need to get a username and password
to access the database.
7
When you are done checking and editing the fields, click OK to close the
Connection Editor and save your changes.
These changes are written to the dbxconnections.ini file and the selected
connection is assigned as the value of the SQLConnection component’s
ConnectionName property
Tip
If you need additional help while using the Connection Editor, click the Help
button.
8
Choose File|Save All to save your project.
Creating a CLX database application
5
Setting up data access components
Setting up the unidirectional dataset
A basic database application uses a dataset to access information from the database.
In dbExpress applications, you use a unidirectional dataset. A unidirectional dataset
reads data from the database but doesn’t update data.
To add the unidirectional dataset:
1
From the dbExpress page, drop TSQLDataSet at the top of the form.
2
In the Object Inspector, set the SQLConnection property to SQLConnection1 (the
database connection created previously).
3
Set the CommandText property to Select * from SALES to specify the command that
the dataset executes. You can either type the Select statement in the Object
Inspector or click the ellipsis to the right of CommandText to display the
CommandText Editor where you can build your own query statement.
Tip
If you need additional help while using the CommandText Editor, click the Help
button.
4
Set Active to True to open the dataset.
5
Choose File|Save All to save the project.
Setting up the provider, client dataset, and data source
The Data Access page contains components that can be used with any data access
mechanism, not just dbExpress.
Provider components are the way that client datasets obtain their data from other
datasets. The provider receives data requests from a client dataset, fetches data,
packages it, and returns the data to the client dataset. If using dbExpress, the
provider receives updates from a client dataset and applies them to the database
server.
To add the provider:
1
From the Data Access page, drop a TDataSetProvider component at the top of the
form.
2
In the Object Inspector, set the provider’s DataSet property to SQLDataSet1.
The client dataset buffers its data in memory. It also caches updates to be sent to the
database. You can use client datasets to supply the data for data-aware controls on
the user interface using the data source component.
To add the client dataset:
1
From the Data Access page, drop a TClientDataSet component to the right of the
TDataSetProvider component.
2
Set the ProviderName property to DataSetProvider1.
3
Set the Active property to True to allow data to be passed to your application.
6
Tutorial
Designing the user interface
A data source connects the client dataset with data-aware controls. Each data-aware
control must be associated with a data source component to have data to display and
manipulate. Similarly, all datasets must be associated with a data source component
for their data to be displayed and manipulated in data-aware controls on a form.
To add the data source:
1
From the Data Access page, drop a TDataSource component to the right of the
TClientDataSet component.
2
Set the data source’s DataSet property to ClientDataSet1.
3
Choose File|Save All to save the project.
So far, you have added the nonvisual database infrastructure to your application.
Next, you need to design the user interface.
Designing the user interface
Now you need to add visual controls to the application so your users can view the
data, edit it, and save it. The Data Controls page provides data-aware controls that
work with data in a database and build a user interface. You’ll display the database
in a grid and add a few commands and a navigation bar.
Creating the grid and navigation bar
To create the interface for the application:
1
You can start by adding a grid to the form. From the Data Controls page, drop a
TDBGrid component onto the form.
2
Set DBGrid’s properties to anchor the grid. Click the + next to Anchors in the Object
Inspector to display akLeft, akTop, akRight, and akBottom; set them all to True. The
easiest way to do this is to double-click False next to each property in the Object
Inspector.
3
Align the grid with the bottom of the form by setting the Align property to
alBottom. You can also enlarge the size of the grid by dragging it or setting its
Height property to 400.
Creating a CLX database application
7
Designing the user interface
4
Set the grid’s DataSource property to DataSource1. When you do this, the grid is
populated with data from the employee database. If the grid doesn’t display data,
make sure you’ve correctly set the properties of all the objects on the form, as
explained in previous instructions.
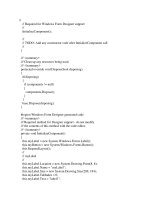
So far your application should look like this:
The DBGrid control displays data at design time while you are working in the IDE.
This allows you to verify that you’ve connected to the database correctly. You
cannot, however, edit the data at design time; to edit the data in the table, you’ll
have to run the application.
5
From the Data Controls page, drop a TDBNavigator control onto the form. A
database navigator is a tool for moving through the data in a dataset (using next
and previous arrows, for example) and performing operations on the data.
6
Set the navigator bar’s DataSource property to DataSource1 so the navigator is
looking at the data in the client dataset.
7
Set the navigator bar’s ShowHint property to True. (Setting ShowHint to True allows
Help hints to appear when the cursor is positioned over each of the items on the
navigator bar at runtime.)
8
Choose File|Save All to save the project.
8
Tutorial
Designing the user interface
9
Press
F9
to compile and run the project. You can also run the project by clicking the
Run button on the Debug toolbar, or by choosing Run from the Run menu.
When you run your project, the program opens in a window like the one you
designed on the form. You can test the navigation bar with the employee database.
For example, you can move from record to record using the arrow commands, add
records using the
+ command, and delete records using the - command.
Tip
If you encounter an error while testing an early version of your application, choose
Run|Program Reset to return to the design-time view.
Adding support for a menu
Though your program already has a great deal of functionality, it still lacks many
features usually found in GUI applications. For example, most applications
implement menus and buttons to make them easy to use.
In this section, you’ll add an action list. While you can create menus, toolbars, and
buttons without using action lists, action lists simplify development and
maintenance by centralizing responses to user commands. (Note that for Windows-
only development, you can also use Action Bands to simplify development of
toolbars and menus.)
1
If the application is still running, click the X in the upper right corner to close the
application and return to the design-time view of the form.
2
From the Common Controls page of the Component palette, drop an ImageList
component onto the form. Line this up next to the other nonvisual components.
The ImageList will contain icons that represent standard actions like cut and paste.
3
From the Standard page of the Component palette, drop an ActionList component
onto the form. Set the action list’s Images property to ImageList1.
Creating a CLX database application
9
Designing the user interface
4
Double-click the action list to display the Action List editor.
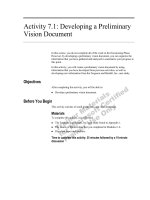
5
Right-click the Action List editor and choose New Standard Action. The Standard
Actions list box appears.
6
Select the following actions: TEditCopy, TEditCut, and TEditPaste. (Use the
Ctrl
key
to select multiple items.) Then click OK.
7
Right-click on the Action List editor and choose New Action to add another action
(not provided by default). Action1 is added by default. In the Object Inspector, set
its Caption property to Update Now!
This same action will be used on a menu and a button. Later on, we’ll add an event
handler so it will update the database.
8
Click (No Category), right-click and choose New Action to add another action.
Action2 is added. Set its Caption property to E&xit.
9
Click the X (in the upper right corner) to close the Action List editor.
You’ve added three standard actions plus two other actions that we’ll connect to
event handlers later.
10
Choose File|Save All to save the project.
Right-click in the
editor and choose
New Standard
Action to display
the Standard
Actions list box.
Select the actions
you want and click
OK. Press
Ctrl
to
select multiple
actions.
You’ve added standard actions
that come with the product.
You’ll use these on a menu.
10
Tutorial
Designing the user interface
Adding a menu
In this section, you’ll add a main menu bar with two drop-down menus—File and
Edit—and you’ll add menu items to each one using the actions in the action list.
1
From the Standard page of the Component palette, drop a TMainMenu component
onto the form. Drag it next to the other nonvisual components.
2
Set the main menu’s Images property to ImageList1 to associate the image list with
the menu items.
3
Double-click the menu component to display the Menu Designer.
4
Type &File to set the Caption property of the first top-level menu item and press
Enter
.
5
Click the File menu and select the blank menu item that appears under it. Set the
blank menu item’s Action property to Action2. An Exit menu item appears under
the File menu.
6
Click the second top-level menu item (to the right of File). Set its Caption property
to &Edit and press
Enter
. Click the Edit menu and select the blank menu item that
appears under it.
7
In the Object Inspector, set the Action property to EditCut1 and press
Enter
. The
item’s caption is automatically set to Cut and a default cut bitmap appears on the
menu.
When you type
&File
and
press
Enter
, the top-level File
command appears.
The ampersand before a
character activates an
accelerator key.
Creating a CLX database application
11
Designing the user interface
8
Select the blank menu item (under Cut) and set its Action property to EditCopy1 (a
default copy bitmap appears on the menu).
9
Select the blank menu item (under Copy) and set its Action property to EditPaste1 (a
default paste bitmap appears on the menu).
10
Select the blank menu item (under Paste) and set its Caption property to a hyphen
(-) to create a divider line in the menu. Press
Enter
.
11
Select the blank menu item (under the divider line) and set its Action property to
Action1. The menu item displays Update Now!
12
Click the X to close the Menu Designer.
13
Choose File|Save All to save the project.
14
Press
F9
or Run on the toolbar to run your program and see how it looks.
15
Close the application when you’re ready to continue.
Adding a button
This section describes how to add an Update Now button to the application. This
button is used to apply any edits that a user makes to the database, such as editing
records, adding new records, or deleting records.
To add a button:
1
From the Standard page of the Component palette, drop a TButton onto the form.
(Select the component then click the form next to the navigation bar.)
2
Set the button’s Action property to Action1.
The button’s caption changes to Update Now! When you run the application, it
will be grayed out until an event handler is added to make it work.
12
Tutorial
Displaying a title and an image
Displaying a title and an image
You can add a company title and an image to make your application look more
professional:
1
From the Standard page of the component palette, drop a TLabel component onto
the form (named Label1 by default).
2
In the Object Inspector, change the label’s Caption property to World Corp or
another company name.
3
Change the company name’s font by clicking the Font property. Click the ellipsis
that appears on the right and in the Font dialog box, change the font to Helvetica
Bold, 16-point type. (If Helvetica is not available, choose another font.) Click OK.
4
Position the label in the upper right corner.
5
From the Additional Component palette page, drop a TImage component next to
the label (named Image1 by default).
6
To add an image to the Image1 component, click the Picture property. Click the
ellipsis to display the Picture Editor.
7
In the Picture editor, choose Load and navigate to
Program Files\Common Files\Borland Shared\images\icons.
8
Double-click earth.ico. Click OK to load the picture and to close the Picture Editor.
Click on the ellipsis
to display a standard
font dialog.
You can change the font of the label using
the
Font
property in the Object Inspector.
Creating a CLX database application
13
Writing an event handler
9
Size the default image area to the size of the picture. Place the image next to the
label.
10
Choose File|Save All to save the project.
11
Press
F9
to compile and run your application.
Close the application when you’re ready to continue.
Writing an event handler
Most components on the Component palette have events, and most components
have a default event. A common default event is OnClick, which gets called whenever
a component, such as TButton, is clicked. If you select a component on a form and
click the Object Inspector’s Events tab, you’ll see a list of the component’s events.
For more information about events and event handlers, see “Developing the
application user interface” in the Developer’s Guide or online Help.
Writing the Update Now! command event handler
First, you’ll write the event handler for the Update Now! command and button:
1
Double-click the ActionList component to display the Action List editor.
2
Select (All Actions) to display a list of actions.
3
Double-click Action1. In the Code editor, the following skeleton event handler
appears:
procedure TForm1.Action1Execute(Sender: TObject);
begin
end;
You can drag the
edge to set the
width of
Image
, or
you can set its
Width
property in
the Object
Inspector.
14
Tutorial
Writing an event handler
Right where the cursor is positioned (between begin and end), type:
if ClientDataSet1.State in [dsEdit, dsInsert] then ClientDataSet1.Post;
ClientDataSet1.ApplyUpdates(-1);
This event handler first checks to see what state the database is in. When you move
off a changed record, it is automatically posted. But if you don’t move off a changed
record, the database remains in edit or insert mode. The if statement posts any data
that may have been changed but was not passed to the client dataset. The next
statement applies updates held in the client dataset to the database.
Note
Changes to the data are not automatically posted to the database when using
dbExpress. You need to call the ApplyUpdates method to write all updated, inserted,
and deleted records from the client dataset to the database.
Writing the Exit command event handler
Next, we’ll write the event handler for the Exit command:
1
Double-click the ActionList component to display the Action List editor if it is not
already displayed.
2
Select (All Actions) to display a list of actions.
3
Double-click Action2. The Code editor displays the following skeleton event
handler:
procedure TForm1.Action2Execute(Sender: TObject);
begin
end;
Right where the cursor is positioned (between begin and end), type:
Close;
This event handler will close the application when the File|Exit command on the
menu is used.
4
Close the Action List editor.
5
Choose File|Save All to save the project.
Creating a CLX database application
15
Writing an event handler
Writing the FormClose event handler
Finally, you’ll write another event handler that is invoked when the application is
closed. The application can be closed either by using File|Exit or by clicking the X in
the upper right corner. Either way, the program checks to make sure that there are no
pending updates to the database and displays a message window asking the user
what to do if changes are pending.
You could place this code in the Exit event handler but any pending database
changes would be lost if users chose to exit your application using the X.
1
Click the grid area of main form to select the form.
2
Select the Events tab in the Object Inspector to see the form events.
3
Next to OnClose type FormClose then double-click FormClose. A skeleton
FormClose event handler is written and displayed in the code editor after the
other event handlers:
procedure TForm1.FormClose(Sender: TObject; var Action: TCloseAction);
begin
end;
Right where the cursor is positioned (between begin and end), type:
Action := caFree;
if ClientDataSet1.State in [dsEdit, dsInsert] then
ClientDataSet1.Post;
if ClientDataSet1.ChangeCount> 0 then
begin
Option := Application.MessageBox(
'You have pending updates. Do you want to write them to the database?',
'Pending Updates',[smbYes, smbNo, smbCancel], smsWarning, smbYes);
case Option of
smbYes: ClientDataSet1.ApplyUpdates(-1);
smbCancel: Action := caNone;
end;
end;
This event handler checks the state of the database. If changes are pending, they
are posted to the client dataset where the change count is increased. Then before
closing the application, a message box is displayed that asks how to handle the
changes. The reply options are Yes, No, or Cancel. Replying Yes applies updates to
the database; No closes the application without changing the database; and Cancel
cancels the exit but does not cancel the changes to the database and leaves the
application still running.
16
Tutorial
Writing an event handler
4
You need to declare the variable used within the procedure. On a line between
procedure and begin type:
var
Option: TMessageButton;
5
Check that the whole procedure looks like this:
procedure TForm1.FormClose(Sender: TObject; var Action: TCloseAction);
var
Option: TMessageButton;
begin
Action := caFree;
if ClientDataSet1.State in [dsEdit, dsInsert] then
ClientDataSet1.Post;
if ClientDataSet1.ChangeCount> 0 then
begin
Option := Application.MessageBox(
'You have pending updates. Do you want to write them to the database?',
'Pending Updates',[smbYes, smbNo, smbCancel], smsWarning, smbYes);
case Option of
smbYes: ClientDataSet1.ApplyUpdates(-1);
smbCancel: Action := caNone;
end;
end;
end;
6
To finish up, choose File|Save All to save the project. Then press
F9
to run the
application.
Tip
Fix any errors that occur by double-clicking the error message to go to the code in
question or by pressing
F1
for Help on the message.
That’s it! You can try out the application to see how it works. When you want to exit
the program, you can use the fully functional File|Exit command.
Index
v
A
ActionList component 8
adding
a grid to an application 6
a title to an application 12
an image to an application 12
database connection to an application 3
main menu to an application 10
applying edits to database 11
architecture, database 1
B
Button component 11
button, adding Update Now! 11
C
ClientDataSet component 5
compiling programs 8
components
ActionList 8
Button 11
ClientDataSet 5
DataSetProvider 5
DataSource 6
DBGrid 6
DBNavigator 7
Image 12
ImageList 8
Label 12
MainMenu 10
nonvisual 3
SQLConnection 3
SQLDataSet 5
creating a project 2
D
database applications
accessing 3 to 4
overview 1
database example 1 to 16
database user name and password 4
database, sample 4
DataSetProvider component 5
datasets
client 5
unidirectional 5
DataSource component 6
DBGrid component 6
DBNavigator component 7
E
employee.gdb sample database 4
event handlers, writing 13 to 16
example program 1 to 16
G
graphics, displaying 12
grid, adding to an application 6
I
icons, adding to an application 12
Image component 12
ImageList component 8
L
Label component 12
M
MainMenu component 10
menu, adding to an application 10
N
navigating data in a dataset 7
nonvisual components 3
P
Panel component 12
pictures, displaying 12
project
creating 2
running 8
R
Run button 8
running applications 8
Index
vi
Tutorial
S
sample database 4
SQLConnection component 3
SQLDataSet component 5
T
tutorial 1 to 16
U
unidirectional dataset 5
Update Now! button 11
updating a database 11
W
writing event handlers 13 to 16