Project00 setting up linux dev env pdf
Bạn đang xem bản rút gọn của tài liệu. Xem và tải ngay bản đầy đủ của tài liệu tại đây (1.4 MB, 16 trang )
1
Project 00 - Setup Linux development environment
Project 00 – Setup Linux development environment
•
Tools to be used
1. gcc Compiler
2. Linux ISO image – We will use Ubuntu 14.04, you are free to use any
3. GNU debugger
4. Windows as a Host OS
5. Virtualization software – Virtual box,
6. ssh client – MobaXterm for windows
7. Git installation
8. VIM Editor
9. cscope
It might be possible that you are running linux already and natively on your
Machine. In that case, we still need to install Linux on top of native linux using
virtual box. Reason for doing this is that Vbox would help us to simulate multiNode environment which we need in one of our project.
Steps 1 and 3 already come pre-installed with linux :p
Lets Begin …
2
Project 00 - Setup Linux development environment
3
Assumption :
I am assuming you are running Windows 7 or above and have not worked in Linux
environment ever. Pls follow the steps ahead.
Step 1 :
•
From your windows machine,
Download the Ubuntu 14.04 LTS iso image i386 (32) from Internet. Its free.
(Resource 1)
•
Download Virtual box latest version, and install it as usual
•
Windows users : (Resource 2)
•
Mac users : (Resource 2)
• After installing the Virtual Box, Just Google how to install Ubuntu in Virtual box. There are many
articles regarding this and is very easy process.
Project 00 - Setup Linux development environment
4
Assumption :
I am assuming you are running Windows 7 or above and have not worked in Linux
environment ever. Pls follow the steps ahead.
Step 2 :
•
By Now you have Ubuntu installed in your Virtual box as a Virtual Machine.
•
Now we will do Virtual box settings so that Ubuntu Virtual Machine can access internet. We need
internet connection to install the Vim editor in Ubuntu VM.
Project 00 - Setup Linux development environment
5
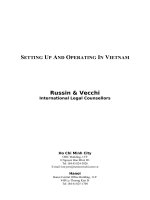
Using Virtualization software such as Virtual box , we can run another Operating
System as Virtual Machine on top of our host Operating system.
Ubuntu Applications
Ubuntu Virtual Machine
Virtual Box – just another application
Host OS – Windows/Mac/Linux
Actual Computer Hardware – DISK/RAM/CPU etc
Project 00 - Setup Linux development environment
Assumption :
6
I am assuming you are running Windows 7 or above and have not worked in Linux
environment ever. Pls follow the steps ahead.
Step 3 :
•
By Now you have Ubuntu installed in your Virtual box as a Virtual Machine and
we verified that you are able to access internet from within your Ubuntu VM.
•
Now login to your Ubuntu VM, open terminal (ctrl + alt + T)
•
We will install VIM as follows :
sudo apt-get install vim
•
install cscope tool. This tool helps you quickly browse and jump within your code from one place
to another. Screen will help to resume work from exact same place when you login next time.
sudo apt-get install cscope
sudo apt-get install screen
Project 00 - Setup Linux development environment
Some very basic Linux commands, if you are using linux shell for the first time
1. touch <file name>
-- create a new file
2. rm <file name>
-- delete existing file
3. mkdir <dir name>
-- create a new dir
4. rm –rf <dir name>
-- delete a dir and all its contents
5. cd
-- jump to your linux home folder
6. cd <dir path name> -- enter into dir path
7. cd ..
-- come out of current dir
8. pwd
-- see which dir path you are currently working in
9. sudo <cmd name>
-- to run any command which require administrative privileges
10. ls –l
-- list all files/dir in current dir
7
Project 00 - Setup Linux development environment
8
Some very vim commands, if you are using vim editor for the first time
1. vim <file name>
-- open a new/existing file in vim
2. i
-- enter into insert mode and start code
3. esc + :w
-- save file
4. Esc + :w <file name> -- save file with a new name
5. Esc + :wq
-- save and exit file
6. Esc /<string>
-- search a string in a file, press ‘n’ to jump to next matching string. Press
‘shift-n’ to jump to prev matching string
7. Esc %s/Hello/Bye/gci -- replace Hello with Bye in the file with confirmation from user each time.
8. Explore more on your own, don’t over burden yourself, there are 100s of VIM functionalities. Just
learn few of them as above to get started.
Project 00 - Setup Linux development environment
9
Some more vim settings:
Open .vimrc file in vim and copy paste the below lines :
vm@vm:~$ pwd
/home/vm
vm@vm:~$ vim .vimrc
filetype plugin on
set number
set smartindent
set tabstop=4
set shiftwidth=4
set expandtab
set hlsearch
Save and exit the .vimrc file
:wq
Note : All files starting with dot are hidden
files and are not listed when “ls –l” cmd is
invoked.
Use “ls –la” to see hidden files as well.
In vim, simply selecting a text with mouse
is equivalent to copy
Simply right click = paste
Project 00 - Setup Linux development environment
10
• Also, download c.vim file from and copy it in ~/.vim/plugin folder
• c.vim file will customize your VIM editor automatically for C programming
• />
Working with Screen
/>(Resource 3)
All you need are :
1.
2.
3.
4.
5.
6.
7.
8.
9.
10.
screen –S <create a new screen>
Press ctrl-a , release ctrl-a and then press only d -- detach the screen
screen –ls -- list the screens
screen –d –r <screen name> -- re-attach to the existing screen
Press ctrl-a , release ctrl-a and then press only c -- create a new subscreen within screen
Press ctrl-a , release ctrl-a and then press only n -- jump to next subscreen
Press ctrl-a , release ctrl-a and then press only p – jump to previous subscreen
Press ctrl-a , release ctrl-a and then shift-a
-- rename a subscreen
Press ctrl-a , release ctrl-a and then enter screen number
-- jump to particular subscreen
screen –X –S <screen name> quit -- destroy the screen permanently
Project 00 - Setup Linux development environment
11
Assumption :
I am assuming you are running Windows 7 or above and have not worked in Linux
environment ever. Pls follow the steps ahead.
Step 4 :
•
gcc C-compiler and gnu debuggers comes pre-installed with linux. So you need not do
anything else.
•
You may not be familiar with what VIM is. VIM is editor for linux. Industry use VIM all the time for
coding in linux. Pls spend some time – an hour or so to get comfortable with VIM.
•
Learn basic operation to start with. Do not go much deep into VIM functionalities. Its endless.
Project 00 - Setup Linux development environment
12
Access Your VM from Windows/Host OS directly.
You may want to access your Ubuntu VM directly from windows.
Install Mobaxterm personal edition in windows, the best ssh client I know so far
Let me take you through the steps to get this done.
Download home-Edition only.
/>TIP : After installing ssh in Ubuntu, you need to restart Virtual machine.
Project 00 - Setup Linux development environment
13
Assumption :
I am assuming you are running Windows 7 or above and have not worked in Linux
environment ever. Pls follow the steps ahead.
Step 5 : Git Installation
• Goto www.github.com and create your account.
• Create your first repository on the website.
• Install git into your Ubuntu VM
sudo apt-get install git
• Once the git is installed, run the below commands in terminal to configure git
•
•
•
git config --global user.name “Suresh"
git config --global user.email
git config --global core.editor vim
Project 00 - Setup Linux development environment
14
Assumption :
I am assuming you are running Windows 7 or above and have not worked in Linux
environment ever. Pls follow the steps ahead.
Step 6 : Get Familiar with git
•
Git is not that simple, but you should explore git to the extent that you can work with your
projects on git. Since, you are a single user and no other person is working on your projects,
very minimal git operations you need to know to work with git with ease.
•
This one time pain would worth. Git is the strongest proof that you are the fine developer and it
shouts aloud to hiring managers to hire you. It showcase all your work to the entire world.
Project 00 - Setup Linux development environment
Most used git commands
1. git add file1.c file2.c . . .
Move the file from working area to staging area, i.e. changes are ready for commit.
Also, add newly created file to git when new files area created.
2. git checkout -- file1.c file2.c …
Discard all the changes in the file in working area
3. git RESET HEAD file1.c file2.c . . .
discard and remove all the changes made in the file from staging area. File is reset to last committed version
4. git rm file1.c file2.c . . .
Mark the file for deletion. From git perspective, deleting a file is just another normal change in a file.
5. git commit
commit all the staged files locally.
6. git push origin master
upload your all local commits to git servers
7. git clone />download the repository from git servers locally on your machine
8. git diff – [staged | cached]
That’s all.
We are good to go to work on
Our first linux project.
Best of luck buddy.
Computer Science is so fascinating, but only if you learn it right way.
15
16