The Adobe Photoshop Layers Book- P5 pps
Bạn đang xem bản rút gọn của tài liệu. Xem và tải ngay bản đầy đủ của tài liệu tại đây (4.49 MB, 30 trang )
The Adobe Photoshop Layers Book
94
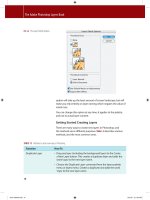
This Hue/Saturation technique can be used in a variety of
combinations of masking and color range selections, making it
a very versatile tool. You might, for example, consider making a
change to the center of the ower by choosing another color to
edit on the Hue/Saturation screen, creating another range using
the sampling tools, and making an adjustment. You may need to
combine this with additional masking to achieve the result you are
looking for (Figure 4.15). For example, if you set the color range and
make a hue adjustment, and it changes other parts that you don’t
want it to, you can easily block the changes by adjusting
the mask.
Masking in this case allows you to make a change, and then
localize the change to the area you want corrected. This is just a
small hint as to the enormous power of masking. Hold on to
that image, there is more to come as we work on soft-focus
e ects.
FIG 4.14 The initial click sets the standard range, the click-and-drag samples a range of color
to add to the initial sample.
Ch04-K52076.indd 94Ch04-K52076.indd 94 6/20/07 9:44:21 PM6/20/07 9:44:21 PM
Masking: Enhanced Area Isolation
95
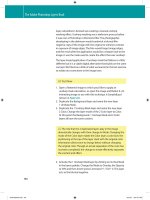
FIG 4.15 Because there is a lot of yellow in the eye of the ower,
it is virtually impossible to isolate the change by a color range
selection alone. Adding masking to the Hue/Saturation can easily
limit the change to just the center of the ower.
Ch04-K52076.indd 95Ch04-K52076.indd 95 6/20/07 9:44:23 PM6/20/07 9:44:23 PM
The Adobe Photoshop Layers Book
96
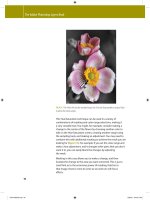
Add Soft Focus
While there are certainly parts of this image that are in focus,
the very shallow depth of eld and lighting make the nature of
this image a little soft. I nd it is usually better to go with the
ow, and not try to force a softer image to pretend to be tack
sharp. There are ways to make this image look sharper, and we’ll
look at that a bit later. Enhancing the soft focus may be the
more natural and helpful in making this particular image look
its best.
Soft-focus e ects are achieved photographically by scattering
light. You can use soft-focus lters and soft-focus lenses to achieve
the e ect, and a similar e ect can be had by using a UV lter and
smearing the outer edge with Vaseline while leaving the center of
the lens clear. The latter may seem like quite a sloppy solution, but
the reasoning is all the same: disburse some of the light passing
into the lens and di use it.
To have light you have to have brightness. That is, darker parts
of your image will tend to have less light to disburse, and lighter
parts will have more. The logical solution for creating soft-focus
e ects would be to make a selection of image content based on
brightness and then copy that to its own layer and blur and that
is exactly right. You might follow this up using layer opacity to
control the e ect, and perhaps layer modes to re ne the e ect
you want.
That is the general idea, although it may be a slight bit
oversimpli ed (technically, you probably want to make this
adjustment separately for each component of light, RGB).
Following this logic, we can look at a slightly more advanced and
satisfying result for this image. Remember that we have already
blurred the background, and maybe we want to contain
further blurring and e ects. We can do that by compounding
masks.
Try It Now
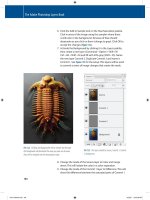
1. Create a composite layer at the top of the layer stack and name
it 10 Composite Color Enhancements (see
Figure 4.16).
Ch04-K52076.indd 96Ch04-K52076.indd 96 6/20/07 9:44:26 PM6/20/07 9:44:26 PM
Masking: Enhanced Area Isolation
97
2. Once again, load the mask we made for the owers as a
selection. You can do this in a variety of di erent ways, but – as
we haven’t done it quite this way – hold down the Command /
FIG 4.16 Using one layer for the spot corrections early on and adding the color change for the
eye of the ower, there are currently 10 layers in this image including the new composite. You
may have fewer or more layers depending on the choices you made in processing.
Ch04-K52076.indd 97Ch04-K52076.indd 97 6/20/07 9:44:26 PM6/20/07 9:44:26 PM
The Adobe Photoshop Layers Book
98
Ctrl key and click on the mask for the Levels or Hue/Saturation
layers created in the previous section.
3. Copy the content of the 10 Composite layer to a new layer
using the selection you just loaded. Copy and Paste will work,
as will CommandϩJ / CtrlϩJ. Name the new layer 11 Copied
Composite Using Blurred Manual Mask, or similar name.
4. Blur the content of the 11 Copied Composite layer using
Gaussian Blur and a radius of 30 pixels. This will turn the image
to a horrible blurry mess – however, this is not the immediate
goal.
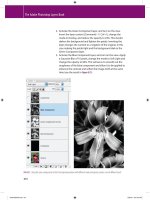
5. Open the Channels palette (WindowϾChannels). This shows
a display of the RGB information for the image at a glance
(See
Figure 4.17).
FIG 4.17 The palette controls and options for the Channels palette are very similar to the Layers
palette but Channels are quite a di erent animal, representing the RGB light components of the
current image composite.
6. Hold down the Command / Ctrl key and click the thumbnail
for the Green channel in the Channels palette to load it as a
selection.
Ch04-K52076.indd 98Ch04-K52076.indd 98 6/20/07 9:44:27 PM6/20/07 9:44:27 PM
Masking: Enhanced Area Isolation
99
Green is at the center of the visible spectrum and as such
shares similarities to what we might expect to see as a luminous
conversion to black and white, so that is why it is being used.
Other channels could be an option as could Luminosity, which is
a component of LAB mode. We’ll look at Luminosity advantages
later in this book.
7. On the Layers palette (you can close the Channels palette if
you want), be sure the 11 Copied Composite layer is active,
and then click the Add Layer Mask button at the bottom of the
Layers palette. This will create a mask for the layer using the
Green component. This will block the soft-focus e ect in darker
portions of the image.
8. Lower the opacity of the 11 Copied Composite layer to 50%.
This will allow you to see through the blurring even more.
9. Duplicate the 11 Copied Composite layer and change the
mode to Softlight, then name the layer 12 Duplicated Copied
Composite. This added layer will enhance the soft focus e ect.
The last few steps in the procedure here both lower the e ect of
the blur by masking and use of opacity, then increase the contrast
to compensate for some of the dynamics lost in the blur (Softlight
mode). You can further control this e ect by making adjustments
to the layers you added using Opacity or Modes, increasing/
decreasing the amount of blur, or changing the masking (e.g., for
variations you could use the Red channel for the mask instead of
the Green, or load the mask before making the blur).
This image has come quite a way already, but there is still a ways
to go. Be sure to save it o at this point so you can continue with
the corrections in the next section. Try toggling the views on and
o for the 11 Copied Composite and 12 Duplicate Copied
Composite layers just to see the di erence before and after the
soft-focus addition. You can also compare before and after for the
whole process (see the Before and After sidebar).
Before and After
There are several di erent ways to compare before and after. Here are three di erent ways:
1. Toggle o the views for all other layers than the Background layer. To do this, you can click-and-drag the
cursor over the Layer Visibility Indicators in the layers palette.
Ch04-K52076.indd 99Ch04-K52076.indd 99 6/20/07 9:44:28 PM6/20/07 9:44:28 PM
The Adobe Photoshop Layers Book
100
2. Use the History palette to toggle between the original and current state of the image by clicking the
appropriate states. Click the snapshot at the top of the palette to return to the original state, and the last
item in the History to return to the current state (see Figure 4.18).
3. Duplicate the Background layer and drag the duplicate to the top of the layer stack. Name it Before, and
toggle the view as needed.
Any of these methods will work, depending on how you like to work and how you use layers, some methods
may prove convenient at di erent times.
FIG 4.18 The History palette only retains as many states as you have entered in the preferences, but it does maintain the initial state of
the image as well. Toggle between the initial state and the last one on the list to see before and after.
Ch04-K52076.indd 100Ch04-K52076.indd 100 6/20/07 9:44:28 PM6/20/07 9:44:28 PM
Masking: Enhanced Area Isolation
101
Color Enhancements
Color enhancements for this example image come in two types:
enhancement of natural color as we looked at earlier in this chapter,
and enhancement by addition which we’ll look at here. In this image,
adding some muted color to the additional objects in the scene like
the stems and buds in the background will make them seem less
distant, and more a part of the image, while giving the image a little
more dynamics overall. We’ll take a look at this color adjustment and
how to do it with layers by painting in color enhancements.
Try It Now
1. Create a new layer at the top of the layer stack and call it 13 Green.
2. Choose the paintbrush tool and a small soft brush, then double-
click the foreground color swatch on the tool bar and choose a
green (I chose RGB: 15, 120, 20). Lower the opacity of the brush to
50%. A 50% brush opacity will layer color as you apply it, yielding
density changes that may prove pleasing in the nal result.
3. Paint on the 13 Green layer over the areas of the image that you
think should be green. I painted over the buds and stems to the
left. Don’t worry about the coverage being 100% or whether it
is completely even – in fact you may not want it to be (see the
comments after the exercise).
4. Apply a Gaussian Blur to the layer, just a few pixels (5 or so).
This will smooth out and blend in the color.
5. Set the layer to Color mode and adjust the Opacity until it
seems pleasing.
6. Add a Hue/Saturation layer as a clipping layer grouped with
the 13 Green layer and try variations on the color (adjusting
Saturation and Hue sliders) to see if there is a shade you like
better.
Add color to additional areas of the image if you wish like the
petals, or consider layering color. For example, in this image I used
yellow to create some highlights, blue complements may have
worked as well. Add a new layer for each of these colors so you can
control opacity and blur separately. In fact you may want to add
color in layers, using several layers for individual colors to allow
varying opacity, blur and modes.
You may also want to experiment using multiple layers, layer
modes and brushes. For example, I often use the Fade control and
Ch04-K52076.indd 101Ch04-K52076.indd 101 6/20/07 9:44:30 PM6/20/07 9:44:30 PM
The Adobe Photoshop Layers Book
102
other brush dynamics for size to taper brush strokes and apply
other randomizing brush e ects. While the layers themselves are
acting as masks by locating color to those spots where the brushes
are applied, layer masks can be added in addition to con ne
application areas. There is a lot of room for creative application and
we can’t possibly cover it all, but we will look at it again in several
other exercises as we go.
Sharpen and Enhance Contrast
Sharpening an image is sometimes understood as an action or
application of lters done to magically make an image appear to
be more in focus. That is not entirely the way it goes. Sharpening
is meant to enhance edge contrast and detail that already exist
in an image. This means enhancing the sharpness that is already
in the image. If an image is utterly out of focus, soft and blurry,
then there are no strong edges, nothing to sharpen, and applying
some means of sharpening may actually end up making the image
worse – depending on how the sharpening is applied and at what
strength. The goal of sharpening is not really to snap an out-of-
focus image into sharpness.
Sharpening will do several things very well. It will:
• enhance the appearance of sharpness already in an image to
make it appear even sharper,
• it can enhance edges in images that are going to print to help
counteract dot gain (where ink bleeds into the paper and softens
images),
• enhance existing contrast.
On the negative side, sharpening can also:
• cause edges to exhibit haloing, where edge contrast is enhanced
too much and appears to create a glow around edges (see
Figure 4.19);
• cause image damage by blowing out highlight detail (making
color run to absolute white) or blocking up shadow detail
(making color run to absolute black).
The upshot is that sharpening can do just as much harm as good
if you use it incorrectly. We’ll look at best practices for using the
Unsharp Mask, and how to use it for both enhancing sharpness
and enhancing image contrast. Later we’ll look at a much di erent
Ch04-K52076.indd 102Ch04-K52076.indd 102 6/20/07 9:44:30 PM6/20/07 9:44:30 PM
Masking: Enhanced Area Isolation
103
FIG 4.19 When images are oversharpened, they may display noticeable haloing on hard
edges that appears as an unnatural glow. In this case, with rather extreme settings, a dark halo
appears around the ower petals, the edges of the petals blow out, noise is enhanced and
detail lost.
means of sharpening by combining several techniques that we
have already looked at.
The basic application of the Unsharp Mask attempts to enhance
the apparent sharpness of an image. This can work wonders in
some images that are already reasonably sharp, and can work well
with ne detail like fur. Continue working with the image we’ve
been using throughout this chapter.
Try It Now
1. Create a new layer at the top of the layer stack, call it 14 Unsharp
Mask.
2. Copy the visible content to the layer by pressing
CommandϩOptionϩShiftϩE / CtrlϩAltϩShiftϩE. The unsharp
mask will need to be applied directly to the image content.
Unsharp Mask
The Unsharp Mask lter
causes a lot of confusion
because of its name. It seems
incongruous that a lter
called ‘unsharp’ is used for
sharpening image.
The name unsharp comes
from darkroom practice. A
blurred, inverted copy of a
negative was sandwiched
with the original to create an
edge mask. During exposure
in the darkroom, that ‘unsharp
mask’ was used to enhance
edge separation, increasing
the apparent sharpness of the
results.
The Unsharp Mask lter
attempts to mimic the results
of this type of masking using
a digital calculation.
Ch04-K52076.indd 103Ch04-K52076.indd 103 6/20/07 9:44:30 PM6/20/07 9:44:30 PM
The Adobe Photoshop Layers Book
104
3. Open the Unsharp Mask lter (FilterϾSharpenϾUnsharp
Mask).
4. In the dialog, set the Amount to between 50% and 100%, the
radius to between 1 and 3 pixels and the threshold to 0.
Higher amount and higher Radius will a ect more pixels
more intensely. The settings noted here work with most
images (4–8 megapixels). Use higher Radius and Amount
settings for larger images.
5. Click OK.
Depending on your settings and how you have handled the image
thus far, sharpening may have given you pleasing, somewhat
pleasing, or sorta ornery results. The fact is that very little of this
image will need sharpening, and because of the nature of the
image and added noise, you may actually experience unpleasant
enhancement of noise. Sharpening does not play favorites, it
enhances everything in the image.
Your choices are to use the same measures we’ve been looking
at throughout this chapter to control the result: use masking or
opacity. Here it may be best to mask the change to the parts of the
image that bene t most: the eye of the ower.
Try It Now
1. Be sure the 14 Unsharp Mask layer is active, and click the Add
Layer Mask button at the bottom of the Layers palette. This will
add a mask to the layer.
2. Fill the mask with black. You can do this by using the Paint
Bucket tool with black as the foreground color, or choose Fill
from the Edit menu and use Black as the Content.
3. Choose the brush tool and a medium-soft brush, change the
foreground to white (press D with the mask thumbnail active),
and paint over areas you would like to selectively sharpen (in
following the exercise that would be over the eye of the ower).
Painting white into the mask reveals those areas.
Another means of applying Unsharp Mask is using a smaller Amount
(10–30%) and broader Radius (50–100 pixels). This will enhance
An Alternative to Layer
Masking
There is an alternative to
applying a layer mask that
yields identical results, but
can sometimes come in
handy: using a clipping layer
instead of a mask. Try using
clipping groups instead of
standard layer masks:
1. Activate the Unsharp Mask
layer by clicking on it in
the layers palette.
2. Create a new layer by
clicking the Create New
Layer button on the layers
palette. Call it Unsharp
Mask Masking.
3. Press Commandϩ[ / Ctrlϩ[
to move the new layer
below the sharpening
layer.
4. Activate the Unsharp Mask
layer again by clicking it
in the layers palette and
press CommandϩShiftϩG
/ CtrlϩShiftϩG (this was
CommandϩG / CtrlϩG for
Photoshop CS or earlier).
This creates a clipping
group from the Unsharp
Mask and Unsharp Mask
Masking layer.
5. Choose the paintbrush
tool, your brush and apply
it to the Unsharp Mask
Masking layer to reveal the
sharpened contents of the
Unsharp Mask layer.
With this type of masking it is
the solidity of the lower layer
(rather than the tone of the
mask) which controls what
can be seen.
Ch04-K52076.indd 104Ch04-K52076.indd 104 6/20/07 9:44:32 PM6/20/07 9:44:32 PM
Masking: Enhanced Area Isolation
105
the local contrast in your image. This can often work well with
images that seem a little at, but can still be abused and may lead
to trouble. There are other techniques that we will look at in later
chapters using layer modes that will also enhance local contrast.
Local contrast is part of how objects and colors play against
one another. Enhancing local contrast is not as radical as atly
enhancing contrast in an image as it depends on object and
color proximity.
Additional Manual Sharpening
One thing you will be able to do here (for practice, fun, learning
and if you have the time) is to try and sharpen up the edge of
some of the petals which seem soft. Much of this is an artistic
decision, but one that relies on a simple idea: lack of sharpness is
apparent where edges are blurry. Fix the edges and you improve
the sharpness of the image.
A manual way to enhance edges and create sharpness where
it seems to be lacking is to paint in new edges using our Clone
Stamp and Healing layers.
Try It Now
1. Create a new layer at the top of the layer stack and call it
15 New Edges. This will be used to hold your new adjustments.
2. Choose the Clone Stamp, and a brush that is relatively
hard – relative to the image. For this image I set the brush
hardness to 80% and chose a brush of 45 pixels without brush
dynamics (uncheck other dynamics options in the Brushes
palette).
An absolutely hard brush will make an absolutely hard new
edge, a softer brush will make a softer edge; 80% seems to
work well with this image because it enhances the look of the
edge without seeming impossibly sharp in comparison.
3. Sample from another portion of the petal, and then use that
sampled to stamp a new edge in the areas where you want the
petal to be sharper (see Figure 4.20).
Ch04-K52076.indd 105Ch04-K52076.indd 105 6/20/07 9:44:32 PM6/20/07 9:44:32 PM
The Adobe Photoshop Layers Book
106
FIG 4.20 Applying the Clone Stamp allows you to make a new
harder edge that seems to have more focus, and applying
Healing next to that allows you to seamlessly blend in the
new edge.
Ch04-K52076.indd 106Ch04-K52076.indd 106 6/20/07 9:44:33 PM6/20/07 9:44:33 PM
Masking: Enhanced Area Isolation
107
4. Create a new layer for the Healing tool and blend in the new
edge by applying Healing to the area between the new edge
and the petal. This brush can be about the same as the one
chosen for the Clone Stamp but should be 100% hard.
Figure 4.20 shows the technique described in steps 3 and 4 and
the immediate result of the edge creation. Continue to build and
blend. You can do this right on the same Clone Stamp and Healing
layers. See the before and after in Figure 4.21.
FIG 4.21 Applying the Clone Stamp allows you to make a new harder edge that seems to have more focus, and applying Healing next to
that allows you to seamlessly blend in the new edge.
Summary
Throughout this rather rambling exercise you have looked at many
implementations of layers and masking and the type of separation
and application advantages they provide in a real world situation.
Six desired adjustments have led to a plethora of changes, and 19
layers in my sample image (see Figure 4.22). The resulting layers can be
perused if you open the Sample2_complete.psd image on the CD.
Ch04-K52076.indd 107Ch04-K52076.indd 107 6/20/07 9:44:36 PM6/20/07 9:44:36 PM
The Adobe Photoshop Layers Book
108
Throughout this chapter, we have looked with some depth at a
variety of ways masking is applied in images. The basic concept is
indeed ‘masking hides’ but it can hide and reveal and becomes a
particularly powerful tool when used in combination with layers
for the purpose of corrections.
What can be a mask?
• Layer content: It masks what is below in the layer stack.
• A clipping group: It masks what is grouped above based on layer
content.
• Layer Opacity: This will allow you to mask the intensity of how an
upper layer supersedes content below in the layer stack.
• Layer Mode: This will allow you to vary the means by which how
an upper layer combines with layers below (we’ll look at this in
more depth later), e ectively masking change.
• Selection: It masks changes so they are applied to the selected
area only.
FIG 4.22 Layer stack may di er from the one shown here depending on the steps you have chosen to include throughout this chapter and
how you chose to handle them, but the results should be similar.
Ch04-K52076.indd 108Ch04-K52076.indd 108 6/20/07 9:44:39 PM6/20/07 9:44:39 PM
Masking: Enhanced Area Isolation
109
FIG 4.22 (Continued) Depending on what choices you have made (e.g., how you handled
cloning changes and color additions) you may have more or fewer layers than shown here.
• Layer masks: They mask the portions of the layer they are
associated with. Black hides, white reveals, gray hides as a
percentage gray or as a semi-transparent mask.
• Adjustment layer settings: These can target a color or tonal
range.
• Channels: These store layer masks and selections, but can
become masks themselves.
Ch04-K52076.indd 109Ch04-K52076.indd 109 6/20/07 9:44:42 PM6/20/07 9:44:42 PM
The Adobe Photoshop Layers Book
110
And there are more advanced masking options left to dig into,
like Blend If. The real challenge is to take some of what you have
learned about masking in layers and apply it to your own images.
It isn’t so important to remember the various means of masking
or even the terms. What is important is that masking is a layer
property, and you can use it instead of erasing image details, or
instead of applying changes directly. Either erasing or applying
directly end up permanently obliterating, which is directly
opposed to the advantages of non-destructive editing as we
intend to explore it in this book. In short, use masks, not the eraser.
Keep in mind that the corrections list you develop for each photo
drives your layer creation and the steps you take in making
adjustments to your images. Creating the list of what to correct
takes a disciplined eye. Some image needs will be obvious, and
others may be found as you work through corrections. For now, if
you start making those lists in your mind and on paper every time
you look at an image, you will begin to see your work ow layout
before you like a map. Hopefully with layers you can make all the
topographical lines t together without much trouble. Think about
what you are doing with each step, and help yourself with later
adjustments by letting layers de ne the order of changes in the
image.
If you get stuck at any time and have questions, visit
!
Ch04-K52076.indd 110Ch04-K52076.indd 110 6/20/07 9:44:43 PM6/20/07 9:44:43 PM
111
CHAPTER 5
Applying Layer E ects
S
omewhere just beyond isolating objects into their own layers
and more advanced blending lies the genus of layer-based
e ects. E ects encompass a broad range of enhancements and
adjustments from solid color lls and stroked outlines, to drop
shadows and bevels, to combinations of these that create more
complex layer styles. Application can be wild e ects (often
used with type, see Figure 5.1) to more moderate doses that add
separation between image objects and subtle image enhancement.
FIG 5.1 A fairly simple application of
standard styles can radically change the
appearance of type.
Ch05-K52076.indd 111Ch05-K52076.indd 111 6/21/07 5:00:01 PM6/21/07 5:00:01 PM
The Adobe Photoshop Layers Book
112
It is useful to know what Styles and E ects are, where to nd them,
how to apply them and how they act. Further utility comes from
methods for using and controlling these e ects using multiple
layers, Fill and Opacity controls, Global Settings and considering
application of manual e ects – which leads nicely into other topics
of correction.
Styles are akin to lters in that you can waste hours and hours
applying and adjusting them, then undoing and applying again.
It can become addictive when doing creative projects. However,
there is a practical side to styles, and we’ll look at an overview of
e ects in this chapter from a standpoint of practical application
in image enhancement and touch on the implication for broader
creative e ects.
The Basics of E ects and Styles
The di erence between Styles and E ects is that E ects are the
separate functions that can be applied to a layer, and a Style is a
preset for any E ect or combination of E ects. There are 10 total
e ects (Table 5.1).
Drop Shadow Adds a shadow on the outer perimeter of
the layer content. A ects only the content
in layers below the current layer content.
Inner Shadow Adds a shadow inside the perimeter of the
layer content. A ects only the content of
the current layer.
Outer Glow Adds a glow around the content of the
layer where it is applied. A ects only the
content below the current layer.
TABLE 5.1 The basics of E ects and Styles.
Ch05-K52076.indd 112Ch05-K52076.indd 112 6/21/07 5:00:05 PM6/21/07 5:00:05 PM
Applying Layer Effects
113
Inner Glow Adds a glow inside the content of the
layer where it is applied. A ects only the
content in the current layer.
Bevel and Emboss Adds highlights and shadows to a layer
to a ect a raised (Up) or lowered (Down)
appearance. Can be used in several
modes, including Outer Bevel (applied to
the outer perimeter a ecting only layers
below), Inner Bevel (applied to the inner
perimeter a ecting only the current layer),
Emboss (applied as both Inner and Outer
bevels), Pillow Emboss (applied as Inner
Bevel Up and Outer Bevel Down) or Stroke
Emboss (applied to Strokes e ects only).
Satin Applies shading to the inner perimeter
of the layer. Supposed to give a satin
look.
Color Fills the layer content with a color. A ects
only the current layer.
Gradient Fills the layer content with a gradient.
A ects only the current layer.
Pattern Overlay Fills the layer content with a pattern.
A ects only the current layer.
Stroke Strokes the outline of the current layer
content using color, a gradient or a
pattern.
TABLE 5.1 (Continued)
Ch05-K52076.indd 113Ch05-K52076.indd 113 6/21/07 5:00:06 PM6/21/07 5:00:06 PM
The Adobe Photoshop Layers Book
114
Photoshop has a set number of E ects (see the list of E ects), and
comes with a few canned/prefabricated Styles that you can apply
just by choosing an e ect from a menu. Styles can be created
and saved, or you can download them from the Internet or buy
collections and load them to apply at will. These canned styles
work well usually for more creative applications, and far less
frequently for enhancements. The list of Styles currently loaded
can be found on the Styles palette.
Try It Now
1. Open the Sample3.psd image on the CD.
2. Click on the Wild Type E ectz layer in the layers palette if it is
not already active.
3. Choose Styles from the Windows menu to open the Styles
palette (see Figure 5.2).
To nd Style names, roll your cursor over the styles one-at-
a-time. You can also view the names of the styles in the palette
by choosing Text, Small List or Large List from the Styles
palette menu. Text is text only; Small List and Large List are
text and thumbnail preview combinations.
FIG 5.2 The Styles palette shown here has the default Styles. To return to the defaults, choose Preset Manager from the Styles Palette menu,
and Reset Styles from the Preset Manager menu
4. Locate the Style named Chrome Satin, and apply it by clicking
the thumbnail.
Ch05-K52076.indd 114Ch05-K52076.indd 114 6/21/07 5:00:08 PM6/21/07 5:00:08 PM
Applying Layer Effects
115
Really that is all there is to applying a style: locate and click.
However, there is a little more to working with the styles as we’ll
see. In the following steps we’ll add another E ect to the existing
Style.
5. Choose Inner Glow from the Add a Layer Style menu located
either at the bottom of the Layers palette, or o the Layers
menu (LayerϾLayer StylesϾInner Glow). This will open the
Layer Style dialog (see
Figure 5.3).
FIG 5.3 The Inner Glow Style to the left
of the Layer Style dialog will be checked
and highlighted. The Inner Glow options
will be displayed at the center of the
screen.
6. Change the Blend Mode to Color Burn, and change the color
to Red (RGB: 255, 0, 0). This will intensify and burn in the red
at the edge of the letters. To change the color to Red, click the
Set Color of Glow swatch in the Structure panel and choose the
color in the Color Picker that appears.
You can experiment with other settings, but at this point you have
replicated the results from Figure 5.1. To see how each of the E ects
is contributing to the result of the Style you have applied, uncheck
the box next to the E ect at left to toggle the view. To adjust the
settings for any of the E ects, just click the name of the E ect to
reveal the options, and change them as desired. For example, if
you change the Gradient Overlay from –90º to 180º, you will get a
much di erent e ect (see Figure 5.4).
Ch05-K52076.indd 115Ch05-K52076.indd 115 6/21/07 5:00:09 PM6/21/07 5:00:09 PM
The Adobe Photoshop Layers Book
116
FIG 5.4 Changing the options for any of the E ects will change the result for the Style accordingly.
Separate e ects within the style can be managed with a click
from the Layers palette, just like they were separate layers. In the
layers palette, each e ect within the style applied to your layer
has a visibility toggle (see Figure 5.5) that you can use to shut o
the view for individual e ects, or the whole grouping of e ects
FIG 5.5 Just click the visibility toggles on individual e ects to manage them from the layers palette.
Ch05-K52076.indd 116Ch05-K52076.indd 116 6/21/07 5:00:10 PM6/21/07 5:00:10 PM
Applying Layer Effects
117
(for the latter use the E ects visibility toggle for the layer). Shut o
the Bevel and note the di erence in the e ect on the image. You
can toggle the e ect to see, but in the end, leave the visibility for
that particular e ect o .
This hardly scratches the surface of what styles can do, and
hopefully from the fact that you made a small change in
one parameter and completely remade the style suggests
something about the potential for variety. Be careful with the
amount of time you devote to playing around with these and
experimenting and set a limit before hand, or you can lose hours
of what would otherwise be productive work time correcting
images.
Don’t close this le; you’ll need it in a moment.
I personally nd styles most useful for storing favored
settings. For example, I occasionally use a bevel e ect that
is sets both the Highlight and Shadow to black and multiply
in combination with the Inner Shadow e ect. I like the
opportunity the combination gives me to tune the beveling
e ect. Storing that as a style allows me to apply it with a click.
Likewise, you may nd half a dozen or so practical settings
for reuse, but Styles are more often a creative tool than a
correction tool.
Saving Styles
If you hit on a Style that you want to save and perhaps use in the
future, you can save the style. Not only that you can save style
libraries that you create for speci c purposes, or to help you
manage styles that you nd handy. Say, for example, you like the
e ect created for the type in Figure 5.4 in the previous section. You
can save the e ects as a style and store it for future use.
Try It Now
1. Double-click the E ect item in the layers palette under the layer
for the image you were just working on (see Figure 5.6). This will
open the Layer Style palette.
2. Click the New Style button at the right of the Layer Style palette.
This will open the New Style dialog.
Ch05-K52076.indd 117Ch05-K52076.indd 117 6/21/07 5:00:15 PM6/21/07 5:00:15 PM
The Adobe Photoshop Layers Book
118
FIG 5.6 Double-click right on the item
named E ect directly below the layer
where the Style that you want to save
is applied.
FIG 5.7 Naming the Style may be the most di cult part of this exercise. Try to make the name
clarify what the e ect does, and feel free to name parameters/e ects used.
3. Name the new style by something that you will recognize, and
click OK (see Figure 5.7). Options at the bottom of the New Style
dialog allow you to save blending options (Opacity, Blend If,
Channel targeting) as well as the e ects. We’ll look more at
blending options in Chapter 7.
Now that you have stored the style, you can access it from the
Styles menu any time you need to.
Try It Now
1. With the previous image still open, click directly on the E ects
item and drag it to the trash at the bottom of the Layers palette.
This will remove the e ect from the image.
Ch05-K52076.indd 118Ch05-K52076.indd 118 6/21/07 5:00:15 PM6/21/07 5:00:15 PM