Adobe Dreamweaver CS3 Unleashed- P27 potx
Bạn đang xem bản rút gọn của tài liệu. Xem và tải ngay bản đầy đủ của tài liệu tại đây (911.6 KB, 50 trang )
The next few steps outline creating a new recordset to retrieve the Employees information as well as a
customized way to create a randomized order number.
Obtaining the Customer ID
Probably the most crucial piece of the puzzle is the session variable created when the user logs in. So far,
you've been adding items to your cart and modifying quantities without any concern for who is purchasing
them. If the user decided to purchase the items added to the cart, how would the application—or you the
merchant—know to whom to send the final merchandise? Retrieving and setting that information in the
checkout page allows us to process that information and eventually create an entry for that customer within
the Orders table. Before we jump ahead of ourselves, let's look at how to retrieve the user's information into
the checkout page:
1.
Before we create the recordset that will retrieve the data from the database based on the session
variable, let's create a new query in our database (Access/MySQL). (If you're using SQL Server, you
can create a new view.) To do this, open the vectacorp.mdb file located in the Database folder and
immediately switch to the Queries category. If you're using MySQL, you'd open MySQL Query Browser.
Alternatively, if you're using SQL Server 2005 Express Edition, you'd open Management Studio Express
Edition to create a new view.
2.
Select the Query Design option. The Show Table dialog appears.
3.
Select both the CreditCards and the Employees tables and click Add.
4.
Choose both the Employees.* and the CreditCards.* options from the field menus as shown in Figure
27.16.
Figure 27.16. Select both the Employees.* and the CreditCards.* options from the
field menus.
[View full size image]
5.
Save the query by choosing the Save As option from the File menu and typing EmployeesCreditCards
when the Save As dialog appears. Click OK to save the query.
6.
Close Access.
7.
With the checkout.asp page open, create a new recordset by choosing the Recordset option from the
Binding panel's Add (+) menu. The Recordset dialog appears.
8.
Name the new Recordset rsEmployee.
9.
Select the connVectaCorp option from the Connection menu.
10.
Select the EmployeesCreditCards option from the Table menu. This is the query that we just created in
Access.
11.
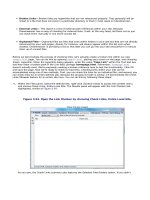
Create a new filter for Username and set that equal to the session variable MM_Username. The result is
shown in Figure 27.17. The MM_Username session variable is what's created when you log in; more on
this in the next chapter.
Figure 27.17. Create a new recordset for the customer. Also, add a filter that
retrieves the value from the MM_Username session.
12.
Click OK to create the new recordset.
13.
With the recordset created, drag all the appropriate bindings from the Bindings panel list into their
respective fields in the table. The result looks similar to Figure 27.18.
Figure 27.18. Drag all the data elements into their respective positions in the table.
[View full size image]
For simplicity's sake, we'll assume that Vecta Corp has credit card information on file. In a real-world
scenario, however, you would most likely add text boxes here and allow the user to enter them manually
before checking out.
Generating an Order Number
The creation of a randomly generated order number is always a good idea. This gives you a unique way of
distinguishing the vast number of orders that you will eventually receive. It also provides a way for users to
reference their orders if they ever need to contact you with a question or concern. You can create a
randomly generated number by inserting some simple ASP code into your page. To do so, follow these
steps:
1.
Place your cursor inside the cell that will display the order number and switch to Code view.
2.
Insert the following code:
%
Set oTools = Server.CreateObject("MSWC.Tools")
intNum1 = Abs(oTools.Random) Mod 9 + 1
intNum2 = Abs(oTools.Random) Mod 10
intNum3 = Abs(oTools.Random) Mod 10
intNum4 = Abs(oTools.Random) Mod 10
intNum5 = Abs(oTools.Random) Mod 10
intNum = (intNum1 & intNum2 & intNum3 & intNum4 & intNum5)
Response.Write(intNum)
%>
The result of the code insertion will resemble Figure 27.19.
Figure 27.19. The randomization code programmatically generates a five-digit number that we'll
store as an order number.
[View full size image]
You can test the randomized code by launching the employeestore.asp page in the browser. Find an item
and immediately add it to add to your cart. Click Check Out. As you'll see, the randomization code
programmatically generates a five-digit number. Every time the user comes to this page, the randomization
code kicks in and a new five-digit number is generated on-the-fly.
Writing to the Orders Table
The last order of business is to save all the information that the Shipping and Receiving department will
need into the Orders table. To fully process orders (accept credit card numbers, automatically transfer funds
to your bank account, and so on), you would want to integrate some third-party merchant software. For
simplicity's sake, however, you are going to write all the order information to the Orders database, allowing
the Shipping and Receiving department to extract the data as they see fit and process orders accordingly. A
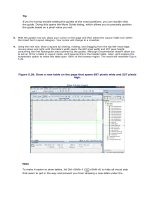
quick review of the Orders table, shown in Figure 27.20, shows the data for which you need to account.
Figure 27.20. The Orders table contains an ID from all the necessary tables.
A quick glance at the data within the table shows that only numeric values are present within the fields, and
not all of the fields contained within the checkout.asp page (name, address, city, state, and so on). The
beauty in relationships is that they let you account for the rest of the data items in a given page by using a
unique ID. Later, when you want to extract all the information from a given table, you look it up by the ID
contained in the Orders table. (This will make more sense toward the end of the section.) For now, let's
concentrate on checking out the user and subsequently writing that data to the Orders table. You can do this
by following these steps:
1.
Review how the information will be written to the Orders table: You will use the Insert Record
behavior, but remember that the Insert Record behavior requires form objects with data in them to
extract. You can solve this problem by inserting hidden form fields in the checkout.asp page. You will
need hidden form fields for the EmployeeID, ItemID, and Quantity fields. Insert new hidden form fields
by placing your cursor next to the Checkout button and selecting Insert, Form, Hidden Field. Name the
Hidden Form fields hiddenEmployeeID, hiddenItemID, and hiddenQuantity. The result is shown in
Figure 27.21.
Figure 27.21. Insert hidden form fields for the EmployeeID, ItemID, and Quantity
fields.
[View full size image]
Tip
It doesn't really matter where you put the hidden fields as long as they reside within the
form tag.
2.
Click the lightning bolt icon (binding) for each of the hidden fields in the Property inspector and point
them to their respective binding in the cart recordset. This action guarantees that the values are
written not only to the table cells, but into the hidden form fields as well. Although the ItemID and
Quantity hidden fields will be bound to the ProductID and Quantity bindings in the cart recordset, the
EmployeeID hidden field will be bound to the EmployeeID binding in the rsEmployee recordset.
3.
Now that the form fields are inserted, you can create your Insert Record behavior. Select Insert
Record from the Server Behaviors drop-down menu. The Insert Record dialog appears.
4.
Select the connVectaCorp option from the Connection menu. Select the Orders option from the Insert
into Table menu. Select the form1 option from the Get values from menu.
5.
Finally, notice how only the hidden form fields appear in the Form elements list box. Match up the
appropriate form objects with their respective field names in the Orders table, as shown in Figure
27.22.
Figure 27.22. Modify the Form elements list box to match up the hidden text fields
with the recordset field names.
[View full size image]
6.
Click OK to close the Insert Record dialog.
7.
Save your work.
8.
Open the employeestore.asp page and press F12 (Option+F12) to launch the page in the browser.
Select an item from the employeestore.asp page. You are redirected to the viewcatalog.asp page,
and the item appears in your cart.
9.
Click the Check Out hyperlink. You are redirected to the checkout.asp page. Finally, click the Check
Out button to process the order.
Now check the Orders table in the Access database to see the appropriate information written to the table.
If you open the Employees table, you will find that the user was, in fact, the user whose EmployeeID
appears in the EmployeeID column. If you open the EmployeeStore table, you will notice that the ItemID
selected is the ItemID that appears in the Orders table. Later, if you need to query the tables for products
and employees, you can filter the results based on the IDs that appear in the Orders table.
In the next chapter, we'll discuss security and authentication. In this chapter, we actually set the
MM_Username session variable that we reference throughout the chapter. Doing so enables you to display the
checkout.asp page and ultimately process the order for the appropriate logged-in user.
Chapter 27. Adding Shopping Cart Functionality
IN THIS CHAPTER
Creating the Employee Store Shopping Cart Using ASP
Creating the Employee Store Shopping Cart Using ASP.NET
Welcome to the chapter that covers the heart of all dynamic web applications: the shopping cart. Most
dynamic web applications are created for the sole purpose of making money on the web. Let's face it—why
go through all the work of creating a dynamic web application if you don't plan to make money through it?
Sure, companies employ dynamic intranet sites and granted, there are still some (although very few) free
web applications you can use. In the real world, however, dynamic web applications are created in an
attempt to make money by selling merchandise on the web. Providing the capability to add items to a
virtual shopping cart as you browse through a website is still very much a business that commands good
money. Companies such as VeriSign, WebAssist, and LinkPoint charge to provide developers with the
capability to add this virtual shopping cart functionality to their own websites. Fortunately for you,
Dreamweaver comes through by providing the capability to interact with shopping cart features by using
feature-rich extensions you can download right from the Adobe Exchange.
This chapter discusses the creation of an online shopping cart for the Vecta Corp application. The topics
covered in this chapter include the following:
A shopping cart definition
An overview of the UltraDev Shopping Cart
Installing the UltraDev Shopping Cart
Building the Employee Store shopping cart in both ASP and ASP.NET
Note
This chapter covers adding shopping cart functionality to the Vecta Corp site under only the ASP and
ASP.NET server models. In the ASP server model, we'll use the free UltraDev Shopping Cart server
behaviors suite, and the ASP.NET model covers building a shopping cart by hand. The UltraDev
Shopping Cart server behavior is but one example of a set of server behaviors for adding shopping
cart functionality to your web applications. If you're using the ColdFusion or PHP server models,
review the process as it's covered in ASP, then browse through the Adobe Exchange and pick out a
server behavior suite that outlines the topics covered here in your server model of choice. The goal is
not to pick ASP over other server models, but rather to demonstrate the overall functionality using a
free set of server behaviors in the UltraDev Shopping Cart that just happens to run only under the
ASP model.
As you've done with the rest of the chapters in this book, you can work with the examples in this chapter by
downloading the files from www.dreamweaverunleashed.com. Remember that you'll want to save the files
for Chapter 27 (not the folder) in the C:\Inetpub\wwwroot\VectaCorp<technology> directory, where
<technology> represents the server technology (ASP or ASPX) you plan to use. You should also make sure
that your site is also properly defined within Dreamweaver, including the appropriate server-side technology
you plan to use in the Testing Server category. For your convenience, the free UltraDev Shopping Cart
server behavior and patch are available as downloads from the website.
Creating the Employee Store Shopping Cart Using ASP
This chapter focuses on the UltraDev Shopping Cart server behavior. The next few sections provide you with
a brief description of shopping cart technologies, an overview of the Shopping Cart behavior, and finally,
how to integrate the Shopping Cart behavior with the Vecta Corp web application.
What Is a Shopping Cart?
The term shopping cart has been thrown around for quite some time now. But what exactly is a shopping
cart? We know a shopping cart to be the physical basket on wheels that you push around at a grocery store.
Think about why you use the grocery store shopping cart. You go to your local grocery store, you push
around the cart, and you add items from shelves as you see fit. When your shopping cart is full or you
decide that you are finished shopping, you push your shopping cart all the way to the front of the store to
the checkout counter. At the checkout counter, you provide your debit card, cash, or check to the cashier,
finish the transaction, and off you go. Sound familiar? The web is no different; rather than a physical
shopping cart, however, you are provided with a virtual shopping cart, which is little more than a client-side
cookie, server-side user session, or combination of both. A virtual table, if you will, that takes items you
request from the database and stores them in a temporary location (a cookie, a session, or both) until you
are ready to check out. If you decide that you want another item or more of the same item, you keep
adding to the cart. Similar to the grocery store checkout counters, virtual checkouts enable you to enter
your credit card information for purchase. The major difference is that, rather than you physically walking
away with the items, the items are conveniently mailed to your doorstep.
Most people think of shopping carts in the terms of the preceding example. But the same methodology is
used in websites such as Microsoft's Clip Art Gallery, iTunes, Photodisc, and more. These websites use the
same idea of a shopping cart, but rather than purchasing the items within your shopping cart, you download
them. Think of online shopping carts as a virtual table that stores information the user requests for
downloading or purchasing.
The UltraDev Shopping Cart
The UltraDev Shopping Cart (so named because of its original integration with Dreamweaver UltraDev) is
the perfect example of Dreamweaver's flexibility and extensibility in terms of shopping cart integration.
Written purely in JavaScript by Rick Crawford, the UltraDev Shopping Cart consists of some powerful
behaviors that enable you to create and manipulate merchandise within your web application. Aside from
the central UltraDev Shopping Cart server behavior, the UltraDev Shopping Cart server behavior suite
consists of the following functionality:
Add to Cart Via Form— Enables the user to select a form object within a page to manually insert an
item into the shopping cart.
Add to Cart Via Link— Enables the user to select a link within a page to manually insert an item into
the shopping cart.
Repeat Cart Region— Similar to the Repeat Region server behavior, the Repeat Cart Region repeats
a table with multiple contents.
Update Cart— Updates items within the cart using a form object contained in the shopping cart page.
Save Cart to Table— Enables the user to save the order to a database table so that an administrator
can later look through orders received for a particular day and mail out merchandise accordingly. This
is where the Vecta Corp database's Orders table comes into play.
Get Unique ID from Table— Enables the cart to dynamically retrieve a unique ID from a database
table.
Empty Cart— Selecting a link on the page empties the cart of its contents.
Redirect if Empty— Redirects the user to a different page if the shopping cart is empty.
The UltraDev Shopping Cart's functionality begins with the UltraDev Shopping Cart server behavior. Very
similar to a recordset, the UltraDev Shopping Cart allows for dynamic text binding within form objects,
tables, and so on. The UltraDev Shopping Cart server behavior is created in either the Server Behaviors or
the Bindings panel, again similar to the recordset. Shopping cart items appear within the drop-down list,
available by selecting the Add (+) button, along with the capability to bind the number of items within the
cart, the sum of the quantity of all items in the cart, and the sum of the prices of all the items in the cart.
Now that you have a firm understanding of what constitutes the UltraDev Shopping Cart, let's go over the
installation process.
Installing the UltraDev Shopping Cart
If you haven't done so already, you'll have to download the free UltraDev Shopping Cart and UltraCart Patch
for UD4 extensions from www.dreamweaverunleashed.com. After you've downloaded the extensions, unzip
the MXP files and double-click them one at a time to install them using the Adobe Extension Manager CS3 as
shown in Figure 27.1. The UltraDev Shopping Cart and UltraCart Patch for UD4 appear in the Dreamweaver
CS3 extensions list when installed successfully.
Figure 27.1. Install the Shopping Cart extension by double-clicking the MXP file, which is located
in the Downloaded Extensions folder.
[View full size image]
Note
You'll no doubt receive complaints from Adobe Extension Manager CS3 regarding the install of these
extensions that are nearly eight years old. Fear not, however; although Adobe Extension Manager
CS3 balks at the installation, rest assured that the installation will proceed and the extensions will
work flawlessly in Dreamweaver.
Integrating the Shopping Cart with the Employee Store
Now that the UltraDev Shopping Cart has been installed, you can access it from either the Server Behaviors
panel or the Bindings panel. The next few sections go over the UltraDev Shopping Cart in more detail as it
relates to the Employee Store application in ASP. You can begin by opening Dreamweaver if you have not
already done so already. Select the VectaCorpASP defined site, open any ASP page, and then click the Add
(+) button from either the Server Behaviors panel or the Bindings panel to reveal the UltraDev Shopping
Cart, as shown in Figure 27.2.
Figure 27.2. Select the Add (+) button to reveal the newly installed UltraDev Shopping Cart.
[View full size image]
Building the Employee Store Shopping Cart
Oddly enough, we build the Employee Store shopping cart starting with a View Cart page. The reasons for
this are simple: first, to demonstrate how the UltraDev Shopping Cart behavior is utilized, and second,
because it is the only page that uses the binding features within it. You can begin building the Employee
Store shopping cart by following these steps:
1.
Create a new page by selecting New from the File menu. Choose the Page from Template category,
choose the VectaCorpASP site, select the template titled template, and then click Create. The new
document window instance appears.
2.
Immediately save the page as viewcart.asp.
3.
Add the Shopping Cart behavior by clicking the Add (+) button and selecting the UltraDev Shopping
Cart option from the Bindings panel's submenu. The UltraDev Shopping Cart dialog appears.
4.
Although you'll need to customize certain options in this dialog, first and foremost, you must name
your cart. Like a recordset, it's best to name the cart something relevant to your site. For our
purposes, enter the name cartVectaCorp into the Cart Name text box.
5.
The next option after Cart Name is the Days text box. To store the information that users place in their
carts, a cookie is written to the user's computer. You can set the number of days to store the cookie or
select 0 for none. For now, enter 0. This setting guarantees that when the browser is closed, the user's
information is not stored. It is important to note that by setting the number of days you want to store
the cookie, you are essentially allowing users to come back and still have the same items inside their
carts. The cart does not empty until either the user physically empties it or the cookie expires.
6.
Define the columns the cart will use to store data in the Define Shopping Cart Columns list box. By
default, ProductID, Quantity, Price, and Total appear as fixed columns and cannot be removed or
modified. These columns are part of the functions used by the Shopping Cart behavior. Because the
default cart columns suffice for our example, leave this list box as is. After the list box is the Edit
Column Name and Compute By text box and drop-down menu. Should you need to create your own
custom column, name it here and choose how it should be computed (if it needs to be computed) from
the Compute By menu. For instance, the Total field multiplies the Price column by the Quantity column
to obtain a result. You can set these computations by hand for your custom columns using this
selection. When you are finished configuring the dialog, the result should look similar to Figure 27.3.
Figure 27.3. Configure your cart accordingly.
7.
Click OK to create the cart. The Bindings panel displays the cart, appearing similar to that of a
recordset. Notice that the names of the columns match the EmployeeStore table almost exactly. These
columns will eventually be read from the dynamic text inserted in the employeestore.asp page that
we created in Chapter 24.
8.
Now that you've created the shopping cart, you are ready to begin building the table that will display
the dynamic data. Begin by removing the text that appears in the Content editable region and replace
it with a new form by choosing Insert, Form, Form.
9.
Place your cursor in the form and choose the Table option from the Insert menu. Give your new table 4
rows, 5 columns, a width of 475 pixels, a cell spacing and cell padding of 1, and a border thickness of
0. Click OK to insert the new table into the form.
10.
Insert the captions Product #, Name, Quantity, Price, and Total into the cells of the first row of the
table. Select all the captions and make them bold. The result is shown in Figure 27.4. You might decide
to format the color scheme of the table to coincide with the color scheme of the Vecta Corp site. It's up
to you.
Figure 27.4. Create a new table that displays the items in the cart.
[View full size image]
11.
Drag the field names from the Bindings panel into the appropriate cells of the second row of the newly
created table, as shown in Figure 27.5.
Figure 27.5. Drag the shopping cart columns into the appropriate cells in the table.
[View full size image]
12.
To calculate the grand total of all the items in the cart, merge the three bottom-right cells, add the
caption Grand Total, and drag the sum[total] field from the Bindings panel into the table cell. The
result is shown in Figure 27.6.
Figure 27.6. Create a cell for the grand total and drag the column from the shopping
cart into it.
[View full size image]
13.
You can also format how the total appears within that cell by clicking the drop-down arrow from the
sum[Total] column in the shopping cart. From the Currency submenu, select 2 Decimal Places, as
shown in Figure 27.7.
Figure 27.7. Format the text in the cell to the Currency data type.
[View full size image]
Although it doesn't seem like we've accomplished much, believe it or not, the majority of the work is done.
The next few sections walk you through other options available in the Shopping Cart server behavior.
Repeating Cart Regions
Similar to the binding fields in a recordset, the UltraDev Shopping Cart displays only the first item added
unless you allow for regions to repeat. You can insert the Repeat Cart Region to accomplish this task. To
insert the Repeat Cart Region behavior, follow these steps:
1.
Select the entire second row of the table in the viewcart.asp page, similar to Figure 27.8.
Figure 27.8. Select the second row of the table.
[View full size image]
2.
Select the Repeat Cart Region behavior from the UltraDev Shopping Cart submenu.
Making Quantities Editable
You've probably noticed that the quantities are currently hard-coded, meaning that when the user adds an
item to the cart, the cart automatically inserts a single item. Rather than binding the Quantity column to the
table cell (as it currently stands), you can add a text box to enable users to modify the quantity value on
their own. Then by clicking an Update Cart button, users can change the quantities in the cart. You can add
this functionality by following these steps:
1.
Start by creating a new column in your cart table just after the Total column: Place your cursor in a cell
in the last column and choose Modify, Table, Insert Rows or Columns. When the Insert Rows or
Columns dialog appears, choose the Columns option button, enter 1 into the Number of Columns text
box, and choose the After Current Column option button. Click OK to create the column.
2.
With the new column in the table, you're now ready to insert a new button. This is the button users will
interact with when they want to update a quantity. To add the button, place your cursor in the newly
created cell (next to the cart.Total field) and choose Insert, Form, Button. Give the button the value
Update and make sure that the button is set to Submit.
3.
Create the text field that will display the quantities and ultimately allow the user to make edits. To do
this, start by removing the cart.Quantity binding from the Quantity column. Then insert a new text
field by choosing Insert, Form, Text Field. Name the text field txtQuantity and assign it a Char Width
of 5.
4.
Drag the Quantity binding from the cart bindings list in the Bindings panel into the Quantity text field,
as shown in Figure 27.9.
Figure 27.9. Bind the Quantity field to the new text box.
[View full size image]
5.
To get the cart update functionality to work, add the Update Cart server behavior. To do this, choose
the Update Cart option from the UltraDev Shopping Cart submenu available by clicking the Add (+)
button in the Server Behaviors panel. The Update Cart dialog appears.
6.
The Update Cart dialog enables you to specify the form and form object to use for the cart update as
well as a URL to redirect to after the update takes place. For our purposes, choose the form1 option
from the Form menu and select the txtQuantity option from the Form element menu. The result is
shown in Figure 27.10.
Figure 27.10. Configure the Update Cart dialog to handle your update.
[View full size image]
7.
Click OK.
When you've finished, the Update Cart server behavior appears in the Server Behaviors list and the form is
highlighted in blue (because it is an invisible element).
The viewcart.asp page is completely finished. You can now see all the items as you insert and update them
within the cart as necessary. The next step focuses on the most important part of the chapter: adding items
to the cart.
Adding Items to the Cart
So far, you've learned how to display the items contained in the cart. But you can't stop there. You need to
be able to add items to the cart before you can actually view them. This section introduces you to the Add to
Cart Via Form server behavior contained in the UltraDev Shopping Cart submenu.
As previously mentioned, there are two ways of adding items to the cart: Add to Cart Via Form and Add to
Cart Via Link. Because both do virtually the same thing, this section focuses primarily on the Add to Cart Via
Form server behavior. To add an item to the cart, follow these steps:
1.
Close the viewcart.asp page if you still have it open and then open employeestore.asp.
2.
To add items to the cart, you'll need to add a Button form element. This is the object that employees
will use to initiate the addition of the particular item to the cart. To do this, start by creating two new
rows under the current Cost binding: Place your cursor in the Cost cell and press the Tab key twice.
3.
Add a new form to the cell by choosing Insert, Form, Form. In that form, add a new Button form
element by selecting Insert, Form, Button. Change the value of the button to read Add to Cart. The
result is shown in Figure 27.11.
Figure 27.11. Insert a new form and then a form button to the newly created row.
[View full size image]
4.
Before we select the Add to Cart Via Form server behavior, we'll need to add an instance of the
UltraDev Shopping Cart recordset. Do this by switching to the Bindings tab, clicking the Add (+)
button, and selecting the UltraDev Shopping Cart option from the Bindings panel's submenu. The
UltraDev Shopping Cart dialog appears. Enter the cart name as cartVectaCorp and click OK.
5.
Insert the Add to Cart Via Form server behavior by selecting it from the UltraDev Shopping Cart
submenu, available by clicking the Add (+) button in the Server Behaviors panel. The Add to Cart Via
Form dialog appears.
6.
The dialog enables you to configure all the data items that will be sent into the cart. You can select the
form from which the data is coming, all the cart columns and their corresponding data elements in the
recordset, the actual recordset to use, and the URL to redirect to after the addition takes place. Before
we jump ahead, however, select the form1 option from the Form menu.
7.
You'll want to match up the corresponding cart items to their respective fields in the recordset. You can
do this by selecting a cart column from the Cart Columns list and then selecting the appropriate option
button from the group that appears just below the list. In our case, we'll want to select the Recset Col
option button and select the appropriate recordset field from the menu. The exception is the Quantity
column; for this column, use a numeric literal 1, guaranteeing that only one item is inserted at a time.
The following table illustrates the data elements to which you should point your cart columns. The
resulting dialog looks similar to Figure 27.12.
Figure 27.12. Configure the Add to Cart Via Form dialog, matching the appropriate
cart columns to their respective data elements.
[View full size image]
Cart
Column
Data
Element
Value
ProductID
Recset col
ItemID
Quantity
Literal
1
Name
Recset col
ItemName
Price
Recset col
Cost
8.
Enter the value viewcart.asp into the Go to URL text box and click OK.
Save your work and test the results in the browser by pressing F12 (Option+F12). Log in to the site and
navigate to the Employee Store link. Find an item to place into your cart and click the Add to Cart button.
You're immediately redirected to the viewcart.asp page where one item appears in your cart. Select the
Employee Store link in the navigation bar to be redirected back to the employee store page. Try adding a
different item. Again you're redirected to the viewcart.asp page, but this time two items appear in your
cart. Try modifying the quantity and then click the Update Cart button. Notice how the grand total changes
to compensate for the added quantity.
Checking Out the Customer
Now that the customer has selected items to order, the customer may want to continue with the purchase.
This section covers creating a checkout page so that a particular customer can verify items in the cart as
well as personal and credit card information.
Note
Notice that, throughout this section, there is no place for a customer to enter credit card information.
The reason for this is twofold. First, we store the credit card information when the user registers;
second, tying the cart to a third-party payment host is beyond the scope of this book and is therefore
not covered. This example supposes that the merchant (Shipping and Receiving) assumes
responsibility for running the credit card after the order has been processed. It's important to point
out, though, that a truly dynamic site would integrate some third-party online payment service such
as VeriSign or PayPal for automatic electronic payment deductions.
Creating the Checkout Page
When you're working with shopping carts, it's generally a good idea to provide a quick synopsis of the user's
information as well as a detailed overview of all the items the user is purchasing. All this data can be
integrated into a checkout page of some sort. On this page, you might also want to provide randomly
generated order numbers that users can reference whenever they contact your customer support
department. Another benefit to creating a checkout page is the capability for the user to track and print out
the summary as an invoice. You can create the checkout page for the employee store by following these
steps:
1.
Rather than creating a new page from a template in this case, we'll use the same viewcart.asp page,
save it as checkout.asp, and then create a new table under the existing cart table that represents the
checkout functionality. Open viewcart.asp if it's not open already and select Save As from the File
menu. Name the file checkout.asp and click Save.
2.
With checkout.asp open, add a new table with seven rows and two columns with the captions Order
Number, Employee ID, Name, Address, Credit Card, Number, and Expiration. Place this table directly
underneath the existing cart table. Format the table to match the color scheme you provided for the
cart table.
3.
Remove the Update Cart button and corresponding column. Also, remove the txtQuantity text field and
associated Update Cart behavior. Rebind the Quantity column as a dynamic text element. The result
will resemble Figure 27.13.
Figure 27.13. Remove the Update Cart functionality including Update Cart behavior,
Text Box, and Update Cart button and rebind the cart.Quantity field to the table's
cell.
[View full size image]
4.
Place your cursor just after the newly created table and add a Submit button by choosing Insert, Form,
Button. Give it the text value Check Out and leave the Action as Submit. The result is shown in Figure
27.14 (shown with Invisible Elements turned off so that you can clearly see the table structure and
scheme).
Figure 27.14. Add a form Submit button to the page.
[View full size image]