Building XNA 2.0 Games- P8 potx
Bạn đang xem bản rút gọn của tài liệu. Xem và tải ngay bản đầy đủ của tài liệu tại đây (1.76 MB, 30 trang )
198
CHAPTER 7
■ PARTICLE MAYHEM
AddParticle(new Smoke(loc,
Rand.GetRandomVector2(-50f, 50f, -50f, 10f)
- traj * Rand.GetRandomFloat(0.001f, 0.1f),
1f, 1f, 1f, 0.25f,
Rand.GetRandomFloat(0.05f, 0.25f),
Rand.GetRandomInt(0, 4)));
AddParticle(new Smoke(loc,
Rand.GetRandomVector2(-50f, 50f, -50f, 10f),
0.5f, 0.5f, 0.5f, 0.25f,
Rand.GetRandomFloat(0.1f, 0.5f),
Rand.GetRandomInt(0, 4)));
}
}
We’re making a bunch of dust here! The first AddParticle() call sends a bit of light smoke
back in the direction the bullet came from, albeit much slower (and at a random speed). The
second AddParticle() creates a softer, darker bit of smoke. Since we’re doing 16 of each, we get
a soft spray of dust, as shown in Figure 7-11 (it looks better in motion, obviously).
Figure 7-11. Bullet ricochet
CHAPTER 7 ■ PARTICLE MAYHEM
199
Adding Zombies
Shooting the earth is fun enough, but what we really need here are some undead punching
bags, and not a moment too soon! We’re all the way to Chapter 7 with nary a monster in sight,
so, without further ado, let’s make some zombies!
We need to start off with some graphics. We’ll use a few new images: head2.png, torso2.png,
and legs2.png, as shown in Figure 7-12.
Figure 7-12. Zombie parts
We’ll add these images to the Content project in two solutions: CharacterEditor and
ZombieSmashers. We also need to upgrade CharacterEditor again to allow the user to specify
which textures to use.
Zombies in the Character Editor
First, we’ll change the arrays as created in Game1.LoadContent() to contain two indices. Fortu-
nately, we don’t need to change the loading, because we coded it to automatically load the
textures based on the length of the array.
legsTex = new Texture2D[2];
torsoTex = new Texture2D[2];
headTex = new Texture2D[2];
weaponTex = new Texture2D[1];
Let’s add a new tab to our low-budget triggers/script tab area, turning it into a triggers/
script/textures tab area. We’ll start by creating a new class-level constant:
const int AUX_SCRIPT = 0;
const int AUX_TRIGS = 1;
const int AUX_TEXTURES = 2;
Now we’ll draw our texture-selection panel in Draw(). We’ll just be iterating through the
four texture indices, incrementing, decrementing, and drawing text.
#region Texture Switching
if (auxMode == AUX_TEXTURES)
{
200
CHAPTER 7
■ PARTICLE MAYHEM
for (int i = 0; i < 4; i++)
{
if (DrawButton(210 + i * 21, 40, 1,
mouseState.X, mouseState.Y, mouseClick))
{
switch (i)
{
case 0:
if (charDef.HeadIndex > 0) charDef.HeadIndex ;
break;
case 1:
if (charDef.TorsoIndex > 0) charDef.TorsoIndex ;
break;
case 2:
if (charDef.LegsIndex > 0) charDef.LegsIndex ;
break;
case 3:
if (charDef.WeaponIndex > 0)
charDef.WeaponIndex ;
break;
}
}
string t = charDef.HeadIndex.ToString();
switch (i)
{
case 1:
t = charDef.TorsoIndex.ToString();
break;
case 2:
t = charDef.LegsIndex.ToString();
break;
case 3:
t = charDef.WeaponIndex.ToString();
break;
}
text.Color = Color.White;
text.DrawText(212 + i * 21, 60, t);
if (DrawButton(210 + i * 21, 85, 2,
mouseState.X, mouseState.Y, mouseClick))
{
switch (i)
{
CHAPTER 7 ■ PARTICLE MAYHEM
201
case 0:
if (charDef.HeadIndex < headTex.Length - 1)
charDef.HeadIndex++;
break;
case 1:
if (charDef.TorsoIndex < torsoTex.Length - 1)
charDef.TorsoIndex++;
break;
case 2:
if (charDef.LegsIndex < legsTex.Length - 1)
charDef.LegsIndex++;
break;
case 3:
if (charDef.WeaponIndex < weaponTex.Length - 1)
charDef.WeaponIndex++;
break;
}
}
}
}
#endregion
Finally, we add a third tab button to our triggers/script/texture area:
#region Script/Trigs Selector
.
.
.
if (auxMode == AUX_TEXTURES)
{
text.Color = Color.Lime;
text.DrawText(300, 110, "tex");
}
else
{
if (text.DrawClickText(300, 110, "tex", mouseState.X,
mouseState.Y, mouseClick))
auxMode = AUX_TEXTURES;
}
#endregion
Our texture selection panel (and zombie) is shown in Figure 7-13.
We’ve set up the zombie with some simple animations: idle, fly, land, and run—which
we’ve dealt with before—and hit, which will become a new reserved word animation that we’ll
set a character to when it has been hit.
202
CHAPTER 7
■ PARTICLE MAYHEM
Figure 7-13. Texture selection and a brand-new zombie
Bringing Zombies into the Game
Now let’s bring the zombie into ZombieSmashers. First, put the zombie.zmx file into data/chars,
and make sure to include it in the project and select Copy If Newer. Now is probably a good
time to add a new field to Character to specify which team that character is on (the good guys
or the bad guys). At the class level in Character, add the following:
public const int TEAM_GOOD_GUYS = 0;
public const int TEAM_BAD_GUYS = 1;
public int Team;
CHAPTER 7 ■ PARTICLE MAYHEM
203
Then change the constructor to this:
public Character(Vector2 newLoc,
CharDef newCharDef, int newId, int newTeam)
{
Id = newId;
Team = newTeam;
Now that our Character class has a new team field and constructor, we need to update
Game1.Initialize() to load the new zombie file and create characters using the new constructor.
charDef[(int)CharacterType.Guy] = new CharDef("chars/guy");
charDef[(int)CharacterType.Zombie] = new CharDef("chars/zombie");
character[0]
= new Character(new Vector2(100f, 100f),
charDef[(int)CharacterType.Zombie],
0,
Character.TEAM_GOOD_GUYS);
We deemed it prudent to make eight zombies, spaced at 100-pixel intervals across our
map. They will just spawn in the sky, land, and stand there.
for (int i = 1; i < 9; i++){
character[i] =
new Character(new Vector2((float)i * 100f, 100f),
charDef[(int)CharacterType.Zombie], i,
Character.TEAM_BAD_GUYS);
character[i].Map = map;
}
Now, in Draw(), we’ll draw all existing characters instead of just the guy at index 0. Change
the character[0].Draw() line as follows:
for (int i = 0; i < character.Length; i++)
if (character[i] != null)
character[i].Draw(spriteBatch);
There! We’ve added our zombie character definition file zombie.zmx to ZombieSmashers,
parsed the file as CharacterType.Zombie, created eight zombies, and are now drawing all char-
acters every frame. The result is shown in Figure 7-14. We don’t have hit collision yet, but that’s
coming up soon.
204
CHAPTER 7
■ PARTICLE MAYHEM
Figure 7-14. Zombies in a row
Time for the fun part!
Smashing Zombies
We finally get to the whole point: smashing zombies. It’s time to put our weapons to use.
Shooting Zombies
First, we need to put a function in Character that will determine if a vector is within our hit
boundaries.
public bool InHitBounds(Vector2 hitLoc)
{
if (hitLoc.X > Location.X - 50f * Scale &&
hitLoc.X < Location.X + 50f * Scale &&
hitLoc.Y > Location.Y - 190f * Scale &&
hitLoc.Y < Location.Y + 10f * Scale)
return true;
return false;
}
CHAPTER 7 ■ PARTICLE MAYHEM
205
Let’s create a class to manage all things related to hitting characters; we’ll call it HitManager.
We’ll use it to iterate through valid characters, determine if characters are fair game, and figure
out what to do with characters that get hit. We are also going to do some refactoring in the
Particle class, adding some properties for Owner, and making both Location and Trajectory
into public fields.
class HitManager
{
public static bool CheckHit(Particle p, Character[] c,
ParticleManager pMan)
{
bool r = false;
CharDir tFace = GetFaceFromTraj(p.Trajectory);
for (int i = 0; i < c.Length; i++)
{
We’ll want to make sure characters can’t hurt themselves with their own particles (other-
wise, we could end up hitting ourselves with our own bullets):
if (i != p.Owner)
{
if (c[i] != null)
{
if (c[i].InHitBounds(p.Location))
{
if (p is Bullet)
{
if(tFace == CharDir.Left)
c[i].Face = CharDir.Right;
else
c[i].Face = CharDir.Left;
c[i].SetAnim("idle");
c[i].SetAnim("hit");
c[i].Slide(-100f);
pMan.MakeBulletBlood
(p.Location, p.Trajecotry / 2f);
pMan.MakeBulletBlood
(p.Location, -p.Trajectory);
pMan.MakeBulletDust
(p.Location, p.Trajectory);
r = true;
}
}
}
206
CHAPTER 7
■ PARTICLE MAYHEM
}
}
return r;
}
}
GetFaceFromTraj() is a short function that returns CharDir.Right for positive x trajectories,
and CharDir.Left for negative and zero x trajectories.
public static CharDir GetFaceFromTraj(Vector2 trajectory)
{
return (trajectory.X <= 0) ? CharDir.Left : CharDir.Right;
}
Now, in ParticleManager, we need to create a method for MakeBulletBlood(). It’s a bit like
MakeBulletDust(). We’ll be calling it twice: once for the exit wound and once for a splatter in
the direction of the bullet.
public void MakeBulletBlood(Vector2 loc, Vector2 traj)
{
for (int t = 0; t < 32; t++)
AddParticle(
new Blood(loc,
traj *
-1f * Rand.GetRandomFloat(0.01f, 0.1f) +
Rand.GetRandomVector2(-50f, 50f, -50f, 50f),
1f, 0f, 0f, 1f,
Rand.GetRandomFloat(0.1f, 0.3f),
Rand.GetRandomInt(0, 4)));
}
Let’s define Blood. When we instantiate Blood, we’ll send it a location, trajectory, color,
size, and icon. We’ll be using the same images as we used for smoke, but tinted red so they look
fine and bloody. We’ll be drawing wide and thin, and at the angle of its trajectory, so we get
good bits of splatter.
CHAPTER 7 ■ PARTICLE MAYHEM
207
class Blood : Particle
{
public Blood(Vector2 loc,
Vector2 traj,
float r,
float g,
float b,
float a,
float size,
int icon)
{
Location = loc;
Trajectory = traj;
this.r = r;
this.g = g;
this.b = b;
this.a = a;
this.size = size;
flag = icon;
owner = -1;
Exists = true;
rotation = GlobalFunctions.GetAngle(Vector2.Zero, traj);
frame = Rand.getRandomFloat(0.3f, 0.7f);
}
When we update the blood, we want it to be slightly affected by gravity, but not so much
that it doesn’t seem a bit misty.
public override void Update(float gameTime, Map map,
ParticleManager pMan, Character[] c)
{
Trajectory.Y += gameTime * 100f;
if (Trajectory.X < -10f) Trajectory.X += gameTime * 200f;
if (Trajectory.X > 10f) Trajectory.X -= gameTime * 200f;
rotation = GlobalFunctions.GetAngle(Vector2.Zero, Trajectory);
208
CHAPTER 7
■ PARTICLE MAYHEM
base.Update(gameTime, map, pMan, c);
}
When we draw the blood, notice how the scale we’re giving it is new Vector2(size * 2f,
size * 0.5f). This will give us wide, thin blood streaks.
public override void Draw(SpriteBatch sprite, Texture2D spritesTex)
{
Rectangle sRect = new Rectangle(flag * 64, 0, 64, 64);
float frameAlpha;
if (frame > 0.9f)
frameAlpha = (1.0f - frame) * 10f;
else
frameAlpha = (frame / 0.9f);
sprite.Draw(
spritesTex,
GameLocation,
sRect,
new Color(new Vector4(r, g, b, a * frameAlpha)),
rotation,
new Vector2(32f, 32f),
new Vector2(size * 2f, size * 0.5f),
SpriteEffects.None,
1.0f
);
}
}
Our last order of business is changing our Bullet.Update() function to allow the bullets to
strike zombies.
public override void Update(float gameTime,
ZombieSmashersXNA.map.Map map,
ParticleManager pMan,
Character[] c)
{
if (HitManager.CheckHit(this, c, pMan))
frame = 0f;
if (map.CheckParticleCol(loc))
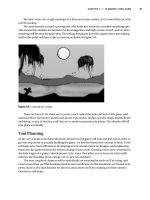
Now we’re checking for hits from Bullet.Update() and killing off the bullets if they strike
anything. Figure 7-15 shows some zombie-shooting action.
CHAPTER 7 ■ PARTICLE MAYHEM
209
Figure 7-15. Zombie shooting!
There we have it! We can shoot zombies, and it looks good.
More Zombie Smashing
Let’s put the wrench to use. We have a couple of combos mapped out in our guy’s character
definition file, but they won’t do anything until we create some hit triggers and implement
them in the game. Starting at the class level of CharacterEditor, define the triggers as follows:
const int TRIG_WRENCH_UP = 3;
const int TRIG_WRENCH_DOWN = 4;
const int TRIG_WRENCH_DIAG_UP = 5;
const int TRIG_WRENCH_DIAG_DOWN = 6;
const int TRIG_WRENCH_UPPERCUT = 7;
const int TRIG_WRENCH_SMACKDOWN = 8;
const int TRIG_KICK = 9;
Each trigger has a slightly different direction; some of them won’t even be used yet. When
our guy swings his wrench down and across, that’s TRIG_WRENCH_DIAG_DOWN. When he swings it
in a wide arc up, that’s TRIG_WRENCH_UP. It’s easy to figure out the rest.
210
CHAPTER 7
■ PARTICLE MAYHEM
Normally, this would be considered very poor code design for a few reasons. The biggest
issue with declaring constants such as these, or even putting them in an enumeration, is that
they are completely dependent on you implementing them in the code. In the grand scheme of
game development, implementation of what kind of attacks are allowed and how they are carried
out should be split between the game designers and the artists. In this way, artists can draw the
attacks and weapons, and the designers can let the game engine know they exist. This way, no
major pieces of code need to be written whenever a new attack is developed. However, you are
an independent developer trying to get your game out quickly, so this is excusable for now.
Let’s move on and make sure to add the string names in GetTrigName() of
CharacterEditor’s Game1:
case TRIG_PISTOL_UP:
return "pistol up";
case TRIG_WRENCH_DOWN:
return "wrench down";
case TRIG_WRENCH_SMACKDOWN:
return "wrench smackdown";
case TRIG_WRENCH_DIAG_UP:
return "wrench diag up";
case TRIG_WRENCH_DIAG_DOWN:
return "wrench diag down";
case TRIG_WRENCH_UP:
return "wrench up";
case TRIG_WRENCH_UPPERCUT:
return "wrench uppercut";
case TRIG_KICK:
return "kick";
We can add our new triggers to just the appropriate frames of animation. For instance, for
our ground wrench combo, we’ll use this:
• TRIG_WRENCH_DIAG_DOWN
• TRIG_WRENCH_UP
• TRIG_WRENCH_DOWN
• TRIG_KICK
Our air combo is about the same, but only three attacks long, culminating in the ever-so-
aptly-named TRIG_WRENCH_SMACKDOWN. Also, we’ll add TRIG_WRENCH_UPPERCUT to our uppercut
animation. Wrench triggers in the character editor are shown in Figure 7-16.
With all of our spanner-whacking triggers set up, let’s implement the action in ZombieSmashers.
The first order of business is to bring the new trigger constants (the same ones declared at the
class level of CharacterEditor—TRIG_PISTOL_UP, TRIG_PISTOL_DOWN, and so on) to the Character
class-level declarations.
CHAPTER 7 ■ PARTICLE MAYHEM
211
Figure 7-16. Wrench triggers
Next, let’s create a new Particle called Hit. We’ll use Hit for any trigger that’s a one-shot
attack. By one-shot, we mean that the particle is spawned, checks for impact at Update(), and
dies. Here’s what Hit looks like:
class Hit : Particle
{
public Hit(Vector2 loc, Vector2 traj, int owner, int flag)
{
Location = loc;
Trajectory = traj;
Owner = owner;
flag = flag;
Exists = true;
frame = 0.5f;
}
212
CHAPTER 7
■ PARTICLE MAYHEM
public override void Update(float gameTime,
ZombieSmashersXNA.map.Map map,
ParticleManager pMan,
Character[] c)
{
HitManager.CheckHit(this, c, pMan);
KillMe();
}
public override void Draw(SpriteBatch sprite, Texture2D spritesTex)
{
//
}
}
We’ll be using flag to hold the trigger index. In Update(), we check to see if we’ve hit anything,
and then self-destruct, regardless of whether or not we’ve hit anything. Notice how we’re not
doing anything in Draw(), but are still overriding the parent method so nothing gets drawn.
After we handle Bullet impact in HitManager, let’s handle particles of type Hit, as follows:
if (p is Bullet)
{
}
else if (p is Hit)
{
c[i].Face = (tFace==CharDir.Left) ? CharDir.Right : CharDir.Left;
float tX = 1f;
if (tFace == CharDir.Left)
tX = -1f;
c[i].SetAnim("idle");
c[i].SetAnim("hit");
We’ll want the hit character to slide back more if he is grounded. If the character is
airborne, we want to keep him closer for air combos.
if (c[i].State == CharState.Grounded)
c[i].Slide(-200f);
else
c[i].Slide(-50f);
Next, we do a case-by-case lookup on what to do. For most cases, we just make some blood
and set a variable called Game1.slowTime, which we’ll explain after we look at the code. The
method we’re going to create to make blood splashes will accept a location and a trajectory.
For some of the heavier moves, we set the victim’s animation and toss him around a bit.
CHAPTER 7 ■ PARTICLE MAYHEM
213
switch (p.Flag)
{
case Character.TRIG_WRENCH_DIAG_DOWN:
pMan.MakeBloodSplash(p.Location,
new Vector2(50f * tX, 100f));
Game1.SlowTime = 0.1f;
break;
case Character.TRIG_WRENCH_DIAG_UP:
pMan.MakeBloodSplash(p.Location,
new Vector2(-50f * tX, -100f));
Game1.SlowTime = 0.1f;
break;
case Character.TRIG_WRENCH_UP:
pMan.MakeBloodSplash(p.Location,
new Vector2(30f * tX, -100f));
Game1.SlowTime = 0.1f;
break;
case Character.TRIG_WRENCH_DOWN:
pMan.MakeBloodSplash(p.Location,
new Vector2(-50f * tX, 100f));
Game1.SlowTime = 0.1f;
break;
case Character.TRIG_WRENCH_UPPERCUT:
pMan.MakeBloodSplash(p.Location,
new Vector2(-50f * tX, -150f));
c[i].Trajectory.X = 100f * tX;
c[i].SetAnim("jhit");
c[i].SetJump(700f);
Game1.SlowTime = 0.125f;
break;
case Character.TRIG_WRENCH_SMACKDOWN:
pMan.MakeBloodSplash(p.Location,
new Vector2(-50f * tX, 150f));
c[i].SetAnim("jfall");
c[i].SetJump(-900f);
Game1.SlowTime = 0.125f;
break;
case Character.TRIG_KICK:
pMan.MakeBloodSplash(p.Location,
new Vector2(300f * tX, 0f));
214
CHAPTER 7
■ PARTICLE MAYHEM
c[i].Trajectory.X = 1000f * tX;
c[i].SetAnim("jhit");
c[i].SetJump(300f);
Game1.SlowTime = 0.25f;
break;
}
}
Here’s a bit of air juggling: if the victim is airborne and we set his animation to hit, we’ll
make sure he gets tossed up in the air slightly and set to a proper getting-hit-in-air animation.
if (c[i].State == Character.STATE_AIR)
{
if (c[i].AnimName == "hit")
{
c[i].SetAnim("jmid");
c[i].SetJump(300f);
if (p is Hit)
{
For airborne enemies, we want to make sure our air combos work out just right. What
seems to work well is to set the victim’s y location to that of the hero if both the hero and victim
are airborne and the attack is a melee attack.
if (c[p.Owner].team == Character.TEAM_GOOD_GUYS)
c[i].Location.Y = c[p.Owner].Location.Y;
}
}
}
Lastly, let’s define MakeBloodSplash() in ParticleManager. It’s pretty similar to the bullet
blood function, creating spurts of blood mixed with dust:
public void MakeBloodSplash(Vector2 loc, Vector2 traj)
{
traj += Rand.G etRandomVector2(-100f, 100f, -100f, 100f);
for (int i = 0; i < 64; i++)
{
AddParticle(new Blood(loc, traj *
Rand.GetRandomFloat(0.1f, 3.5f) +
Rand.GetRandomVector2(-70f, 70f, -70f, 70f),
1f, 0f, 0f, 1f,
Rand.GetRandomFloat(0.01f, 0.25f),
Rand.GetRandomInt(0, 4)));
CHAPTER 7 ■ PARTICLE MAYHEM
215
AddParticle(new Blood(loc, traj *
Rand.GetRandomFloat(-0.2f, 0f) +
Rand.GetRandomVector2(-120f, 120f, -120f, 120f),
1f, 0f, 0f, 1f,
Rand.GetRandomFloat(0.01f, 0.25f),
Rand.GetRandomInt(0, 4)));
}
MakeBulletDust(loc, traj * -20f);
MakeBulletDust(loc, traj * 10f);
}
Here, we create 128 particles of blood—what a mess! Of those, 64 will be “exit wound” type
splatters—they will fire off in a tighter cone in the direction of the strike. The other 64 particles
will be “entry splatter”—they will come in the opposite direction of the strike and will be in
looser form.
We still have a few odds and ends to work out. Let’s start with Game1.slowTime. We use that
for Matrix-esque pauses in action—to accent strikes and to build anticipation for devastating
moves. We declare Game1.SlowTime in the Game1 class-level declarations as follows:
private static float slowTime = 0f;
public static float SlowTime
{
get { return slowTime; }
set { slowTime = value; }
}
Then, in Game1.Update(), we reduce frameTime by a factor of 10 if slowTime is greater than
zero. This way, if we want a half second of pause, we set slowTime to 0.5.
frameTime = (float)gameTime.ElapsedGameTime.TotalSeconds;
if (slowTime > 0f)
{
slowTime -= frameTime;
frameTime /= 10f;
}
Now that we are using our own timing system that allows us to slow down time, we need
to make sure our Character class uses it. Ensure that frameTime in Game1 is a private static field,
and then expose it via a static property. Then, in the Character.Update() method, change the
local variable et to use the Game1.FrameTime property.
float et = Game1.FrameTime;
//float et = (float)gameTime.ElapsedGameTime.TotalSeconds;
The next step in the Character class is to make sure we are firing the hits correctly. In the
FireTrig() method, update the switch case statement to add a default case.
216
CHAPTER 7
■ PARTICLE MAYHEM
default:
pMan.AddParticle(new Hit(loc, new Vector2(
200f * (float)Face - 100f, 0f),
Id, trig));
break;
Before we test our zombie smashing, we have one last thing to do. Remember how when
our characters land, we set them to the land animation? Well, a character who has been knocked
into (or out of) the air should land in a hitland animation. Let’s change our Character.Land()
method to this:
private void Land()
{
state = STATE_GROUNDED;
switch (animName)
{
case "jhit":
case "jmid":
case "jfall":
SetAnim("hitland");
break;
default:
SetAnim("land");
break;
}
}
Now you should be able to run the game. What you’ll discover is that the attacks feel tremen-
dously wrong. Why? We haven’t yet implemented character-to-character collision. When you
go to do a combo, you just slide right on through whoever you’re attacking. So what are we
waiting for? Let’s remedy this ugliness!
Character-to-Character Collision
We obviously can’t have characters just walking through each other, but how should we handle
this? Collision detection, as always, is simple enough, but how do we respond? We could imple-
ment character-to-character collision response in a few ways:
• Manually move colliding players so that they are not colliding. This is most commonly
used, and will give a solid-looking collision response.
• Change the colliding characters’ trajectories so that they eventually will not be colliding.
This is what was originally used in The Dishwasher game. It gives sort of sloppy collisions, in
that it’s possible for fast-moving characters to pass through each other.
• Add a new collision trajectory to the colliding characters’ trajectories. This is what was
eventually used for The Dishwasher. When tweaked properly, it provides a slightly
bouncy collision response that isn’t too weak.
CHAPTER 7 ■ PARTICLE MAYHEM
217
We chose to go with the third technique. We use essentially the first technique for map
collision detection, so you get a good lesson on that as well.
In the Character class at the class level, let’s declare our collision trajectory value:
public float ColMove = 0f;
Then in Update(), we’ll detect and respond to character-to-character collisions:
#region Collison w/ other characters
for (int i = 0; i < c.Length; i++)
{
if (i != Id)
{
if (c[i] != null)
{
The next section basically compares our location with that of the other character. We
might want to change these values, depending on the feel of the collision response.
if (Location.X > c[i].Location.X - 90f * c[i].Scale &&
Location.X < c[i].Location.X + 90f * c[i].Scale &&
Location.Y > c[i].Location.Y - 120f * c[i].Scale &&
Location.Y < c[i].Location.Y + 10f * c[i].Scale)
{
We’ve detected a collision; now let’s respond. We calculate dif as a value that scales up as
the two characters get closer to each other. Then we set our colMove value and the other char-
acter’s colMove value to opposite values of dif, to move them apart.
float dif = (float)Math.Abs
(Location.X - c[i].Location.X);
dif = 180f * c[i].Scale - dif;
dif *= 2f;
if (loc.X < c[i].loc.X)
{
ColMove = -dif;
c[i].ColMove = dif;
}
else
{
ColMove = dif;
c[i].ColMove = -dif;
}
}
}
}
}
218
CHAPTER 7
■ PARTICLE MAYHEM
We’ll reduce the value of ColMove to zero, giving our colliding characters a sort of springy
response.
if (ColMove > 0f)
{
ColMove -= 400f * et;
if (ColMove < 0f) ColMove = 0f;
}
else if (ColMove < 0f)
{
ColMove += 400f * et;
if (ColMove > 0f) ColMove = 0f;
}
#endregion
Later in Update(), when we update our location by trajectory, we add the following:
Location.X += Trajectory.X * et;
Location.X += ColMove * et;
We’re going to include ColMove when we call CheckXCol(). The new function looks like this:
public void CheckXCol(Vector2 pLoc)
{
if (Trajectory.X + ColMove > 0f)
if (Map.CheckCol(
new Vector2(Location.X + 25f, Location.Y - 15f)))
Location.X = pLoc.X;
if (Trajectory.X + ColMove < 0f)
if (Map.CheckCol(
new Vector2(Location.X - 25f, Location.Y - 15f)))
Location.X = pLoc.X;
}
Your project should look and feel good. Our zombie smashing in progress is shown in
Figure 7-17.
■Note We arrived at a lot of the values we used in the project by tweaking. If you’re using this book as a
guide and not following along exactly, you may need to make your own adjustments until everything looks right.
CHAPTER 7 ■ PARTICLE MAYHEM
219
Figure 7-17. Fun air combos!
Conclusion
Finally, we got to do all the fun stuff in this chapter! Let’s go over the improvements we put into
Zombie Smashers XNA:
• Implemented a particle system with a particle manager, particle bass class, and a bunch
of assorted particles
• Implemented map updating, which we used to make our torch segments generate fire
and smoke
• Added triggers to the map editor and game, which we use to make bullets, muzzle flashes,
and hits
• Added a hit manager to manage . . . hits, obviously
• Implemented collision detection, giving the movement and combat a good feel
220
CHAPTER 7
■ PARTICLE MAYHEM
Finally, our project resembles a real game that can actually be played! After all, what would
a game called Zombie Smashers be without any actual zombie smashing? However, this isn’t
the end, because neither our hero or the zombies can die. What this game needs is a goal and
ways to impede the player’s progress toward that goal. What does this mean in reality? More
blood, death, and zombie destruction.
221
■ ■ ■
CHAPTER 8
XACT Audio, Rumble, and More
Sensory Overload
At this point, we have a robust game-playing system—a world we can run and jump around
in, zombies to shoot and bash, some fun revolver and wrench moves to shoot and bash
zombies with, and oodles of cool combat effects. But something is definitely missing, and, as
the chapter title suggests, that something is audio.
To understand the impact audio will have on our game (or any game), consider a game
that has sold millions of copies. Think of your favorite game, and now imagine it without sound.
Remember how when you fire a gun in a shooter game, you can hear the bullets fire, ricochet,
and hit your target. Now try to imagine firing the gun without sound. Audio not only provides
entertainment value, but it also gives the player feedback as to what is going on in the game.
And as a rule of thumb, the more feedback you can give players without crowding them, the
better the game will be.
Audio is another area where a scripting system really shines. Before we had the idea of the
character-scripting system, we hard-coded all of the sound. Needless to say, our older games
didn’t have any really complex audio expression! Of course, there are still instances when we
can hard-code sound. For example, remember our Character.Land() function? We set the
character animation to hitland where appropriate, and with that, we could play a thumping
sound. If we had to hard-code every character to make the thumping sound in hitland, it
would be a hassle. Then again, if we want different characters to make different thumping
sounds, we might just want to forego the hard-coding. Food for thought!
Because this is the sensory overload chapter, we’re also going to implement some rumble.
Rumble is often not implemented in games that target the casual game-playing audience, and
it is more than frequently left out of games developed by hobbyists. We think that rumble is
necessary in most game types, because it gives the player feedback through another area:
touch. Players have sound, as you will see in this chapter, and players already have visual feed-
back. Tactile feedback can help players know immediately what is going on with their character
and his surroundings.
Obtaining and Editing Audio
So, we’re setting out to add audio to our game. We can’t do much if we don’t have any good
sound files in the first place, can we?
222
CHAPTER 8
■ XACT AUDIO, RUMBLE, AND MORE
And after we get those audio files, we’ll need to edit them to suit our game. Much like the
particle systems we created previously, generating good audio is more an art than it is a science. It
takes a lot of practice, some creativity, and a lot of testing.
Getting Sound Files
Getting sound files can be a tricky process. Unlike graphics, clean audio is not really something
an amateur developer without any expensive equipment can produce. This leaves us with a few
options:
Find free sounds: This leads to licensing issues and has varying results. A few good sites to go to
are FlashKit (www.flashkit.com) and the Freesound Project ( />Buy sounds: This may also lead to licensing issues, but typically provides better results than
the free route. A number of web sites sell sounds; we like Sounddogs (www.sounddogs.com).
Record your own sounds: This typically provides the worst results of all, unless you are a
professional audio person—in which case, congratulations, you have a fallback career!
We’re going to go with the first option because it provides the best balance between quality
and cost. But remember that the term free usually means a few things. One major disadvantage
of using free resources is that their license is often restrictive. If you’re looking to make money
off your game, we suggest you get good licenses with your audio. The second large problem
with free resources is that you will often find them used in many places. Be sure to look over as
much audio as you can stand before deciding.
■Tip You can often record some interesting sounds using items found around the house. Trash cans (metal)
and pots make excellent clangs, and if you are lucky enough to have a younger brother, he may let you hit him
over the head a few times! You may not have professional equipment, but having some sound is what is
important. For instance, just for fun, a few friends created a Tower Defense clone (a game that involves a lot
of sounds) using XNA. During the development process, it was important to get sounds working as soon as
possible to know where and how they would fit in. While the team scoured the Internet for decent sounds, they
used placeholder sounds, including those that literally consisted of the developers saying words like “click”
for a button click. It may not have been pretty, but it worked well enough while the rest of the game was
developed.
For Zombie Smashers, we used some sounds from FlashKit. If you go to the Sound FX section
of the site and search within the Mayhem category, you should be in pretty good shape! Alter-
natively, you can use the sound files included with the downloadable materials for this book
(available from the Source Code/Download section of www.apress.com). We’ve provided all the
audio files used in this chapter.
We’ll use an assortment of smacking and crunching sounds:
• Slapstick punch
• Cracking bones