ADOBE PHOTOSHOP FOR UNDERWATER PHOTOGRAPHERS- P5 pps
Bạn đang xem bản rút gọn của tài liệu. Xem và tải ngay bản đầy đủ của tài liệu tại đây (897.94 KB, 30 trang )
90 ADOBE
®
PHOTOSHOP
®
FOR UNDERWATER PHOTOGRAPHERS
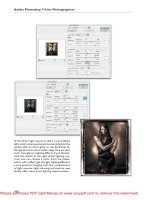
Above—Original digital
camera image of feather
duster worms in the Cayman
Islands. Left—The Layers
menu shows the Background
image at the bottom, High
Pass filter in the middle, and
the Dust & Scratches layer at
the top.
LAYER CONTROLS
No matter which method you use
to sharpen your image—the Unsharp
Mask, Smart Sharpen, High Pass filter,
or maybe a third-party plug-in (see
chapter 15)—you should always apply
the sharpening effect to a copy (Ctrl/
Cmd+J) of the Background layer.
You can then use the Opacity slider
to increase or decrease the effect by
controlling how much the original,
underlying Background layer shows
through the duplicated later.
You can also use more than a dozen
different blending modes on your
sharpening layer. Before you scan through the different layer blending modes,
make sure you have the Move tool selected from the toolbox. You can then
hold the Shift key and use the + or – keys to move up and down through the
layer blending modes. You can also use either the numeric keypad or the
Opacity slider to change the opacity percentage.
Add a Mask. You can also add a mask to your sharpening layer, and then
use the black brush to selectively remove the sharpening effect. By adjusting
the opacity setting of the brush, you can control the sharpening removal. The
blending mode and opacity setting for the Brush tool are found at the top of
the editing screen.
ADVANCED SHARPENING TECHNIQUES 91
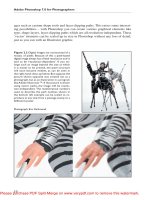
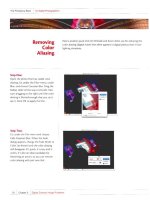
Top—Enlarged section before any layer edit-
ing is added. Center—Enlarged section after
the High Pass layer was added. Note that the
backscatter in the background was unaffect-
ed by the High Pass filter because of the mask,
and the resulting image is unacceptable.
Bottom—The water background was copied
and pasted as a new layer. Then the Dust &
Scratches filter was applied to remove the
backscatter.
A
s the digital camera became the norm, photographers—especially
those using DSLRs—were introduced to the RAW file format.
Initially, most manufacturers had their own RAW translator and editor
specifically designed for their camera models. If you owned several cameras,
you had to open a different program for each camera’s type of RAW file. With
the introduction of CS and CS2, it all changed, as the RAW file interface in
Photoshop can now accept dozens of different RAW file formats.
The key to working with these RAW files is to remember that they are just
that—raw data. The file has not been adjusted by the camera for contrast,
sharpness, white balance, gamma, and
many other camera settings. All that
must be done in the RAW file editor.
When you load a RAW file, the editor
automatically loads along with the file.
Most of image controls are located under tabs for image adjustment, sharpness,
noise, lens corrections, gamma curve, and sensor calibration.
A
DJUST TAB
The best place to start your image adjustment is with the Adjust tab. Here you
have the option to select from more than a half dozen different white balances,
so you can pick the one that best fits the image. We recommend that you use
As Shot for your starting point. The Exposure, Shadows, Brightness, and Con-
trast are set to Auto in the installed default mode, but you can adjust them if
necessary. Just move the sliders and the Auto box is unchecked so that you can
adjust the settings. There are additional sliders for Saturation, Tint, and Temp-
erature, so you can manually bias the white balance.
We just told you to use the Auto function to correct your images in the As
Shot white balance mode, but sometimes it can cause problems. Yes, it will
automatically correct your images—quickly and easily—but it may not provide
a true representation of what your camera’s LCD viewer recorded. For in-
92 ADOBE
®
PHOTOSHOP
®
FOR UNDERWATER PHOTOGRAPHERS
9. WORKING WITH RAW FILES
THE KEY TO WORKING WITH THESE
RAW FILES IS TO REMEMBER THAT THEY
ARE JUST THAT—RAW DATA.
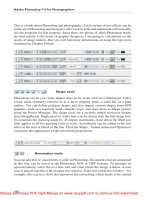
WORKING WITH RAW FILES 93
The Camera RAW editor can be opened from Bridge, Photoshop, or by double clicking on the
files in the operating system’s File Manager. Camera RAW is divided into three areas: the tool-
box at the top, the workflow in the lower-left corner, and the image adjustments on the right of
the screen. The toolbox and the adjust folder will be used to make most of the corrections to your
RAW files.
94 ADOBE
®
PHOTOSHOP
®
FOR UNDERWATER PHOTOGRAPHERS
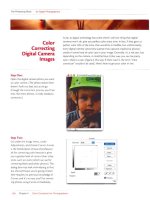
These images illustrate a problem with digital camera exposure. The top image looks good but
is actually being corrected 3 stops by the RAW file editor. If you turn off the auto exposure in
the RAW file editor as shown in the bottom image, you will see the actual exposure made with
the camera. If you are getting these kinds of settings, you need to adjust your digital camera
exposures so that the auto exposure is closer to 0.
stance, if the Auto Exposure indicates +3, you should note that your camera
exposure is way off. Turn the Auto functions off initially to see just how your
camera is recording the exposure. To maximize your editing capability, you
must begin with a good exposure. A correct exposure should be relatively close
to zero when you check the Auto boxes.
D
ETAIL TAB
The two most important features under the Detail tab are the Sharpness and
Color Noise Reduction sliders. The Sharpness setting is pretty straightforward
with one slider that adjusts the sharpness from minimum to maximum. Move
WORKING WITH RAW FILES 95
Another method for reducing blown-out areas in the RAW file image is to manually reduce the
exposure. As you do, you will notice that those areas indicated in red will slowly disappear.
96 ADOBE
®
PHOTOSHOP
®
FOR UNDERWATER PHOTOGRAPHERS
The White Balance tool was applied to a gray area on the scuba tank (top) to correct this avail-
able light image. The resulting image (above) shows a big improvement.
your cursor over the large preview image and use the Ctrl/Cmd and +/– keys
to zoom in and out on the image. When you zoom in, hold down just the
Ctrl/Cmd key and the cursor turns into a hand, allowing you to reposition the
image. The Luminance Smoothing and Color Noise Reduction sliders are then
used to reduce any artifacts that occur due to the sharpening effect.
L
ENS TAB
If you are shooting underwater images using a wide-angle lens, you may have
vignetting due to light falloff. To correct this, select the Lens tab, and move
the Vignetting slider labeled Amount to the right until the lighting is more
even. If your image shows some chromatic aberrations (color fringing along
sharp edges), you can use the sliders labeled Fix Red/Cyan Fringe and Fix
Blue/Yellow Fringe to make your corrections. The Midpoint slider at the
bottom of the menu is used to adjust the midpoint corrections in the upper
sliders.
C
URVE TAB
The Curve tab displays the actual photographic curve captured by the camera.
If you want to adjust the ratio of tones in the shadows to highlights, you can
select any of the existing points on the curve or add new ones. You can then
move the selected point, and the image will reflect the changes you made to
WORKING WITH RAW FILES 97
You should check the
Highlight and Shadow
boxes at the top of the
Camera RAW editing
screen to see shadow and
highlight areas that are
being clipped and losing
detail. In this case, a
highlight was blown out,
so the Curves folder was
selected and the top of
the curve was pulled
down until the bloom-
ing disappeared.
the photographic curve. A histogram of the data is displayed behind the curve
to help you determine how to make your image adjustments.
C
ALIBRATE TAB
The Calibrate tab features sliders for adjusting the color settings of the camera
profile used to take the RAW file. With these sliders, you can adjust the hue
and saturation for the red, green, and blue channels in the image. There is also
a slider that can be used to adjust the shadow tint. If you like the changes you
have made, you can save them as a new profile to be used on future images.
This is an extremely powerful tool for color crossover problems.
W
ORKFLOW OPTIONS
The Workflow Options menu can be found in the lower-left portion of the
RAW file editor. With this menu, you can set the color management profile of
the image, bit depth (8 or 16/Bits Channel), and the resolution of the image.
The Size control allows you to change the actual megapixel rating of the image
from less than 2 megapixels to over 25. If you know that you are going to need
a larger file size for printing, this
is the place to rescale the image.
Also, if you know your image
will need a lot of sharpening,
you might consider increasing
the file’s megapixel rating
because the higher the resolu-
tion, the more you can sharpen
the image.
98 ADOBE
®
PHOTOSHOP
®
FOR UNDERWATER PHOTOGRAPHERS
This image is extremely off color
because the flash was either too weak or
too far from the subject. The image was
first cropped with the Crop tool in the
toolbox. The White Balance tool was
then used to select a small white coral
in the lower-left portion of the image.
The adjusted image was then import-
ed into Photoshop for final cleanup of
backscatter and other small artifacts.
TOOLBOX
The RAW file toolbox is located at the top of the editor and provides power-
ful control over your RAW images. Working from left to right, you have the
Zoom tool for zooming in and out on the image, and the Hand tool for mov-
ing around in the image.
The third icon, the White Balance tool, is probably one of the most power-
ful tools in the RAW editor. When you click on something that should be neu-
WORKING WITH RAW FILES 99
This RAW file fisheye im-
age of the Wreck of the
Anne (right) in the Solo-
mon Islands proved to be
dark, bluish, and lacking
color saturation. The im-
age was easily corrected by
clicking on a sandy area
using the White Balance
tool. No other correction
was made to the image.
tral in color, the entire image rebalances. This is a fantastic tool to use on avail-
able light images. Just click on the white of an eye, an area of dead coral, or the
side of a gray angelfish, and presto, you have a beautifully balanced image.
The Color Sampler tool displays the color components of a specific point
you select in a RAW file image. The Crop tool works very much like the Crop
tool in Photoshop, and handles on each edge of the photo can be used for re-
sizing the image. The Straighten tool requires that you draw a line along any
edge in the image that should be level. The editor will then create a new crop
image that will rotate once you open the image in Photoshop or when it is
saved with the RAW file. The final two icons enable you to quickly rotate the
image 90 degrees counterclockwise, or 90 degrees clockwise.
RAW F
ILE LAYER EDITING
There will be times when the exposure or color balance captured by the RAW
file is too extreme to bring into Photoshop. A good example of this is a split-
level image where you have a good exposure above water but a dark and off-
color underwater area.
100 ADOBE
®
PHOTOSHOP
®
FOR UNDERWATER PHOTOGRAPHERS
Left—This split-level fisheye image taken in
the Solomon Islands has a good exposure above
water but is dark below the surface. Above—
The Layers palette shows the original RAW
file image with good sky exposure is our back-
ground layer. The top layer is from the same
RAW file, but the underwater portion has
been corrected. The mask was added to block
the sky in the top layer so the sky from the background could show through. Facing Page—The
final split-level image was saved as a PSD file so that we could adjust the topside and under-
water portions separately at a later time.
RAW editor and bring it into Photoshop as your background image. Then,
reload the file and make changes with RAW file control to correct the under-
water portion of the image. Open this image in Photoshop, then copy and
paste it into the background image. Press the F7 key to open the Layers palette,
and add a mask to the layer with the corrected underwater portion. Take the
Brush tool set to black and remove the top portion of this layer so that the sky
shows through.
This technique works well when you photograph an animal down in a hole.
If you correct the exposure for the animal, the areas outside the hole are
washed out. If you attempt the opposite correction, the animal in the hole is
still in the dark. The solution is to correctly adjust each part using the RAW file
editor, bring them both into Photoshop, and use the mask and brush tech-
nique to blend the two together.
If you find the mask leaves an edge between the two layers, select the mask
itself in the Layers palette, and go to the Filter>Blur>Gaussian Blur, and apply
this to the mask. This should fix the problem.
102 ADOBE
®
PHOTOSHOP
®
FOR UNDERWATER PHOTOGRAPHERS
When you have mastered RAW file shooting and editing, you may be ready to try your hand at
shooting the ultimate underwater RAW file image, a 360-degree underwater panorama. Four
RAW file images were shot using a fisheye lens and were edited in Camera RAW using the
same settings for all the images.
O
ne of the most difficult aspects of underwater photography is back-
scatter. It varies from one dive location to the next, but it is always
there. Most new image editors will attempt to remove the backscat-
ter using the Clone tool. Sure, it will work—but it is very time consuming and
can often leave telltale editing signs. Here are a couple of the more advanced
solutions to backscatter problems.
S
POT HEALING BRUSH
The Spot Healing Brush was first introduced with Elements 3 and is now part
of Photoshop CS2. Unlike the Clone tool and the Healing Brush, which
require a two-click process, the Spot Healing Brush requires one click to
accomplish the task. Use the bracket keys ([ or ]) to size the brush slightly larg-
er than the particles you want to eliminate, click on the particles, and they mag-
ically disappear.
ADVANCED BACKSCATTER REMOVAL 103
10. ADVANCED BACKSCATTER REMOVAL
The Spot Healing
Brush is the fourth
icon down on the left
side of the toolbox.
Brush size can be
controlled by right
clicking on the im-
age, accessing the
Brush menu at the
top of the screen, or
by using the bracket
keys ([ = smaller, ] =
larger).
DUST & SCRATCHES FILTER
To remove backscatter from large areas, such as blue water or blurred back-
grounds, the Dust & Scratches filter does a great job. You need to be able to
clearly see the problem you are attempting to solve, so use the Zoom tool to
zero in on your work area. If you find there are some really large particles, you
may want to remove them first using the Clone tool, Healing Brush, or Spot
Healing Brush.
Now select the Lasso tool from the toolbox and draw a line around the area
in which you want to remove backscatter. Load the Dust & Scratches filter
from the Filter>Noise pull-down menu, and set both the Radius and Threshold
sliders to the lowest settings. Move the Radius slider to the right until all the
particles disappear. The selected area will become very blurred, but that’s
alright at this point. Now move the
Threshold slider to the right until the
particles appear again, then move it
slightly back to the left until they dis-
appear once more. In the end, the par-
ticles will be gone, but the background detail remains the same. This procedure
works best in out-of-focus areas, so we have a Plan B for other situations.
Layers. A more controllable method for using the Dust & Scratches filter is
to add a second copy of the background image as a layer. You can then apply
the Dust & Scratches filter to the entire image and use the brush to remove the
areas where you don’t want the filter effect. This method is especially suited to
images that have more backscatter area than subject. Here’s how it works.
Open the Layers palette, then go to Layer>Duplicate Layer, and a new iden-
tical layer will be stacked on top of the Background layer. Click on the Add
New Mask icon at the bottom of the palette, and a special mask will appear next
to your new layer. Click on the left thumbnail image in that Adjustment Layer,
and then go to the Filter>Noise>Dust & Scratches filter. Slowly move the
Radius and Threshold sliders to remove the backscatter as outlined above.
When all the backscatter is gone, click on the mask in the same layer, and
then select the Brush tool from the toolbox. Make sure that the foreground is
set to black and the background to white. In the Brush options menu at the
top of the screen, you should set the Hardness of the brush to 0%. Now brush
the areas that you don’t want the Dust & Scratches filter to affect.
If you need to undo some of the areas you brushed on, just swap the fore-
ground and background colors and paint away. If you don’t want the full effect
104 ADOBE
®
PHOTOSHOP
®
FOR UNDERWATER PHOTOGRAPHERS
IF YOU FIND THERE ARE SOME REALLY LARGE
PARTICLES, YOU MAY WANT TO REMOVE THEM
FIRST USING THE CLONE TOOL . . . .
ADVANCED BACKSCATTER REMOVAL 105
Heavy backscatter can be removed with the Filter>Noise>Dust & Scratches filter. After mini-
mizing the Radius and Threshold settings, move the Radius slider until the backscatter is gone.
Then move the Threshold slider until it reappears, and back off slightly until it disappears
again.
106 ADOBE
®
PHOTOSHOP
®
FOR UNDERWATER PHOTOGRAPHERS
When you use a flash to light fire coral from behind, backscatter usually becomes apparent.
ADVANCED BACKSCATTER REMOVAL 107
Top Left—Here’s an enlarged section of the
area to be fixed. Above—The Magic Wand
and Lasso tools were used to select the back-
ground area with the backscatter problem.
The shortcut Ctrl/Cmd+J was used to make a
copy of the problem area. We right clicked on
the New Layer thumbnail to bring up the submenu with the Select Layer Transparency com-
mand. This command loads the selection for that layer. From there you can go to the bottom of
the Layers palette and add a new mask to that layer. You can then tweak the mask, using the
Brush tool, set to black, to block areas you don’t want the Dust & Scratches filter to affect. Top
Right—If you want to see only your mask, click on the eye icon to turn off the layer visibility.
The mask will appear as a checkerboard in the Layers palette. Bottom Right—Enlarged section
of the fire coral after the Dust & Scratches filter was used with layering techniques.
of the filter in a specific area, you can set the Opacity to less than 100%. This
will blend the effect of the Dust & Scratches filter with the background image.
A variation of this technique is to select your work area with the Lasso tool,
feather your selection, and use the Ctrl/Cmd+J keyboard command to make a
layer of just your selected work area. Use the Dust & Scratches filter the same
way we mentioned, and your results will be the same. The difference is that you
can separate each Dust & Scratches correction into its own layer, which keeps
the file size smaller than making a copy of the entire background.
108 ADOBE
®
PHOTOSHOP
®
FOR UNDERWATER PHOTOGRAPHERS
The upper-right picture is a digital image that contains sensor artifacts in the upper-left cor-
ner. The top image shows the enlarged selection around the sensor artifacts to be repaired. The
middle image shows the default settings of the Dust & Scratches filter before it is applied, and
the bottom image reflects the effects of the applied filter.
DSLR SENSOR ARTIFACTS
DSLR camera sensors can be exposed to the environment, especially when you
change lenses. When this happens, small specks of dust can float down and land
on the sensor, creating black particles
in all of your images. In order to
remove them from your photos, you
should treat them as if they were
backscatter. Use the Dust & Scratches
filter for large out-of-focus areas, and the Spot Healing Brush for areas with
fine detail.
B
LUR FILTERS
When you find that you have tons of backscatter across both out-of-focus and
sharp areas, you’ll find that the Dust & Scratches filter just doesn’t do the job.
If we dig a bit deeper into our bag of tricks, we find two types of blur filters in
the Filter>Blur menu that will allow you to slightly blur small particles and still
maintain image detail.
Smart Blur. You need to be aware that if there is much backscatter across
your image, you’ll have to sacrifice a bit of overall sharpness in the correction
process. The Smart Blur filter was introduced with Photoshop CS, and it can
selectively blur different levels of detail in an image. Unfortunately, it is not an
easy filter to use, as it reacts quite differently with each image and its unique
problems.
The easiest way to use this filter is to start by zooming in on an area that has
both out-of-focus and sharp detail. Then set the Radius to 20 and the Quality
to high. The Radius determines the edge size of the blurred areas. Set the
Threshold from 5–40 depending on the severity of the problem. The Thresh-
old setting determines what qualifies as an area to blur. The higher the
Threshold number the less visible the backscatter, but the more blurred the
image detail.
For better control when using this filter, make a copy of the image in the
Layers palette and add a mask. Apply the Smart Blur to the duplicate image,
and then use the black brush on the mask to eliminate any unwanted detail.
Surface Blur. A new backscatter solution called Surface Blur became avail-
able with the introduction of Photoshop CS2. When you open the Filter>
Blur>Surface Blur filter you will immediately notice that it resembles the Dust
& Scratches filter, but its application is quite different.
ADVANCED BACKSCATTER REMOVAL 109
SMALL SPECKS OF DUST CAN FLOAT DOWN
AND LAND ON THE SENSOR, CREATING BLACK
PARTICLES IN ALL OF YOUR IMAGES.
110 ADOBE
®
PHOTOSHOP
®
FOR UNDERWATER PHOTOGRAPHERS
Above—Although the water visibility was poor,
we took this image anyway using one of the first
digital underwater cameras. Left—This image
required some complex corrections, so we
grouped our changes into two sections. The orig-
inal image is shown as the Background layer.
The Select>Color Range command was used to
select the water in the background. The shortcut
Ctrl+J was used to create a new layer and a
mask was added. The Filter>Blur>Smart Blur
filter was then applied to that layer.
The selection was then loaded from the
thumbnail, inversed, and turned into a second
layer with the Ctrl+J command. A new Select>
Color Range selection was made that only in-
cluded the light areas on the statue. A new layer
was made from this selection, and the Filter>Noise>Dust & Scratches filter was applied. Fin-
ally, a new Levels Adjustment Layer was added to the statue group of layers where we adjust-
ed for correct color, brightness, and gamma levels.
ADVANCED BACKSCATTER REMOVAL 111
Top—The Select>Color Range command was used to select the water background so
that a new layer could be created from that selection. Above—The Filter>Blur>Smart
Blur filter was applied to this new layer.
Move the Radius slider to a fairly high number, say 25–50, and then slowly
increase the Threshold until you have sharp subject detail while still keeping the
backscatter at bay. Every image is different, so the settings for the Radius and
Threshold will vary. The best bet is to experiment, and use the Preview box to
minimize the detail loss as you eliminate the backscatter. You will find that this
process will slightly blur the image, so we highly recommend that you use the
Unsharp Mask to help restore any lost image sharpness.
As you work your way through this process, you may find that a few of the
small particles have now become dominant. Cleaning up the image is a simple
process of using the Dust & Scratches filter on the out-of-focus spots and the
Spot Healing Brush on the detailed areas.
An additional benefit to this filter is that while removing backscatter, the fil-
ter also reduces noise in the background, and it doesn’t matter whether it was
the result of film grain or digital camera noise! If you find that the digital noise
has been reduced too much, you might consider using the Add Noise filter to
introduce small amounts of noise to equalize the editing effect.
112 ADOBE
®
PHOTOSHOP
®
FOR UNDERWATER PHOTOGRAPHERS
This shows the final image after all the layers were applied.
ADVANCED BACKSCATTER REMOVAL 113
Top—This digital camera image
taken in the Solomon Islands has
both large and small backscatter
particles. The Spot Healing Brush
was used to remove the large par-
ticles. Bottom—The Polygonal
Lasso tool was used to select the
backscatter in the background
before the Filter>Blur>Surface
Blur filter was applied to the
selection.
114 ADOBE
®
PHOTOSHOP
®
FOR UNDERWATER PHOTOGRAPHERS
When you enlarge a section where the Surface Blur filter was used, you will notice that it is
much smoother than the unedited section. To equalize both sides, go to the Filter>Noise>Add
Noise command and move the slider until the background noise in the selected and unselected
areas match.