ADOBE PHOTOSHOP FOR UNDERWATER PHOTOGRAPHERS- P8 pps
Bạn đang xem bản rút gọn của tài liệu. Xem và tải ngay bản đầy đủ của tài liệu tại đây (749.47 KB, 30 trang )
Adobe
®
Photoshop
®
FOR UNDERWATER
PHOTOGRAPHERS
Adobe Photoshop
Amherst Media
®
PUBLISHER OF PHOTOGRAPHY BOOKS
JACK and SUE
DRAFAHL
Copyright © 2006 by Jack and Sue Drafahl.
All photographs by the authors.
All rights reserved.
Published by:
Amherst Media, Inc.
P.O. Box 586
Buffalo, N.Y. 14226
Fax: 716-874-4508
www.AmherstMedia.com
Publisher: Craig Alesse
Senior Editor/Production Manager: Michelle Perkins
Assistant Editor: Barbara A. Lynch-Johnt
ISBN: 1-58428-189-8
Library of Congress Card Catalog Number: 2005937371
Printed in Korea.
10 9 8 7 6 5 4 3 2 1
No part of this publication may be reproduced, stored, or transmitted in any
form or by any means, electronic, mechanical, photocopied, recorded or oth-
erwise, without prior written consent from the publisher.
Notice of Disclaimer: The information contained in this book is based on the
author’s experience and opinions. The author and publisher will not be held
liable for the use or misuse of the information in this book.
To Kristy and Tommy—
Thanks for your continuous strength and support.
We love you guys.
1. INTRODUCTION . . . . . . . . . . . . . . . . . . . . . . . . . . . . . . . . . . . . . . . . . .11
2. T
HE ADVANCED DIGITAL DARKROOM . . . . . . . . . . . . . . . . . . . . . . . . .14
Processors . . . . . . . . . . . . . . . . . . . . . . . . . . . . . . . . . . . . . . . . . . . . . . . .14
RAM . . . . . . . . . . . . . . . . . . . . . . . . . . . . . . . . . . . . . . . . . . . . . . . . . . . .15
Hard Disk . . . . . . . . . . . . . . . . . . . . . . . . . . . . . . . . . . . . . . . . . . . . . . . .15
Monitor . . . . . . . . . . . . . . . . . . . . . . . . . . . . . . . . . . . . . . . . . . . . . . . . . .16
Dual Monitors . . . . . . . . . . . . . . . . . . . . . . . . . . . . . . . . . . . . . . . . . . .16
Using a Laptop . . . . . . . . . . . . . . . . . . . . . . . . . . . . . . . . . . . . . . . . . . .17
Monitor Calibration . . . . . . . . . . . . . . . . . . . . . . . . . . . . . . . . . . . . . . .17
Software Considerations . . . . . . . . . . . . . . . . . . . . . . . . . . . . . . . . . . . . . .19
Upgrades . . . . . . . . . . . . . . . . . . . . . . . . . . . . . . . . . . . . . . . . . . . . . . .19
Photoshop Classes . . . . . . . . . . . . . . . . . . . . . . . . . . . . . . . . . . . . . . . . . .19
3. T
OP TEN EDITING TOOLS . . . . . . . . . . . . . . . . . . . . . . . . . . . . . . . . .20
Levels Editor . . . . . . . . . . . . . . . . . . . . . . . . . . . . . . . . . . . . . . . . . . . . . .21
Clone Tool . . . . . . . . . . . . . . . . . . . . . . . . . . . . . . . . . . . . . . . . . . . . . . . .22
Healing Brush . . . . . . . . . . . . . . . . . . . . . . . . . . . . . . . . . . . . . . . . . . . . .23
Spot Healing Brush . . . . . . . . . . . . . . . . . . . . . . . . . . . . . . . . . . . . . . . .23
Saturation Control . . . . . . . . . . . . . . . . . . . . . . . . . . . . . . . . . . . . . . . . . .23
Unsharp Mask . . . . . . . . . . . . . . . . . . . . . . . . . . . . . . . . . . . . . . . . . . . . .24
Dust & Scratches . . . . . . . . . . . . . . . . . . . . . . . . . . . . . . . . . . . . . . . . . . .27
Crop Tool . . . . . . . . . . . . . . . . . . . . . . . . . . . . . . . . . . . . . . . . . . . . . . . .27
Burn and Dodge Tools . . . . . . . . . . . . . . . . . . . . . . . . . . . . . . . . . . . . . . .29
Variations Menu . . . . . . . . . . . . . . . . . . . . . . . . . . . . . . . . . . . . . . . . . . . .29
Transform . . . . . . . . . . . . . . . . . . . . . . . . . . . . . . . . . . . . . . . . . . . . . . . .31
4. H
IGH-SPEED IMAGE EDITING . . . . . . . . . . . . . . . . . . . . . . . . . . . . . .33
Keyboard Shortcuts . . . . . . . . . . . . . . . . . . . . . . . . . . . . . . . . . . . . . . . . .33
Adobe Bridge . . . . . . . . . . . . . . . . . . . . . . . . . . . . . . . . . . . . . . . . . . . . . .35
CONTENTS 3
CONTENTS
Actions . . . . . . . . . . . . . . . . . . . . . . . . . . . . . . . . . . . . . . . . . . . . . . . . . . .37
Scripts . . . . . . . . . . . . . . . . . . . . . . . . . . . . . . . . . . . . . . . . . . . . . . . . . . .40
5. P
HOTO TRIAGE . . . . . . . . . . . . . . . . . . . . . . . . . . . . . . . . . . . . . . . . . .41
Photo Grouping . . . . . . . . . . . . . . . . . . . . . . . . . . . . . . . . . . . . . . . . . . . .42
Time Travel . . . . . . . . . . . . . . . . . . . . . . . . . . . . . . . . . . . . . . . . . . . . . . .42
Workflow . . . . . . . . . . . . . . . . . . . . . . . . . . . . . . . . . . . . . . . . . . . . . . . . .46
Transfer and Duplicate File . . . . . . . . . . . . . . . . . . . . . . . . . . . . . . . . .46
PSD Files . . . . . . . . . . . . . . . . . . . . . . . . . . . . . . . . . . . . . . . . . . . . . . .47
Crop . . . . . . . . . . . . . . . . . . . . . . . . . . . . . . . . . . . . . . . . . . . . . . . . . .47
Full-Image Corrections . . . . . . . . . . . . . . . . . . . . . . . . . . . . . . . . . . . . .47
Correcting Specific Sections . . . . . . . . . . . . . . . . . . . . . . . . . . . . . . . . . .47
Sharpen the Image . . . . . . . . . . . . . . . . . . . . . . . . . . . . . . . . . . . . . . . .47
Save and Flatten . . . . . . . . . . . . . . . . . . . . . . . . . . . . . . . . . . . . . . . . .47
File Naming Conventions . . . . . . . . . . . . . . . . . . . . . . . . . . . . . . . . . . . . .48
Save as PSD . . . . . . . . . . . . . . . . . . . . . . . . . . . . . . . . . . . . . . . . . . . . .49
Add a Letter . . . . . . . . . . . . . . . . . . . . . . . . . . . . . . . . . . . . . . . . . . . .49
Find it Quickly . . . . . . . . . . . . . . . . . . . . . . . . . . . . . . . . . . . . . . . . . . .49
Batch Rename . . . . . . . . . . . . . . . . . . . . . . . . . . . . . . . . . . . . . . . . . . .49
6. A
DJUSTMENT LAYERS . . . . . . . . . . . . . . . . . . . . . . . . . . . . . . . . . . . . .51
Adjustment Layer Basics . . . . . . . . . . . . . . . . . . . . . . . . . . . . . . . . . . . . . .51
How Layers Work . . . . . . . . . . . . . . . . . . . . . . . . . . . . . . . . . . . . . . . . .51
Speeding up the Action . . . . . . . . . . . . . . . . . . . . . . . . . . . . . . . . . . . . .53
Let the Action Begin . . . . . . . . . . . . . . . . . . . . . . . . . . . . . . . . . . . . . . .55
Clone or Healing Layer . . . . . . . . . . . . . . . . . . . . . . . . . . . . . . . . . . . . . .55
Create a New Layer . . . . . . . . . . . . . . . . . . . . . . . . . . . . . . . . . . . . . . .55
Layer Visibility . . . . . . . . . . . . . . . . . . . . . . . . . . . . . . . . . . . . . . . . . . .56
The Sharper Image . . . . . . . . . . . . . . . . . . . . . . . . . . . . . . . . . . . . . . . . . .57
Selectively Sharpen . . . . . . . . . . . . . . . . . . . . . . . . . . . . . . . . . . . . . . . .60
Going Back . . . . . . . . . . . . . . . . . . . . . . . . . . . . . . . . . . . . . . . . . . . . . .60
Burning and Dodging Techniques . . . . . . . . . . . . . . . . . . . . . . . . . . . . . .60
Selective Editing . . . . . . . . . . . . . . . . . . . . . . . . . . . . . . . . . . . . . . . . . .63
Blending Modes . . . . . . . . . . . . . . . . . . . . . . . . . . . . . . . . . . . . . . . . . .63
Use Separate Layers . . . . . . . . . . . . . . . . . . . . . . . . . . . . . . . . . . . . . . .63
Advanced Layering Techniques . . . . . . . . . . . . . . . . . . . . . . . . . . . . . . . . .63
4 ADOBE
®
PHOTOSHOP
®
FOR UNDERWATER PHOTOGRAPHERS
7. ADVANCED COLOR AND EXPOSURE CORRECTIONS . . . . . . . . . . . . . . .69
Levels Editor . . . . . . . . . . . . . . . . . . . . . . . . . . . . . . . . . . . . . . . . . . . . . .69
Eyedroppers . . . . . . . . . . . . . . . . . . . . . . . . . . . . . . . . . . . . . . . . . . . . . .70
Auto Functions . . . . . . . . . . . . . . . . . . . . . . . . . . . . . . . . . . . . . . . . . . . .71
Options . . . . . . . . . . . . . . . . . . . . . . . . . . . . . . . . . . . . . . . . . . . . . . . .72
Curves Editor . . . . . . . . . . . . . . . . . . . . . . . . . . . . . . . . . . . . . . . . . . . . . .72
Add Control Points . . . . . . . . . . . . . . . . . . . . . . . . . . . . . . . . . . . . . . . .72
Adjusting Specific Areas . . . . . . . . . . . . . . . . . . . . . . . . . . . . . . . . . . . .73
Multiple Problems . . . . . . . . . . . . . . . . . . . . . . . . . . . . . . . . . . . . . . . . .74
Finding White and Black Points . . . . . . . . . . . . . . . . . . . . . . . . . . . . . .74
Color Shifts . . . . . . . . . . . . . . . . . . . . . . . . . . . . . . . . . . . . . . . . . . . . . .74
Shadow/Highlight . . . . . . . . . . . . . . . . . . . . . . . . . . . . . . . . . . . . . . . . . .75
Exposure . . . . . . . . . . . . . . . . . . . . . . . . . . . . . . . . . . . . . . . . . . . . . . . . .77
Selective Midtone Adjustments . . . . . . . . . . . . . . . . . . . . . . . . . . . . . . . . .77
Brush Tool and Layers Mask . . . . . . . . . . . . . . . . . . . . . . . . . . . . . . . . . .78
High Dynamic Range . . . . . . . . . . . . . . . . . . . . . . . . . . . . . . . . . . . . . . . .79
Crossover Color Shifts . . . . . . . . . . . . . . . . . . . . . . . . . . . . . . . . . . . . . . .79
Hue/Saturation . . . . . . . . . . . . . . . . . . . . . . . . . . . . . . . . . . . . . . . . . .79
Replace Color . . . . . . . . . . . . . . . . . . . . . . . . . . . . . . . . . . . . . . . . . . . .80
Green Water to Blue . . . . . . . . . . . . . . . . . . . . . . . . . . . . . . . . . . . . . . . . .81
Replace Color . . . . . . . . . . . . . . . . . . . . . . . . . . . . . . . . . . . . . . . . . . . .81
Channel Mixer . . . . . . . . . . . . . . . . . . . . . . . . . . . . . . . . . . . . . . . . . . .82
Black & White Conversions . . . . . . . . . . . . . . . . . . . . . . . . . . . . . . . . . . .83
Grayscale . . . . . . . . . . . . . . . . . . . . . . . . . . . . . . . . . . . . . . . . . . . . . . .83
Split Channels . . . . . . . . . . . . . . . . . . . . . . . . . . . . . . . . . . . . . . . . . . .83
Channel Mixer . . . . . . . . . . . . . . . . . . . . . . . . . . . . . . . . . . . . . . . . . . .84
Selective Color . . . . . . . . . . . . . . . . . . . . . . . . . . . . . . . . . . . . . . . . . . . .85
8. A
DVANCED SHARPENING TECHNIQUES . . . . . . . . . . . . . . . . . . . . . . . .86
Smart Sharpen . . . . . . . . . . . . . . . . . . . . . . . . . . . . . . . . . . . . . . . . . . . . .86
Various Adjustments . . . . . . . . . . . . . . . . . . . . . . . . . . . . . . . . . . . . . . .86
Advanced Settings . . . . . . . . . . . . . . . . . . . . . . . . . . . . . . . . . . . . . . . .87
High Pass Filter . . . . . . . . . . . . . . . . . . . . . . . . . . . . . . . . . . . . . . . . . . . .88
Layer Controls . . . . . . . . . . . . . . . . . . . . . . . . . . . . . . . . . . . . . . . . . . . . .91
Add a Mask . . . . . . . . . . . . . . . . . . . . . . . . . . . . . . . . . . . . . . . . . . . . .91
CONTENTS 5
9. WORKING WITH RAW FILES . . . . . . . . . . . . . . . . . . . . . . . . . . . . . . .92
Adjust Tab . . . . . . . . . . . . . . . . . . . . . . . . . . . . . . . . . . . . . . . . . . . . . . . .92
Detail Tab . . . . . . . . . . . . . . . . . . . . . . . . . . . . . . . . . . . . . . . . . . . . . . . .95
Lens Tab . . . . . . . . . . . . . . . . . . . . . . . . . . . . . . . . . . . . . . . . . . . . . . . . .97
Curve Tab . . . . . . . . . . . . . . . . . . . . . . . . . . . . . . . . . . . . . . . . . . . . . . . .97
Calibrate Tab . . . . . . . . . . . . . . . . . . . . . . . . . . . . . . . . . . . . . . . . . . . . . .98
Workflow Options . . . . . . . . . . . . . . . . . . . . . . . . . . . . . . . . . . . . . . . . . .98
Toolbox . . . . . . . . . . . . . . . . . . . . . . . . . . . . . . . . . . . . . . . . . . . . . . . . . .99
RAW File Layer Editing . . . . . . . . . . . . . . . . . . . . . . . . . . . . . . . . . . . . .100
10. A
DVANCED BACKSCATTER REMOVAL . . . . . . . . . . . . . . . . . . . . . . . .103
Spot Healing Brush . . . . . . . . . . . . . . . . . . . . . . . . . . . . . . . . . . . . . . . .103
Dust & Scratches Filter . . . . . . . . . . . . . . . . . . . . . . . . . . . . . . . . . . . . .104
Layers . . . . . . . . . . . . . . . . . . . . . . . . . . . . . . . . . . . . . . . . . . . . . . . . .104
DSLR Sensor Artifacts . . . . . . . . . . . . . . . . . . . . . . . . . . . . . . . . . . . . . .109
Blur Filters . . . . . . . . . . . . . . . . . . . . . . . . . . . . . . . . . . . . . . . . . . . . . . .109
Smart Blur . . . . . . . . . . . . . . . . . . . . . . . . . . . . . . . . . . . . . . . . . . . . .109
Surface Blur . . . . . . . . . . . . . . . . . . . . . . . . . . . . . . . . . . . . . . . . . . . .109
11. R
EMOVING UNWANTED OBJECTS . . . . . . . . . . . . . . . . . . . . . . . . . .115
Hanging Gauges . . . . . . . . . . . . . . . . . . . . . . . . . . . . . . . . . . . . . . . . . .115
Healing Coral . . . . . . . . . . . . . . . . . . . . . . . . . . . . . . . . . . . . . . . . . . . . .118
Using the Magic Wand . . . . . . . . . . . . . . . . . . . . . . . . . . . . . . . . . . . .118
Clone Tool . . . . . . . . . . . . . . . . . . . . . . . . . . . . . . . . . . . . . . . . . . . . .118
Healing Brush . . . . . . . . . . . . . . . . . . . . . . . . . . . . . . . . . . . . . . . . . .118
Nondestructive Repairs . . . . . . . . . . . . . . . . . . . . . . . . . . . . . . . . . . . . . .120
Copy Data from One Photo to Another . . . . . . . . . . . . . . . . . . . . . . . . .120
Plug-in Filters . . . . . . . . . . . . . . . . . . . . . . . . . . . . . . . . . . . . . . . . . . . . .123
12. D
IVER MODIFICATIONS . . . . . . . . . . . . . . . . . . . . . . . . . . . . . . . . . .124
Flash Angle . . . . . . . . . . . . . . . . . . . . . . . . . . . . . . . . . . . . . . . . . . . . . .124
Add a Flash . . . . . . . . . . . . . . . . . . . . . . . . . . . . . . . . . . . . . . . . . . . .126
Snaps, Gauges, and Meters . . . . . . . . . . . . . . . . . . . . . . . . . . . . . . . . . . .128
Face Masks . . . . . . . . . . . . . . . . . . . . . . . . . . . . . . . . . . . . . . . . . . . . . . .128
Reflections . . . . . . . . . . . . . . . . . . . . . . . . . . . . . . . . . . . . . . . . . . . . .128
Shadowed Face . . . . . . . . . . . . . . . . . . . . . . . . . . . . . . . . . . . . . . . . . .131
6 ADOBE
®
PHOTOSHOP
®
FOR UNDERWATER PHOTOGRAPHERS
13. EDITING BLOOMING EFFECTS . . . . . . . . . . . . . . . . . . . . . . . . . . . .136
Blooming Effect in Open Water . . . . . . . . . . . . . . . . . . . . . . . . . . . . . . .136
Make Your Selection . . . . . . . . . . . . . . . . . . . . . . . . . . . . . . . . . . . . . . 136
Create a Layer . . . . . . . . . . . . . . . . . . . . . . . . . . . . . . . . . . . . . . . . . .137
Set the Foreground and Background . . . . . . . . . . . . . . . . . . . . . . . . . .137
Gradient Tool . . . . . . . . . . . . . . . . . . . . . . . . . . . . . . . . . . . . . . . . . . .140
Blur Filters . . . . . . . . . . . . . . . . . . . . . . . . . . . . . . . . . . . . . . . . . . . . .142
Healing Brush . . . . . . . . . . . . . . . . . . . . . . . . . . . . . . . . . . . . . . . . . .144
Add Sun Rays . . . . . . . . . . . . . . . . . . . . . . . . . . . . . . . . . . . . . . . . . .145
Fixing Blooming in RAW Files . . . . . . . . . . . . . . . . . . . . . . . . . . . . . .146
Blooming Effect with Subject in Foreground . . . . . . . . . . . . . . . . . . . . .150
Subject Selection . . . . . . . . . . . . . . . . . . . . . . . . . . . . . . . . . . . . . . . . .150
Healing Brush . . . . . . . . . . . . . . . . . . . . . . . . . . . . . . . . . . . . . . . . . .150
14. C
HANGING BACKGROUNDS . . . . . . . . . . . . . . . . . . . . . . . . . . . . . . .153
Selection Tools . . . . . . . . . . . . . . . . . . . . . . . . . . . . . . . . . . . . . . . . . . . .153
Magic Wand . . . . . . . . . . . . . . . . . . . . . . . . . . . . . . . . . . . . . . . . . . .153
Magnetic Lasso . . . . . . . . . . . . . . . . . . . . . . . . . . . . . . . . . . . . . . . . . .153
Polygonal Lasso . . . . . . . . . . . . . . . . . . . . . . . . . . . . . . . . . . . . . . . . . .154
Background Image Adjustments . . . . . . . . . . . . . . . . . . . . . . . . . . . . . . .154
Levels Editor . . . . . . . . . . . . . . . . . . . . . . . . . . . . . . . . . . . . . . . . . . . .154
Saturation . . . . . . . . . . . . . . . . . . . . . . . . . . . . . . . . . . . . . . . . . . . . .154
Extract Filter . . . . . . . . . . . . . . . . . . . . . . . . . . . . . . . . . . . . . . . . . . . . .157
Lens Blur . . . . . . . . . . . . . . . . . . . . . . . . . . . . . . . . . . . . . . . . . . . . . . . .161
Save the Selection as an Alpha Channel . . . . . . . . . . . . . . . . . . . . . . . .163
Gradient Fill . . . . . . . . . . . . . . . . . . . . . . . . . . . . . . . . . . . . . . . . . . .165
Apply Lens Blur . . . . . . . . . . . . . . . . . . . . . . . . . . . . . . . . . . . . . . . . .165
15. U
NDERWATER PLUG-IN APPLICATIONS . . . . . . . . . . . . . . . . . . . . . .168
Focus Magic . . . . . . . . . . . . . . . . . . . . . . . . . . . . . . . . . . . . . . . . . . . . . .169
Andromeda VariFocus . . . . . . . . . . . . . . . . . . . . . . . . . . . . . . . . . . . . . .171
AutoFX Mystical Lighting . . . . . . . . . . . . . . . . . . . . . . . . . . . . . . . . . . .171
Digital Elements Aurora . . . . . . . . . . . . . . . . . . . . . . . . . . . . . . . . . . . . .172
Corel KPT Lens Flare . . . . . . . . . . . . . . . . . . . . . . . . . . . . . . . . . . . . . . .174
Extensis Mask Pro 3 . . . . . . . . . . . . . . . . . . . . . . . . . . . . . . . . . . . . . . . .176
Alien Skin Smart Fill . . . . . . . . . . . . . . . . . . . . . . . . . . . . . . . . . . . . . . . .179
Genuine Fractals Print Pro . . . . . . . . . . . . . . . . . . . . . . . . . . . . . . . . . . 180
CONTENTS 7
Extensis Photo Cast Shadow . . . . . . . . . . . . . . . . . . . . . . . . . . . . . . . . .182
The Plug-in Site . . . . . . . . . . . . . . . . . . . . . . . . . . . . . . . . . . . . . . . . . . .183
Kodak Digital GEM, ROC, and SHO Pro . . . . . . . . . . . . . . . . . . . . . . .185
New Plug-ins . . . . . . . . . . . . . . . . . . . . . . . . . . . . . . . . . . . . . . . . . . . . .185
16. A
DVANCED LAYERING TECHNIQUES . . . . . . . . . . . . . . . . . . . . . . . .187
Different Photoshop Versions . . . . . . . . . . . . . . . . . . . . . . . . . . . . . . . . .188
Photo Collage Using Full Images . . . . . . . . . . . . . . . . . . . . . . . . . . . . . .187
Smart Objects . . . . . . . . . . . . . . . . . . . . . . . . . . . . . . . . . . . . . . . . . . .188
Moving Layers . . . . . . . . . . . . . . . . . . . . . . . . . . . . . . . . . . . . . . . . . .189
Add a Shadow . . . . . . . . . . . . . . . . . . . . . . . . . . . . . . . . . . . . . . . . . .190
Copy the Shadow in Photoshop CS . . . . . . . . . . . . . . . . . . . . . . . . . . . .190
Copy the Shadow in Photoshop CS2 . . . . . . . . . . . . . . . . . . . . . . . . . . . .191
Grid Alignment . . . . . . . . . . . . . . . . . . . . . . . . . . . . . . . . . . . . . . . . .192
Auto Guides . . . . . . . . . . . . . . . . . . . . . . . . . . . . . . . . . . . . . . . . . . . .193
Arranging the Layers . . . . . . . . . . . . . . . . . . . . . . . . . . . . . . . . . . . . .193
Photo Collage with Soft Edges . . . . . . . . . . . . . . . . . . . . . . . . . . . . . . . .193
Blending Modes . . . . . . . . . . . . . . . . . . . . . . . . . . . . . . . . . . . . . . . . . . .195
Layer Mask . . . . . . . . . . . . . . . . . . . . . . . . . . . . . . . . . . . . . . . . . . . . . . .195
Adding Text . . . . . . . . . . . . . . . . . . . . . . . . . . . . . . . . . . . . . . . . . . . . . .197
Vector Graphics . . . . . . . . . . . . . . . . . . . . . . . . . . . . . . . . . . . . . . . . . .198
Styles . . . . . . . . . . . . . . . . . . . . . . . . . . . . . . . . . . . . . . . . . . . . . . . . .198
Clipping Mask . . . . . . . . . . . . . . . . . . . . . . . . . . . . . . . . . . . . . . . . . . . .201
Shapes . . . . . . . . . . . . . . . . . . . . . . . . . . . . . . . . . . . . . . . . . . . . . . . . . .203
17. O
UTPUT OPTIONS . . . . . . . . . . . . . . . . . . . . . . . . . . . . . . . . . . . . . .204
Crop and Resize . . . . . . . . . . . . . . . . . . . . . . . . . . . . . . . . . . . . . . . . . . .204
Color Management . . . . . . . . . . . . . . . . . . . . . . . . . . . . . . . . . . . . . . . .206
Three Choices . . . . . . . . . . . . . . . . . . . . . . . . . . . . . . . . . . . . . . . . . . .206
Manual Control . . . . . . . . . . . . . . . . . . . . . . . . . . . . . . . . . . . . . . . . .206
Gamut Warning . . . . . . . . . . . . . . . . . . . . . . . . . . . . . . . . . . . . . . . . . . .211
Photographic Edges and Framing . . . . . . . . . . . . . . . . . . . . . . . . . . . . . .211
Jump Plug-ins . . . . . . . . . . . . . . . . . . . . . . . . . . . . . . . . . . . . . . . . . .211
More Plug-ins . . . . . . . . . . . . . . . . . . . . . . . . . . . . . . . . . . . . . . . . . . .211
Digital Slide Shows . . . . . . . . . . . . . . . . . . . . . . . . . . . . . . . . . . . . . . . . .215
Resize Your Files . . . . . . . . . . . . . . . . . . . . . . . . . . . . . . . . . . . . . . . . .215
8 ADOBE
®
PHOTOSHOP
®
FOR UNDERWATER PHOTOGRAPHERS
Video Output . . . . . . . . . . . . . . . . . . . . . . . . . . . . . . . . . . . . . . . . . . . . .216
Sizing Your Files . . . . . . . . . . . . . . . . . . . . . . . . . . . . . . . . . . . . . . . . .216
NTSC Colors . . . . . . . . . . . . . . . . . . . . . . . . . . . . . . . . . . . . . . . . . . .217
Pixel Aspect Ratio . . . . . . . . . . . . . . . . . . . . . . . . . . . . . . . . . . . . . . .218
18. C
ONCLUSION . . . . . . . . . . . . . . . . . . . . . . . . . . . . . . . . . . . . . . . . . .219
Index . . . . . . . . . . . . . . . . . . . . . . . . . . . . . . . . . . . . . . . . . . . . . . . . . . .221
CONTENTS 9
ABOUT THE AUTHORS
Jack and Sue Drafahl are a husband
and wife team of professional pho-
tojournalists, lecturers, and multi-
media producers. For over thirty
years, their articles have appeared in
Petersen’s PHOTOgraphic, Range-
finder, Sport Diver, Skin Diver, Dive
Training, Diver, National Wildlife
Federation, and National Geographic
World Magazine. They have been
actively involved in the digital tran-
sition since the early ’80s and are
software and hardware Beta testers
for companies like Adobe, Applied
Science Fiction, Corel, Kodak, and
Ulead Systems.
Jack and Sue started their profes-
sional photographic careers at Brooks Institute of Photography in Santa
Barbara, CA, where Jack later started the audio visual department. Both
are active scuba divers, receiving their diving certification in the early ’70s.
Jack and Sue were awarded Divers of the Year from Beneath the Sea, and
Sue is an inaugural member of the Women Divers Hall of Fame.
Jack and Sue make their home on the Oregon coast and enjoy teach-
ing seminars worldwide on all aspects of photography, both topside and
underwater. Recently, they have put their years of photographic experi-
ence to use designing the Oregon Coast Digital Center, an enhanced
learning facility that features in-depth digital classes to help students bet-
ter understand the digital realm. In addition to their various monthly arti-
cles, Jack and Sue are authors of Digital Imaging for the Underwater
Photographer, Photo Salvage with Adobe Photoshop, Step-by-Step Digital Pho-
tography, Advanced Digital Camera Techniques, Plug-ins for Adobe Photo-
shop, and Master Guide to Underwater Photography, all from Amherst
Media.
For more on the authors, please visit www.jackandsuedrafahl.com.
I
n a matter of a few short years,
the underwater digital camera
went from a novelty item to the
predominant method for taking
underwater pictures. Never before has
a technology advanced so rapidly.
Thanks to digital, though, underwater
photography has evolved into a shoot-
to-edit process. Rather than having to
get each image just right as you did
when using film, you now have the
option of editing the image post-
capture. Image editing programs
make it easy to correct minor defects
in your images, and Adobe Photoshop
leads the pack as the most popular im-
age editing software program.
Our very first book with Amherst Media was called Digital Imaging for the
Underwater Photographer. It was introduced at the onset of digital, when most
underwater photographers were scanning their film images and editing them in
Photoshop. There were very few digital cameras on the market at that time,
and only a few brave souls took their expensive digital cameras underwater. As
you can see, times have definitely changed. There are now plenty of digital
cameras and their corresponding underwater housings, and digital underwater
photography has rapidly gained popularity.
Before Digital Imaging for the Underwater Photographer went into its sec-
ond edition, we updated it and added several new chapters. Although its con-
tents were enough to satisfy the new digital underwater photographer, we
found that many underwater photographers had mastered all the editing skills
the book had to offer, so we decided it was time for a sequel.
THE ADVANCED DIGITAL DARKROOM 11
1. INTRODUCTION
Digital photographs are created with a digi-
tal camera (left) or by scanning film images
to create digital image files (right).
Adobe
®
Photoshop
®
for Underwater Photographers is your next step in master-
ing many of the powerful editing tools found in Photoshop. In the following
chapters, we will present some of the more complex issues we have encoun-
tered over our past 35 years of diving and will show you how to correct com-
mon flaws using Photoshop’s vast collection of tools. We will assume that you
have already read Digital Imaging for the Underwater Photographer and have
mastered the skills discussed therein, so we will minimize the repetition.
We also won’t teach you the camera skills required for taking digital under-
water photos as we have dedicated an entire book to the subject. The Master
Guide for Underwater Digital Photography provides tips on taking better digi-
tal underwater photos, so be sure to order your copy.
We feel that once you understand how to fix the problems addressed in this
book, you can utilize these tools and your newfound expertise to solve other
unique problems. If you find that you encounter problems that are not solved
in the scope of this book, log on and drop us an e-mail (www.jackandsue
drafahl.com). Now, give the page a turn. We hope you enjoy our book.
12 ADOBE
®
PHOTOSHOP
®
FOR UNDERWATER PHOTOGRAPHERS
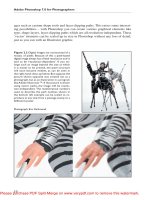
This flash-filled sunlight image of a wreck illustrates the shoot-to-edit concept. It is really dif-
ficult to expose for the sunlight and still get a good exposure for the flashlight. The solution is to
shoot the image as best you can (left) and then modify the rest in Adobe Photoshop (right). The
blooming effect in the upper corner was removed with a Gradient Fill and Lens Flare filter,
and the flashlight beam was increased with the Lens Flare filter.
THE ADVANCED DIGITAL DARKROOM 13
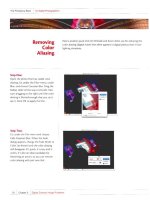
A common problem with digital cameras is
improper exposure and color saturation. In
this case, the fish is dark and very low in color
saturation (right). The photo was easily cor-
rected (below) with the Levels editor and the
Saturation menu.
B
efore we get into the real power of Photoshop, we need to address set-
ting up your digital darkroom for editing underwater images. In chap-
ter 2 of our first book, Digital Imaging for the Underwater Photog-
rapher, we covered the basics of how to set up your new digital darkroom.
Since that time, computer technology has been changing even faster than dig-
ital photography, so there are no specific products or hardware we can recom-
mend. Instead, we offer in this chapter a discussion of some features to consid-
er and point out some new toys that will help make your digital darkroom more
efficient.
P
ROCESSORS
In order to edit your underwater images quickly and effectively you must have
the fastest machine you can afford. It is not uncommon to see computer
processors in excess of 2GHz, and
computers with over 10GHz are just
down the road. Dual processors are
quickly becoming a standard feature.
14 ADOBE
®
PHOTOSHOP
®
FOR UNDERWATER PHOTOGRAPHERS
2. THE ADVANCED DIGITAL DARKROOM
Top Left—It is important to continuously
hone your Photoshop skills. You might consid-
er attending Photoshop classes at our school,
the Oregon Coast Digital Center. The class
size is limited to four students to guarantee
personalized attention. For more informa-
tion, go to www.oregoncoastdigitalcenter.com.
Bottom Left—Most computers today have two
or three slots for RAM. You should start with
a 1GB RAM card and add additional cards
as you need them.
RAM
Increasing the processor speed is only part of the solution, as you must consid-
er RAM. Most computers at the time of publication come standard with either
512MB or 1GB of RAM and usually offer slots for expansion. We now recom-
mend a minimum of 1GB of RAM—and more if you can afford it—when using
Photoshop CS, CS2, and higher.
Photoshop often makes five or more copies of an image in memory as
you are editing. When working with
a 12MP digital camera image, this
equates to about a 40MB file. So, a
single working image could use as
much as 2000MB of RAM! Then if
you add on the memory needed for
the operating system, your RAM allo-
cation disappears quickly. When the
computer runs out of RAM, it starts
using the hard disk as a memory cache
and slows to a snail’s pace.
H
ARD DISK
The third factor that limits the speed
of your editing system is your hard
disk configuration. If you want an
ideal editing system, we suggest you
have three drives in your computer.
The first drive should contain your
programs and operating system, the
second should hold all the images you
are editing, and the third should serve
as a backup drive for your photo-
graphs and as a scratch drive.
Another way to increase the speed
of your editing system is to use ATA
serial drives. This type of drive is much
faster than the standard IDE drives
and can often double the speed of a
drive system.
INTRODUCTION 15
This shows a typical image editing system with
three hard drives. Drive C is used for the oper-
ating system and programs. Drive D holds
images and serves as a scratch (temporary)
space for the operating system. Drive E is an
optional drive used for image backup and
also as a Photoshop scratch drive space.
MONITOR
The next consideration is the computer monitor. When in doubt, bigger is bet-
ter: the larger the screen, the finer the image detail. As you move into moni-
tors with resolutions of 1600x1200 and higher, you will find your images have
a very smooth tonal value with no apparent pixels. The trend today is flat-
screen monitors, and the larger ones needed for efficient image editing are
indeed pricey. Don’t worry though, because we have a cool solution.
Dual Monitors. As an alternative to large-screen editing, you can use two
smaller monitors. When you open Photoshop, you can store all your tools,
palettes, menus, and file manager on one monitor and use the other for full-
screen image editing. To move a menu
from one monitor to another, simply
use your mouse to grab the menu and
drag it to the other screen.
Many of the new graphics cards
support the concurrent use of dual
monitors. Once you try dual-monitor
editing, you’ll be hooked for sure.
16 ADOBE
®
PHOTOSHOP
®
FOR UNDERWATER PHOTOGRAPHERS
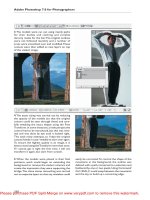
Top—The use of dual monitors is an effective alternative to working with one larger monitor.
This type of setup requires a video display adapter that supports two monitors. With this setup
you can put your menus on one screen and your image on the other. Above—If you have both
laptop and desktop systems, an alternative dual screen option uses special software from
MaxiVista. It links up to three laptops to your desktop system and allows you to drop images and
menus from your desktop to the laptop screen and vice-versa. (Photo courtesy of MaxiVista.)
Using a Laptop. If you like the
idea of dual monitors but don’t want
to buy another monitor, we have yet
another solution. If you own both a
laptop computer and a desktop sys-
tem, you can use special software from
MaxiVista (www.maxivista.com) to
link the two computers through your
network Ethernet system and magical-
ly you have a dual monitor system.
Monitor Calibration. Photoshop
uses an image profile system that saves
your monitor brightness, contrast,
and saturation values in a special sec-
tion of your image file. When that file
is sent to another computer with the
same profiling system loaded, it will
convert the data so that the image
looks identical on both systems. Mon-
itor calibration is mandatory if you are
serious about image editing.
In Digital Imaging for the Under-
water Photographer, we briefly out-
lined the need for monitor calibration for image consistency from one system
to the next. We mentioned that Adobe’s Gamma Loader program comes with
Photoshop, but we have found the results are inconsistent and very subjective.
We have since switched to hardware monitor calibration and have found it to
be much more accurate. There are several types out there, but one of the more
cost effective is the Spyder from Color Vision (www.colorvision.com).
These calibration devices are easy to use. Simply load the special software
program that operates the device, attach the unit to your computer monitor,
press the start button, and the software–hardware combination does the rest.
Best of all, you can attach the unit to flat-screen or CRT monitors, and there
is even an attachment so you can use it on your laptop computer. When the cal-
ibration is done, save the profile as the default for your monitor. Each time you
start your computer this monitor profile will be loaded and used as you edit
images in Photoshop.
INTRODUCTION 17
One of the most accurate ways to calibrate
your monitor is with a hardware device like
the Spyder 2 from www.colorvision.com. This
device works on both CRT and LCD flat
screens. Its user-friendly interface takes you
through the step-by-step process of creating
your own color profiles for your monitor.
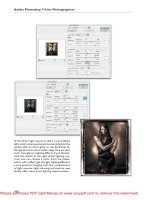
Upgrading Adobe Photoshop is an important part of keeping your digital darkroom up to date.
This illustration shows the changes in the Photoshop toolbox from version 2.5 through CS2 (ver-
sion 9).
Above—Adobe Photoshop upgrades about
every two years, so most of the text and illus-
trations in this book are based on CS2
(Creative Suite 2). Right—You can set the
preferences in Photoshop so that the new fea-
tures of CS2 are highlighted.
SOFTWARE CONSIDERATIONS
Upgrades. One of the problems facing image editors today is the expense of
the software and how often new versions come out. As a general rule of thumb,
Adobe will come out with a new ver-
sion of Photoshop every two years.
Once you make the initial investment
in Photoshop, you no longer have to
pay the full price of the program as
you can purchase upgrade versions for considerably less. We have been Adobe
Photoshop Beta testers since the very beginning so we see all the new features
ahead of time. If you are serious about image editing, then we would recom-
mend upgrading every version as the time-saving new features are worth the
investment.
P
HOTOSHOP CLASSES
Photoshop can be quite overwhelming at first, so we highly recommend read-
ing everything you can about it. Also, consider attending some Photoshop
classes. We feel so strongly about the hands-on approach to learning the pro-
gram that we founded the Oregon Coast Digital Center, an enhanced learning
facility. Enrollment is limited to four students to maximize personal attention
(www.oregoncoastdigitalcenter.com).
Another source of advanced Photoshop education can be derived from
watching the Photoshop videos produced by one of the many Photoshop
gurus. You can also join one of the many Photoshop-user groups on the Web
to help find answers—and use relevant tutorials—to solve those nagging
Photoshop questions. The Help function and the Photoshop manual are also
excellent places to go for added information on a specific function.
INTRODUCTION 19
AS A GENERAL RULE OF THUMB, ADOBE WILL
COME OUT WITH A NEW VERSION OF
PHOTOSHOP EVERY TWO YEARS.
P
hotoshop has more than 700 tools, or variations of tools, that can be
used to edit your underwater images. Fortunately, you will need less
than a dozen to edit 95 percent of your images. Once you have become
proficient in using these few but powerful tools, you will have mastered a big
part of Photoshop.
20 ADOBE
®
PHOTOSHOP
®
FOR UNDERWATER PHOTOGRAPHERS
3. TOP TEN EDITING TOOLS
The Levels editor is the most commonly used tool for global image correction. The histogram pro-
vides a graphic display of all the shadow, midtone, and highlight data contained in the image.
The sliders (wedges) can be moved to readjust the gamma when necessary. Here we moved the
left (shadow) slider to align with the data and change the shadows level. By moving the right
(highlight) slider over, we corrected the dark highlights, and by adjusting the midtone slider, we
increased midtone detail.
One interesting aspect of Photoshop is that almost every tool can be
accessed several different ways. You may find that a tool can be accessed from
a pull-down menu at the top of the
screen, by using shortcut commands,
or through other editing menus con-
taining the tool. For example, the
Levels editor can be accessed from the
Image>Adjustments>Levels pull-down menu, by using the Ctrl/Cmd+L
shortcut command, via Window>Layers, or by pressing the F7 button. (Note:
Windows users will use the Ctrl button when executing these keystroke com-
binations, and Mac users will hit the Cmd key.)
If there is a function without a keyboard shortcut assignment, you can go
to Edit>Keyboard Shortcuts or Window>Workspace>Keyboard Shortcuts &
Menus and assign your own special key to that function (see chapter 4). You
can also use a special feature called Actions to automate adjustments to an
image. (We’ll cover this topic in detail in chapter 4.)
After many years of editing underwater images, we have found that there are
several tools that we use most often; we call them our “top ten tools,” and in
this chapter, we’ll describe their use. In later chapters, we will be adding to
these favorites as we work together on some of the more difficult problems
encountered while editing underwater photographs.
L
EVELS EDITOR
We all know that underwater photography presents its own set of problems.
The nature of light as it penetrates the deep invariably yields photos with mid-
tone detail that is too dark. For this reason, you will quickly find that you use
the Levels editor more than any other function in Photoshop.
Before you start using the Levels editor, let’s give you a refresher so you
understand how it works and how to interpret it. When you open the Levels
editor (Image>Adjustments or Ctrl/Cmd+L), you are presented with a his-
togram. The histogram displays all the tonal values in an image as it ranges
from pure black (left) to pure white (right). If the data is evenly spread across
the histogram, then you have a well-balanced exposure. If most of the data is
on the left side, the image will be dark; if most of the data is on the right, the
image will be very light or overexposed. Most underwater images have exten-
sive data on the left, indicating that they lack both highlight and midtone
detail.
TOP TEN EDITING TOOLS 21
YOU WILL QUICKLY FIND THAT YOU USE THE
LEVELS EDITOR MORE THAN ANY OTHER
FUNCTION IN PHOTOSHOP.
Below the histogram you will find a black wedge (left), a gray wedge (cen-
ter), and a white wedge (right). If you are missing data on the right, you can
move the white wedge until it is under the leading edge of data in the his-
togram, making the lightest detail in the image pure white. If you have miss-
ing data in the shadows, just grab the black pointer and move it to the right so
that it is positioned directly under the leading edge of shadow data. Photoshop
will rearrange the data so that the darkest detail in the image is pure black.
Now let’s suppose that you have a good black and white, but the image is
still dark in the midtones. To make this correction, merely select the gray slid-
er and move it toward the left while carefully watching its effect on your image.
When you have achieved the desired tone and level of detail, release the point-
er and save your midtone correction.
C
LONE TOOL
The Clone tool is designed to copy and paste small amounts of data from one
position to another. To remove a small artifact such as a backscatter particle,
place your cursor over the area to be copied, hold down the Alt/Opt key, and
click on that spot. The Clone tool then copies that data into memory. Move
the cursor to the area you want to cover up, release the Alt/Opt key, click the
mouse button, and the preselected
data will be copied onto that area. You
can size the Clone tool by right click-
ing on the mouse or, better yet, use
the “[” key for smaller Clone tool
sizes and the “]” for larger. Al-
ternatively, you can click on the brush
icon at the top of the editing screen to
select the desired shape and size for
the Clone tool.
22 ADOBE
®
PHOTOSHOP
®
FOR UNDERWATER PHOTOGRAPHERS
To eliminate a bright white spot like this one,
select the Clone tool and place it near the
bright area. By holding down the Alt/Opt key
and clicking, the data under the cursor is
copied. To paste the data to the new area,
release the Alt/Opt key, move the cursor over
the white area, and click.
HEALING BRUSH
The Healing Brush was
introduced in Photo-
shop 7 and works much
like the Clone tool ex-
cept that in addition to
copying patterns from
selected areas, it utilizes
the brightness levels of
its desired destination.
This is a great tool for
filling in spots of dead
coral or light areas in an underwater scene.
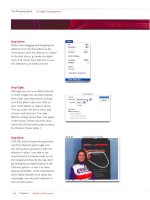
Spot Healing Brush. The Spot Healing Brush found in Adobe Elements is
now available in Photoshop CS2. This tool is great because it is a one-step cor-
rection process. You don’t have to copy data since it pulls data from the area
under your cursor and fills in the area with a single click. Merely set the Spot
Healing Brush tool to a size larger than the area you want to remove and click
the mouse. Since this new brush works like a Clone tool and Healing Brush
combined, we use it more than the other two brushes for removing single
specks of backscatter in an underwater image.
S
ATURATION CONTROL
Since most underwater subjects lose color either by depth or their distance
from the camera, it is often necessary to adjust the image saturation. To open
the Hue/Saturation palette, go to Image>Adjustments>Hue/Saturation or
use the shortcut command, Ctrl/Cmd+U.
TOP TEN EDITING TOOLS 23
The dead coral in this image
was covered up using the
Healing Brush. This brush
works much like the Clone
tool except that it also copies
texture and shades of light-
ing. It usually takes several
mouse clicks to fill in very
bright areas.
As you move the Saturation slider
to the left or right it will decrease or
increase the color saturation. With the
Preview box checked, the image on
the editing screen reflects the new sat-
uration values so you can immediately
see your modifications. Be careful
when you use this tool—it is overused
by many editors.
U
NSHARP MASK
When an image is converted to a dig-
ital file via a film scanner or shot
directly in a digital camera it tends to
lose sharpness. Both film scanners and
digital cameras have sharpening func-
tions, but we recommend you either
leave them at the default settings or
just not use them at all. We find that
the Unsharp Mask in Photoshop or
some of the third-party sharpening
plug-in filters do a better job. (See
chapter 14 for more on the plug-in
versions.)
When you open the Unsharp Mask
from the Filter>Sharpen pull-down
menu, you are presented with three
settings. The Amount slider is used to
set the amount of pixel contrast in an image. Generally, film images can be set
from 100–200%, while digital can extend to 200–400%. The Radius slider set-
ting determines how many pixels along a pixel edge are used for sharpening.
The Threshold slider is used to determine what level of pixel contrast should
be considered an edge. When you set the Threshold value to 0, everything in
the image is sharpened. As the threshold value increases, fewer pixels are sharp-
ened if they exhibit little or no contrast change. The best way to use the
Threshold setting is to initially set the Amount and Radius values, then move
the Threshold slider to visually select your sharpness choice.
24 ADOBE
®
PHOTOSHOP
®
FOR UNDERWATER PHOTOGRAPHERS
When the digital camera is some distance
from the subject, the image can be under-
exposed and low in color saturation. This
sponge was corrected using Ctrl/Cmd+W—
the Hue/Saturation menu—and moving
both the Saturation and Lightness sliders to
the right until the image looked correct.