Sử dụng photoshop cs5 part 9 pps
Bạn đang xem bản rút gọn của tài liệu. Xem và tải ngay bản đầy đủ của tài liệu tại đây (836.78 KB, 7 trang )
ptg
52 Chapter 3
Creating and using collections
e collection features in Bridge provide a useful
way to catalog and access les without your actu-
ally having to relocate them. ere are two kinds of
collections: a Smart Collection that is created from
the results of a Find search, and what we call a
“nonsmart” collection which is created by dragging
thumbnails manually into a collection icon.
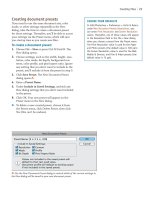
To create a Smart Collection:
1. Click the tab for the Collections panel. (If it’s
hidden, choose Window > Collections Panel.)
2. Perform a search via the Edit > Find command
(see the preceding page). When the search is
completed, click the Save as Smart Collection
button at the top of the Content panel.
A
3. A new Smart Collection icon appears in the
Collections panel. Type a name in the high-
lighted eld, then press Enter/Return.
B
➤ To add a collection to the Favorites panel, right-
click the icon and choose Add to Favorites.
➤ To delete a collection, click it, click the Delete
Collection button, then click Yes in the alert.
Not to worry: is won’t delete the actual les.
To display the contents of a collection:
Click its icon in the Collections panel.
If you edit an existing Smart Collection based
on added or new criteria in a new search, the
collection contents will update automatically.
To edit a Smart Collection:
1. In the Collections panel, click the icon for an
existing Smart Collection.
2.
At the top of the Content panel or in the lower
left corner of the Collections panel, click the
Edit Smart Collection button.
C
3.
e Edit Smart Collection dialog opens. It looks
like the Find dialog, which is shown on the pre-
ceding page. To add another criterion, click the
next button, choose and enter the criterion,
and choose “If any criteria are met” from the
Match menu. You can also change the source
folder and/or change the original criteria.
4.
Click Save. e results of the new search will
display in the Content panel.
Note: If you move a thumbnail from a Smart
Collection into a folder that wasn’t used in the
search (or do the same with the actual le), it
will be removed from the collection, but not
from your hard drive. Don’t delete a thumbnail
from a Smart Collection unless you want to
delete it from your hard drive!
A
To create a Smart
Collection, click
the Save as Smart
Collection button in
the Content panel.
B
A new Smart
Collection appears
on the Collections
panel. Type a name
for it in the eld.
C
To edit a Smart
Collection, click a Smart
Collection icon on the
Collections panel, then
click the Edit Smart
Collection button at the
bottom of the panel.
ptg
Bridge 53
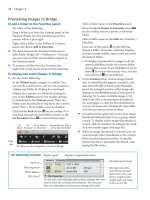
A collection can also be created without running a
search rst. We call this a “nonsmart” collection.
You can add to a nonsmart collection by dragging
thumbnails into it (not so for a Smart Collection).
To create a nonsmart collection:
1. Do either of the following:
On the Content panel, select the image thumb-
nails to be placed into a collection. On the
Collections panel, click the New Collection
button, then click Yes in the alert dialog.
While viewing les in Review mode (Ctrl-B/
Cmd-B), drag any les you don’t want to
include in the collection out of the carousel,
then click the New Collection button.
2.
On the panel, rename the collection,
A
then
press Enter/Return. e number of thumbnails
in the collection is listed next to the name.
★
To add thumbnails to a nonsmart
collection:
1. Display the Collections panel.
2.
Drag one or more thumbnails from the Content
panel over a nonsmart collection icon.
B
➤ You can copy and paste thumbnails from a
Smart Collection into a nonsmart one, or from
one nonsmart collection into another.
To remove thumbnails from a nonsmart
collection:
1. On the Collections panel, click the icon for a
nonsmart collection to display its contents.
2.
Select the thumbnails to be removed, then click
Remove From Collection at the top of the
Content panel.
C
If you rename a le or move it from its original
location on disk, Bridge tries to update the link to
any nonsmart collections the le is a member of.
If Bridge is unsuccessful at this, follow these steps.
To relink a missing file to a nonsmart
collection:
1. On the Collections panel, click the collection
to which you want to relink a le or les.
2.
Next to the Missing File Detected alert at the
top of the Content panel, click Fix.
D
3. In the Find Missing Files dialog, click Browse,
locate and select the missing le, then click
Open. Click OK to exit the dialog.
C
To take
selected thumb-
nails out of
the currently
selected col-
lection, click
Remove from
Collection.
A
To create a new col-
lection, click the New
Collection button, then
type a name for it in
the highlighted eld.
D
To relink a le
that’s missing
from a collection,
click Fix.
B
Drag thumbnails to a nonsmart collection listing.
ptg
54 Chapter 3
Exporting the Bridge cache
When the contents of a folder are displayed in
the Content panel in Bridge for the rst time, the
program creates a cache le containing informa-
tion about those les, such as the data it uses to
display ratings, labels, and high-quality thumb-
nails. Having the cache helps speed up the display
of thumbnails when you choose that folder again.
If you want this data to be included with les that
you copy to a removable disc or to a shared folder
on a network, you have to build the cache les and
export them to the current folder rst.
To export the Bridge cache to the current
folder:
1. Choose Edit/Adobe Bridge CS5 > Preferences >
Cache. In the Cache area, check Automatically
Export Cache to Folders When Possible, then
click OK.
2.
Display a folder in Bridge.
3.
Choose Tools > Cache > Build and Export
Cache. In the dialog, check Export Cache to
Folders, keep the Build 100% Previews option
o, and click OK.
4.
Two hidden cache les will be placed in the cur-
rent folder, one named .BridgeCache (metadata
cache) and the other named .BridgeCacheT
(thumbnail cache).
Now if you use the File > Move To (or Copy To)
command in Bridge to move (or copy) selected
thumbnails, the folder cache you just created
will also move or copy, thanks to the export
preference that you checked.
➤ To display the cache le icons in the Content
panel, choose View > Show Hidden Files.
u m b n a i l c a c h e l e s s o m e t i m e s c a u s e d i s p l a y
problems. Purging the cache for the current folder
may solve the problem, because it prompts Bridge
to rebuild the cache.
To purge the cache files from Bridge:
Do either of the following:
To purge the cache les from the current folder,
choose Tools > Cache > Purge Cache for Folder
“[current folder name].”
Two new (hidden)
cache les will be generated.
To purge the cache les for multiple selected
thumbnails, right-click one of them and choose
Purge Cache for Selection.
ATTACHING IPTC INFO TO A FILE
Via the IPTC Core category in the Metadata panel,
you can attach creator, description, copyright, and
other information to the currently selected fi le.
Click the fi eld next to a listing, enter or modify the
fi l e d e s c r i p t i o n i n f o r m a t i o n , p r e s s T a b t o p r o g r e s s
through other fi elds and enter data, then click the
Apply button in the lower right corner of the
panel. (IPTC is an information standard that is used
for describing photos and providing information
about them.)
ptg
Bridge 55
Assigning keywords to files
Keywords (words that are assigned to les) are used
by search utilities to locate les and by le manage-
ment programs to organize them. In Bridge, you can
create parent keyword categories (for events, people,
places, themes, etc.), and nested subkeywords within
those categories, and then assign them to your les.
You can locate les by entering keywords as search
criteria in the Find dialog, build a Smart Collection
based on a search for keywords, or display les by
checking listings below Keywords in the Filter panel.
To create keywords and subkeywords:
1. Display the Keywords panel. To create a new
parent keyword category, click the New Keyword
button, then type a keyword.
2. To create a nested subkeyword, click a parent
keyword, click the New Sub Keyword button,
type a word, then press Enter/Return.
A
To add
more subkeywords, click the parent keyword rst.
You can also create nested sub-subkeywords.
➤ You can move (drag) any subkeyword from one
parent keyword category into another.
➤ Read about the Keywords Preferences on page 397.
For more about keywords, see Adobe Bridge Help.
To assign keywords to files:
1. Select one or more image thumbnails in the
Content panel. If an image has keywords assigned
to it already, they will be listed at the top of the
Keywords panel; you can assign more.
2. Check the box for one or more subkeywords.
B
(Although you can assign a parent keyword to a
le, we can’t think of a reason for doing so.) To
remove a keyword from a le, uncheck the box.
➤ e keywords that are assigned to the les in the
current folder are also listed in the Keywords
category in the Filter panel.
➤ To assign keywords via the File Info dialog, select
one or more thumbnails, then from the Rene
menu
on the Bridge toolbar, choose File Info
(Ctrl-I/Cmd-I). In the Description tab, Keywords
eld, enter keywords, separated by semicolons or
commas. Be on the alert for typing errors!
➤ If you import a le into Bridge that contains
keywords that you want to add as permanent
subkeywords, right-click each subkeyword under
Other Keywords in the Keywords panel and
choose Make Persistent from the context menu.
B
We clicked an image thumbnail, then assigned
subkeywords to it by checking the boxes.
A
We created a new parent keyword entitled “Food,”
kept that category selected, then via the New Sub
Keyword button, added subkeywords to it.
USING THE KEYWORDS PANEL
Rename
a parent
keyword or
subkeyword
Right-click the word, choose
Rename from the context menu,
then type a name (this won’t alter
any already embedded data).
Delete
a parent
keyword or
subkeyword
Click the word, then click the
Delete Keyword button. If that
keyword is assigned to any fi les, it
will now be listed in italics.
Find a
keyword or
subkeyword
on the list
Type the word in the search fi eld at
the bottom of the panel. Choose a
search parameter from the menu.
ptg
56 Chapter 3
GETTING ILLUSTRATOR FILES INTO PHOTOSHOP
Open command (this
page)
Opens the fi le as a new
document and converts
paths into pixels
Place command (see
page 309; or for type,
see page 340)
Opens the fi le as a Smart
Object layer in an exist-
ing Photoshop document
Drag a path from an
Illustrator document
into a Photoshop docu-
ment (see the last tip
on page 309)
Arrives as a new Smart
Object layer
Copy an object in
Illustrator, then Paste
it into a Photoshop
document (see the
next page)
Via the Paste dialog,
choose to Paste As a
Smart Object, Pixels,
Path, or Shape Layer
(vectors are preserved,
unless you click Pixels)
Opening PDF and Illustrator files
When you open PDF or Adobe Illustrator (AI) les
into Photoshop, they are rasterized automatically
(converted from their native vector format into the
Photo shop pixel format). For a PDF, you can either
open one or more whole PDF pages or extract raster
images from them. Follow these instructions to open
a PDF or Adobe Illustrator le from Bridge as a new
rasterized document, or follow the instructions on
page 309 to place a PDF or Illustrator le as a Smart
Object into an existing Photoshop document.
To open a PDF or Adobe Illustrator file as a
new Photoshop document:
1. In Bridge, locate and click the PDF or AI le
to be opened. Choose File > Open With >
Adobe Photoshop CS5 or right-click the image
thumbnail and choose Open With > Adobe
Photoshop CS5 from the context menu. If an
alert dialog appears at any time while following
these instructions, see page 58.
➤ From the umbnail Size menu, choose a size
for the thumbnail display.
2.
e Import PDF dialog opens in Photoshop.
Under Select, do the following:
Click Pages to view the whole PDF pages
A
or
click Images to view just the images that are con-
tained in the PDF le.
B
For the latter, click the
image (or select multiple images) to be opened,
then click OK— you’re done.
If you clicked Pages, follow the remaining steps.
Note: If the PDF le you’re opening contains
multiple pages, click the thumbnail for the
desired page, or Shift-click or Cmd-click to select
multiple pages. Each page you select is going to
open as a separate Photoshop le.
3.
Under Page Options, do the following:
Optional: Type a Name for the new document.
Choose a Crop To option. We keep this on the
default setting of Bounding Box to exclude any
white areas outside the artwork.
Check Anti-aliased to reduce jaggies and soften
the edge transitions.
4.
For Image Size, do the following:
For a whole PDF page, you can enter the desired
maximum Width and Height for the Photoshop
document(s) or keep the current dimensions.
Check Constrain Proportions to preserve the
A
To open a whole PDF page , in the Import PDF dialog, click
Pages, click a page, then choose options for the Photoshop le.
B
Or if you prefer to open just one image from a PDF le,
click Images, click an image, then click OK.
ptg
Bridge 57
aspect ratio of the original PDF, to prevent
distortion.
Enter the Resolution required for your output
device. Entering the correct resolution for the
image here, before it’s rasterized, will produce a
higher-quality image.
From the Mode menu, choose a color mode for
the document (preferably one that is consis-
tent with the Adobe RGB color space you were
directed to establish in Chapter 1). If the le con-
tains an embedded RGB color prole, that prole
will be the default listing on the menu and should
be kept as your choice. If not, select RGB Color.
Choose a Bit Depth of 8 Bit or 16 Bit.
Leave Suppress Warnings unchecked to allow an
alert to display should a color prole conict arise.
5. Click OK.
➤ If you try to open an Adobe Illustrator le that
wasn’t saved with the Create PDF Compatible File
option checked, the thumbnail in the Import PDF
dialog will display only a text message. Reopen
the le in Illustrator, choose File > Save As,
rename or replace the le, then click Save. In
the Illustrator Options dialog, check Create PDF
Compatible File, then click OK. Now you can go
ahead and open the le in Photoshop.
➤ To create a solid Background for an imported
PDF in Photoshop, create a new layer, ll it with
white via Edit > Fill, then choose Layer > New >
Background from Layer.
To paste Adobe Illustrator art into
Photoshop:
1. In Illustrator, go to Edit/Illustrator > Preferences >
File Handling & Clipboard, check the Copy
As: PDF and AICB options, click Preserve
Appearance and Overprints, then click OK.
2. Copy an object via Edit > Copy (Ctrl-C/Cmd-C).
3. In a Photoshop document, choose Edit > Paste
(Ctrl-V/Cmd-V). e Paste dialog opens.
4. Click Paste As: Smart Object or Shape Layer to
keep the vector object editable, or click Pixels to
rasterize it, then click OK.
5. If you clicked Smart Object or Pixels in the
dialog, you need to accept the placed object. Click
the Commit Transform button on the Options
bar or press Enter/Return. To learn about editing
Smart Object layers, see pages 310–311.
BRINGING EPS FILES INTO PHOTOSHOP
You have different options for bringing EPS fi les into
Photoshop than for AI or PDF fi les:
➤ If you open an EPS fi le into Photoshop via the
File > Open command in Photoshop or via the File >
Open With command in Bridge, the Rasterize EPS
Format dialog appears. Make Image Size, Resolution,
and Mode choices, then click OK.
➤ If you use the File > Place command in Photoshop
or the File > Place > In Photoshop command in
Bridge, the EPS fi le will open directly into Photoshop
without an import dialog opening. The fi le will
appear in a bounding box at fi rst (to allow for scal-
ing, rotating, and moving), and will become a Smart
Object layer when you press Enter/Return.
➤ The Rasterize EPS Format dialog also displays if
you use the File > Open as Smart Object command in
Photoshop to bring an EPS fi le into Photoshop. Click
OK, and the fi le will import as a Smart Object layer.
CMYK COLORS FROM ILLUSTRATOR
When importing an Illustrator fi le that contains CMYK
colors, in Photoshop, use the File > Place command.
It will arrive as a Smart Object (see page 309). This
way, the Photoshop fi le can stay in RGB Color mode
but the CMYK colors in the Smart Object will be pre-
served. For print output, you can convert the whole
fi l e t o C M Y K C o l o r m o d e .
e R a s t e r i z e E P S F o r m a t d i a l o g d i s p l a y s w h e n y o u
use the Open or Open as Smart Object command to
open an EPS le in Photoshop.
ptg
58 Chapter 3
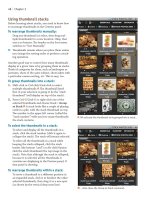
A
i s a l e r t d i a l o g a p p e a r s i f f o n t s t h a t a r e b e i n g
used in the le you’re opening are missing.
B
A missing fonts
alert icon displays
in the editable type
layer thumbnail.
C
i s a l e r t d i a l o g a p p e a r s i f y o u t r y t o e d i t a n
editable type layer that’s using a missing font.
➤ If you open a le in Photoshop in which a
missing font is being used (the font isn’t avail-
able or installed), an alert dialog will appear.
A
★
If you click OK to open the le, an alert icon will
display on the oending layer(s) on the Layers
panel.
B
If you try to edit the layer, yet another
alert dialog will appear, indicating that font sub-
stitution will occur if you click OK.
C
★
You can
either click OK to allow the missing font to be
replaced or click Cancel, make the required fonts
available, then reopen the document.
➤
If the le’s color prole doesn’t match the cur-
rent working space for Photoshop, the Embedded
Prole Mismatch alert dialog will appear.
D
Click Use the Embedded Profile (Instead of
the Working Space) if you must keep the docu-
ment’s current prole, or for better consistency
with your color management workow, we rec-
ommend clicking Convert Document’s Colors to
the Working Space to convert the prole to the
current working space. Click OK. See also pages
10, 13, and 16.
E
If this Missing Prole alert dialog appears, click Assign
Working RGB: Adobe RGB (1998) to convert the le to the
default working space for Photoshop.
D
If this Embedded Prole Mismatch alert dialog appears,
indicate whether you want to continue to use the embedded
prole or convert the le to the current working space.
➤
If the Missing Prole alert dialog appears,
E
click
Assign Working RGB: Adobe RGB (1998) to
assign the prole that you chose as the working
space for Photoshop in Chapter 1.
Note: If you’re unable to open a le, it may be
because the required plug-in module for its
format (such as Scitex CT or JPEG 2000) isn’t cur-
rently installed in the Photoshop Plug-Ins folder.
Install the required plug-in, then open the le.
Responding to alert dialogs upon opening a file


