Sử dụng photoshop cs5 part 36 potx
Bạn đang xem bản rút gọn của tài liệu. Xem và tải ngay bản đầy đủ của tài liệu tại đây (773.95 KB, 5 trang )
ptg
Adjustments in Depth 217
A Color Balance adjustment layer can be used to
apply a warm or cool cast to an image or, con-
versely, to neutralize an unwanted cast. e three
Tone choices of Shadows, Midtones, and Highlights
let you restrict the adjustments to a specic tonal
range, and each slider aects a pair of cool and
warm colors. Note: If you need to pinpoint color
adjustments to an even narrower range, use Curves
or Hue/Saturation.
To make an image cooler or warmer using
a Color Balance adjustment layer:
1. Click a layer or the Background.
A
2. On the Adjustments panel, click the Color
Balance button.
3. For Tone, click the range to be adjusted:
Shadows, Midtones, or High lights.
Optional: Keep Preserve Lumi nosity checked
to preserve the tonal values of the layer as you
make corrections. Or uncheck this option to
apply soft color adjustments to highlights, such
as to skin tones.
4. Each slider pairs a cool color with a warm one.
Move a slider toward any color you want to add
more of or away from any color you want to
reduce
B–C
(also
A–B
, next page). For exam-
ple, you would move a slider toward green to
subtract magenta, or toward yellow to reduce
blue. Watch how the overall image changes as
you add or reduce a particular color.
➤ To make the image warmer or cooler, move
multiple sliders toward similar colors. For
example, to add a cool cast, you could move
the rst slider toward Cyan and the third
one toward Blue. Or to make an image
warmer, move the rst slider toward Red
and the third one toward Yellow.
5. Click any other Tone button, then adjust the
color sliders for that range. You can click the
visibility icon to compare the adjusted image
with the original.
A
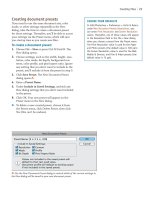
i s i m a g e h a s a c o o l b l u e c a s t .
C
e s h a d o w a r e a s l o o k m o r e n e u t r a l t h a n
before, but further corrections are needed.
See also the figures on the following page
B
We clicked the
Shadows range for our
Color Balance adjust-
ment layer, then moved
the sliders toward Red,
Green, and Yellow to
neutralize the shadows.
Applying a Color Balance adjustment
ptg
218 Chapter 13
A
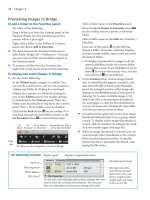
To neutralize the blue cast in the midtones,
we clicked Tone: Midtones, then moved the
sliders toward Red and Yellow. A blue cast in
the highlights remains to be xed.
B
To warm the highlights and neutralize the
remaining traces of the blue cast, we clicked
Tone: Highlights, then moved the sliders
toward Red and Yellow (and also slightly
toward Magenta). Now the food and the
plate look warmer (and more appetizing!)
and the shadows are more neutral.
ptg
Adjustments in Depth 219
For making precise hue and saturation corrections
without having to make a selection, try using a
Hue/Saturation adjustment layer. With the Hue/
Saturation controls, you can target specic colors,
then shift just those colors to a dierent hue or
adjust their saturation or lightness. is is a useful
way to swap out colors in a product or fashion shot.
To use a Hue/Saturation adjustment layer
for color correction:
1. Click a layer.
A
2. On the Adjustments panel, click the Hue/
Saturation button.
3. Do any of the following:
To correct all the colors in the image, keep
Master as the choice on the second menu.
Move the Hue slider to adjust all the hues, the
Saturation slider to adjust their color intensity,
or the Lightness slider to lighten or darken
them. After adjusting the Lightness, you may
need to increase the Saturation to revive any
colors that became too light or dark.
To change the hue of a specic color,
B
click
the Targeted Adjustment tool on the panel,
then Ctrl-drag/Cmd-drag horizontally over
that color in the image.
C
e color range you
drag over is now listed on the menu, and the
adjustment slider shifts to that color on the
color bar. Or to change the saturation of a spe-
cic color, drag horizontally with the Targeted
Adjustment tool over that color in the image
without holding down Ctrl/Cmd.
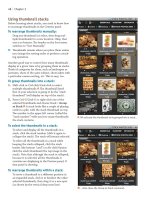
A
We will change the blue napkin on the right side of this
image to yellow, to coordinate better with the lemons on the left.
C
Now the napkin is yellow.
B
We created a Hue/Saturation adjustment
layer, then clicked the Targeted Adjustment tool.
Holding down Ctrl/Cmd, we dragged over the
blue of the napkin until the hue shifted into the
yellow range. Finally, we increased the Saturation
and reduced the Lightness for the adjusted colors.
Changes to the
sliders are reected
in the lower color bar
Applying a Hue/Saturation adjustment
ptg
220 Chapter 13
Applying an Auto Color Correction
e Auto Color Correction Options dialog oers
a choice of three preset algorithms (formulas) for
adjusting the color and contrast in an image, and in
addition, it lets you correct the luminosity and color
temperature of the midtones.
To apply an Auto Color Correction:
1. Open an image.
A
2.
On the Adjustments panel, click the Levels
button, then hold down Alt/Option and click
Options (the Auto button becomes Options).
3.
e Auto Color Correction Options dialog
opens.
B
Move it, if necessary, so it’s not blocking
the Levels histogram, which you should monitor
as you choose options.
4.
Click the Find Dark & Light Colors algorithm
(see the sidebar on the next page).
C
We clicked the Midtones
swatch to open this dialog,
then chose a medium brown
to neutralize the color
temperature of the sand.
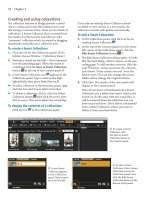
B
In the Auto Color Correction Options dialog, we
clicked Find Dark & Light Colors and checked Snap
Neutral Midtones.
A
e m i d t o n e s i n t h e o r i g i n a l i m a g e h a v e a m a g e n t a c a s t , w h i c h
is noticeable in the sand.
5.
Check Snap Neutral Midtones. Any colors that
are close to neutral will be adjusted to match the
Midtones target color swatch in the dialog.
6.
To adjust the color temperature of the image,
you can assign a subtle color tint to the mid-
tones. Click the Midtones swatch. e Select
Target Midtone Color picker opens.
C
Click the H button in the HSB group, then drag
the circle in the large square slightly to the right
(keep the S value around 10–30). Next, on the
vertical Hue bar, click a reddish-yellow hue to
make the overall temperature of your image
warmer, or a greenish-blue hue to cool it down.
To adjust the brightness of the midtones, drag
the circle slightly upward or downward (keep the
B value around 45–55).
ptg
Adjustments in Depth 221
Note: Midtones is the only swatch you need
to change; the other two swatches will be adjusted
automatically when the le is prepared for printing.
7.
Click OK to exit the Select Target Midtone Color
dialog, then again to exit the Auto Color Correction
Options dialog.
A
When the alert dialog appears, oering you the
option to save the new target colors as defaults,
click No (we would rather choose settings on a case-
by-case basis than establish global default settings).
THE AUTO COLOR CORRECTION ALGORITHMS
➤ Enhance Monochromatic Contrast moves the black
and white Input Levels sliders inward to enhance con-
trast. The sliders are moved the same amount for each
channel, to preserve color relationships. (The Image >
Auto Contrast command also uses this algorithm.)
➤ Enhance Per Channel Contrast moves the Input
Levels sliders inward by a different amount for each
channel, and produces more noticeable color shifts and
changes in contrast than the other algorithms. (The
Image > Auto Tone command also uses this algorithm.)
➤ Find Dark & Light Colors (our favorite algorithm)
positions the black and white Input Levels sliders in
each channel based on the average darkest and lightest
pixels in the image, and enhances the contrast. (The
Image > Auto Color command also uses this algorithm.)
B
By comparison, clicking in the original image with the
gray eyedropper in Levels (in the location shown above)
failed to remove the magenta cast from the midtones.
A
e a d j u s t m e n t s m a d e
to the midtones via the
Snap Neutral Midtones and
Target Colors options in
the Auto Color Correction
Options dialog successfully
removed the magenta cast.
➤ e Auto Color Correction Options dialog also
opens when you Alt-click/Option-click the Auto
button for a Curves adjustment layer.
➤ You could also adjust the midtones by clicking a
neutral gray area in the image with the gray point
(middle) eyedropper in Levels or Curves, but this
method is less reliable because it only works if
you click in the right spot, which isn’t as easy as
it sounds.
B


