Sử dụng photoshop cs5 part 37 ppt
Bạn đang xem bản rút gọn của tài liệu. Xem và tải ngay bản đầy đủ của tài liệu tại đây (769.47 KB, 5 trang )
ptg
222 Chapter 13
Correcting the color using Curves
By using a Curves adjustment layer, you can adjust
the values in a narrow tonal range, such as the high-
lights, quarter tones, midtones, three-quarter tones,
or shadows. Precise corrections can be applied to
the composite channel (all the channels in the image
combined) or to individual color channels. In these
steps, you will make tonal corrections rst, then
adjust the color.
To correct color and tonal values using a
Curves adjustment layer:
Part 1: Apply tonal adjustments
1.
Open an RGB image that needs a color
adjustment.
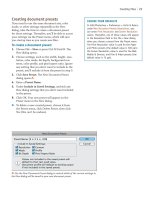
A
2. On the Adjustments panel, click the Curves
button. Choose Curves Display Options from
the Adjustments panel menu, check all four of
the Show options (described in the sidebar at
right), leave Show Amount Of on the default
setting of Light (0-255), then click OK.
3.
If the contrast in the image needs improvement,
do either of the following:
e Input sliders aect the lightest and dark-
est tonal values in the image. To increase the
contrast (darken the shadows and brighten the
highlights), drag the black shadow Input slider
and white highlight Input slider inward so they
align with the ends of the histogram. e steeper
the curve, the greater the contrast.
To increase the contrast by establishing the light-
est and darkest values in a high-contrast display
of clipping called r e s h o l d mode, Alt-drag/
Option-drag the black slider until a few areas of
black appear, and the white slider until a mere
smidgen of white appears. (Note that this can
also be done in Levels.)
4.
For more targeted adjustments, do any of the
following:
Drag part of the curve; a point will appear on it.
For example, to lighten the midtones, drag the
middle of the curve upward, or to darken the
midtones, drag the middle of the curve downward.
➤ When a tonal value is lightened, its Output
value (after adjustment) becomes higher
than its Input value (the original brightness
value). When a tonal value is darkened, its
Output value becomes lower than its Input
value.
A
i s i m a g e i s u n d e r e x p o s e d ( t o o d a r k ) a n d h a s a b l u e c a s t .
USING THE DISPLAY OPTIONS IN CURVES
The four Show options in the Curves Display Options
dialog are as follows:
Channel
Overlays
Color channel curves
Histogram
Static histogram for the image
Baseline Straight diagonal line representing
no adjustments, for comparison
Intersection
Line
Axis guides that appear as you move
a point on the curve
In the same dialog, you can click the larger grid
button to display quarter-tone grid lines or the
smaller grid button for a fi ner grid.
ptg
Adjustments in Depth 223
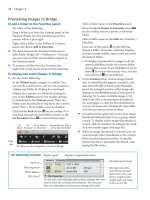
Click the Targeted Adjustment tool on the
panel, then move the pointer over the image; a
small circle appears on the curve. Drag upward
in the image to lighten the tonal value under the
pointer, or downward to darken it. A point corre-
sponding to that value appears on the curve.
A–B
To cycle through the points on the curve, press
the + (plus) key. To nudge a selected point, press
an arrow key. (To remove a selected point, press
Backspace/ Delete.)
Keep the Curves controls showing on the panel.
To correct the color, follow the steps on the next
page.
B
To lighten the midtones, we clicked the Targeted Adjustment tool, then dragged
upward slightly on the grass. Although our adjustments improved the tonal balance,
the image still has a blue color cast. We’ll work on that next.
Midtones
A
To lighten the highlights, we moved the white slider to the left.
Shadows
Highlights
ptg
224 Chapter 13
Part 2: Correct the color
1. With the Curves adjustment layer still selected,
from the second menu, choose Red to adjust
that channel separately, then do any of the
following:
Drag the middle of the curve upward to add red
to the midtones or downward to subtract red (to
a lesser extent, this adjustment will also aect
the reds in the shadows and highlights). is
midtone adjustment is often all that’s required.
You can also add or subtract red in the shadows
by dragging the lower part of the curve, or in
the highlights by dragging the upper part of
the curve.
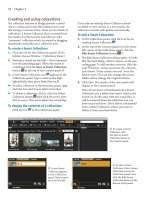
A
Click the Targeted Adjustment tool on the
panel, then drag in the image to adjust the
part of the curve that corresponds to that color
value.
B
2. Choose the Green channel, then the Blue
channel, adding or subtracting that color from
the image, as in the preceding step. You can
switch back and forth between the color chan-
nels, and readjust them if needed (
A–D
, next
page).
3. Optional: To lessen the impact of the Curves
adjustment layer, lower the layer opacity; or
click the adjustment layer mask, then with the
Brush tool and the Foreground color set to
black, apply brush strokes to the image.
➤ To save your adjustment settings as a preset for
future use, see page 200.
APPLYING CURVES TO A CMYK IMAGE
The Curves options work the opposite way for a CMYK
image than for an RGB image:
➤ Readouts from the Curves graph refer to
percentages of ink. Black equals 100% and white
equals 0%.
➤ Shadow values are represented by the upper right
part of the curve, and highlights are represented by
the lower left part of the curve. Drag the curve down-
ward to lighten a tonal value or upward to darken
it. For an individual color channel, you can drag the
curve upward to add more of that color or downward
to subtract it.
➤ Colors work in tandem. For example, reducing
cyan adds red, reducing magenta adds green, and
reducing yellow adds blue.
B
With the Targeted Adjustment tool, we
dragged slightly upward in the gray area of
the clouds. is produced a point on the curve
(right) and added some red to the clouds and
other midtones.
A
To add red to the highlight areas
(such as in the clouds), with the Red
channel selected, we moved the white
slider slightly inward.
ptg
Adjustments in Depth 225
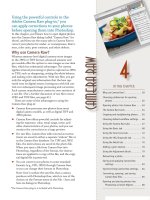
D
To reduce blue in the midtones, we
dragged downward slightly with the Targeted
Adjustment tool on the road. A point appeared
on the curve. is is the cumulative result of
all our Curves adjustments.
C
And nally, to remove green from
the highlights, with the Blue channel
selected, we dragged the white slider
slightly inward.
A
To remove red and blue from the high-
lights, with the Green channel selected, we
dragged the white slider slightly inward.
B
To reduce green in the image, we dragged
downward with the Targeted Adjustment tool
on the gray clouds and on the grass below the
barn. Two points appeared on the curve.
ptg
226 Chapter 13
A
We corrected a photo via a Levels adjustment layer, then saved our settings as a preset.
B
We clicked the tab for another photo in the same series, created a Levels adjustment layer, then chose our preset
of saved settings from the preset menu.
Open a series of photos that were shot under the
same lighting conditions, have the same color profi le,
and require the same color correction. Adjust one
photo via a Levels, Curves, Exposure, Hue/Saturation,
Black & White, Channel Mixer, or Selective Color
adjustment layer, then save your settings as a preset
via the Save [preset name] Preset command on the
panel menu.
A
Click another document tab, then for
the same type of adjustment layer, choose your
saved preset from the preset menu.
B
Note: To copy
adjustment settings for controls that can’t be saved
as a preset, on the Arrange Documents menu on the
Application bar, click an appropriate “Up” button to
tile the documents. Drag and drop the adjustment
layer from the Layers panel of the corrected document
into each of the other document windows.
APPLYING THE SAME ADJUSTMENT SETTINGS TO MULTIPLE IMAGES


