Photoshop cs5 cho nhiếp ảnh gia part 1 doc
Bạn đang xem bản rút gọn của tài liệu. Xem và tải ngay bản đầy đủ của tài liệu tại đây (644.4 KB, 6 trang )
1
■ THINKING DIGITALLY
1
Ph o t o by EllE n Anon
Thinking Digitally
The first step in digital photography is to
create the best possible picture in the field. The
second step is to optimize that capture and use
software to present the final image in the best
possible way. Digital photography requires
embracing certain concepts and techniques in
addition to the traditional photographic tools.
The better your photographic techniques and
the more efficient your digital workflow, the
less time you’ll spend on the computer doing
mundane tasks and fixing mistakes. Similarly,
knowing the capabilities of the digital dark-
room will enable you to capture images that
you can optimize to portray whatever you
envision. This chapter covers some of the
basic digital concepts you need to consider
while in the field, as well as some common
digital concerns.
Chapter Contents
Photographic Techniques
Choosing RAW versus JPEG
Understanding Histograms
Exposure
White Balance in Nature Photography
Color Management
Photographing Images to Composite Later
Aperture and Lightroom
Storage Considerations
607343c01.indd 1 4/11/10 11:02:22 PM
2
c h a p t e r 1: THINKING DIGITALLY ■
Photographic Techniques
With the advent of digital photography, some people erroneously thought that they
didn’t need to be as conscientious in the field; they assumed they could “fix” the image
in Photoshop. In fact, nothing could be more harmful to the quality of your images
than to be sloppy in the field with plans to “fix” the images later. Whether digital or
film, the basics of photography remain the same. You still have to do everything pos-
sible to take the best pictures you can in the field. That way, you can devote the time
you spend at your computer to optimizing images and being creative, rather than try-
ing to compensate for mistakes you made while taking the pictures. Using Photoshop
in conjunction with good photographic techniques will enable you to create images
that are closer to what you envision than was ever possible in the past.
With digital cameras, you still need to use most of your photographic tools to
help create the best images possible, including tripods, mirror lockup, and cable releases
when appropriate. Although we claim to sharpen images in a raw converter or Photo-
shop using the Unsharp Mask or Smart Sharpen filter (techniques described in Chap-
ter 10, “Output”), this sharpening is not designed to fix an out-of-focus picture. Rather,
its intent is to compensate for the slight softening that occurs in the digital process.
Focus carefully and accurately so that you capture the sharpest picture you can.
Use a tripod whenever it’s reasonable. In fact, using a tripod is essential when you
want to combine images to expand exposure latitude, and it’s highly recommended
when you intend to create a panorama by stitching together several individual photo-
graphs. If you don’t use a tripod when taking several pictures at various exposure set-
tings in order to create an exposure latitude composite, then when you try to combine
them into a single image (discussed in Chapter 8, “Composites”), the images may not
combine properly; in fact, they may not merge at all. If you try to shoot a panorama
without a tripod, you’re likely to encounter a variety of complications when you try to
stitch them together, a topic also covered in Chapter 8.
Use a reflector, polarizer, or split neutral-density filter when appropriate. Even
though it’s essentially possible to create a custom neutral-density filter digitally in
Adobe Camera Raw or by using adjustment layers and layer masks, if the scene lends
itself to using a split neutral-density filter, as in Figure 1.1, it will save you time and
effort later, so use it! However, you no longer need to use a warming or cooling filter
since adjusting the white balance will alter the image in very similar ways.
Choose your camera settings such as Aperture Priority, Shutter Priority, or
Manual to create the type of image you have in mind. Planning to use Photoshop is
not an excuse to suddenly rely on the fully automatic shooting modes. Many nature
photographers shoot in Aperture Priority or Manual because controlling the depth of
field is their primary concern. If you envision a picture with a shallow depth of field,
photograph it that way using a wide aperture to begin with rather than relying on one
of the blur filters within Photoshop. Use a filter later to accentuate the effect if desired.
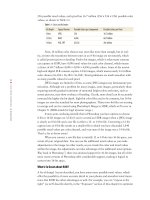
Occasionally nature photographers choose to use Shutter Priority for a specific need,
such as to create a blur of birds in flight) or to create a pleasing softness to moving
water (as shown in Figure 1.2). Although you can create motion blurs in Photoshop,
planning your image ahead of time (for example, using a slow shutter speed combined
607343c01.indd 2 4/11/10 11:02:22 PM
3
■ PHOTOGRAPHIC TECHNIQUES
with panning) enables you to capture images with motion effects that would require
a lot more time to make digitally. In some cases you can capture motion effects that
would be nearly impossible to re-create in Photoshop, because objects closer to you
blur more than objects that are farther away.
Figure 1.1 Use good photographic techniques,
including tripods, cable releases, and even split
neutral-density lters, when appropriate, to
capture the best images possible and then
optimize them in Photoshop for impact.
Ph o t o by EllE n Anon
Figure 1.2 Using a
slow shutter speed can
create pleasing eects
with moving water that
would be dicult to
emulate in Photoshop.
Ph o t o by EllE n Anon
607343c01.indd 3 4/11/10 11:02:24 PM
4
c h a p t e r 1: THINKING DIGITALLY ■
Compose carefully. Take the time to create a pleasing composition so you can
use all the pixels your camera is capable of capturing. Of course you can crop the image
later, but that means you will be cropping away pixels. With fewer pixels your final
image may not be able to be printed as large as you had hoped or have as much detail.
Careful metering is as important as ever, but easier since you now have a histo-
gram to give immediate feedback as to whether the exposure is correct. Meter as you
always have, but make it a habit to check the histogram, at least for the first image in
a series, to see whether you need to tweak your exposure.
Note: A full discussion of photographic techniques is beyond the scope of this book, but we recom-
mend Digital Nature Photography: The Art and the Science by John and Barbara Gerlach (Focal Press, 2007).
Choosing RAW versus JPEG
It’s funny how this became such an emotionally charged topic for some, almost akin
to the classic “which is better?” debates, such as Nikon versus Canon or Mac versus
PC. The truth is both formats have advantages and disadvantages, which we’ll discuss.
However, the evolution in software to convert raw images has made it just as easy, and
in most cases more efficient, to use raw files rather than JPEGs. Most professionals
now agree that it’s best to shoot in RAW whenever possible.
Before considering the benefits of each format, we’ll define what each one is.
RAW is actually a pseudoformat used to refer to a lot of camera manufacturers’ pro-
prietary formats: Canon CR2 and CRW, Nikon NEF, Olympus ORF, Fuji RAF, and
more. It’s a category of files rather than a specific file format like JPEG and TIFF. Raw
files are similar to film negatives. They’re files containing all the information about
the amount of light that was captured by each sensor. Parameters such as color space,
white balance, sharpening, saturation, contrast, and so on are recorded as metadata
or tags, but they’re not applied to the image in-camera. You can still readily modify all
these parameters at the time of conversion.
JPEG is a file format that uses lossy compression each time you resave your
file in order to decrease the file size. This means as the pixels are compressed, data is
thrown away, even the initial time when the camera first writes the image. Each time
thereafter that you resave your image after making any change, it is recompressed,
and more data is lost. Although you may not notice any problem with the initial
image, if you resave an image often, you are likely to see some degradation in image
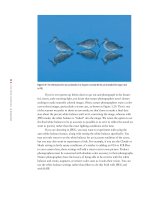
quality. Figure 1.3 presents sections of the same image at 100 percent magnification.
The first version was a raw file saved as a TIFF file; the second version was resaved
numerous times as a JPEG, with only the name of the file changed each time, to illus-
trate the potential image degradation that can occur.
TIFF is a generic file format people often use to save their raw files after conversion
or to save images that were initially shot as JPEGs. TIFF files can be compressed, but they
use lossless compression, so you can resave your files with no loss of image quality. TIFF
files are larger than JPEG files, meaning that they require more space on a hard drive.
607343c01.indd 4 4/11/10 11:02:24 PM
5
■ CHOOSING RAW VERSUS JPEG
Figure 1.3 A section of an image originally captured as a raw le and the same section after being resaved
multiple times as a JPEG.
Ph o t o by EllE n Anon
Another difference among these formats has to do with something called bit
depth. Many nature photographers start to feel in over their heads when computerese
slips into the discussion, but bit depth isn’t very complicated. In simple terms, a bit is
the smallest unit of information that can be recorded digitally—either a 1 or a 0—and
it refers to black or white (even in a color image). In an 8-bit image, each color channel
(red, green, and blue) contains 2
8
or 256 possible tonal values. Since each channel has
607343c01.indd 5 4/11/10 11:02:25 PM
6
c h a p t e r 1: THINKING DIGITALLY ■
256 possible tonal values, each pixel has 16.7 million (256 × 256 × 256) possible color
values, as shown in Table 1.1.
Table 1.1 Colors and Bit Depths
Bit Depth Typical Format Possible Colors per Component Possible Colors per Pixel
8 bits JPEG 256 16.7 million
12 bits RAW 4,096 68.7 billion
16 bits PSD, TIFF 65,536 281 trillion
Now, 16 million color choices may seem like more than enough, but in real-
ity, at times the transitions between tones in an 8-bit image are not smooth, which
is called posterization or banding. Twelve-bit images, which is what many cameras
can capture in RAW, have 4,096 tonal values for each color channel, which means
a choice of 68.7 billion (4,096
× 4,096 × 4,096) possible colors. Some of the newest
high-end digital SLR cameras capture 14-bit images, which means nearly 4.4 trillion
color choices (16,384
× 16,384 × 16,384). Tonal gradations are much smoother with
so many possible values for each pixel.
JPEG images are limited to 8 bits, so some JPEG images may demonstrate pos-
terization. Although not a problem for many images, some images, particularly those
requiring smooth gradual transitions of saturated bright colors and tones, such as
sunset pictures, may show evidence of banding. Clearly, more detail can be accurately
conveyed the higher the bit depth. Eight-bit color files used to be common, but 16-bit
images are now the standard for most photographers. Thirty-two-bit files are starting
to emerge and can be created using Photoshop’s Merge to HDR, which we’ll cover in
Chapter 8. (HDR stands for high dynamic range.)
It may seem confusing initially that in Photoshop you have options to choose
8-bit or 16-bit images (or 32-bit if you’ve created an HDR image) when a JPEG image
is clearly an 8-bit file and a raw file is either a 12- or 14-bit file. Converting a 12-bit
capture into an 8-bit file results in a smaller file in which you have discarded 3,840
possible tonal values per color channel, and even more if the image was a 14-bit file.
That’s a lot to throw away!
When you convert a raw file that is initially 12 or 14 bits into 16-bit space, you
retain all your original data. You can use the additional tonal values as you make
adjustments to the image. In other words, as you tweak the color and tonal values
within the image, the adjustments can take advantage of the additional tonal options.
Way back in Photoshop 7, there was minimal support for 16-bit images, but all of the
more recent versions of Photoshop offer considerable support, making it logical to
convert into 16-bit space.
What’s So Great about RAW?
A lot of things! As just described, you have many more possible tonal values, which
offer the possibility of more accurate detail in your photos and smoother tonal transi-
tions. But RAW has other advantages as well. For example, you can “expose to the
right” (as we’ll describe shortly, in the “Exposure” section of this chapter) to optimize
607343c01.indd 6 4/11/10 11:02:26 PM