Photoshop cs5 cho nhiếp ảnh gia part 5 doc
Bạn đang xem bản rút gọn của tài liệu. Xem và tải ngay bản đầy đủ của tài liệu tại đây (567.46 KB, 7 trang )
20
c h a p t e r 1: THINKING DIGITALLY ■
the clouds. Of course, if you are shooting a silhouette, a spike at the left side of the his-
togram indicating black for the silhouette is acceptable, while any specular highlights
may be fine as pure white. (Specular highlights are those extremely bright areas that
occur when the sun reflects off water or metal or other highly reflective surfaces. We
expect those areas to be pure white without detail.) But for most images, in order to
capture detail in both the shadows and the highlights, you want the tonalities to fall
within the boundaries of the histogram.
Note: Some photographers new to digital and Photoshop think they don’t have to worry about
exposure anymore because they can “fix it” later in Photoshop. The harsh reality is if you blow out the
highlights or totally block up the shadows, the only “fix” will be to clone in pixels from other areas.
Photoshop gives you lots of ways to tweak the exposure, which we’ll explain in Chapters 3, “Adobe
Camera Raw,” and 6, “Exposure Adjustments,” but if the data isn’t there because of overexposure or
underexposure, Photoshop isn’t going to create it for you.
Exposure
If you check the histogram and see that you have a spike at the far right and room on
the left side, you need to modify your exposure to have less light. If you are shooting
in Aperture Priority, you may choose to put in some minus exposure compensation,
or if you are using manual mode, either use a smaller aperture or increase your shut-
ter speed. Because you’re shooting digitally, you have a third option—to switch to a
slower ISO. Although you still need to set the correct exposure, you can use the same
depth of field/aperture setting as you originally wanted (perhaps in an effort to keep
the background out of focus) and/or the same shutter speed (perhaps in an attempt to
blur your subject).
Similarly, if the histogram is indicating a spike at the black end and has room
on the right side, you’ll want to add light via plus exposure compensation, slower
shutter speeds, wider apertures, and/or possibly a faster ISO to allow you to use the
desired apertures and shutter speeds. Faster ISOs—those with the larger numbers—
mean that less light is required to hit the sensor to achieve the proper exposure. The
problem with this is that the faster the ISO, the more noise the picture may have.
Some cameras have less noise while using higher ISOs than do other cameras. Test
your own camera to determine the highest ISO you can use without noise becoming
an issue. (Keep in mind that longer exposure times also contribute to noise.) When
using a higher ISO, be extra careful not to underexpose your image, because when
you go to lighten it the increased noise will become apparent. In general, use the slow-
est (smallest number) ISO that you can. We usually leave our cameras set to ISO 200
and change the ISO according to the situation.
607343c01.indd 20 4/11/10 11:02:43 PM
21
■ EXPOSURE
Note: Usually, the lower the ISO, the less noise you will encounter. Noise is in many ways the digi-
tal equivalent of film grain, except that it tends to be more evident in darker shadow areas. It appears
as variations in color and tonality in areas that should be smooth.
Technically, not only should the ideal histogram for a raw image contain all the
pixels with no spikes at either end, but also it should be exposed as far to the right as
possible with no blown-out highlights. This is to obtain the best signal-to-noise ratio
possible. (It is important to keep in mind that this applies to raw images but not to
those captured as JPEGs because the main benefits occur in the process of the con-
version. If you are shooting in JPEG, make the most accurate exposure you can, and
make sure you’re not clipping data on either end.)
Throughout this book, we’ve asked some of the top nature photographers in the
world to share some of their insights and favorite tips for using Photoshop effectively.
Michael Reichmann does an excellent job of explaining proper exposure, so we asked
him to share that explanation with you. The following section, “Expose Right,” was
written and contributed by him. For more information on Reichmann and his work,
please visit his website,
www.luminous-landscape.com.
“Expose Right” by Michael Reichmann
In the beginning there was the light meter. Photographers used them and saw that they
were good. Then there was through-the-lens metering, and the people rejoiced. Auto-
matic exposure followed, and photographers thought that the millennium had arrived.
Eventually the millennium actually did arrive, and with it digital cameras with histo-
gram displays; and the world changed again.
What hasn’t changed over the years is the need for accurate exposure, which all
of this technology is ultimately in aid of. But what constitutes proper exposure is quite
different between film and digital. In this section, you’ll see why, and how to take best
advantage of it.
Don’t Blow It
Digital is very much like color slide film in that you want to avoid overexposure.
Although it’s often possible to recover some information from the shadows of an
underexposed digital image (especially if a low ISO is being used), if the image is
overexposed so that no highlight detail is captured on the sensor, there is no infor-
mation to be retrieved. The individual photo sites or pixels have simply recorded
100 percent of the information that they can absorb, and this is a featureless white.
This would lead most people to think that the best thing to do would therefore
be to bias their exposure toward the left of the histogram—toward underexposure.
This would avoid the risk of blown-out highlights, and since it’s often possible to
retrieve detail from underexposed shadow areas, what have you got to lose?
A lot, actually, as you’ll see.
607343c01.indd 21 4/11/10 11:02:43 PM
22
c h a p t e r 1: THINKING DIGITALLY ■
Signals and Noise
Digital uses very tiny photo sites—sensor elements made of silicon that are sensitive to
light. Essentially, if no light hits a sensor element, no voltage is generated and a value
of 0 or black is recorded. If the sensor element is flooded with light (overexposed), it
records a maximum value of 255 and a corresponding voltage level is produced. Light
levels in between are recorded as some value between 0 and 255.
Although silicon doesn’t suffer directly from what we describe as grain in film,
it does have a comparable issue. This is described as noise. Noise in this context is any
form of non-image-forming energy (light is just one form of energy). Various things
can cause noise to be recorded by the sensor. These include heat, cosmic rays, and sev-
eral other exotic sources. All silicon chips have an inherent noise level. As a percentage
of the total signal being recorded, it is usually quite small and unnoticeable. But it’s
always there, and depending on the exposure being recorded, it can become visible
and annoying. This is somewhat akin to the noise that one sees on a TV screen when
there’s no channel broadcasting or antenna attached.
Note: We authors interrupt to add that usually the energy that causes noise is low enough in its
intensity that it falls to the left (dark) side of the histogram.
© Mi ch AE l REi c hMAn n
607343c01.indd 22 4/11/10 11:02:44 PM
23
■ EXPOSURE
This is where what we call the sensor’s signal-to-noise (s/n) ratio comes in. If
there’s a lot of signal (data on the right side of the histogram), then the s/n ratio is
high, the signal predominates, and the noise isn’t visible. But if the signal is low (on
the left of the histogram), then the s/n ratio is low, and you see the noise because it
represents a relatively high percentage of the total signal present.
So, the solution is clear. Take a photograph, check the instant review histo-
gram, and make sure that the exposure is as far to the right of the histogram as pos-
sible without touching the right edge.
Dynamic Range and Bit Mode
The concept of bit mode is important to properly understanding digital image qual-
ity. Assume for the purposes of illustration that a digital SLR camera has a dynamic
range of five stops. (It’s usually closer to six stops, and may be as high as seven or eight
stops of usable information for some newer cameras, but for the sake of illustration,
we’ll use five stops.) When working in raw mode, most cameras record a 12- or 14-bit
image. (Yes, we say it’s in 16 bits, but the reality is that the camera is recording only 12
or 14 bits of information in a 16-bit space. This is better than 8 but not as good as a
real 16 bits would be.)
A 12-bit image is capable of recording 2
12
= 4,096 discrete tonal values in each
component. You would therefore think that each f/stop of the five-stop range would be
able to record some 4,096
÷ 5 = 820 of these steps. But, alas, this is not the case. The
way it really works is that the first (brightest) stop worth of data contains 2,048 of
these steps—fully half of those available.
Why? Because CCD and CMOS chips are linear devices. And, of course, each
f/stop records half the light of the previous one and therefore half the remaining data
space available. Table 1.2 tells the tale.
Table 1.2 Where Light Levels Are Stored on Chips
F/stop Number of Levels Available
Within the first f/stop, which contains the brightest tones 2,048
Within the second f/stop, which contains bright tones 1,024
Within the third f/stop, which contains the midtones 512
Within the fourth f/stop, which contains dark tones 256
Within the fifth f/stop, which contains the darkest tones 128
This realization carries with it a number of important lessons, the most impor-
tant of them being that if you do not use the right fifth of the histogram for recording
some of your image, you are in fact wasting fully half of the available encoding levels
of your camera.
But we all know (or at least should by now) that the worst sin in digital imag-
ing is to blow out the highlights. Once they’re blown (past the right edge of the histo-
gram), it’s bye-bye data.
607343c01.indd 23 4/11/10 11:02:44 PM
24
c h a p t e r 1: THINKING DIGITALLY ■
The Lesson
The simple lesson to be learned from this is to bias your exposures so that the histo-
gram is snuggled up to the right (as illustrated in Figure 1.17) but not to the point that
the highlights are blown. This can be seen by the flashing alert on most camera LCD
screens. Just back off so that the flashing stops.
Figure 1.17 A normal exposure shows a centered histogram (left). This histogram is shifted to
the right for maximum signal/noise ratio (right).
Now when you look at the raw file in your favorite raw-processing software,
such as ACR, the image will likely appear to be too light. That’s OK. Just use the
available sliders to change the brightness level and contrast so that the data is spread
out appropriately and the image looks “right.” This accomplishes a number of goals.
First, it maximizes the s/n ratio. Second, it minimizes the posterization and noise that
potentially occurs in the darker regions of the image.
Please be aware, though, that for proper results you need to make these cor-
rections while working with a 16-bit (14-bit) raw file in a raw converter. Unlike what
some people think, in raw mode the camera is not doing any nonlinear processing.
All nonlinear processing takes place in the raw converter. This is why if you’re going
to try this trick, you must shoot in RAW and then manually readjust the image in the
raw converter before exporting the file into Photoshop and possibly then converting it
to an 8-bit file. By doing this, you’ll be maximizing the data bandwidth of your entire
system.
Also be aware that by doing this, you are in fact effectively lowering the ISO
used to capture the image, requiring slower shutter speeds and/or larger apertures. If
you are holding the camera by hand or shooting moving objects, the trade-off may not
be worth the reduced noise level.
But, if ultimate image quality is your goal and you have the ability to control all
the variables, exposing to the right is a technique that will serve you well.
White Balance in Nature Photography
With film cameras, you use specific types of film according to the lighting conditions,
and you use filters to further control the color casts. With digital, you have a some-
what equivalent but far more flexible choice, which is white balance. As you know, the
color (or temperature) of light varies throughout each day. It’s a “warmer” color in the
morning, and the world takes on a reddish/yellow glow. Your eyes adapt to that and
compensate because you know that white is still white. (Think about when you put
607343c01.indd 24 4/11/10 11:02:45 PM
25
■ WHITE BALANCE IN NATURE PHOTOGRAPHY
sunglasses on and a few minutes later the colors look “normal” again.) Later, when
the bright sun is overhead, the color appears “cooler,” or bluer. Your eyes continuously
adapt so that you see neutral colors as neutral, and most people are rarely aware of
color casts.
Cameras are more literal—they record the colors exactly as they see them. With
digital cameras you can use the white balance setting to render the neutral tones (any
shade from white to black where the red, green, and blue values are all the same) as
neutral, rather than rendering them with a color cast. For example, you need a differ-
ent white balance in the cool bluish light of an overcast day than in the warm reddish
light of a sunset. Nearly all digital cameras offer an automatic white balance setting in
which the camera makes a best guess as to the correct lighting temperature. Surpris-
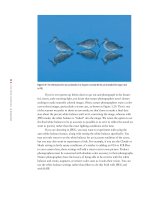
ingly, most do quite a good job, as shown in Figure 1.18.
Figure 1.18 Auto white balance was used to capture this photo in the warm light of early morning.
Ph ot o b y EllE n An o n
Some photographers think the best way to be certain of getting the correct
white balance is to set it themselves. However, most of these photographers are con-
tent to use one of the presets supplied with the camera, such as Flash, Sunny, Cloudy,
Shade, Fluorescent, and so on.
If you don’t use Auto White Balance and you shoot JPEGs, you must be vigilant
about changing lighting conditions and altering your white balance accordingly. As you
can see in Figure 1.19, if you use the wrong white balance setting, your picture may
have a strong color cast. If you shot the image in RAW, you can easily correct this dur-
ing the conversion process; but if you shot it in JPEG, a mistake like this could ruin the
image.
607343c01.indd 25 4/11/10 11:02:45 PM
26
c h a p t e r 1: THINKING DIGITALLY ■
Figure 1.19 The white balance here was accidentally set to Tungsten. A mistake like this can be deadly if the image is shot
in JPEG.
If you’ve ever gotten up before dawn to go out and photograph in the beauti-
ful, warm, early-morning light, you know that nature photographers aren’t always
seeking to make neutrally colored images. Often, nature photographers want a color
cast in their images, particularly a warm cast, as shown in Figure 1.20. This is one
of the reasons we prefer to shoot in raw mode; we don’t have to make a final deci-
sion about the precise white balance until we’re converting the image, whereas with
JPEG mode, the white balance is “baked” into the image. We retain the option to set
the final white balance to be as accurate as possible or to set it to reflect the mood we
want to portray rather than the exact lighting conditions at the time.
If you are shooting in JPEG, you may want to experiment with using the
auto white balance feature, along with setting the white balance specifically. You
may not only want to set the white balance for an accurate rendition of the scene,
but you may also want to experiment a little. For example, if you use the Cloudy or
Shade setting in fairly sunny conditions, it’s similar to adding an 81A or 81B filter
to your camera lens; these settings will add a warm cast to your picture. Product
photographers must be concerned with absolute color accuracy in their photography.
Nature photographers have the luxury of being able to be creative with the white
balance and create, augment, or remove color casts as it suits their vision. You can
use the white balance settings rather than filters to do this both with JPEG and
with RAW.
607343c01.indd 26 4/11/10 11:02:47 PM