Photoshop cs5 cho nhiếp ảnh gia part 2 pdf
Bạn đang xem bản rút gọn của tài liệu. Xem và tải ngay bản đầy đủ của tài liệu tại đây (515.05 KB, 5 trang )
6
c h a p t e r 1: THINKING DIGITALLY ■
256 possible tonal values, each pixel has 16.7 million (256 × 256 × 256) possible color
values, as shown in Table 1.1.
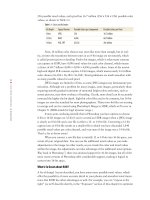
Table 1.1 Colors and Bit Depths
Bit Depth Typical Format Possible Colors per Component Possible Colors per Pixel
8 bits JPEG 256 16.7 million
12 bits RAW 4,096 68.7 billion
16 bits PSD, TIFF 65,536 281 trillion
Now, 16 million color choices may seem like more than enough, but in real-
ity, at times the transitions between tones in an 8-bit image are not smooth, which
is called posterization or banding. Twelve-bit images, which is what many cameras
can capture in RAW, have 4,096 tonal values for each color channel, which means
a choice of 68.7 billion (4,096
× 4,096 × 4,096) possible colors. Some of the newest
high-end digital SLR cameras capture 14-bit images, which means nearly 4.4 trillion
color choices (16,384
× 16,384 × 16,384). Tonal gradations are much smoother with
so many possible values for each pixel.
JPEG images are limited to 8 bits, so some JPEG images may demonstrate pos-
terization. Although not a problem for many images, some images, particularly those
requiring smooth gradual transitions of saturated bright colors and tones, such as
sunset pictures, may show evidence of banding. Clearly, more detail can be accurately
conveyed the higher the bit depth. Eight-bit color files used to be common, but 16-bit
images are now the standard for most photographers. Thirty-two-bit files are starting
to emerge and can be created using Photoshop’s Merge to HDR, which we’ll cover in
Chapter 8. (HDR stands for high dynamic range.)
It may seem confusing initially that in Photoshop you have options to choose
8-bit or 16-bit images (or 32-bit if you’ve created an HDR image) when a JPEG image
is clearly an 8-bit file and a raw file is either a 12- or 14-bit file. Converting a 12-bit
capture into an 8-bit file results in a smaller file in which you have discarded 3,840
possible tonal values per color channel, and even more if the image was a 14-bit file.
That’s a lot to throw away!
When you convert a raw file that is initially 12 or 14 bits into 16-bit space, you
retain all your original data. You can use the additional tonal values as you make
adjustments to the image. In other words, as you tweak the color and tonal values
within the image, the adjustments can take advantage of the additional tonal options.
Way back in Photoshop 7, there was minimal support for 16-bit images, but all of the
more recent versions of Photoshop offer considerable support, making it logical to
convert into 16-bit space.
What’s So Great about RAW?
A lot of things! As just described, you have many more possible tonal values, which
offer the possibility of more accurate detail in your photos and smoother tonal transi-
tions. But RAW has other advantages as well. For example, you can “expose to the
right” (as we’ll describe shortly, in the “Exposure” section of this chapter) to optimize
607343c01.indd 6 4/11/10 11:02:26 PM
7
■ CHOOSING RAW VERSUS JPEG
the signal-to-noise ratio and then correct the exposure in the raw converter to yield
the most accurate tonal information with the least problems from noise.
More important, all the information captured by the sensor is available, and
during the conversion process, you determine how it appears. A tremendous amount
of flexibility and control is available to you as to how to present the information you
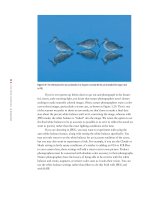
captured on the sensor, as you can see in Figure 1.4. The raw capture (top) was con-
verted with settings that revealed significantly more color than was captured in the
JPEG version (bottom) of the same image. No pixels have been damaged, and yet the
image is significantly more dramatic.
Figure 1.4 Notice the increased color and impact of the raw capture as compared to the rather bland JPEG capture.
Ph ot o b y EllE n An o n
607343c01.indd 7 4/11/10 11:02:27 PM
8
c h a p t e r 1: THINKING DIGITALLY ■
You can modify the exposure of raw files after the fact, making the image
lighter or darker, sometimes significantly lighter or darker. In most cases, you can
tweak the exposure in the raw converter such that there is rarely a need to bracket
exposures by a third of a stop in the camera anymore, except when you are in danger
of clipping your highlights. Clipping highlights means you have overexposed your
image and captured no detail in the highlights. In the latest raw converters, including
Adobe Camera Raw (ACR), you can reclaim some highlight and/or shadow detail that
initially may appear to be clipped as long as the information was recorded on the sen-
sor. You may be able to regain roughly one stop worth of information from clipped
highlights, and two stops worth of information from clipped shadows. This is a huge
benefit of RAW over JPEG capture. However, keep in mind that although you can
instruct the converter to distribute the information the sensor captured in ways that
will maximize the contrast, decrease it, or change the white balance, and so on, what
you can’t do is re-create information that isn’t there. So if you have highlights or shad-
ows with no information, you may be able to lighten or darken them, but you won’t
be able to re-create detail within them.
That may make it seem that you would be wise to underexpose rather than
overexpose, but the fact is that more noise may become visible in the image when it
is lightened, as shown in Figure 1.5. For the best results, try to limit lightening in a
raw converter to one stop or less. We’ll talk more about this issue later in this chapter
when we discuss exposing to the right.
Figure 1.5 Lightening the rocks revealed considerable color noise—the
magenta, green, and blue blobs on areas of the rocks should be shades
of gray.
Ph o t o b y EllE n An o n
607343c01.indd 8 4/11/10 11:02:28 PM
9
■ CHOOSING RAW VERSUS JPEG
In addition to being able to make decisions about parameters such as exposure,
contrast, white balance, color saturation, and more in the raw converter, you can even
select the color space there. Usually you will want Adobe RGB (1998), which is a wide
color space that correlates well to the colors most ink-jet printers can print. When
capturing as JPEG files, most cameras use the sRGB color space, which has fewer col-
ors available. sRGB is particularly suited for web use and projection. We’ll talk more
about color spaces in Chapter 4, “Foundations.”
Note: If your camera allows you to select a color space, Adobe RGB (1998) is a good choice for
nature photographers.
RAW also offers you the ability to easily fix some problems that occur in some
images, such as noise reduction for images taken using higher ISOs, chromatic aberra-
tion that occurs with some lenses (resulting in fringing), and vignetting. We’ll explain
how to identify these potential problems and how to easily minimize or eliminate
these issues in Chapter 3, “Adobe Camera Raw.”
It used to be that the downside of all this flexibility and capability was that
in order to use raw images you had to convert them to a format like TIFF or PSD.
Although you still have to convert a raw file before final output, software such as
Aperture and Lightroom make it as easy to work with raw files as with JPEGs. We’ll
talk more about those programs later in this chapter. Additionally, ACR is now so
powerful that you can do nearly all your optimizing right in the raw converter within
an easy-to-use interface. By using Smart Objects, you can place a raw image directly
in your PS file and readjust the raw file at will. We’ll cover this more extensively in
Chapter 5, “Workflows and First Steps.”
A downside of shooting in RAW is that you will need a lot more storage space,
both in your camera and on your computer, when you capture in RAW than if you use
JPEG. Since the cost of storage space has tumbled over the years, this should not be a
major hindrance to shooting in RAW. However, keep in mind that if you purchase a
new camera when it is first released, there may be a slight delay before programs such
as ACR offer support for its raw files.
Advantages and Disadvantages of Shooting JPEGs
Shooting JPEGs does offer some conveniences. For example, even capturing in high-
resolution JPEG means you need less storage space; a 4GB compact flash card will
make you feel like you can shoot forever. Also convenient is that JPEG images are
faster to download, and you may be able to take a burst of more images before the
camera buffer fills.
But JPEGs have two huge downsides. One is that your camera settings, includ-
ing color space, contrast, sharpening, white balance, exposure, and saturation, are
607343c01.indd 9 4/11/10 11:02:28 PM
10
c h a p t e r 1: THINKING DIGITALLY ■
applied to your image at the moment of capture. Any changes, even if they’re done
using the ACR interface, will result in some destruction of pixels and therefore image
degradation. In reality, this may often be so slight that it’s not noticeable, but it’s
there. And sometimes the differences may be huge. For example, if you accidentally
use the wrong white balance, a JPEG image may be nearly useless at first and at
best may require extensive corrections in Photoshop. But the extent of the exposure
corrections you’ll be able to make will be less because you’ll have only an 8-bit image
to work with, and extensive Photoshop corrections may result in posterization or
noise. Furthermore, as discussed earlier, a JPEG file is compressed lossy, which means
that even when you first open it on your computer, it has already thrown away some
information the sensor captured when you took the picture. Sometimes this is not
noticeable, but at other times it can result in banding and other strange artifacts.
Which is right for you, JPEG or RAW? For most serious amateur and profes-
sional photographers, RAW is the way to go. It offers more flexibility and “forgiv-
ability” while simultaneously enabling the highest quality of output. If you make large
prints and want the best images you can get, RAW is without a doubt the way to go.
If limited storage space is your main priority and if you primarily post your images on
the Web, email them to friends, and make only an occasional tiny print, then JPEG
may be for you. If you plan on selling your images or entering contests, check with
your intended clients or the contest rules, because some will require you to provide the
original raw file as well as the converted image.
Try It! Shoot a series of images in RAW and in JPEG. Expose them to the best of your ability in
JPEG and then use the same settings for the raw version or use RAW + JPEG if your camera has that
option. Then shoot one set with an incorrect white-balance setting. Capture a variety of scenes, includ-
ing some with shadow areas, some with significant highlight areas, and some more average-toned
scenes. See whether you can detect a difference in the optimized versions. You may have to wait until
you finish a few more chapters so you can optimize both versions of the pictures to their maximum
potential for your final decision.
Understanding Histograms
Without a doubt one of the most important advantages of shooting digitally is the
ability to check the histogram to ensure you are exposing your images correctly. In
the old days—that is, just a few years ago, before digital cameras were common in the
field—wherever there was a group of photographers shooting similar subject matter,
you’d inevitably hear someone ask, “What are you shooting at?” People felt comfort-
able with their compositions but always worried about setting the exposure correctly,
knowing that as little as 1⁄3 stop difference could mean the difference between an
awesome image and a throwaway.
With digital cameras you can review your shots on the small LCD screen on
the back of the camera. Although this may be somewhat helpful for double-checking
607343c01.indd 10 4/11/10 11:02:28 PM