Photoshop cs5 cho nhiếp ảnh gia part 12 pps
Bạn đang xem bản rút gọn của tài liệu. Xem và tải ngay bản đầy đủ của tài liệu tại đây (694.56 KB, 6 trang )
60
c h a p t e r 2: BRIDGE ■
Note: If you drag the Filter, Collections, and Export panels from their default locations and place
them by Folders and Favorites, the lower pod will collapse unless you have placed another panel there.
In fact, once you remove all the panels from any pod, that pod will collapse until you drag a new panel
into it. Further, any panel in Bridge can be positioned in any pod by clicking the tab at the top of the
panel and dragging it to the desired location. By doing this you could place the filmstrip on the left and
the folders on the right, or create any other configuration that suits your needs.
When initially viewing images, we usually select the Folders tab and navigate
to the desired folder so we can have the Folders panel fill the left pod. (If you have
used Adobe Photo Downloader, it will automatically open a new Bridge window and
navigate to the folder containing the newly imported images.) However, while we sort
through our images, we like to have the Filter and Keyword panels visible on the left.
Occasionally we like to use the Light Table view to scan the contents of a folder. Ellen
has created a custom view called Ellen 1. The new workspace is automatically added
to the list of presets, as shown in Figure 2.21. That way, she can use any of the other
presets but still quickly return to her preferred layout.
Figure 2.21 Choose a name for each workspace you save that clearly
describes it, so you can quickly select the best workspace for any task.
To create and save a customized workspace, take these steps:
1. Choose the default workspace that initially is closest to what you want to use.
2. Adjust the size of the pods as described earlier.
3. Select which panels to have visible by choosing Window > Workspace and tog-
gling the check marks on and off.
4. Drag the panels to the desired pods.
Once you have configured the space the way you want it, save the workspace
by choosing Window
> Workspace > Save Workspace or by clicking the Workspace-
changer drop-down menu in the top of the interface and choosing Save Workspace.
A new dialog will appear in which you name your workspace. There are also options
to save the current sort order and the physical location of the window. After you save
your workspace, it’s available from Window
> Workspace or from the Workspace-
changer icons at the top of the interface, as shown in Figure 2.21.
Other Views
Sometimes it’s helpful to be able to see more of the images at once without seeing a
larger preview of a single image. The Light Table view shows only the Content panel
(see Figure 2.22). This can be helpful when you want to get an overall look at the
images. We often use this view when looking for a specific image or checking to get a
sense of the images that are in a folder.
607343c02.indd 60 4/11/10 11:03:16 PM
61
■ BRIDGE VIEWS AND WORKSPACES
Figure 2.22 Using the Light Table view allows you to see as many of your image thumbnails as possible for an initial sort.
Ph ot os by EllE n An on
This view is also excellent if Bridge didn’t automatically rotate your verticals
so they appear with the proper orientation (which requires that your digital camera
support this feature). To rotate images, simply select them, and click the appropriate
rotation button at the top of the Bridge window—these buttons have circular arrows
indicating the direction of rotation. To select a group of images to be rotated, click the
first one, then Shift-click the last one in the group, and finally click a rotation button.
To rotate noncontiguous images, Ctrl+click/F+click the desired images, and then click
a rotation button. When you rotate an image in Bridge, only the thumbnail preview is
rotated. The actual image isn’t rotated until you open it.
Resize the thumbnails using the same procedure as described earlier. Usually
you’ll want the thumbnails to be fairly small in this view since you’re not checking the
individual files for details but rather getting a sense of what images are in the folder.
If you want to see a full-screen preview of your image at any time, press the
spacebar. The interface will change to reveal only the selected image. Press the space-
bar again to return to your regular workspace. To view multiple images in a full-
screen view, click the Refine icon
and choose Review Mode.
Try It! To get more comfortable with the many options available in Bridge, point it to a folder
containing some of your images, and adjust the various options we’ve discussed here for changing the
interface, including the view, pod size, and panel locations.
607343c02.indd 61 4/11/10 11:03:17 PM
62
c h a p t e r 2: BRIDGE ■
Recognizing the Icons
Bridge CS5 uses a lot of icons in the interface in the main menu bar as well as the Path
bar below it, as shown in Figure 2.23. We’ve labeled the icons for you in the figure,
but when you hover the cursor over them on your monitor, a tooltip will appear with
their names. Still, it helps to know what functions are available from the icons rather
than having to go to the menus.
Go Back or Go Forward
Go to Parent or Favorites
Go to Recent File or Folder
Get Photos From Camera
Path Bar Rene
Output
Browse Quickly/Prefer Embedded Images Filter Items
by Rating
View Sort
Trash
Create New Folder
Options for Thumbnail Quality and Previews
Open in Camera Raw
Return to Last Application
Workspace Changer Rotate Left/Rotate Right
Open Recent Folder
Switch to Compact Mode
Search For Field
Figure 2.23 The icons in the Bridge interface make it easy to access a multitude of features with a single click.
The top bar is always visible, but if the bottom bar, called the Path bar, is miss-
ing, choose Window
> Path Bar and click to toggle its visibility.
Notice that there are icons to control the quality of the thumbnail previews.
When you want to browse quickly, click the
icon. To specify the overall quality
used for the thumbnails and size of the previews, use the
icon. We tend to set the
Quality to Always High and then use the Quick Browse icon when we’re anxious to
see the images and don’t want to wait for high-quality preview generation. You can
choose whichever setting best meets your needs.
Stacking Images
As you go through your images, if you’re like most nature photographers you’ll see
that you have a series of very similar images. This is particularly true if you are a
wildlife photographer seeking just the right head angle and subject position. Or per-
haps you’re taking shots to composite into a panorama. Sometimes it helps to orga-
nize your images into stacks. That way, you can rapidly glance through the stacked
view to have a general idea of what you’ve captured, and you can edit each stack
individually.
To stack a group of images, first select them by Ctrl+clicking/F+clicking the
images you want to group. If the images were shot in sequence and are all next to
each other, click the first one and Shift-click the last one to select the entire series;
press Ctrl+G/F+G to group them as a stack. Alternatively, you can stack them by
choosing Stacks
> Group as Stack. The stacked images will appear with an outline
around them and a number on top indicating how many images are in the stack (see
Figure 2.24).
607343c02.indd 62 4/11/10 11:03:17 PM
63
■ BRIDGE VIEWS AND WORKSPACES
Figure 2.24 Stacking groups of similar images makes it easy to nd specic sequences of images.
Ph ot os by EllE n An on
We find the following techniques helpful when working with stacks:
T• o open an individual stack, click the number at the top of the stack. Click the
number again to close that stack.
T• o open all stacks, choose Stacks
> Expand All Stacks, and to close all stacks,
choose Stacks
> Collapse All Stacks.
T• o move an image in or out of an existing stack, click and drag it in or out of
the stack.
T• o unstack images, select the stack and choose Stacks
> Ungroup from Stack
(Ctrl+Shift+G/F+Shift+G).
The image on top of the stack will be the image that’s the farthest to the left in
the group when you open the stack. You can click any image in the stack and drag it
to the right or left, thereby selecting which image will be on top of the stack. Usually
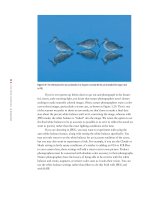
you’ll want to choose the best image from the group, as shown in Figure 2.25.
Figure 2.25 The image farthest to the left will appear on top of the stack.
Ph ot os by EllE n An on
607343c02.indd 63 4/11/10 11:03:18 PM
64
c h a p t e r 2: BRIDGE ■
To open just the top image in ACR, make sure that only the top image is
selected. You can tell because the top image will have a gray background, and there
will be a rim of black on the right and bottom before the outline of the stack, as
shown in Figure 2.26.
Figure 2.26 When there is a black
space to the right and bottom of the
stack, only the top image is selected.
Ph ot os by EllE n An on
To open an entire stack in ACR, first click in the black space, which will then
fill with gray. When the entire stack outline is filled with gray, the entire stack is
selected, as shown in Figure 2.27. Double-click in the main part of the thumbnail to
open the images in ACR. To select just the top image, click in the space on the right
and bottom so that it returns to black.
Figure 2.27 When there is no black
space to the right and bottom of
the stack, all images in the stack are
selected.
In CS5 if a stack contains 10 or more images, when you hover your cursor over
the stack a “play” arrow appears along with a small window with a marker in it. Click
the play button to have Bridge rapidly scroll through all the images in the stack while
leaving the stack closed (Figure 2.28). Move the marker slightly to the right to manu-
ally scroll through the images in the closed stack.
Figure 2.28 By using the play option or
the manual advance, you can view stacked
images without opening the stack.
Bridge CS5 can automatically create stacks for images that you shot to com-
posite into panoramas or HDR composites. After selecting the folder containing the
images, go to Stacks
> Auto-Stack Panorama/HDR. You can help Bridge do this by
making certain to shoot a blank frame (such as sky or your hand) between the last
segment in one series and the first image in the next.
Ph ot os by EllE n An on
607343c02.indd 64 4/11/10 11:03:18 PM
65
■ SORTING AND EDITING
Try It! Practice working with stacks on a folder of your own images. Create stacks, rearrange the
files in them to change the one that appears on top, drag images in and out of the stack, and so on. We
think you’ll like this feature once you get comfortable with it.
Sorting and Editing
Getting your digital images onto your computer and creating a good way to view
them is certainly a start. But as you’ve probably noticed, images seem to accumulate
quickly, and keeping them organized can be a bit of a chore, especially if you have a
backlog of images stored in many folders. So the first step is to figure out what you
have, which images are worth keeping, and which should be deleted. Then you can
select the images you’d like to start optimizing.
A good approach is to plan to do at least two passes through your images. First
reject the images that are obviously poor on the first pass and mark those that you’re
excited about with a star rating. Then take a second look at the rejects before deleting
them. That way you won’t accidentally delete any files you want to keep, and you can
be more aggressive about rejecting images since you know you can opt to recover a file
if necessary. Next you may opt to stack the images and go through them a second or
third time, assigning more careful ratings as well as labels. We’ll go into more detail
about this process later in this section.
If you haven’t already navigated to the folder containing your images, do so
using the Folders panel. It’s a directory of everything on your computer. If you will be
returning to this folder frequently, you may want to drag the folder to the Favorites
panel. That way, you can find it quickly without needing to look through the entire
directory. To place it on the Favorites panel, right-click/Control-click the folder, and
choose Add to Favorites, as shown in Figure 2.29. If both the Favorites panel and
Folders panel are visible, you can simply drag the folder to the area under the words
Drag Favorites Here on the Favorites panel. Then click the folder in Favorites to view
the contents.
Figure 2.29 Placing frequently
accessed folders in the Favorites
panel makes them easier to nd.
Instead of using your mouse to haphazardly click images that you want to view
in more detail, we recommend taking a close look at all of the images in the folder.
Click the first image on the list (scroll to the top of the list if necessary), and then use
the up and down arrow keys on your keyboard to navigate through the images. As
you move up and down, the preview is updated based on the currently active image.
607343c02.indd 65 4/11/10 11:03:19 PM