Photoshop cs5 cho nhiếp ảnh gia part 13 pot
Bạn đang xem bản rút gọn của tài liệu. Xem và tải ngay bản đầy đủ của tài liệu tại đây (528.14 KB, 6 trang )
65
■ SORTING AND EDITING
Try It! Practice working with stacks on a folder of your own images. Create stacks, rearrange the
files in them to change the one that appears on top, drag images in and out of the stack, and so on. We
think you’ll like this feature once you get comfortable with it.
Sorting and Editing
Getting your digital images onto your computer and creating a good way to view
them is certainly a start. But as you’ve probably noticed, images seem to accumulate
quickly, and keeping them organized can be a bit of a chore, especially if you have a
backlog of images stored in many folders. So the first step is to figure out what you
have, which images are worth keeping, and which should be deleted. Then you can
select the images you’d like to start optimizing.
A good approach is to plan to do at least two passes through your images. First
reject the images that are obviously poor on the first pass and mark those that you’re
excited about with a star rating. Then take a second look at the rejects before deleting
them. That way you won’t accidentally delete any files you want to keep, and you can
be more aggressive about rejecting images since you know you can opt to recover a file
if necessary. Next you may opt to stack the images and go through them a second or
third time, assigning more careful ratings as well as labels. We’ll go into more detail
about this process later in this section.
If you haven’t already navigated to the folder containing your images, do so
using the Folders panel. It’s a directory of everything on your computer. If you will be
returning to this folder frequently, you may want to drag the folder to the Favorites
panel. That way, you can find it quickly without needing to look through the entire
directory. To place it on the Favorites panel, right-click/Control-click the folder, and
choose Add to Favorites, as shown in Figure 2.29. If both the Favorites panel and
Folders panel are visible, you can simply drag the folder to the area under the words
Drag Favorites Here on the Favorites panel. Then click the folder in Favorites to view
the contents.
Figure 2.29 Placing frequently
accessed folders in the Favorites
panel makes them easier to nd.
Instead of using your mouse to haphazardly click images that you want to view
in more detail, we recommend taking a close look at all of the images in the folder.
Click the first image on the list (scroll to the top of the list if necessary), and then use
the up and down arrow keys on your keyboard to navigate through the images. As
you move up and down, the preview is updated based on the currently active image.
607343c02.indd 65 4/11/10 11:03:19 PM
66
c h a p t e r 2: BRIDGE ■
This gives you a much better idea of the overall composition, exposure accuracy, and
image quality so you can decide whether you should delete or keep the image. You
can also start to get a better idea of which images deserve more attention as you sort
through them.
Zooming and Comparing Images
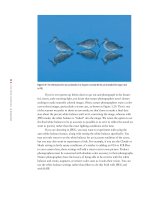
As you go through your images, you need to know whether they are critically sharp.
It’s easy to tell when things are grossly out of focus, but judging critical sharpness can
be challenging, especially on smaller laptop monitors. The Loupe tool enables you to
quickly check sharpness, as shown in Figure 2.30. To access it, simply click the image
preview or Ctrl+click/F+click if you have checked the option in Preferences to require
a modifier key, and then drag the loupe wherever you’d like. The pointed corner of the
tool points at the area it will magnify. Alternatively, click anywhere on the image that
you’d like to view at 100% magnification.
Figure 2.30 Being able to view multiple images simultaneously with a loupe to check for critical sharpness makes it easier to decide
which image is the best.
Ph o t o s by EllE n Anon
By default, the Loupe tool is set to 100%. To adjust the magnification, up to
800%, press the + and – keys. The magnification percentage is visible by the filename
beneath the image preview. To remove the loupe, click the X on the outer-rim corner
of the magnifier.
Sometimes it’s helpful to be able to look at two or more similar images simul-
taneously to decide which one is the best (Figure 2.30).To see more than one image
in the Preview panel, Ctrl+click/F+click the thumbnails in the Content panel. The
previews will automatically resize and move to accommodate as many images as you
want to compare. To remove an image from the Preview panel, Ctrl-click/F-click it in
607343c02.indd 66 4/11/10 11:03:20 PM
67
■ SORTING AND EDITING
the Content panel. You can create a loupe for each image that’s currently in the Pre-
view panel, as shown in Figure 2.30.
Rating Images
Bridge includes a rating capability that allows you to assign a value of one to five stars
or “reject” to your images, much like you might rate a movie. In so doing, you can
quickly go through your images and rate them so that when you’ve finished with the
sorting and editing process, you’ll know exactly which images are your favorites and
which ones need to be deleted.
As you sort through your images, begin by rejecting those you definitely don’t
want to keep. To apply a Reject rating, press Alt+Delete/Option+Delete. The image will
remain in the folder but will be marked with Reject in red. You could opt to delete each
throwaway image instead, but then there is no safeguard if you accidentally reject/delete
one that you later decide you should have kept. We strongly believe it’s better to first
mark the throwaways with a Reject rating.
You’ll also want to start thinking about which images are your favorites, since
those are the ones you’ll want to spend the most time optimizing. To assign a rank,
simply press a number from 1 through 5 to assign a star rating.
Note: You must change the Label preference in Bridge preferences to enable you to assign labels
and ratings without pressing the Ctrl/F key. Otherwise, the keyboard shortcut for applying ratings is
Ctrl/F plus a number key from 1 through 5. We have found no advantage to using the additional key-
stroke; it’s much faster to do the rating by simply pressing a number key.
If you prefer to not use the keyboard shortcuts to apply ratings, select an image
(or images), and move your mouse over the row of five dots below the thumbnail. The
dots represent the possible star ratings, so click the first dot to rate it as one star, the
second dot to rate it as two stars, and so on (these dots are visible only if the image
is selected, but the star rating you’ve applied to an image will display regardless of
whether it is selected). If you have multiple images selected when you click, the rating
will be updated to the same value for all the selected images. You can remove a rat-
ing by clicking to the left of the row of dots. The star-rating display replaces the dots
below the image, so you can see at a glance what you rated a given image (see Fig-
ure 2.31).
Figure 2.31 When you apply a rating to
an image, that rating is reected with stars
displayed below the image thumbnail.
Ph o t o by EllE n Anon
This gives you a much better idea of the overall composition, exposure accuracy, and
image quality so you can decide whether you should delete or keep the image. You
can also start to get a better idea of which images deserve more attention as you sort
through them.
Zooming and Comparing Images
As you go through your images, you need to know whether they are critically sharp.
It’s easy to tell when things are grossly out of focus, but judging critical sharpness can
be challenging, especially on smaller laptop monitors. The Loupe tool enables you to
quickly check sharpness, as shown in Figure 2.30. To access it, simply click the image
preview or Ctrl+click/F+click if you have checked the option in Preferences to require
a modifier key, and then drag the loupe wherever you’d like. The pointed corner of the
tool points at the area it will magnify. Alternatively, click anywhere on the image that
you’d like to view at 100% magnification.
Figure 2.30 Being able to view multiple images simultaneously with a loupe to check for critical sharpness makes it easier to decide
which image is the best.
Ph o t o s by EllE n Anon
By default, the Loupe tool is set to 100%. To adjust the magnification, up to
800%, press the + and – keys. The magnification percentage is visible by the filename
beneath the image preview. To remove the loupe, click the X on the outer-rim corner
of the magnifier.
Sometimes it’s helpful to be able to look at two or more similar images simul-
taneously to decide which one is the best (Figure 2.30).To see more than one image
in the Preview panel, Ctrl+click/F+click the thumbnails in the Content panel. The
previews will automatically resize and move to accommodate as many images as you
want to compare. To remove an image from the Preview panel, Ctrl-click/F-click it in
607343c02.indd 67 4/11/10 11:03:20 PM
68
c h a p t e r 2: BRIDGE ■
Labeling Images
The labeling feature in Bridge allows you to take the rating system a step further
by assigning a color code to your images. You do this by applying a colored label to
images in a way very similar to ratings. You can then filter the display to show only
the images that are labeled or only those labeled with a specific color. The available
colors for labels are red, yellow, green, blue, and purple.
To use these effectively, you’ll first want to come up with a system that identifies
what the colors mean. You might, for instance, use the labels to identify categoriza-
tions of images. For example, you might use a yellow label to mark images to use for a
contest or competition, a green label to mark images to illustrate an article, and a blue
label to designate images for a slide show. It’s a good idea to document your system
so you won’t get confused later as you are reviewing images that have been previ-
ously labeled or as you are trying to remember what color specific images should be
labeled in a new group of images. You could opt to add the information to Labels in
Preferences as mentioned earlier in this chapter, but once you do so, you can’t change
it easily. Changing the text associated with each color label can result in older labels
changing to white if you view images that were labeled with the text set a different
way. Consistency is important to taking full advantage of this capability.
To label an image, you simply select it (or several images) and press the num-
bers 6 through 9; 6 for red, 7 for yellow, 8 for green, and 9 for blue (purple doesn’t
have a shortcut key). Alternatively, you can choose Label and then the desired color
from the menu. You can turn off the label by pressing the number key a second time
or by selecting Label
> No Label.
When you label an image, a colored bar appears below the thumbnail (see Fig-
ure 2.32). This allows you to see at a glance which images were marked for a particu-
lar purpose, based on the system you’re using for color-coding with labels.
Figure 2.32 When you apply a label
to an image, a colored bar appears
below the thumbnail in Bridge.
Of course, just seeing a colored bar or a star rating below the thumbnail image
doesn’t quite provide you with a powerful way to review your decisions about the images.
By using the Filter panel, you can make even better use of the rating and labeling options.
Using the Filter Panel
When you have assigned a rank and/or label to all the images in your current project,
you can sort the images by a particular parameter such as ratings or labels by clicking
607343c02.indd 68 4/11/10 11:03:20 PM
69
■ SORTING AND EDITING
the Sort Manually icon . You can also opt to display only a subset of
the images—in other words, to filter them from the Filter icon
or from the Filter
panel.
The Filter icon enables you to view only images that have a certain rating or
label by clicking on the desired option. To specify images that have a certain rating or
higher and a label, Ctrl+click/F+click on the additional option. Toggle off a criterion
by clicking on it again.
The Filter panel enables you to choose which images to display at any one time
according to a larger variety of parameters. In addition, Bridge shows how many images
in the folder match each parameter. You can select just one parameter such as stars,
labels, or Reject, or you can select multiple parameters. If the parameters are within the
same category, such as Ratings, then selecting more than one parameter is the equiva-
lent of saying, “Show all images with this rating or that rating.” When you choose an
additional parameter from a different category such as Labels, then you are instructing
Bridge to show only those images that meet the conditions checked in both categories;
for example, in Figure 2.33 they must have a rating of five stars and a yellow label. If you
clear a label or rating for an image at this point, it will disappear from the current view if
it no longer meets the display criteria. When you want to see all the images again, toggle
off all the check marks in the Filter panel.
Figure 2.33 Use the Filter panel to
selectively display images meeting
specic criteria.
You may want to combine using the sort and filter options. For example, you
may choose to view images with three or more stars or those containing a label. You
can then use the Sort Manually options to reorder the images according to a variety of
parameters, including file type, bit depth, rating, labels, and so on.
In our workflow, after we have made the first pass through our images and
rejected some of them, we filter the images to show only the rejects. We then quickly
look through the images to make certain there are none we want to keep. To delete the
images, we select them all (Ctrl+A/F+A) and then press Delete. A warning dialog will
appear asking whether to delete or reject the images. Choose Delete.
Note: You may opt to check the box to prevent the warning dialog from appearing in the future
since by rejecting the images first, you have introduced a safety step. It’s a matter of personal prefer-
ence to keep or eliminate this particular warning.
607343c02.indd 69 4/11/10 11:03:20 PM
70
c h a p t e r 2: BRIDGE ■
Creating Collections
The idea behind collections is that you may want to view certain groupings of your
images even though the files are housed in different folders. To begin, click on the
Collections panel. If it’s not visible choose Window
> Collections Panel. Then click
the
icon. Name the collection, then click and drag one or more images into it. To
remove an image from a Collection, right-click/Control-click on the thumbnail in the
Content panel and choose Remove from Collection.
By clicking the Refine icon
and choosing Review, you can view all the
images currently visible in the Content panel in a full-screen Preview-only mode. If
there are more than a few images, the images will appear in a carousel. By clicking the
arrow, you can delete images from view. Click the icon to place the remaining
images into a collection. A dialog will appear in which you name the new collection.
You can opt to have Bridge create collections for you based on certain param-
eters that you specify as shown in Figure 2.34. To begin, click the new Smart Collec-
tion icon
. In the new dialog box that appears, specify where Bridge should check
for potential images. You could choose a folder or a broader part of your computer.
Then specify the criteria. The first drop-down window says Filename by default, but
by clicking within it you can choose from among a huge number of options. If you
want to specify more than one parameter, click the
+ sign at the end of this line and
then repeat the process until you have specified all the criteria. Next choose between
If Any Criteria Are Met and If All Criteria Are Met in the drop-down window. To
create the collection, click Save. The Smart Collection will have a blue icon in the
Collections panel. To edit the criteria, click the Edit Smart Collections icon
in
the lower left of the panel.
Figure 2.34 Smart Collections help you
organize your images in groupings that are
meaningful to you.
Using Keywords
Applying keywords to your images is essential if you want to be able to easily find par-
ticular images, or types of images, in the future. Although it may feel like a nuisance,
it’s important to apply keywords to your images early in your workflow. It’s all too
easy to procrastinate and figure you’ll do it later so that you can get on with the fun
part of optimizing your images. But if you skip adding the keywords, you’re likely to
wind up with thousands of images stashed in various folders without an easy way to
607343c02.indd 70 4/11/10 11:03:21 PM