Photoshop cs5 cho nhiếp ảnh gia part 17 pot
Bạn đang xem bản rút gọn của tài liệu. Xem và tải ngay bản đầy đủ của tài liệu tại đây (1.08 MB, 7 trang )
97
■ USING THE ACR INTERFACE
Using the Spot Removal Tool
The Spot Removal tool is similar to the Clone and Healing Brush tools in Pho-
toshop, although not quite as powerful. The Spot Removal tool is particularly well
suited to removing the dust that plagues most digital photographers. Unfortunately,
since retouching in ACR is limited to circular spots, it is not well suited for object
removal. That type of retouching is best done later in Photoshop.
If you are using a Smart Object–based flexible workflow (see Chapter 5), it’s
helpful to do as much of your dust removal as possible in ACR. That way, anytime you
change the Smart Object, your retouching will automatically change as well. If you use
the flexible workflow but do your cleanup in Photoshop, some changes you may make
later to the Smart Object (your background layer with the raw file) may force you to
have to redo the cleanup layer. For instance, if you make tonal or color corrections to
the raw file, any cloning and healing that was based on the previous settings will no
longer match.
To use the Spot Removal tool, follow these steps:
1. Zoom into your image to 100% magnification.
2. Begin at one corner and systematically work your way through the image.
Figure 3.5 The Straighten tool automatically crops
and straightens your image.
607343c03.indd 97 4/12/10 11:48:25 PM
98
c h a p t e r 3: ADOBE CAMERA RAW ■
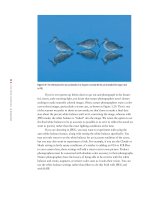
3. When you find a speck of dust, click the Spot Removal tool. As shown in Fig-
ure 3.6, several new options appear to the right of the image.
Figure 3.6 After clicking the Spot Removal tool, specify the Heal or Clone tool, as well as the radius, opacity, and
whether to show an overlay of the corrections.
4. Select either Heal or Clone in the Type drop-down menu. Clone will copy the
pixels from another area that you choose to replace the dust, whereas Heal will
copy the texture and blend the color just as the similar tools do in Photoshop.
(For more in-depth coverage of cloning and healing, see Chapter 5.)
5. Check Show Overlay so a circle will remain showing areas that have been
retouched, as well as the source for the retouching. That way, if you need to
modify an area, you can redo it easily.
6. Click and drag over the dust to create a circle just slightly larger than the dust.
A red circle appears to indicate this is the spot you are currently working on.
As you drag, the size of the circle changes. You can also modify the size of the
circle, before or after you’ve created it, by adjusting the Radius slider.
7. Whether you are cloning or healing, a second circle will appear with broken
green lines. That indicates the source for the cloning or healing. To change the
source, click within that circle and drag it to the desired location.
8. Once you click the next spot, the previous red circle changes to a broken circle
indicating the area that was retouched.
9. To modify a previously retouched area, click within the circle. If you place the
cursor directly on the outline of the circle, you can drag to change its size. To
change the source, click within the source circle and drag.
607343c03.indd 98 4/12/10 11:48:26 PM
99
■ USING THE ACR INTERFACE
10. To remove a single retouched spot, click within the circle and press the Delete
key on the keyboard. To remove all the retouching, click the Clear All button
in ACR.
Note: The Red Eye Removal tool in ACR works similarly to the Red Eye Removal tool in
Photoshop. Click and drag over the red pupils, and drag the Darken slider until the eye looks natural.
Because red-eye removal is not a task faced by most nature photographers and the tool is straightfor-
ward to use, we won’t go into more detail about using it.
Controlling the Default Appearance of Your Image
Bridge generates thumbnails and initial previews of your images to help you edit your
images based on the ACR settings. These previews also serve as a starting place for
your ACR adjustments. By default, they are set to use Auto Tone Adjustments and to
apply some sharpening to generate these previews. In addition, the default preview
uses the Adobe Standard camera profile. You may decide that you would rather edit
your images in Bridge, viewing the file previews with the settings you used to shoot
them or some other combination of settings. ACR allows you to specify what settings
it should use to generate the default thumbnails and previews as well as to create and
save a new Camera Raw default. Click the Preferences icon in the toolbar
to open
the dialog box shown in Figure 3.7.
Figure 3.7 Click the Preferences icon to modify the default appearance of image
previews in Bridge and ACR.
607343c03.indd 99 4/12/10 11:48:26 PM
100
c h a p t e r 3: ADOBE CAMERA RAW ■
Specifying the General Settings
We recommend you use the default setting and save your image settings in sidecar
XMP files. These are the settings that contain the adjustments you make to the image,
and it’s useful to have them go with your image if you opt to open it in another appli-
cation. Many applications are able to read XMP files and thus maintain consistency
with the appearance of your image.
By default, ACR applies some sharpening to each image. This is to balance the
slight bit of softening that is inherent within digital capture. In the past, we recom-
mended that you change the Apply Sharpening To option to preview images only.
However, the sharpening algorithms have been improved substantially in the most
recent versions of ACR, and we have yet to see an image that was adversely affected
by applying the default low levels of sharpening as a first pass of sharpening. There-
fore, we now leave the sharpening option set to All Images.
Specifying the Default Image Settings
ACR includes several options for determining how you want to preview your
images. There is an option to preview your images using auto-tone corrections for
exposure, shadows, contrast, and brightness. For images from some cameras, these
auto- corrections work fairly well and give you a good start on optimizing your images.
With images from other cameras, the settings can be too extreme and result in clipped
data or other less-than-ideal presentations. By default, CS5 may have the Auto setting
functionality turned on. This means that when you view your images in Bridge, you’re
seeing the raw files with the Auto settings applied. In reality, your raw file is still a raw
data file; the settings are applied only to the previews, not to the raw files themselves.
When you open the image in ACR, you not only can but should modify any and all
settings to customize the conversion as you desire. The Auto settings are useful pri-
marily as starting points.
We prefer to set ACR so that Auto is not applied to raw files. That way, when
you edit in Bridge, you’ll see your files as you shot them. Therefore, we recommend
that you deselect the Apply Auto Tone Adjustments check box under Default Image
Settings.
Also in the Default Image Settings section, we enable Apply Auto Grayscale
Mix When Converting to Grayscale. In addition, if you use more than one camera
body, we recommend checking the option Make Defaults Specific to Camera Serial
Number. That way, you can establish different settings for each camera if necessary.
In particular, you may find that one camera requires a different amount of default
color noise reduction or camera-calibration settings.
We leave the other settings at their defaults. However, you may want to con-
sider the TIFF and JPEG options.
T• he Automatically Open All Supported JPEG/TIFF Files setting causes all
JPEGS and TIFFs to open in ACR when you double-click on them in Bridge.
T• he default setting, Automatically Open JPEGs/TIFFs with Settings, means
that ACR will open any JPEG or TIFF file with editable settings from ACR
607343c03.indd 100 4/12/10 11:48:26 PM
101
■ USING THE ACR INTERFACE
(ACR tags) in them. For example, with the preference set this way, if you select
a JPEG file in Bridge; open it in ACR by using right-click/Control-click and
choosing Open in Camera Raw; edit it; and click Done, this file will always
open in ACR. However, any JPEG that you haven’t opened and modified like
this will not open by default in ACR. JPEGs you edit within ACR and save in
ACR will not reopen in ACR by default, as they already have a special tag—the
AlreadyApplied CRS tag (CRS stands for Camera Raw settings)—because the
settings are “burned in” and can no longer be modified.
T• o force a JPEG or TIFF file to open in ACR, right-click/Control-click, and
choose Open in Camera Raw.
For Photoshop Elements Users: Using Camera Raw with JPEGs and TIFFs
To open TIFF and JPEG files in Camera Raw with Elements, take these steps:
1. Choose File > Open.
2. Select the TIFF or JPEG file.
3. Change the Format pop-up menu setting to Camera Raw.
4. Click Open.
Saving Settings
You may find with images shot under certain conditions that you frequently make
similar adjustments. To save time, you can save these settings as a preset. At other
times you may want to return to the ACR default settings, or you may want to estab-
lish new ACR default settings. To do any of these, click the fly-out menu icon
that’s on the right side of the ACR interface about one-third of the way down. It’s
actually on the far right edge of each adjustment tab. A new menu appears, as shown
in Figure 3.8.
607343c03.indd 101 4/12/10 11:48:27 PM
102
c h a p t e r 3: ADOBE CAMERA RAW ■
Figure 3.8 ACR enables you to save a group of
settings as a preset or as the new default settings.
To save the settings for a particular image so that you can use them later for
other images taken under similar conditions, choose Save Settings. A second dialog
box appears, as shown in Figure 3.9, in which you select which parameters to save.
Clicking Save will cause another dialog box to open in which you give the setting a
name. We suggest you give it a name that’s specific enough that you will easily recog-
nize its purpose. Unless you have a clear reason for changing it, store the settings in
the default location.
Figure 3.9 When saving a group of settings, you
can select as many or as few of the parameters as
are useful for any particular situation.
To use these settings, choose Apply Presets or click the icon to go to the last
adjustment tab, which contains a list of your presets.
607343c03.indd 102 4/12/10 11:48:27 PM
103
■ US ING T HE B ASIC TA B
For Photoshop Elements Users: Custom Defaults
Elements does not support saving or loading settings, but it does allow you to save new Camera
Raw defaults.
To save your settings as the new default for ACR to use for all images (before
they are individually adjusted), adjust the sliders and settings as desired, and then
choose Save New Camera Raw Defaults. You will not see a dialog box asking which
settings to save—it saves all of them. If you later change your mind, you can click
Reset Camera Raw Defaults.
Using the Basic Tab
Whether or not you choose to use the Auto settings as your default, chances are that
you will often want to make some tonal and color adjustments to your images. The
ability to easily make subtle tweaks, as well as major corrections, to your exposure is
one of the many advantages of working with the ACR interface.
The Basic tab
icon is visible by default when the ACR interface first opens; it
contains the white balance adjustments as well as some exposure and color adjustments.
Setting White Balance
One of the major advantages of using the ACR interface is the ability to fine-tune
the white balance, or color cast. If you decide that you want to make your picture as
neutral as possible, then including a gray card such as the WhiBal card (available at
www.rawworkflow.com) or the new SpyderCube (www.datacolor.com) within one frame of
your pictures makes it easy to determine the correct white balance. Just use the White
Balance tool
and click the gray tone in the card or cube in your image. In fact, you
can use this eyedropper to click any pixel within any image that you want to define as
neutral—that is to say, any shade of pure gray from the lightest to the darkest gray—
and the tonalities within the entire image are remapped accordingly.
However, for most nature photographers pure neutral is not the goal for most
images. We nature photographers tend to like the warm color casts of early morning
and late daylight. Sometimes we even like the cool colors of shadows and/or the harsh
blue light on winter snow. And sometimes we like to pretend those color casts were
present even when they weren’t! In such cases, the white balance you ultimately select
may be correct, but perhaps not accurate. Fortunately, there are no “white-balance
police” running around demanding that your choice of white balance must be true to
life! However, if you’re trying to depict your images more documentarily, then you’ll
want to make your white-balance choices as accurate as possible.
Note: There is a difference between accurate white balance and correct white balance. Accurate
white balance portrays the lighting as it existed when you photographed the scene. Correct white bal-
ance is the ideal setting that gives the image the feeling you seek to express.
For Photoshop Elements Users: Custom Defaults
Elements does not support saving or loading settings, but it does allow you to save new Camera
Raw defaults.
607343c03.indd 103 4/12/10 11:48:27 PM