Photoshop cs5 cho nhiếp ảnh gia part 24 pot
Bạn đang xem bản rút gọn của tài liệu. Xem và tải ngay bản đầy đủ của tài liệu tại đây (1.27 MB, 14 trang )
135
■ CUSTOMIZING SETTINGS
Once you’ve established the preferred options in Color Management Settings,
click OK to apply the settings. You don’t need to restart Photoshop for the changes to
take effect.
Preferences
In addition to the color settings, there is a large number of preference settings you
can establish within Photoshop. As the name implies, many of these are a matter of
personal preference. However, we do have recommendations for some of the settings.
Access the Preferences dialog box by choosing Edit
> Preferences > General from the
menu. (On a Mac, choose Photoshop
> Preferences > General.)
Note: Because the Preferences dialog box contains so many settings, we won’t cover all of them.
Instead, we’ll focus on the settings we think are most important. Elements users will find a sidebar
(“For Elements Users: Setting Preferences”) with specifics for them at the end of this section, but there
is considerable overlap, and for full details they should read through this entire section.
General Settings
The General page includes a variety of settings that affect your overall experience in
Photoshop, as you can see in Figure 4.2.
Figure 4.2 The General section of the Preferences dialog box includes settings that aect your overall experience in Photoshop.
607343c04.indd 135 4/11/10 11:04:12 PM
136
c h a p t e r 4: FOUNDATIONS ■
Here are the settings you should be concerned with:
Color Picker: Adobe Leave Color Picker set to the default of Adobe rather than using the
Color Picker from the operating system.
HUD Color Picker: Hue Strip Most photographers will rarely use the HUD Color Picker, but
when they do we suggest starting with the Hue Strip. We find it slightly easier than a
color wheel to use accurately. But if you find yourself using the HUD Color Picker, try
both and see which style you prefer. To access the HUD Color Picker, with an image
open, select a brush tool or an Eyedropper tool. Next hold down Command+Alt+Ctrl
on a PC and Control+Option+F on a Mac while left-clicking and holding. You can
immediately change the hue and then the luminosity by continuing to hold the keys
and dragging the cursor. But to modify the hue after setting the luminosity you have
to be a bit dexterous because you’ll also need to use your thumb to hold down the
spacebar while continuing to depress the other keys. Don’t release the cursor; just drag
it over to the hue you want. As soon as you release the keys or the cursor, the HUD
Color Picker disappears.
Image Interpolation: Bicubic This is the best general option for interpolation, while other
settings are useful in specific situations. We’ll address the details of interpolation in
Chapter 10, “Output.”
Options Check Boxes
The General page in the Preferences dialog box is dominated by a large number of
check boxes that allow you to set a range of preferences. Here are some of the settings
we find helpful in this section:
Auto-Update Open Documents: O This option causes Photoshop to automatically update
files that are opened and modified in another application. Since this rarely pertains to
nature photographers, we leave it unchecked.
Beep When Done: Personal Preference Turning on this setting causes Photoshop to beep when
a task is completed. That way, you can turn your attention to other matters while wait-
ing for a major task to complete, knowing you’ll be alerted when you’re ready to con-
tinue. We find it annoying to have machines beep at us and prefer to check to see when
a task is done. We rarely have to wait long enough for it to be an issue.
Dynamic Color Sliders: On When selecting a color in the Color panel, it can be helpful for
the sliders to change color as you adjust the color value so you can get a better sense of
what color you’ll achieve by moving a slider in a particular direction. We don’t use the
Color panel very often, but we keep this setting enabled for situations where we put
the panel to use.
Export Clipboard: O This setting determines whether anything copied to the clipboard in
Photoshop will be exported so other applications can use it. We recommend turning
off this feature to reduce the amount of memory being used.
Use Shift Key for Tool Switch: On Each tool in Photoshop has a shortcut key associated with it,
allowing you to activate the tool quickly. Some tools have more than one tool associated
607343c04.indd 136 4/11/10 11:04:12 PM
137
■ CUSTOMIZING SETTINGS
with the same shortcut. By default, to switch among tools with the same shortcut key,
you need to add the Shift key. We recommend leaving this option set because other-
wise you can get some unexpected changes in tools when you press the shortcut key.
Resize Image During Paste/Place: On When you are compositing images, this setting causes
components to be automatically resized to fit, which is often helpful. If you don’t com-
posite images, you can leave this option unchecked.
Animated Zoom: Personal Preference This determines whether zooming is animated. It’s nice
to have but not essential, and it requires OpenGL drawing, which may not be avail-
able on some older computer systems.
Zoom Resizes Windows: On This determines whether a document window will automati-
cally be resized as you zoom in or out in Standard Screen mode. When this setting
is turned on, as you zoom out on an image, the document window becomes smaller
when the image no longer fills the screen; when you zoom in, the document window
enlarges until the image exceeds the space available on the screen. This setting is a
matter of personal preference, but we find it helpful.
Zoom with Scroll Wheel: On If you have a mouse with a scroll wheel, this setting can be
helpful. It allows you to zoom in and out on your image by scrolling the wheel. We
recommend turning this setting on.
Zoom Clicked Point to Center: On When using the Zoom tool, this option will center the
magnified version of your image around the point where you clicked. That’s a real
time-saver.
Enable Flick Panning: Personal Preference This option enables you to move within the docu-
ment by “flicking” the Hand tool (click, drag, and abruptly let go). After you give a
flick, the visible part of the image will continue to move and will drift to a halt. If
you’re checking for dust in an image with very few dust spots, this can be a less tiring
way of navigating through the image. Besides, the animation is fun! However, if you
don’t have OpenGL, turn it off.
Place or Drag Raster Images as Smart Objects: Personal Preference Most photographers will rarely,
if ever, use this feature.
Note: Use the Reset All Warning Dialogs button in this interface if you have opted to have Photo-
shop not show some of the warnings while working, and then later you discover you’d prefer to have
the safety cushion that some of these warnings provide.
History Log
The History Log section provides settings that can help you figure out how you per-
formed a particular action on an image. When you enable this setting, you can have
every step you perform on an image recorded in metadata so you can review the infor-
607343c04.indd 137 4/11/10 11:04:12 PM
138
c h a p t e r 4: FOUNDATIONS ■
mation later. We generally prefer to leave this setting unchecked because there isn’t an
easy way to remove the information later. However, it can save the day if you apply a
series of steps on your images and then want to know how to apply the same changes
on another image. This option is particularly helpful, for example, when you’re apply-
ing a series of filters to an image or experimenting with any creative technique.
When you select the History Log check box, additional settings become avail-
able. If you’re going to use this option, we recommend setting the Save Log Items To
option to Metadata so the information will always be saved with the image file. We
also recommend you set the Edit Log Items option to Detailed so the information
you collect is actually useful. The other options—Sessions Only and Concise—don’t
record the actual settings you used. Although they are helpful for other fields, such as
forensic work, they are not useful for most nature photographers.
Note: If you save the log information to a text file, the information for all images is saved in a
single file, which isn’t very efficient.
If you use the History Log option, you can review the saved information (which
accumulates only after you enable the setting) by selecting File
> File Info and clicking
the History option in the left column (see Figure 4.3). Alternatively, you can view the
information by selecting Bridge
> Metadata > Edit History. Edit History will appear
only if the History Log has been enabled.
Figure 4.3 If you use the History Log feature, you can review everything that has been done
to your image in the History dialog box (File Info
> History).
607343c04.indd 138 4/11/10 11:04:12 PM
139
■ CUSTOMIZING SETTINGS
Interface
The options in the Interface section of Preferences (Figure 4.4) relate to the appear-
ance of your workspace. We’ll talk more about setting up your workspace later in this
chapter; however, you establish some of the basics here.
Figure 4.4 We recommend conguring these options as shown here.
The first options are drop-down menus offering choices as to the background
color for the interface. We suggest using Gray since it’s easiest to make the most accu-
rate color and tonal adjustments against a gray background than against any other
color. Black often looks dramatic, but it can mislead you about some of the contrast
and tonalities within the image. For that reason we choose Black only for Full Screen
mode, which we might use to showcase an image, but not for those modes we use
when we’re actively working on an image.
For similar reasons, we turn off the options for a border. Although a line or
drop shadow can enhance the final presentation of an image, it can be disconcerting
if you’re trying to create a drop shadow on your picture or when you’re making other
decisions about the edges of your image. If you opt for a color other than black for
Full Screen, you may want to use the drop shadow or line options for presentation
purposes.
The following are our preferences for the other options in this section.
Show Channels in Color: O We prefer to view the individual channels in grayscale so we
can easily assess what detail information is contributed by each channel, so we leave
this option off. Turning this on causes the channels viewed through the Channels
panel to be displayed in their actual colors (red for the Red channel, for example),
607343c04.indd 139 4/11/10 11:04:13 PM
140
c h a p t e r 4: FOUNDATIONS ■
rather than as grayscale images. Although this sounds like a good idea in terms of
being able to interpret the color values for each channel, it actually becomes a chal-
lenge, because each of the component colors has a different perceived tonality, making
comparison (and even viewing at times) difficult.
Show Menu Colors: Personal Preference This option is useful if you are new to Photoshop and
use some of the preset workspaces that make certain menu items more obvious. We
rarely take advantage of these features.
Show Tool Tips: On We recommend turning on this option so that as you hover the cursor
over an icon in the workspace, a brief explanation of the function associated with that
icon appears.
Enable Gestures: Personal Preference If you’re using a multitouch track pad and find that
you are inadvertently rotating your images, you’ll want to turn this preference off. It
can make many users crazy (Ellen is one of them), but some people do like to use the
gesture controls in Photoshop.
Auto-Collapse Iconic Panels: O Although it can be handy to save space on your monitor by
collapsing the panels, when we expand a panel, such as the Layers panel, we prefer it
to stay open.
Note: Only one panel at a time can be expanded when the panels are set to the collapsed mode.
Auto-Show Hidden Panels: Personal Preference When this option is checked, panels that are
hidden are temporarily visible as the cursor rolls over them. We don’t often use hidden
panels, so we don’t often use this feature.
Open Documents as Tabs: Personal Preference Checking this option causes new documents
to open as tabs in the window rather than as individual floating windows. We have
become accustomed to using the tab view for most of our work, but if you prefer float-
ing windows, leave it unchecked.
Enable Floating Document Window Docking: Personal Preference Checking this option makes it
possible to dock a window into the tab by dragging it. This can be convenient, but
we’ve found it’s quite easy to accidentally dock images when you’re trying to move
them on the monitor. We prefer to leave this option unchecked. Then if we want to
dock the floating window we right-click/hold down the Ctrl key while dragging.
UI Font Size: Medium or Large This setting provides relief from the tiny text size that results
from running our monitors at extremely high resolutions. You’ll find it very helpful from
a readability standpoint to set this to Medium or Large. Note that this setting does not
take effect until you restart Photoshop.
File Handling Settings
When you’re finished with the General settings in the Preferences dialog box, click
Next to continue to the File Handling section, shown in Figure 4.5. This section con-
tains options related primarily to how files are saved.
607343c04.indd 140 4/11/10 11:04:13 PM
141
■ CUSTOMIZING SETTINGS
Figure 4.5 The File Handling section of the Preferences dialog box contains settings that aect how les are opened and saved.
Two topics appear under File Saving Options:
Image Previews: Always Save The Image Previews setting determines whether a small pre-
view thumbnail will be stored as part of the image file. We leave this setting on Always
Save and check the option to save an icon for use in the Finder. We don’t feel that it’s
worth the extra memory space to store a full-size preview, but an icon is useful.
Append File Extension: Always The File Extension drop-down enables Photoshop to auto-
matically append the filename with the correct extension. In addition, you can choose
between uppercase and lowercase file extensions. This is not a significant concern
because either will work fine with current software.
Several options appear under File Compatibility in addition to a link to the
Camera Raw Preferences (which we cover in Chapter 3, “Adobe Camera Raw”).
Prefer Adobe Camera Raw for Supported Raw Files: On This option causes all supported raw files
to be opened in the ACR interface. We recommend using this option because we think
ACR does an excellent job with most raw files. However, if you are using other raw
conversion software (including Lightroom, your camera manufacturer’s proprietary
software, or other third-party software), you should leave this box unchecked.
Ignore EXIF Prole Tag: O Unless Necessary We recommend you leave this option off unless
you’re encountering problems with the color space embedded in your captures. This
option shouldn’t be an issue for most photographers. If activated, it causes Photoshop
to ignore the embedded color space in your digital captures. It’s an issue only for
images that have problems caused by their embedded profile, which is rare.
607343c04.indd 141 4/11/10 11:04:13 PM
142
c h a p t e r 4: FOUNDATIONS ■
Ask Before Saving Layered TIFF Files: Personal Preference This setting controls the display of the
TIFF Options dialog box. This option is based on your particular workflow. If you
usually save TIFF files flattened (saving the master file with layers as a PSD instead),
leave this option turned on to be reminded if you’re starting to save a TIFF file with
layers. We tend to save TIFF files with layers (or flatten them manually), so we turn
off this option to avoid the extra click on the OK button in the dialog box.
Maximize PSD and PSB File Compatibility: Personal Preference This option essentially controls
whether a full-resolution composite image will be saved as part of the image file in
Photoshop’s native formats. The primary reason to enable this feature is to ensure
that you’re able to open the image as you intended it to appear with other versions
of Photoshop—even if the algorithms determining how adjustments are applied get
changed—or to enable applications that aren’t able to build a thumbnail or preview
from the layered file to utilize the full-resolution composite instead. It also provides
a solution for situations where you have created a PSD file in a recent version of Pho-
toshop and are sending that file to someone using an older version that doesn’t sup-
port all the latest features. The disadvantage to using this setting is that file sizes are
increased considerably (potentially doubled) when this option is used.
Note: The PSB file format can be opened only with Photoshop CS or later.
You’ll see one check box under Adobe Drive:
Enable Adobe Drive: O Unless Necessary Adobe Drive is used to connect to Version Cue CS5
servers.
The final option in the File Handling settings deals with the Recent File list:
Recent File List Contains: 10 Files This option allows you to specify how many files should
be listed on the Open Recent list found on the File menu. We find the default of 10 is
usually adequate.
Performance
The Performance section of Preferences controls some of the behind-the-scenes issues
that help Photoshop run smoothly and quickly. There are four sections in this part of
Preferences: Memory Usage, Scratch Disks, History & Cache, and GPU Settings, as
shown in Figure 4.6.
Memory Usage The Memory Usage setting is quite important for overall system perfor-
mance. As you have no doubt figured out, Photoshop wants to have access to as much
memory as possible. The Memory Usage setting determines how much memory Photo-
shop reserves for its use. Although you would generally expect to benefit from setting
this to the maximum value, that can lead to problems. Very high settings can lead to
stability issues, and on many computers, setting the value to 100% can even prevent
Photoshop from loading.
607343c04.indd 142 4/11/10 11:04:14 PM
143
■ CUSTOMIZING SETTINGS
Figure 4.6 The Performance dialog box enables you to control computer memory–related options.
Photoshop assesses the amount of RAM that’s available on your computer after the
operating system and other programs stake out their portion, and then it suggests an
ideal range for how much to allocate to it. We recommend setting the value at the high
end of the recommended range to provide as much memory to Photoshop as possible
without running the risk of system-stability problems.
Note: For best performance, your computer should have a minimum of 2GB of RAM, and, realisti-
cally, more—lots more. With CS5 supporting 64 bit, Photoshop can take advantage of increased RAM
in your computer, so we recommend at least 8GB RAM. Although Photoshop can operate with less,
you’ll find yourself spending time waiting for things to process.
Scratch Disks In the Scratch Disks section of the Preferences dialog box, it’s important
to establish appropriate settings to ensure optimal performance for Photoshop. When-
ever Photoshop doesn’t have adequate memory to perform a task, it depends on hard-
drive space to simulate additional memory; the hard-drive space used is referred to as
a scratch disk. (Think of it as providing a scratch sheet of paper for Photoshop to use
for figuring out complicated problems.)
When Photoshop must resort to scratch-disk space, you want to make sure it’s work-
ing optimally. If you have more than one internal or external fast hard drive, you can
specify the order in which Photoshop tries to use each drive. For the best performance
607343c04.indd 143 4/11/10 11:04:14 PM
144
c h a p t e r 4: FOUNDATIONS ■
Adobe recommends that the scratch disk not be the disk that your operating system
boots up from, but if that’s the one that has the most free space, then you’ll need to
choose it anyway.
If you have more than two drives installed, you can also establish settings for the
third and fourth, keeping in mind that you want to set these in order of optimal per-
formance, with the fastest drive first and the drive used by the operating system listed
last. Double-check the speeds of any external drives, as many offer much slower per-
formance than internal drives, so they either should not be used for this purpose or
should be last in the order.
If you have a drive separated into multiple partitions, you won’t achieve a benefit by
making these changes. You achieve the benefit by using a separate physical drive for
the scratch-disk usage.
History & Cache The three buttons Tall and Thin, Default, and Big and Flat—despite
sounding like they belong in some weird personal preferences (perhaps Adobe engi-
neers’ humor?)—actually give you options for how to structure the cache most effi-
ciently for the types of documents you create. We leave ours set to Default because
although we use layers, we don’t often create dozens of layers, so we don’t want Tall
and Thin. Default seems to provide the best balance for our workflow. If you work
with extremely large files that have only a few layers, you may find that Big and Flat
offers slightly better performance.
History States: 40 to 60 This determines how many steps you’ll be able to undo in
the History panel. In other words, if you’ve made a mistake, how many indi-
vidual steps can you undo in order to get back to the point where you actually
made the mistake? The default setting of 20 is relatively low, especially for cer-
tain tasks, such as image cleanup with the Clone Stamp tool. However, setting
the value too high consumes a relatively large amount of memory when you are
doing a lot of work on your images. Therefore, we recommend that you strike
a compromise, using a value of 40 to 60. This is usually adequate for being
able to go back and correct a mistake, even if it takes some time to realize what
you’ve done, while not consuming a huge amount of memory.
Cache Levels: 4 The Cache Levels setting determines how many zoom settings are
stored in memory for your image so the image and histogram can be drawn
more quickly when zooming in and out on your image or performing adjust-
ments. The performance difference here is minimal, so we generally leave the
setting at the default value, which is 4.
Cache Tile Size: 1024K This refers to the amount of data Photoshop can store or
process at once. Adobe recommends choosing larger tile sizes for documents
with larger pixel sizes and not many layers, and smaller tile sizes for files with
smaller pixels and lots of layers.
GPU Settings We check the option to Enable OpenGL Drawing. If you click the
Advanced Settings button, you may have the option to choose various modes for the
GL Settings, depending on the type of graphics card you have.
607343c04.indd 144 4/11/10 11:04:14 PM
145
■ CUSTOMIZING SETTINGS
Cursors
Setting Preferences for accurate cursor displays (see Figure 4.7) is essential. Otherwise,
although you may be using an icon that shows you what tool you’re using, you won’t
know precisely where you are creating the effect on the image. In the Painting Cursors
area of the Cursors section, you can adjust the cursors used for your mouse pointer
when working with Brush tools within Photoshop. The following are our preferred
settings.
Figure 4.7 The Cursors section of Preferences is used to control the appearance of the pointer so that it is as useful as possible.
Standard: O The Standard option causes the mouse pointer to display a small icon of
the tool you’re using. Although this helps remind you of which tool is in use, it doesn’t
help much in evaluating the size of the brush being used or the specific area to be
affected.
Precise: O The Precise option uses a “target” display that makes it easy to see exactly
where you’ll paint on the image with a given tool, but it doesn’t give you any size
information.
Normal Brush Tip: On The Normal Brush Tip option uses a mouse pointer that matches the
shape and size of the brush you’re using, with softness accounted for by showing the
perimeter of the brush at the point where the opacity of the brush edge is 50%. (See
the left image in Figure 4.8.) That means the soft edge of the brush actually extends
beyond the shape shown for the brush, but the shape represents the primary area being
affected.
Full Size Brush Tip: O The Full Size Brush Tip setting uses a full display of the actual
brush size, with a fuzzy edge to the mouse pointer representing a soft brush. (See the
607343c04.indd 145 4/11/10 11:04:15 PM
146
c h a p t e r 4: FOUNDATIONS ■
right image in Figure 4.8.) However, this brush size represents the full extent of the
brush, which can be a bit misleading for soft-edged brushes since they generally have
no effect all the way out to the edge of the full brush size.
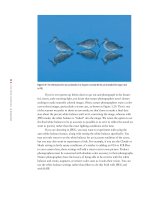
Figure 4.8 The Normal Brush Tip setting (left) causes the brush edge to be dened at the point where the opacity of the brush is
at 50% for soft-edged brushes. The Full Size Brush Tip setting (right) causes the full extent of the brush to be shown (including a
representation of a soft edge), even though there may not be any eect out to that distance when painting.
There are two additional options under Painting Cursors:
Show Crosshair in Brush Tip: On The Show Crosshair in Brush Tip check box allows you to
specify whether you want to see a crosshair in the center of the brush, so it’s easier to
see exactly where the center of the brush is. This can be helpful in a variety of situa-
tions, and we don’t find it to be a distraction, so we recommend leaving it turned on.
Show Only Crosshair While Painting: O When this is checked you no longer see the circle
indicating the size of your brush. For photographic work, we most often want to have
an indication of the brush size, so we leave this option off.
Note: The Caps Lock key toggles the display of brush cursors between Precise and the brush
options, so if you’re not getting the display you expect based on Preferences, check the status of your
Caps Lock key. This is one of the most common problems we see in our workshops!
For Other Cursors, use the Precise option so you can see exactly where in the
image you’re clicking when using one of the nonbrush tools. In most cases, this option
displays a crosshair, or “target,” for the nonbrush tools.
In Brush Preview, we leave the color set to the default of red. All of the remain-
ing sections except Plug-Ins can be left at their default settings, but be sure to have Pre-
set Resolution
> Print Resolution, which is in the Units & Rulers section, set to 300 (or
whatever resolution you use for printing). That way, whenever you create a new docu-
ment it will be set to the correct resolution.
607343c04.indd 146 4/11/10 11:04:16 PM
147
■ CUS TOM I Z I NG SET T I NG S
Plug-Ins
If you use a number of plug-ins, you can opt to store them in a separate folder and
have Photoshop automatically access the folder. To use it, click the Additional Plug-Ins
Folder check box, navigate to the appropriate folder in the dialog box that appears, and
click Choose. If you have an older Photoshop serial number associated with these plug-
ins, you can add that to the Legacy Photoshop Serial Number box. Note that you can
still use a number of plug-ins without opting to store them in a separate folder; if you
want to do that, leave the Additional Plug-Ins Folder option unchecked.
For Photoshop Elements Users: Setting Preferences
The Elements Preferences dialog, seen here, is similar to the Photoshop Preferences, but Ele-
ments generally has fewer choices. We’ll highlight any options that are noticeably different.
Otherwise follow the choices selected in the preceding figures and detailed earlier in the Photo-
shop section.
General
The Elements 8 General preferences are quite similar to CS5’s. However, one Elements-specific
preference we recommend checking is Allow Floating Documents in Full Edit Mode. If checked,
this will let you tear off the tabs for each image so that each image gets its own window. Having
your images in separate floating windows simplifies dragging from one image to another. If this
option is unchecked, Elements will dock the windows into tabs automatically.
Note that Elements does not have a History Log.
Saving Files
The Elements File Handling preferences pane is called Saving Files. Its options are similar to
those in Photoshop CS5, but it does not have support for Camera RAW for JPEG files, saving lay-
ered TIFF files, or Version Cue.
Continues
607343c04.indd 147 4/11/10 11:04:17 PM
148
c h a p te r 4: FOU N DAT IONS ■
For Photoshop Elements Users: Setting Preferences (Continued)
Performance
The Memory Usage, History & Cache, and Scratch Disk options are similar between CS5 and Ele-
ments 8, but Elements does not have options for OpenGL drawing or 3D acceleration.
Display & Cursors
In addition to CS5-like cursor preferences, the Elements Display & Cursors preference pane has
options for the crop shield. The crop shield is what hides the part of the image being cropped. If
Use Shield is checked, Elements will darken that area with whatever color you set in Shield Color
and by however much you set with Opacity. We recommend using a black color and a 50% opac-
ity so that the region to be cropped becomes darker with no color cast.
Units & Rulers
Elements has an option called Photo Project Units. A photo project includes things like photo
calendars and greeting cards. Set this option to the unit of measurement you are comfortable
working with.
The remaining preference panes are quite similar to those in CS5.
Views and Zoom
With Photoshop set up just the way you like it, you’re ready to start looking at your
images. Photoshop provides a variety of ways to do just that, including ways to display
images with Photoshop and ways to navigate within your images using various tools.
Some of these are new to CS5.
Application Bar
The Windows CS5 Application bar, as shown in Figure 4.9, combines the main menu
bar as well as features found in the Application bar prior to CS4. The Mac Applica-
tion bar does not contain the main menu items but shares the other features.
The PC Application bar
The Mac Application bar
Figure 4.9 The new Application bars have increased functionality.
607343c04.indd 148 4/11/10 11:04:17 PM