Photoshop cs5 cho nhiếp ảnh gia part 37 pdf
Bạn đang xem bản rút gọn của tài liệu. Xem và tải ngay bản đầy đủ của tài liệu tại đây (1.28 MB, 8 trang )
223
■ DO I NG C L E A N U P I N PHOT OS HO P
Repairing Wings Using the Patch Tool (Continued)
When I raised the Papilio hoppo swallowtail butterfly I had to wait six weeks for this very
special, expensive, butterfly to hatch. When it did, it immediately went to the carpet and just
damaged its wings and knocked off many of it scales. This is where the Patch tool came to the
rescue. I used it to repair all of the scale damage. The freesia flowers were in need of repair too,
and the Patch tool was used there also. I used the Patch tool in the Source mode and circled the
area that needed repair, and then I moved the circle to the area that I wanted to be picked up
and used.
To replace the missing tail, I used the Lasso to select the good tail. I placed this selection on a
new layer and then moved, flipped, and transformed it to make it appear natural. Then I added
a layer mask to that layer and brushed in the background. Most of the time, though, the Patch
tool is all I need. In fact I use the Patch tool so much I have changed the P key to give me the
Patch tool as a shortcut. Give it a try.
CS5 adds a new way to fix larger areas, called Content-Aware Fill. The idea is
to use the same technology developed for the Content-Aware Spot Healing Brush, but
on larger areas. To use Content-Aware Fill, take these steps:
1. Make a selection of the area to be replaced. Often you’ll do this using the Quick
Selection tool, but you can make the selection any way that’s convenient.
2. Go to Select > Refine Edge and choose settings to soften the edge and make the
selection slightly larger. The actual numbers you use may vary according to
the specifics of the image, but we often try setting Smooth to 50 and Shift Edge
to 50%.
3. Go to Edit > Fill. Select Content-Aware from the Use pop-up menu and click OK.
The area you selected will be replaced by surrounding background pixels.
When you zoom in to a higher magnification, you may discover that you need to do
more final touch up work. Nonetheless, Content-Aware Fill is a huge timesaver when
you’re faced with removing or filling in significant areas in an image. We’ll put it to
use later in the chapter when we add canvas to an image.
Once you’re familiar with the tools, you’ve examined your photo, and you have
a layer available, you’re ready to put these tools to work to clean up your image.
Removing Dust
In most cases, removing the spots created by dust and dirt on your camera’s imaging
sensor is a relatively easy job. Create a new layer as described earlier, zoom in, and
begin carefully navigating throughout your image, checking for dust (see Figure 5.21).
Our first choice for removing these spots is the Content-Aware Spot Healing Brush in
Repair mode for detailed areas and Normal mode for less detailed areas. At times you
Repairing Wings Using the Patch Tool
(Continued)
When I raised the
Papilio hoppo
swallowtail butterfly I had to wait six weeks for this very
special, expensive, butterfly to hatch. When it did, it immediately went to the carpet and just
damaged its wings and knocked off many of it scales. This is where the Patch tool came to the
rescue. I used it to repair all of the scale damage. The freesia flowers were in need of repair too,
and the Patch tool was used there also. I used the Patch tool in the Source mode and circled the
area that needed repair, and then I moved the circle to the area that I wanted to be picked up
and
used.
To replace the missing tail, I used the Lasso to select the good tail. I placed this selection on a
new layer and then moved, flipped, and transformed it to make it appear natural. Then I added
a layer mask to that layer and brushed in the background. Most of the time, though, the Patch
tool is all I need. In fact I use the Patch tool so much I have changed the P key to give me the
Patch tool as a shortcut. Give it a try.
607343c05.indd 223 4/13/10 2:44:16 PM
224
c h a p t e r 5: WORKFLOWS AND FIRST STEPS ■
may want to try it set for Proximity with less detailed areas, and at other times you
may find that the Clone Stamp tool is a better choice. You’ll know quickly whether
one of the Healing brushes is going to work.
Whether you’re using one of the Healing brushes or the Clone tool to remove
dust spots, select a brush size just barely larger than the smallest dimension of the
offending spot. For example, if it’s a hair, the brush should be just wider than the
width of the hair. Click and drag the tool along the length of the hair to remove it.
The brush doesn’t need to be large enough to cover the whole thing in one click. In
fact, more often than not you’ll run into trouble if you try to do that. Sometimes you
need to zoom in even further and use a very tiny brush.
The single most important trick to remember to successfully use these tools is
to click and then drag the cursor a smidge. This avoids the appearance of “correction
circles.”
Try It! Open the image named Dust from www.sybex.com/go/photoshopnature or open
an image of your own, and practice removing the dust spots.
Figure 5.21 Carefully navigate through your picture at 100% magnication to nd the dark blobs resulting
from dust on your camera’s sensor.
Ph o t o by El lEn Anon
607343c05.indd 224 4/13/10 2:44:16 PM
225
■ DO I NG C L E A N U P I N PHOT OS HO P
Removing an Undesirable Object
Eliminating an object—whether it be a branch, a bird, an animal part, or whatever
has crept uninvited into your image—is very similar to removing dust. But doing a
good job requires finesse, patience, and practice. In fact, careful cloning is actually an
advanced technique!
Note: Sloppy cleanup is one of the telltale signs of a poorly optimized image. If you’ve done your
job well, no one should have a clue that anything was removed from the image.
When you decide to remove an object from your image, you need to think even
more like an artist. Imagine what the background would look like if you could see
through the offending object, and then work to create that background by using the
existing pixels in the rest of the picture or by borrowing pixels from another picture.
The new Content-Aware Fill is a huge help as a starting place. But don’t count on it
being a one-click solution. Zoom in to 100% magnification and determine if you need
to modify the results with the Clone tool or one of the Healing brushes. You’ll need to
work precisely and carefully with small brushes, balancing dragging the cursor with
resampling. In some situations if the offending object is part of the background and
is up against (but not in front of) a foreground element (or vice versa), then Content-
Aware Fill may try to re-create the wrong elements. In that case you’ll need to revert
to the Clone Stamp tool and Healing brushes.
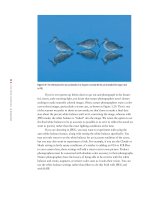
There’s a trick to make it easy to remove an object that comes right up to your
subject—for example, a stick that comes right up to a bird’s body, or another bird
that’s partially visible. Before you do any cloning or healing, use the Lasso tool or
another selection tool to carefully outline the part of the subject that you need to pro-
tect, and then make a loose selection into the area where you’ll be working, as shown
in Figure 5.22. When you do your cloning and healing, Photoshop does not allow the
effects to extend beyond the boundaries of the selection you just made. That way, you
don’t have to worry about accidentally affecting your subject.
Cloning from a Separate Image
You can use an entirely dierent image as the source for your cloning. Open both images, making
certain they are the same size, resolution, and color space. Place your cursor on the image you
want to copy from, and click while holding the Alt/Option key; then release the Alt/Option key,
place the cursor on the other image where you’d like to replace the pixels, and click and drag.
Cloning from a Separate Image
You can use an entirely dierent image as the source for your cloning. Open both images,
making
certain they are the same size, resolution, and color space. Place your cursor on the image you
want to copy from, and click while holding the Alt/Option key; then release the Alt/Option key,
place the cursor on the other image where you’d like to replace the pixels, and click and drag.
607343c05.indd 225 4/13/10 2:44:16 PM
226
c h a p t e r 5: WORKFLOWS AND FIRST STEPS ■
Figure 5.22 By making a selection before you do your cloning or healing, you can protect your subject matter so you don’t
accidentally damage it while xing another part of your image.
Ph o t o by El lEn Anon
After you have removed an object, look at the area even more carefully. If you
are creating something with distinct patterns or textures, such as grasses or ocean
waves, you may need to work with the Healing Brush or Clone Stamp tool at various
opacities on top of the repaired area. Sample from a variety of different areas where
the lighting, size, and direction of the textures match what you need to fill the spot. By
combining these different approaches and tools, you can create a very natural-looking
replacement area.
Try It! Open the image named ExtraPelicans from www.sybex.com/go/photoshopnature,
and remove the background pelicans while creating natural-looking water. Don’t worry if it takes you
more than one try. It takes many people more practice than they think it will, but once you get the hang
of it, it’ll be an invaluable skill to have.
Creating New Background on Empty Canvas
Sometimes your subject is too tight in the frame, whether because you framed it
poorly, the subject moved, you cropped the image, or you had too long a lens for the
subject. No matter what the cause, you can add canvas to remedy the situation and
then clone/heal in new background.
607343c05.indd 226 4/13/10 2:44:18 PM
227
■ DOING CLEANUP IN PHOTOSHOP
The easiest way to add canvas is to use the Crop tool and extend the boundary
beyond the edges of the image. You’ll be visually determining how much canvas to add.
Photoshop will create the extra canvas using the background color in the Color Picker.
To increase the canvas size a specific amount, choose Image
> Canvas Size. (Ele-
ments users can find canvas resizing under Image
> Resize > Canvas Size.) The dialog
tells you the current size of your image. In that dialog, take the following actions:
1. Check the Relative box. This tells Photoshop that the number you put in the
box is the number of inches or pixels (depending on the unit you choose) to add
to your image.
2. Fill in the desired increase in pixels or inches.
3. To specify where to add the additional canvas (top, bottom, right, or left), click
in the Anchor area (shown here) to anchor the image on one or two sides. In
this way, you can choose to add canvas to one, two, three, or four sides of your
image, depending on where you anchor it.
4. (Optional in CS5 if using Content-Aware Fill.) You can also specify what color
to make this new canvas:
a. To get a jump-start on creating a new background, choose Other from the
drop-down menu. This opens the Color Picker dialog.
b. The cursor turns into an eyedropper icon; click a similar background color
in the image.
c. Click OK in the Color Picker dialog.
5. Click OK in the Canvas Size dialog. Your newly added canvas starts out in a
similar color to what will be needed.
In CS5, select the new canvas using the Quick Select tool, then go to Edit
>
Fill
> Use Content-Aware Fill to get a head start on re-creating the background. You’ll
still need to zoom in and apply some finishing touches with the Healing Brushes and
Clone Stamp, but the chances are that Photoshop will have done much of the work for
you, as shown in Figure 5.23.
If you don’t use Content-Aware Fill, then you’ll use the Healing Brush tools in
Replace mode or the Clone Stamp tool to begin from scratch to create the patterns
and tonalities that you would expect to see there. Don’t forget to alternate among
the tools and modes as necessary. Again, you’re going to have to use some artistic
imagination to visualize how this additional background might have looked and then
create it from pixels in other places in your image or by sampling pixels from similar
images.
607343c05.indd 227 4/13/10 2:44:18 PM
228
c h a p t e r 5: WORKFLOWS AND FIRST STEPS ■
Figure 5.23 Adding extra canvas is much easier in CS5 when you use the new Content-Aware Fill to do much of the work for you.
607343c05.indd 228 4/13/10 2:44:19 PM
229
■ DOING CLEANUP IN PHOTOSHOP
Try It! Open the image named AddCanvas from www.sybex.com/go/photoshopnature,
and try adding canvas while making the background appear natural.
We’ve covered a lot of territory in this chapter, beginning with deciding on a
workflow, followed by the initial steps we routinely take in optimizing our images.
Each step is a building block to make your final image the best it can be. In the next
chapter, we’ll cover ways to improve the exposure to maximize the detail and impact
of your image.
607343c05.indd 229 4/13/10 2:44:19 PM
6
Ph o t o by El lEn Anon
607343c06.indd 230 4/12/10 11:42:38 PM