Photoshop cs5 cho nhiếp ảnh gia part 40 doc
Bạn đang xem bản rút gọn của tài liệu. Xem và tải ngay bản đầy đủ của tài liệu tại đây (1.04 MB, 7 trang )
243
■ TARGETING ADJUSTMENTS USING A LAYER MASK
Targeting Adjustments Using a Layer Mask
One of the reasons for using the tonal adjustments within Photoshop in addition to
those you already made in ACR is so that you can apply the changes to only certain
areas of the image. You may want to do this to help emphasize your subject or to reveal
detail in areas of your picture that have different lighting. Doing so requires the use of
a layer mask to target the adjustment to a particular area of the image.
Every adjustment layer comes with a layer mask. It’s the white box that appears
in the adjustment layer in the Layers panel, next to the icon for the type of adjustment.
The shape of the mask matches the shape of your image, as shown in Figure 6.10. When
a mask is active, there is a thin box surrounding the mask icon. The layer mask in
adjustment layers is active by default.
Figure 6.10 Every adjustment layer
automatically comes with a layer mask.
Think of a layer mask as a visibility control for the changes you make on that
layer. By default the mask is white. Wherever a layer mask is white corresponds to
areas of your image where the changes made on that layer will be visible. Wherever a
layer mask is black corresponds to areas of your image where the changes will not be
visible. That’s the key to understanding layer masks. Imagine superimposing the layer
mask over your image—the areas underneath white parts of the mask will show the
changes you make on that layer, and the areas of the image underneath black parts of
the mask will show no effects of that layer.
There are three ways to make parts of the layer mask black that are particularly
useful for nature photographers. The first is by creating a selection before you make
the adjustment layer, the second is by using the Color Range option within the Masks
panel, and the third is by painting parts of the layer mask black. We’ll talk about all of
these approaches in more detail. (Since Elements users don’t have a Masks panel, they
have only two ways to define a layer mask.)
Note: A layer mask identifies which areas of a particular layer will be visible. In this case, we’re
talking about layer masks on adjustment layers, so the mask determines where the adjustment applies
and where it doesn’t. White on the layer mask indicates areas where the adjustment layer affects the
image, and black indicates areas where it does not.
607343c06.indd 243 4/12/10 11:42:42 PM
244
c h a p t e r 6: EXPOSURE ADJUSTMENTS ■
Because CS5 and Elements 8 are nonmodal, you can work on the layer mask at
any time while tweaking the adjustments. (Versions of Photoshop prior to CS4 were
modal, which meant that you couldn’t move from an adjustment to something else until
you completed the adjustment and clicked OK. Now there is no need to click OK before
moving on to something else. Instead, you can uidly move back and forth among the
adjustment, the mask, and other tasks.)
The Masks panel takes advantage of CS5 being nonmodal and offer a variety of
ways to fine-tune the mask (see Figure 6.11). It functions the same way for all adjust-
ment layers. By default it’s set to the Pixel Mask
, which is what you’ll want. The
icon to the right
is used to select a vector mask. Since we rarely (read that as never)
use a vector mask, you don’t have to worry about it!
Figure 6.11 The CS5 Masks panel oers
a number of controls to help create and
rene a mask.
The Density slider controls the opacity of the mask. Most of the time you’ll
begin with 100%, but if you want to tweak the strength of the adjustment you can
change this. The Feather slider enables you to soften the edges of the adjustment so
that it blends more gradually into the rest of the image. However, for most of your
work you’ll want to use the Mask Edge option. Click it to access the Refine Edges
dialog that we covered in Chapter 4, “Foundations.” If you want to invert the mask
and have the adjustment affect the opposite parts of the image, click the Invert but-
ton. Shortly we’ll provide more detail about using the Color Range option to define
the mask.
Note: To copy a mask from one layer to another, click the mask icon in the Layers panel, hold down
the Alt/Option key, and drag the good mask to the desired layer. A dialog will appear asking whether
you want to replace the existing mask. Choose Yes. Use the Invert option in the Masks panel if neces-
sary. All masks for all adjustment layers work this way!
607343c06.indd 244 4/12/10 11:42:42 PM
245
■ TARGETI NG ADJ US TME NT S U SIN G A LAYE R M AS K
For Photoshop Elements Users: Layer Masks
Although Elements 8 is nonmodal as well, there is still not a separate Masks panel within Elements.
This means that you can create a mask by either using the selection method described shortly or by
painting on the layer mask, but not by using Color Range in the midst of creating a mask.
Masking a Selection
When you create a selection first and then create an adjustment layer, we refer to it as
masking a selection. Creating an adjustment layer that is masked based on a selection
is easy, especially since you’ve already seen in Chapter 4 some of the methods you can
use to create selections.
To mask an adjustment layer based on a selection, start by creating a selection
that defines the subject you’d like to modify.
Then create a new adjustment layer of the desired type (in this case using
Levels). Because a selection is active when the adjustment layer is initially created,
Photoshop assumes you want to mask the adjustment layer based on the selection.
Therefore, the adjustment layer applies only to the areas that are selected when you
create the adjustment layer.
Notice that when the adjustment layer appears in the Layers panel, the layer
mask is partially white and partially black. The white areas match the shape of the
selection you originally created (see Figure 6.12). When you make adjustments to the
Levels dialog box, as in this example, the adjustment affects only the area that was
selected when the adjustment layer was created.
Figure 6.12 When you create an adjustment
layer with an active selection, the mask for
that adjustment layer reects the shape of the
selection, so the adjustment applies only to
that area of the image.
Using this concept, it’s easy to see how you could create a selection to define
the area you want to emphasize and then create a Levels adjustment (or a different
type of adjustment as appropriate) to adjust that area and draw more attention to
it. Remember that our eyes tend to go to areas that are brighter and more contrasty,
so if you want to help make your subject stand out from the background, you could
make two Levels adjustments. In the first you may adjust the background to be a little
darker and less contrasty, and in the second you may adjust the subject to be a little bit
brighter and perhaps more contrasty as well. (See Figure 6.13.)
For Photoshop Elements Users: Layer Masks
Although Elements 8 is nonmodal as well, there is still not a separate Masks panel within Elements.
This means that you can create a mask by either using the selection method described shortly or by
painting on the layer mask, but not by using Color Range in the midst of creating a mask.
607343c06.indd 245 4/12/10 11:42:43 PM
246
c h a p t e r 6: EXPOSURE ADJUSTMENTS ■
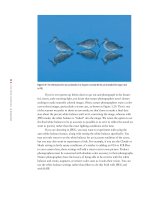
Figure 6.13 By making adjustments using layer masks, you can help emphasize your subject by applying one type of adjustment
to the subject and a dierent one to the background.
Ph oto by EllEn Ano n
Using the Color Range Option
The Color Range option, which is part of the Masks panel in CS5, offers an efficient
method to create a selection for the layer mask even if you’ve already begun setting
the adjustment layer. You can use the options within the Masks panel at any time. Ini-
tially the adjustment is set to affect the entire image unless you began with a selection.
If you began the adjustment process by first creating a selection and then opening an
adjustment layer, the Color Range control will operate only within that selection, not
across the entire image. Color Range becomes a way to limit the effect to a subset of
your original selection.
When you click the Color Range option, the Color Range tool appears. Use
it the way we discussed in Chapter 4 to define the area you want the adjustment to
affect. Think of this as an automated way of controlling where to apply the adjust-
ment. The ability to use the Color Range tool while in the midst of making an adjust-
ment is extremely helpful.
Note: Often it’s helpful to set the Selection preview within Color Range to grayscale to more easily
see the selection.
607343c06.indd 246 4/12/10 11:42:44 PM
247
■ TARGETING ADJUSTMENTS USING A LAYER MASK
Let’s consider an example to see how these panels work when you’re optimiz-
ing your image. Figure 6.14 shows the panels for an image where we want to lighten
the subject. Rather than making a selection beforehand as you might have done in
earlier versions of Photoshop, open the Adjustments panel and click on Levels. Adjust
the sliders to approximately where you think you want them. Then click the Masks
panel and choose Color Range. Click on the subject and use Color Range to make the
best selection you can. Then use Mask Edges to tweak the edges. Now go back to the
Adjustments panel and finalize the settings.
Figure 6.14 Since CS5 is nonmodal, you can
have an adjustment dialog open while you
are tweaking the mask and easily alternate
between the mask and the dialog.
Painting on a Mask
In some situations you don’t want to create the adjustment layer mask based on a
selection. When the edge of the area you want to adjust isn’t well defined, it’s often
easier and more efficient to paint directly on the mask to control where the effect is
visible. The concept is that you paint with white or black on the mask to control the
visibility of the effects of that layer.
Almost all of us have been using a paintbrush since we were preschoolers, so
creating a mask by painting is usually a very natural and intuitive approach. To use
this approach, take the following steps:
1. Create an adjustment layer, in this case a Levels adjustment layer.
2. Make an adjustment so you can see an effect in the image. Concentrate on
making the particular section of your image look the way you want, and don’t
worry that the rest of the image may be “ruined.” We’ll use the layer mask to
restore those areas to their “before” states.
Note: We recommend making an exaggerated adjustment when you’re first learning to use an
adjustment layer so it’s easier to see exactly where in the image the adjustment layer applies.
3. To modify the mask for an adjustment layer, select the Brush tool. We usually
use a soft brush (0% hardness), but in some instances you will want to use a
harder brush or even a totally hard brush to make a discrete edge.
4. Press D to set the colors to their defaults of black and white, and then press X
as needed to switch foreground and background colors.
Figure 6.13 By making adjustments using layer masks, you can help emphasize your subject by applying one type of adjustment
to the subject and a dierent one to the background.
Using the Color Range Option
The Color Range option, which is part of the Masks panel in CS5, offers an efficient
method to create a selection for the layer mask even if you’ve already begun setting
the adjustment layer. You can use the options within the Masks panel at any time. Ini-
tially the adjustment is set to affect the entire image unless you began with a selection.
If you began the adjustment process by first creating a selection and then opening an
adjustment layer, the Color Range control will operate only within that selection, not
across the entire image. Color Range becomes a way to limit the effect to a subset of
your original selection.
When you click the Color Range option, the Color Range tool appears. Use
it the way we discussed in Chapter 4 to define the area you want the adjustment to
affect. Think of this as an automated way of controlling where to apply the adjust-
ment. The ability to use the Color Range tool while in the midst of making an adjust-
ment is extremely helpful.
607343c06.indd 247 4/12/10 11:42:44 PM
248
c h a p t e r 6: EXPOSURE ADJUSTMENTS ■
5. Zoom in so you can easily see the area you want to change.
6. Place your cursor on the image, and begin painting with black as your fore-
ground color to remove the effects of your adjustment from that area.
7. If you make a mistake, reverse your brush colors by pressing X so that white is
your foreground color. Then paint over the area to correct the mistake. Layer
masks are very forgiving!
To help you see exactly where you have masked the image and where the effect
will appear, press the \ key. This will create a type of quick mask over your image. A
transparent red layer will appear over the masked areas, as shown in Figure 6.15. As
you paint with black, the red area will increase; to remove the red from an area and
allow the effect to be visible there, paint with white. We know it’s a little confusing to
paint with black and have it appear red, but remember you’re not really painting on
the image. You’re painting on the layer mask, and the red is there as a superimposed
version of the mask that’s easier to see. To remove the quick mask, press the \ key
again. This is one of our favorite tricks!
Figure 6.15 Pressing the backslash (\) key makes a red mask appear over the parts of your image that are masked,
helping you to see whether you need to rene the mask.
607343c06.indd 248 4/12/10 11:42:45 PM
249
■ TARGETING ADJUSTMENTS USING A LAYER MASK
Note: Another way to view the mask is to Alt/Option+click directly on the adjustment layer mask
in the Layers panel. That way, the mask appears in place of your image preview, making it easy to clean
up small areas that may have been missed in painting.
One of the benefits of using layer masks is that if you decide you need to further
revise the layer mask, you can simply click the adjustment layer to make it active, and
paint as needed to change the areas where the adjustment is blocked or revealed.
Note: Some people find it easier to paint an outline of the area that they want to mask while
looking at the image, then Alt/Option+click on the mask in the Layers panel to see the mask preview
in place of the image. That way they can more easily fill in the area within the outline. When done, Alt/
Option+click on the mask icon again to return to the image preview.
At times, you’ll want the adjustment layer to apply to a very small area of your
image, but that area won’t be conducive to making a selection. In such situations, it
may seem that the only solution is to paint with black throughout most of the image.
An easier way is to begin with a layer mask that is already filled with black and then
paint with white on the areas where you want the effect to show. To do this, take
these steps:
1. After creating the new adjustment layer, choose Edit > Fill from the menu.
2. Select Black from the Use drop-down list, and click OK (see Figure 6.16). This
fills the layer mask with black, blocking the effect of the adjustment from the
entire image.
Figure 6.16 You can use the Fill command
to ll a layer mask with black and then
paint with white to apply the adjustment to
specic areas of the image.
3. Use the Brush tool with the foreground color set to white to paint the adjust-
ment in the areas where you’d like it to be applied.
Note: You can also use Alt+Delete/Option+Delete to fill a layer mask with the foreground color
and use Ctrl+Delete/F+Delete to fill a layer mask with the background color.
So far you’ve seen how you can paint with black or white on an adjustment
layer mask to target specific areas where the adjustment should be blocked or revealed.
607343c06.indd 249 4/12/10 11:42:45 PM