Photoshop cs5 cho nhiếp ảnh gia part 46 docx
Bạn đang xem bản rút gọn của tài liệu. Xem và tải ngay bản đầy đủ của tài liệu tại đây (1.13 MB, 8 trang )
279
■ REMOVING COLOR CASTS
the lovely warm (yellow/red) quality it imparts to their subjects as opposed to the more
neutral or cooler light that may occur in the middle of the day.
Removing Color Casts
There are a number of different approaches to removing color casts. Depending upon
the individual circumstances, one approach is likely to be preferable in a particular
situation, whereas another approach may be more effective in another. For that rea-
son, we’ll present several ways to deal with color casts, some of which are objective
and some subjective.
Note: If while you are shooting you know that you will want to make sure the colors are as accu-
rate as possible, take a shot with a gray card or other neutral gray object in the frame. That way, you can
use it as the source for the eyedropper and ensure accurate neutral color.
Subjective Methods for Removing a Color Cast
First we’ll look at the subjective ways to remove a color cast from your image. Some of
these approaches allow Photoshop to do most of the work for you, while others offer
considerable individual control over the process and invite a great deal of personal
preference.
Using the Gray Eyedropper
If there’s an area that you know should be neutral—it can be any tonality from almost
white to almost black and any shade of gray in between—there is a very simple way to
eliminate the color cast in your picture.
1. Create a new Levels adjustment layer by clicking the Adjustments panel icon
and selecting Levels.
2. Take the time to double-click the word Levels in the Layers panel and rename
the layer; we use the name “color cast.” That way, if you return to this file later,
assuming you save it with your layers intact, you’ll know exactly what you did
in each layer.
3. Click the gray (middle) eyedropper to select it, and then click the area of your
image that should be neutral. Photoshop will automatically define the point you
click as “neutral” (that is, having equal red, green, and blue values) and will
remap the rest of the image accordingly.
You can do the same thing using the gray (middle) eyedropper in the Curves
Adjustment Layer controls; the results will be just slightly different, since Levels uses
a linear algorithm to do the remapping whereas Curves naturally uses a tone curve.
Practically speaking, the results will be very similar in most cases. The results are also
very similar to using the White Balance eyedropper in ACR.
607343c07.indd 279 4/13/10 2:41:45 PM
280
c ha p te r 7: CO LOR ADJ USTME NT S ■
brightest and darkest values. Selecting the Highlights or Shadows option instead
allows you to primarily adjust the most extreme tonalities in your image. You may
want to adjust each of them slightly differently.
This can be quite useful in some situations common to nature photography. For
example, if you have a white bird photographed in early-morning light on water, you
may want to emphasize the warm light on the bird but not make the water appear too
discolored. To do this, click Highlights and adjust the sliders to allow for more yellow
and red and possibly magenta than in the midtones and shadows, where you might be
attempting to limit the color cast, as shown in Figure 7.4.
Setting the best position for the sliders can be challenging and is a subjective,
visual decision. If there is a strong color cast in your image, it’s often easiest to begin
by working with the corresponding slider in the midtones. For example, if your image
has a strong cyan cast, start by adjusting the Cyan/Red slider for Midtones. Then, if
necessary, adjust the other sliders for midtone values; after that, click Highlights and
adjust, and then click Shadows to set those sliders. You may be happy with the color
balance after adjusting only the midtone sliders since they affect the majority of the
pixels within most pictures.
On the other hand, you may find it necessary to adjust each slider several times,
and you may even discover that you can’t decide which setting you like best. If you
find yourself in that position, we offer two suggestions:
P• ull the slider that’s creating a problem for you to an extreme position, and
start again. You might even pull it all the way to the right, then reset it and note
the setting, and then pull it all the way to the left and readjust it to where it
looks best. Hopefully you’ll be able to find a position that looks good to you.
I• f you’re still not sure, it’s time to get up and walk away from your computer for
a couple of minutes. When you come back, note your gut-level reaction to the
picture. Are the colors good, or are they too much toward a specific color cast?
Trust your immediate reaction, don’t overthink it, and then make any necessary
changes.
Try It! Open Colorcast1 from www.sybex.com/go/photoshopnature, or open an image of
your own that you suspect has a color cast but includes an area you think should be neutral. First deter-
mine whether there is in fact a color cast (either use the Hue/Saturation slider method or check the Info
panel). Next create a Levels adjustment layer, and click the middle eyedropper on a pixel that should
be neutral to remove the cast. Turn off the visibility of the Levels layer (by clicking the eyeball next to
it in the Layers panel). Add a Curves adjustment layer, and click the same point with the Curves middle
eyedropper. Then alternate viewing the Curves and Levels layers’ visibility to compare the results.
For Photoshop Elements Users: Removing Color Casts
Elements does not have a Curves adjustment layer, and the Color Curves tool is not suitable for
removing color casts. However, Elements does have a specic Remove Color Cast tool. To access
it, select Enhance
> Adjust Color > Remove Color Cast. Then click on part of the image that should
be black, gray, or white, and Elements will remove the color cast. This is similar to choosing Levels
and using the gray eyedropper.
Using a Color Balance Adjustment Layer
A Color Balance adjustment may be the most generally useful approach to correcting
color casts. In essence, it presents the sliders from each of the individual color channels
within Levels in one interface, along with the ability to set the sliders to affect primar-
ily the midtones, shadows, and/or highlights. As you pull the sliders, you are shifting
the color values in your image toward the basic colors (red, green, and blue) or toward
their opposites (cyan, magenta, and yellow), as shown in Figure 7.3.
Figure 7. 3 Color Balance provides an easy
interface to adjust the balance within each
color channel as well as to make those changes
to the midtones, highlights, and/or shadows.
Tone is set by default to affect the midtones when you first open a Color Bal-
ance adjustment layer. When Midtones is checked, the changes you make on the
sliders affect the majority of the pixels and tones in your image, excluding only the
For Photoshop Elements Users: Removing Color Casts
Elements does not have a Curves adjustment layer, and the Color Curves tool is not suitable for
removing color casts. However, Elements does have a specic Remove Color Cast tool. To access
it, select Enhance
>
Adjust Color
>
Remove Color Cast. Then click on part of the image that should
be black, gray, or white, and Elements will remove the color cast. This is similar to choosing Levels
and using the gray eyedropper.
607343c07.indd 280 4/13/10 2:41:45 PM
281
■ REMOVING COLOR CASTS
brightest and darkest values. Selecting the Highlights or Shadows option instead
allows you to primarily adjust the most extreme tonalities in your image. You may
want to adjust each of them slightly differently.
This can be quite useful in some situations common to nature photography. For
example, if you have a white bird photographed in early-morning light on water, you
may want to emphasize the warm light on the bird but not make the water appear too
discolored. To do this, click Highlights and adjust the sliders to allow for more yellow
and red and possibly magenta than in the midtones and shadows, where you might be
attempting to limit the color cast, as shown in Figure 7.4.
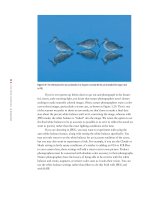
Figure 7.4 Adjusting the Color Balance sliders dierently for the highlights than for the midtones enables you to leave more of a
color cast on the white bird while limiting the color cast on the water.
Ph oto by El lE n An on
Setting the best position for the sliders can be challenging and is a subjective,
visual decision. If there is a strong color cast in your image, it’s often easiest to begin
by working with the corresponding slider in the midtones. For example, if your image
has a strong cyan cast, start by adjusting the Cyan/Red slider for Midtones. Then, if
necessary, adjust the other sliders for midtone values; after that, click Highlights and
adjust, and then click Shadows to set those sliders. You may be happy with the color
balance after adjusting only the midtone sliders since they affect the majority of the
pixels within most pictures.
On the other hand, you may find it necessary to adjust each slider several times,
and you may even discover that you can’t decide which setting you like best. If you
find yourself in that position, we offer two suggestions:
P• ull the slider that’s creating a problem for you to an extreme position, and
start again. You might even pull it all the way to the right, then reset it and note
the setting, and then pull it all the way to the left and readjust it to where it
looks best. Hopefully you’ll be able to find a position that looks good to you.
I• f you’re still not sure, it’s time to get up and walk away from your computer for
a couple of minutes. When you come back, note your gut-level reaction to the
picture. Are the colors good, or are they too much toward a specific color cast?
Trust your immediate reaction, don’t overthink it, and then make any necessary
changes.
607343c07.indd 281 4/13/10 2:41:47 PM
282
c h a p t e r 7: COLOR ADJUSTMENTS ■
Objective Method for Removing a Color Cast
At times, even nature photographers want to make their images as neutral as possible,
and in such cases an objective approach may be best. We’ve also encountered some
photographers who are color-blind and who don’t have the luxury of having someone
close by to comment on the colors within their images. Sometimes they feel safest
using an objective method to correct color casts.
To objectively remove a color cast, you use all three eyedroppers in a Levels
adjustment. Initially you’ll identify and set the white and black points, and then you’ll
have Photoshop define them as neutral.
As you already know, you can hold down the Alt/Option key while pulling the
endpoint sliders within Levels to identify the lightest and darkest pixels within your
image. However, you don’t want to have to rely on your memories as to exactly where
they’re located. Instead, we’ll show you how to mark them to be sure you’re accurately
targeting the darkest and lightest pixels within your image.
To objectively remove a color cast, follow these steps:
1. Begin by choosing the Color Sampler tool. It’s located on the Tools panel with
the Eyedropper tool (see Figure 7.5). Make certain to set the Sample Size option
on the Options bar to 3
× 3 Average rather than to its default value, which is a
one-point sample. The 3
× 3 Average option causes Photoshop to read an aver-
age of 9 pixels, which prevents you from accidentally selecting a pixel that is
different from its neighboring pixels.
Figure 7.5 The Color Sampler tool allows you to mark particular pixels within the image (left). It’s best to set the
Color Sampler tool to use a 3
× 3 sample to avoid accidentally sampling an aberrant pixel.
2. Create a Threshold adjustment layer by choosing the icon in the Adjust-
ments panel.
3. You see a histogram with only one slider, and your image is in black and white,
with no tones in between (see Figure 7.6). Move the slider all the way to the
right until the image preview becomes totally black.
4. Slowly move the slider to the left, and stop when you see the first pixels begin
to turn white. These are the lightest pixels in your image.
5. Zoom in by pressing Ctrl++ to clearly identify the lightest pixels. Accuracy is
vital here.
6. Now, with the Color Sampler tool still selected, place your cursor over the
lightest pixels in your image, and click. The tool leaves a small circle with the
number 1 on your image. (Alternatively, you can hold down the Shift key and
use the Eyedropper tool.)
607343c07.indd 282 4/13/10 2:41:47 PM
283
■ REMOVING COLOR CASTS
Figure 7.6 Your image will appear in black and white, with no in-between tonalities.
7. Zoom out to see your entire image by pressing Ctrl+0/F+0 or use the magnifi-
cation control in the main menu bar.
8. Now move the slider all the way to the left so that the preview becomes entirely
white. Gradually move it to the right, and note where the first black pixels
appear. These are the darkest pixels in the image.
9. Again, zoom in as necessary to clearly see these pixels.
10. Place your cursor over one of the darkest pixels, and click. This time, the Color
Sampler tool leaves a small circle with the number 2.
11. Zoom out again by pressing Ctrl+0/F+0 to see your whole image.
12. Since you no longer need the Threshold adjustment layer, click the trash can
icon in the Adjustments panel to remove it. The selected pixels remain marked,
and you have an objective indicator of the darkest and lightest pixels within
your image, as shown in Figure 7.7.
13. Now create a Levels adjustment layer. Be sure to rename it to indicate you’re
using this one to remove a color cast.
14. Next, you’re going to set the values for the black and white points that you
want Photoshop to use. If you have previously saved default values for black
and white, you can skip this step:
a. Double-click the black eyedropper to open the Color Picker dialog box.
Type values of R = 10, G = 10, and B = 10 for the black point, and click
OK. (If you have established a different set of black values for your printer,
use them here.) Photoshop asks whether you want to set these as your default
values. Click OK.
b. Double-click the white eyedropper, and the Color Picker dialog box reap-
pears. Type values of R = 248, G = 248, B = 248, as shown in Figure 7.8,
for the white point, and click OK. Photoshop asks whether you want to set
these as your default values. Click OK.
Objective Method for Removing a Color Cast
At times, even nature photographers want to make their images as neutral as possible,
and in such cases an objective approach may be best. We’ve also encountered some
photographers who are color-blind and who don’t have the luxury of having someone
close by to comment on the colors within their images. Sometimes they feel safest
using an objective method to correct color casts.
To objectively remove a color cast, you use all three eyedroppers in a Levels
adjustment. Initially you’ll identify and set the white and black points, and then you’ll
have Photoshop define them as neutral.
As you already know, you can hold down the Alt/Option key while pulling the
endpoint sliders within Levels to identify the lightest and darkest pixels within your
image. However, you don’t want to have to rely on your memories as to exactly where
they’re located. Instead, we’ll show you how to mark them to be sure you’re accurately
targeting the darkest and lightest pixels within your image.
To objectively remove a color cast, follow these steps:
1. Begin by choosing the Color Sampler tool. It’s located on the Tools panel with
the Eyedropper tool (see Figure 7.5). Make certain to set the Sample Size option
on the Options bar to 3
× 3 Average rather than to its default value, which is a
one-point sample. The 3
× 3 Average option causes Photoshop to read an aver-
age of 9 pixels, which prevents you from accidentally selecting a pixel that is
different from its neighboring pixels.
Figure 7.5 The Color Sampler tool allows you to mark particular pixels within the image (left). It’s best to set the
Color Sampler tool to use a 3
× 3 sample to avoid accidentally sampling an aberrant pixel.
2. Create a Threshold adjustment layer by choosing the icon in the Adjust-
ments panel.
3. You see a histogram with only one slider, and your image is in black and white,
with no tones in between (see Figure 7.6). Move the slider all the way to the
right until the image preview becomes totally black.
4. Slowly move the slider to the left, and stop when you see the first pixels begin
to turn white. These are the lightest pixels in your image.
5. Zoom in by pressing Ctrl++ to clearly identify the lightest pixels. Accuracy is
vital here.
6. Now, with the Color Sampler tool still selected, place your cursor over the
lightest pixels in your image, and click. The tool leaves a small circle with the
number 1 on your image. (Alternatively, you can hold down the Shift key and
use the Eyedropper tool.)
607343c07.indd 283 4/13/10 2:41:48 PM
284
c h a p t e r 7: COLOR ADJUSTMENTS ■
Figure 7.7 The darkest pixel (bottom edge) and lightest pixel (corner of the mouth) in your image are
marked with a numbered target so you can easily identify them. (Note the red circles are here for
illustrative purposes only; you won’t see them on your image.)
Ph oto by El lE n An on
Figure 7.8 By typing values into the Color
Picker, you can set the black and white values
within your image and then save them as the
default values for Photoshop to use in the future.
607343c07.indd 284 4/13/10 2:41:48 PM
285
■ REMOVING COLOR CASTS
Note: Because most of our printers can’t print in ways that allow us to differentiate shades of black
all the way to 0,0,0 or whites all the way to 255,255,255, we have to use slightly different values. Once
those are set, we can save them as default values. The actual ideal values for your printer may vary and
can be determined by printing out test strips of blacks and whites at various values—(8,8,8), (12,12,12),
(15,15,15), and so on—to determine where you can begin to see differences in the dark tones. You can do
a similar test strip for the whites. The values suggested in Step 14 work for many people.
15. Now click the white eyedropper and then move your cursor onto your image.
Carefully and accurately align the cursor with the point or the Color Sampler
tool marked with the number 1. When you have precisely aligned the cursor
and the sampled point, left-click. This remaps that point to an RGB value of
248,248,248, or neutral white. Verify this by looking at the Info panel, which
shows you the “before” and “after” values of the targeted points.
16. Repeat the same process with the black eyedropper. In most cases, the color
cast within the image is neutralized (see Figure 7.9). In some images, however,
you also need to use the gray (middle) eyedropper and click somewhere in the
image that should be neutral.
Figure 7.9 Compare this neutral version of the heron with the original in Figure 7.7.
607343c07.indd 285 4/13/10 2:41:50 PM
286
c ha p te r 7: CO LOR ADJ USTME NT S ■
17. To remove the little circles with the numbers by them, reselect the Color Sam-
pler tool, and hold down the Alt/Option key. As you approach a circle, your
cursor changes to a scissors. When you click, the circle is removed. Alternately,
simply hide them by choosing View
> Extras from the menu. This toggles the
visibility of the color samples. Simply hiding them can be a time-saver if there is
any possibility that you might want to modify your color-cast adjustments.
Try It! Open the image named Colorcast3 on the website www.sybex.com/go/photoshop-
nature
, or open one of your own images, and try removing the color cast using the objective method.
You can compare the results with what you obtain using your favorite subjective method.
This approach may seem quite long, but actually it’s pretty straightforward
and a good way to set your black and white points as well as to remove a color cast
objectively. You could also use the eyedroppers in a Curves adjustment layer to achieve
similar results. You would follow the exact same procedure described in this section
from within the Curves dialog box.
For Photoshop Elements Users: Objective Method for Removing a Color Cast
Elements does not allow you to mark points on an image, so to objectively neutralize a color
cast use the Enhance
> Auto Color Correction.
Adding a Color Cast
The reality is that nature photographers get up ridiculously early in the morning and
stay out photographing until the sunset is completely over because we like our pictures
to have the warm, special light of early and late day. We tend to prefer the color casts
imparted by this light because our photos have a different feeling in them and often
create more impact on the viewer than more neutral versions of the same subject. It’s
possible to create color casts to simulate that light using the same subjective tech-
niques we used before to remove color casts.
For example, if you’re using the middle (gray) eyedropper from within Levels or
Curves and you click an area that should not be neutral, Photoshop will still be oblig-
ing and redefine the values of that point to be neutral anyway, and the rest of the image
then has a color cast. This can be a good thing! You can introduce a slight warmth to
your images this way by clicking a point that actually should be slightly bluish or cyan-
ish, as shown in Figure 7.10. Conversely, you can make them appear cooler by clicking
a pixel that should actually be slightly yellowish or reddish. Remember that Ctrl+Z/
F+Z undoes your last step, so you can use a trial-and-error approach in finding the
right spot to use. Obviously, this is a subjective way to determine the color balance
within your picture that relies on Photoshop to do most of the work for you.
For Photoshop Elements Users: Objective Method for Removing a Color Cast
Elements does not allow you to mark points on an image, so to objectively neutralize a color
cast use the Enhance
>
Auto Color Correction.
607343c07.indd 286 4/13/10 2:41:50 PM