Photoshop cs5 cho nhiếp ảnh gia part 64 pptx
Bạn đang xem bản rút gọn của tài liệu. Xem và tải ngay bản đầy đủ của tài liệu tại đây (1.27 MB, 9 trang )
398
c h a p t e r 10: OUTPUT ■
Note: When you make adjustments that affect the actual pixel dimensions of the image in the
Image Size dialog box, the current size is displayed after the Pixel Dimensions label, with the starting
size shown in parentheses.
For images that will be displayed digitally on a monitor or digital projector, the
size should be adjusted using the Width or Height text boxes in the Pixel Dimensions
section. This allows you to set the specific pixel sizing for your intended purpose. For
a digital slide show, for example, you might set these dimensions to fit within the reso-
lution of your digital projector. For a website, you might set them to a standard output
size you deem appropriate for your specific site design.
Note: Check the resolution of your projector, and use those values to set the height or width to
resize images that you’ll use in a slide show. Many projectors have a native resolution of 1024 × 768,
while others may be 1400 × 1050, and so on. Your images must fit within those specifications.
Once you’ve established the sizing parameters in the Image Size dialog box,
click OK, and Photoshop resizes the image accordingly.
Note: Some people are tempted to wait and resize in the Print dialog box. We don’t recommend
that, because for best results you need to sharpen your image based on its final size. If you wait to
resize in the Print dialog box, you have to do the sharpening before resizing. You’d be surprised how
different the results can be.
Reducing Noise
Although you could insert steps to reduce noise earlier in your workflow, noise often
becomes more apparent as you are preparing your image for output. Whether you opt
to apply it at the beginning of your workflow or after optimizing the image, we rec-
ommend applying any noise reduction before you apply sharpening to make sure the
process of sharpening won’t exaggerate the noise.
Note: Some people may opt to apply noise reduction on the master image in the traditional
workflow. Others prefer to wait until they’ve duplicated and resized the image for output, since noise
reduction can soften details. That way they can better determine the best amount of noise reduction
to apply based on the final image size. Either way, by applying noise reduction as a smart filter you can
readjust the settings based on the appearance of the image at its output size.
607343c10.indd 398 4/12/10 11:53:21 PM
399
■ OUTPUT WORKFLOW
Photoshop has a noise-reduction filter called Reduce Noise (found under the Filter >
Noise submenu). If noise exists in your image, it’s most likely found in the dark shadow
areas, although sometimes it can also be found in the midtones or even the lighter tones.
To check for noise, zoom in on the dark shadow areas and look for pixels with random
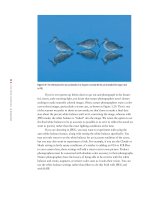
colors and tones that don’t match their surroundings, as shown in Figure 10.5. If you find
noise that is problematic in the image, try using Reduce Noise to minimize it.
Figure 10.5 Noise is most often found in the dark shadow areas of an image when high ISO settings or long
exposures are used with a digital camera.
Ph ot o b y Ell En An o n
If you have opted to use our flexible workflow beginning with a raw file placed
as a Smart Object, you can click the Smart Object layer and use the Reduce Noise
filter as a Smart Filter directly on that layer. However, if you have used other Smart
Filters in conjunction with a layer mask, you will need to duplicate the background
Smart Object layer by dragging it to the New Layer button at the bottom of the Layers
panel. This will create a new Smart Object layer. Next go to Layer
> Rasterize Smart
607343c10.indd 399 4/12/10 11:53:22 PM
400
c h a p t e r 10: OUTPUT ■
Object to apply the original filters to the layer. Then go to Filter > Convert for Smart
Filters. If you have a separate Clone/Healing brush layer in your workflow with sig-
nificant changes, you will need to follow our traditional workflow.
If you are using our traditional workflow, you’ll also need to create a new sepa-
rate layer for this correction. Begin by going to Filter
> Convert for Smart Filters. This
ensures that you are preserving the original image data, adding the flexibility to adjust
the settings you choose, as well as gaining the opportunity to mask out any areas of
this layer if the noise reduction isn’t needed or introduces problems in an area.
To use the Reduce Noise filter, choose Filter
> Convert for Smart Filters, and
then choose Filter
> Noise > Reduce Noise from the menu. This first changes the layer
into a Smart Object so that you can apply the noise reduction as a Smart Filter. The
Reduce Noise dialog box opens, which includes a number of parameters that allow
you to adjust its behavior.
Make sure to zoom in on the preview image in the Reduce Noise dialog box
so you can see detail in the image clearly. We often zoom in to 200% or even 300%
magnification. You can adjust the zoom percentage for the preview using the plus and
minus buttons below the preview image. You can click the preview image to see the
“before” version without the effect of the Reduce Noise filter and release the mouse to
see the “after” version again.
Note: It’s a good idea to set all of the settings in Reduce Noise to 0 before starting so you’ll be
able to see the effect of each individually as you work to find the best settings.
The most important setting in the Reduce Noise dialog box (Figure 10.6) is the
Reduce Color Noise slider. This setting determines how aggressively color noise, exhib-
ited by random color variations (as opposed to luminance noise, exhibited by tonal
variations), should be reduced in the image. The potential risk is that you’ll reduce the
overall color in the image by using a setting that is too high, because it causes an aver-
aging of pixel values within the image. To help ensure you’re getting the best results
with a minimum of unintended effects, we recommend starting with a very low setting
and then gradually increasing the value until you have effectively minimized the noise.
The Strength setting controls the amount of noise reduction you’d like to have
applied to luminosity noise in the image—that is, noise exhibited by tonal rather than
color variations. This is noise that is exhibited by tonal variations at the pixel level;
generally, this isn’t as significant an issue in digital images, and increasing the Strength
setting too much effectively blurs the detail out of your image. However, we still rec-
ommend adjusting this setting for images that have significant noise to see whether it
provides a benefit.
The Preserve Details slider controls the amount of edge detail you want to main-
tain. Adjusting this too high reduces the effect of luminosity noise reduction controlled by
the Strength setting (and in fact, this setting is available only if the Strength is set higher
than 0). However, generally you want to use a relatively high setting here, such as 50% to
60%, to ensure you are maximizing the amount of detail in the image (see Figure 10.6).
607343c10.indd 400 4/12/10 11:53:22 PM
401
■ OU TP U T WO R KFLOW
Figure 10.6 You can use the Preserve Details slider to ensure that maximum detail is maintained in the image despite the changes
being applied by Reduce Noise.
After you’ve reduced the noise in your image, you may want to enhance detail
slightly to compensate for the slight loss caused by the noise-reduction process. The
Sharpen Details setting allows you to enhance edges within the image. We recommend
starting with a low setting and gradually increasing the value until you have achieved
the desired level of edge enhancement, without creating any quality problems within
the image.
For Photoshop Elements Users: Reducing Noise
The Reduce Noise filter is available in Elements in a more basic form. It includes just the controls
from the Basic tab, excluding the Sharpen Details slider. Elements users should follow the basic
workflow to apply this filter.
Note: A number of third-party noise-reduction plug-ins are available. We often use Imagenom-
ic’s Noiseware Professional or Nik Software’s Dfine, both available at www.ellenanon.com. (For a
discount on Noiseware Pro use the promo code ELLENANON and for Dfine use EAnon.)We often prefer
the third-party noise-reduction plug-ins because the controls are easy and intuitive, and the software
does an excellent job with noise removal.
When using any noise-reduction software, you must be vigilant to avoid being overly aggressive in
removing noise and accidentally creating a watercolor effect.
Reduce Noise Advanced Settings
If you discover that you have significant luminosity noise in an image or are struggling
to retain detail while removing noise, we recommend returning the Strength setting to
0 and selecting the Advanced option. Additional per-channel settings become avail-
able that enable you to adjust the noise reduction individually for each color channel
For Photoshop Elements Users: Reducing Noise
The Reduce Noise filter is available in Elements in a more basic form. It includes just the controls
from the Basic tab, excluding the Sharpen Details slider. Elements users should follow the basic
workflow to apply this filter.
607343c10.indd 401 4/12/10 11:53:23 PM
402
c h a p t e r 10: OUTPUT ■
in your image. When you select one of the color channels from the drop-down list
below the smaller preview on the Per Channel tab, that preview is updated to reflect
that channel, and you can adjust the Strength and Preserve Details settings individu-
ally for the channel, as shown in Figure 10.7.
Figure 10.7 The Per Channel tab allows
you to adjust the Strength and Preserve
Details adjustments individually for each
channel in your image.
The greatest benefit of these advanced settings is the ability to target additional
noise reduction to a single channel, such as the Blue channel, which is often where the
most noise exists within digital images. If you have an image with strong noise, it’s help-
ful to examine each of the channels and set individual settings for each to minimize the
amount of noise each channel contributes to the overall image, while simultaneously
minimizing the amount of noise reduction that’s applied to each channel. You can use
much higher settings in one particular channel and lower settings in the other channels.
This will help preserve details while at the same time reducing the luminosity noise. Then
when you have selected the best settings for each channel, return to the initial part of the
dialog box and set any additional overall luminosity noise reduction that’s needed.
Once you have applied appropriate noise reduction to your image (if necessary),
click OK in the Reduce Noise dialog box to apply the settings to your image.
When you’re applying any noise reduction to an image, no matter how carefully
you do it, there is a risk of some loss of image detail. One way to limit the amount
of detail lost is to restrict the application of the filter to just those areas of the image
where noise is an issue. For example, you may not notice the noise in detailed parts of
your image, but many nature images have large out-of-focus backgrounds where noise
may be more obvious. To apply noise reduction selectively, add a layer mask to the
Noise Reduction filter layer by clicking the Add Layer mask button at the bottom of
the Layers panel. If you’re using a Smart Filter, use the smart filter mask. Then paint
with black to remove the noise reduction from areas. Or, as you learned in earlier
chapters, you can begin by filling the layer mask with black (Edit
> Fill > Use: Black),
and then paint with white to selectively apply the noise reduction to parts of the
607343c10.indd 402 4/12/10 11:53:23 PM
403
■ OU TP U T WO R KFLOW
image. Of course, you can reduce the opacity of the brush to partially reveal the noise
reduction in other areas of the picture.
Note: As with most tasks in Photoshop, there are other ways to go about noise reduction. Some
people find it helpful to duplicate the image layer, blur it, and then reduce the opacity of the layer to
taste. This option may work with a particularly high-noise image, but you’ll also need to add a layer
mask to remove the blurred effect from areas needing fine details. Another way of reducing bother-
some noise is to duplicate the Background layer, blur it, and change the blending mode to Color.
For Photoshop Elements Users: Removing Noise Using a Mask
To apply noise reduction with a layer mask in Elements, you will need to use the same technique
we’ve used in previous chapters to create a layer mask. Follow these steps:
1. Duplicate your image layer by dragging its row in the Layers panel to the New Layer button.
2. Add a Levels adjustment layer and leave it empty.
3. Move the Levels adjustment layer below the layer you created in Step 1.
4. Select the topmost layer and choose Layer > Group with Previous.
5. Select the topmost layer and apply noise reduction.
6. Select the Levels adjustment layer’s mask and paint in black to remove the noise-
reduction filter.
Try It! Practice removing noise from your photos by opening the image Noise on this book’s
companion website, www.sybex.com/go/photoshopnature, and applying the Reduce Noise
filter to it.
Sharpening
Sharpening is an important aspect of preparing your image for output and is of partic-
ular importance for nature photographers, who are often concerned with maintaining
maximum detail in their images. It’s not a way to make up for poor in-camera tech-
niques, and you can’t make a blurry picture tack-sharp. However, you can compensate
for the small amount of softening that occurs in the digital process by applying a
sharpening filter and/or increasing detail.
Sharpening filters enhance edge contrast, which helps improve the overall per-
ceived detail in your images. In other words, they create an illusion of increased sharp-
ness. We’ll look at both the Unsharp Mask filter and the Smart Sharpen filter shortly,
but first we’ll share some general tips.
Although it’s important to evaluate the effect of your sharpening settings based
on a view of the actual pixels in your image, we don’t work with the image set to
For Photoshop Elements Users: Removing Noise Using a Mask
To apply noise reduction with a layer mask in Elements, you will need to use the same technique
we’ve used in previous chapters to create a layer mask. Follow these steps:
1.
Duplicate your image layer by dragging its row in the Layers panel to the New Layer button.
2.
Add a Levels adjustment layer and leave it empty.
3.
Move the Levels adjustment layer below the layer you created in Step 1.
4.
Select the topmost layer and choose Layer
>
Group with Previous.
5.
Select the topmost layer and apply noise reduction.
6.
Select the Levels adjustment layer’s mask and paint in black to remove the noise-
reduction filter.
607343c10.indd 403 4/12/10 11:53:23 PM
404
c h a p t e r 10: OUTPUT ■
100% scale while applying sharpening. Doing so allows you to view only a portion of
your image (in most cases). Instead, we prefer to set the image to fit the screen (View
> Fit on Screen) and use the 100% preview in the dialog box for the sharpening filter
being used to make judgments about the settings. This allows you to then click any
area of your image to set the preview to show that area.
Note: Although most images benefit from sharpening, it’s important to keep in mind that
images without significant detail—such as a photo of the sky at sunset with no foreground detail—
may not need to be sharpened.
At this point in the traditional output workflow, we’re working on a flattened
version of our master image file that may or may not already contain a Smart Filter
noise-reduction layer. The initial flattening of the original image is important so we
can apply sharpening—which affects only one layer at a time—to the entire image in
the event that we have additional pixel layers for tasks such as image cleanup or object
removal. When preparing nature images for print, particularly for large prints, we
recommend converting the background layer to a Smart Object so that the sharpening
can be applied as a Smart Filter. That way, you apply the sharpening just to the subject
and not to the background. Many nature images have out-of-focus backgrounds that
should be blurry. Furthermore, by sharpening the subject and not the background, you
can help the subject to stand out from the background.
If you are using the flexible workflow (see Chapter 5) and have done all or most
of your cleanup in the raw converter and do not have a clone layer with significant
changes, you can apply your sharpening as a Smart Filter to the Background layer. If
you have used other Smart Filters, including noise reduction using a mask, duplicate the
Smart Object layer for the sharpening. Rasterize that layer by choosing Layer
> Raster-
ize Smart Object. That will apply the filters you originally applied. Then choose Filter
> Convert for Smart Filter to prepare that layer to be sharpened using a Smart Filter for
flexibility. That way, you can add a mask to apply sharpening to selected areas only.
Note: An alternative method for creating a layer for the sharpening is to click on the top layer of
your image, and press Shift+Alt+Ctrl+E/Shift+Option+F+E to create a Merge Visible layer at the top
of your layers. Then choose Filter > Convert for Smart Filters. This new layer contains all the information
in the layers beneath it, but will not update if you change any of the layers beneath it.
Since sharpening is so important to the final appearance of your image, you may
wonder why it comes so late in the process. One reason is that the sharpening settings
you use vary based on the output size and should be optimized for the output size and
printing process you’re using. Another is that sharpening, while beneficial to the image,
is a destructive process in the standard workflow in that it alters pixel values, so we
want to apply it as part of our output workflow rather than to the master image.
607343c10.indd 404 4/12/10 11:53:23 PM
405
■ OUTPUT WORKFLOW
The Unsharp Mask Filter
It used to be that the most common tool for sharpening images was the Unsharp Mask
filter. Since the introduction of Smart Sharpen, it has become the sharpening tool of
choice for some nature photographers. Nonetheless, we begin by talking about Unsharp
Mask, because understanding how it works will help you use the Smart Sharpen filter.
The Unsharp Mask filter provides excellent control over the sharpening pro-
cess, enabling you to improve the overall appearance of the image without introducing
quality problems in the process. To use Unsharp Mask, if you do not already have a
Smart Object layer ready, first choose Filter
> Convert for Smart Filters to change the
layer into a Smart Object, and then choose Filter
> Sharpen > Unsharp Mask from the
menu. The Unsharp Mask dialog box appears (see Figure 10.8), which contains three
settings you can adjust to modify the sharpening effect: Amount, Radius, and Thresh-
old. Because you’re using it as a Smart Filter, you can readjust the settings at any time.
Before sharpening
After sharpening
PHOTO BY ELLEN ANON
Figure 10.8 The Unsharp Mask dialog box allows you to control the sharpening eect on your image with three individual sliders
called Amount, Radius, and Threshold.
607343c10.indd 405 4/12/10 11:53:24 PM
406
c h a p t e r 10: OUTPUT ■
Unsharp Mask operates by enhancing contrast along the edges of objects within
your image. In other words, it’s enhancing contrast where contrast already exists.
Adjusting the controls in the Unsharp Mask dialog box allows you to change how this
contrast enhancement is applied.
The Amount setting determines how much the contrast is enhanced along
edges. Think of this as an intensity control. The higher the setting, the more intense
the edge contrast is in your image.
The Radius setting allows you to determine the size of the area to be affected
by the boost in contrast along the edges. For images with high detail, you generally
want to have the impact affect only a small area for each edge.
The Threshold setting determines how much tonal difference must exist between
two pixels for the sharpening to be applied. With a minimum Threshold setting of 0,
virtually all pixels are affected by sharpening. As you increase the value, fewer areas
are sharpened because they must exhibit a certain amount of contrast before they’re
considered to be an edge. This helps you maintain smooth textures in areas of the
image where that is important.
The most common question photographers ask is what settings they should
use. And the response is generally different no matter who they ask! In fact, you can
choose among a variety of ways to get good results from the sharpen filters, so we
feel that rather than give you a priori values to use, it’s better if you develop an under-
standing of how the different settings work. That way, you can choose what works
best for your image. Ellen, along with Rick Holt, developed a demo (see Figure 10.9)
that is useful for understanding the different settings.
Figure 10.9 demonstrates how the sharpening works. Contrast is added to every
edge. If a pixel is white, then the contrast is black; if it’s black, the additional con-
trast is white; if it’s yellow, the contrast is blue; if it’s red, the contrast is cyan; and so
on. The contrast is the opposite of the pixel. You control the intensity of the contrast
with the Amount slider, how far out the contrast extends with the Radius slider, and
whether the contrast is applied by the Threshold slider.
Try It! Download the file named SharpenDemo from the companion website, www.sybex
.com/go/photoshopnature
, and experiment with a variety of different settings. Adjust the slid-
ers to extremes to see the effects.
Figure 10.9 This demo makes it easy to see the eects of the sharpen lter sliders.
607343c10.indd 406 4/12/10 11:53:25 PM