Wireless all- In-One for Dummies- P3 doc
Bạn đang xem bản rút gọn của tài liệu. Xem và tải ngay bản đầy đủ của tài liệu tại đây (1.59 MB, 30 trang )
Book II
Chapter 2
Choosing Hardware
39
Going over the Letters
Another benefit to the dual band radios is that you can run your 802.11n cli-
ents in the 5 GHz range and leave the 2.4 GHz band to the 802.11b/g clients.
This way you can make sure your speed-hungry devices aren’t slowed down
by legacy adapters.
Compatibility concerns
Wireless devices are generally downward compatible with other devices in
the same frequency. Therefore, you can mix 802.11b and 802.11g because
they’re both running at 2.4 GHz, but not with 802.11a at 5 GHz.
Keep in mind that just because something’s compatible doesn’t mean that
it’s going to run as well as it could. Even with an 802.11g card (54 Mbit/s,
remember?), you’re limited to 11 Mbps on an 802.11b network.
When your access point’s capabilities exceed that of the clients, you still
have problems. An 802.11g access point will instruct all clients to operate in
a slower compatibility mode if even one 802.11b client is connected. 802.11n
has some protections to prevent this problem with legacy clients but still is
not as fast as an 802.11n only network.
802.11n will coexist with 802.11a, as long as you’ve got a dual band net-
work card in your computer. This limitation isn’t too much to worry about
because 802.11a network cards aren’t terribly popular.
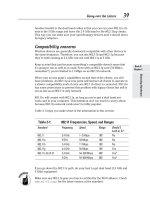
Table 2-1 helps you make sense of the information in this section.
Table 2-1: 802.11 Frequencies, Speed, and Ranges
Standard Frequency Speed Range Should I
Look at It?
802.11 2.4 GHz 1–2 Mbps 100’ No
802.11a 5 GHz 54 Mbps 100’ No
802.11b 2.4 GHz 11 Mbps 150’ No
802.11g 2.4 GHz 54 Mbps 150’ Yes
802.11n Draft 2† 2.4 GHz 54–300 Mbps 300’ Yes*
5 GHz 54–600 Mbps 300’ Yes*
If you go down the 802.11n path, do your best to get dual band (2.4 GHz and
5 GHz) equipment.
Make sure any 802.11n gear you buy is certified by the Wi-Fi alliance. Check
www.wi-fi.org/ for the latest version of the standard.
40
Purchasing a Brand Name
At the moment, 802.11g provides good speed and coverage, and 802.11n
expands on that. If speed is a concern, go with n. If your laptops already have
a b or g radio, then consider starting out with 802.11g and then upgrading in a
year or so after 802.11n is finalized and the gear comes down in price.
Purchasing a Brand Name
Go to the store and you’re going to see an assortment of products, all by dif-
ferent manufacturers. The first part of the selection process is finding which of
these boxes have the features you want, followed by picking a manufacturer.
You’re going to see a few manufacturers, some you recognize, some you
don’t. I recommend going with a name-brand product instead of a cheap,
white, box knockoff, especially if you’re choosing 802.11n. Have a look for
the following:
✦ Do you recognize the manufacturer? Do you see the same manufacturer
being advertised by different stores? If so, chances are it’s a reputable
brand that different stores are willing to stand behind. Also consider
that an established brand has the resources and desire to maintain the
software that makes your wireless card work.
✦ Does the manufacturer offer a toll-free support line? You may need to
call for help at some point.
✦ Does the deal seem too good to be true? Cheap equipment is made cheaply.
✦ Do you see certification logos? This is your guarantee that the device
will interoperate with other vendors’ equipment.
✦ Do you need to supply other parts? Read the fine print carefully; some-
times items shown on the box aren’t inside the box.
A few bucks extra on a name-brand device will almost certainly save you
frustration down the road. Talk to some friends, neighbors, or coworkers to
find out the brands that they like or dislike.
Routing and Bridging
You’re going to have a network in your house, and it’s going to connect to
your service provider’s network. To get between networks, you have to route.
These networks are connected by a device called a router. This router is the
part that lets you get out on the Internet. Routers also incorporate a firewall,
which is a protection mechanism from the bad guys out there on the Internet.
Pretty much every wireless router out there has a built-in firewall.
If you’re connecting parts of your own network, you want to bridge. Maybe
you’re making your wired network bigger by adding more ports. Maybe
you’re adding a new wireless access point to an existing wireless network.
Book II
Chapter 2
Choosing Hardware
41
Expanding Your Wireless Network
Take a look at Figure 2-2. The connection from the Internet service provider
(which is drawn as a cloud, because you can’t have a good network drawing
with at least one cloud) comes in to the router. Anything to the right of the
router is part of the internal network. On the internal network is a device called
a switch, which allows you to add wired ports to a network. One of those ports
connects to an access point, which brings in the wireless computers.
Figure 2-2:
Routing and
bridging.
Laptop
Router Switch
Internet
Access Point
Computer
Computer
The router is routing between the stuff on the left and the stuff on the right. The
network on the right is made up of the switch, the access point, and all the
computers. The switch and the access point bridge all their connections to
each other, which is how a small network grows.
Thankfully, you rarely have to worry about this because most routers you
buy combine the router, the switch, and the wireless access point. If you
need to connect some wired computers in, then make sure your router has
enough ports, or that you’ve got an extra switch that you can connect to the
router to add the ports.
Expanding Your Wireless Network
Before you go thinking “my house is so big, one access point will never be
enough,” give it a try. You might be surprised at what one access point will
do, especially if you’re using 802.11n.
If that one access point leaves you with dead spots in your house, try
moving the access point around (if you can), to see if that helps. Turning an
42
Expanding Your Wireless Network
access point 90 degrees can make a difference. If that doesn’t clean up those
pesky dead spots, then you have to look at alternatives.
Upgrading your antenna
Your access point may have removable antennas, in which case you can try
to find a better antenna. The short, plastic antennas that are what you prob-
ably got with your access point (the highly technical term for these are a
rubber ducky antenna) are optimized to spray radio energy in all directions
such as a big sphere. Other antennas are made to spray in one direction, or
in a doughnut shape.
Changing your antenna is becoming a less attractive option as time goes on.
Some access points have moved to internal antennae, and with the multiple
antennas in 802.11n, replacing several antennae is just a pain. Adding more
devices is becoming so cheap that worrying about your antenna is probably
not worth it.
Repeaters and range extenders
The easiest approach is to add repeaters, or range extenders, to your net-
work. These devices listen to the existing wireless network and rebroadcast
the signal. Because of this, you can expect a repeater to increase your wire-
less range by about 150 percent in one direction, as shown in Figure 2-3.
Figure 2-3:
A wireless
range
extender
in action.
Repeater
Main
AP
Book II
Chapter 2
Choosing Hardware
43
Expanding Your Wireless Network
Wireless range extenders are the easiest way to get what you want, even
though they’re not the most efficient way about going about it. As you can
see from Figure 2-3, the range extender has to be inside the coverage area of
the main access point (white circle). This scenario has a fair bit of overlap
between the two radios: a large part of the extended coverage area (dark
circle) is already covered by the main access point.
When shopping for range extenders, also remember that some wireless
access points can be configured as a repeater, which is the same thing. They
both do a fine job of extending the signal, but knowing that you have the two
options helps you comparison shop.
Creating multiple access points
The solution that gives you the best range is to use multiple access points
and then to bridge them together. Figure 2-4 shows how this works.
Figure 2-4:
How to
connect
multiple
access
points.
Main
AP
Second
AP
This option reduces the overlap between the two wireless zones because the
two access points don’t have to see each other over the wireless network.
However, the two access points must somehow be connected over the wired
network. Given that the benefit of wireless is avoiding wires, this option is
cumbersome to set up. Figure 2-4 does show some overlap between the two
access points, so that there is no dead zone between the two.
Multiple access points can also be helpful if an entire floor is inaccessible
from the main access point. A repeater won’t work in your basement if the
44
Dealing with Wired Devices
signal isn’t strong enough, and your only option might be to run a cable
between two access points.
Dealing with Wired Devices
After all this talk about wireless, you still have to deal with some wires. You
may have a PC or a video game console that doesn’t have a wireless adapter.
Consider replacing your computer with one that has built-in wireless capa-
bility. But if you can’t do that, you got three options:
Wire it, upgrade it, or bridge it.
Wiring a computer
The first option is to simply embrace your device’s lack of wireless and run a
cable from your router to computer. Your router probably has a switch built
in, which is a device that’s there to provide several wired ports. Figure 2-5
shows the switch ports on the back of a router.
Figure 2-5:
Switch
ports on the
back of your
router.
In theory, wiring a computer is easy. If your computer is in the same room as
the router, then run a cable of appropriate length between the two devices,
and you’re set. If your computer is in another room, you’ll have to think of
the least disruptive way to get there. The cable simply plugs into one of the
switch ports on the router on one end, and into the Ethernet port of your
computer on the other.
Run the cable along the baseboard of your wall if you can, or under a strate-
gically placed rug. Avoid bare cable, it just looks bad and people tend to trip
over them, especially when carrying fragile things. If you do have to drill, try
to drill in closets to avoid an ugly mess.
Book II
Chapter 2
Choosing Hardware
45
Dealing with Wired Devices
Speaking of cable, you want Ethernet cable rated at category 5e. You may
also see category 6 cable or some fancy thing with connectors coated in pre-
cious metals, but for a home network you’d just be throwing your money
away. Even better, find a friend with cabling experience to do the work for
you in exchange for dinner.
Wiring up your computer works, but you bought a book on wireless net-
working, not wired networking. Unless your computer is really close to your
router, avoid the mess and pick one of the other options.
Upgrading a computer
Most computers have some expansion slots that let you add peripherals,
such as network cards, to your computer without having to buy a com-
pletely new computer. With this option, you go out and buy the appropriate
adapter for your computer, and then install it.
The key here is to make sure that you’ve got the right adapter for your com-
puter. Computers are getting faster and smaller, and the expansion cards
follow the trend.
Desktops
Desktop computers have two options, depending on the capabilities of your
computer and how much work you feel like doing.
The traditional method is to install a PCI card (that’s peripheral compo-
nent interconnect, for those of you who need to know these things), which
is a card that goes into specially designed slots right on the motherboard
of your computer. The slots are aligned such that one edge of your card
sticks outside your computer’s case, which allows for easy connection of an
antenna. (Chapter 1 of this minibook shows a PCI-based network card.)
Most computers that you buy will have a free PCI slot, but the only way to
make certain is to check. You should see at least one blank panel on the
back of your computer (it’s about 4 inches high and slightly over half an inch
wide). If you open your case, you can see an empty slot for the card.
Opening the case isn’t for everyone, and improvements in the Universal
Serial Bus (USB) have made it possible to get the same speeds without the
hassle. If your computer has a free USB 2.0 slot then you can buy a USB-
based card for around the same cost as an internal one.
Figure 2-6 shows the USB slot from a typical desktop computer.
46
Dealing with Wired Devices
Figure 2-6:
USB slot on
a desktop.
When buying an adapter for a desktop machine, be it USB or PCI, keep in
mind where your computer is and where the antenna would be. An antenna
that’s buried under a pile of books, or is stuck in a cabinet, will not per-
form as well as one that’s got room to breathe. I’d recommend an external
antenna with a cable for PCI cards.
USB adapters are also used with laptops, so are often designed to be small.
You can take a USB adapter with an integrated antenna and attach a USB
extension cable to it if your desk layout hides the antenna. Your adapter
might come with this cable — check the box to make sure.
Laptops
Laptops follow the same idea as desktops; however, the technologies are
different. If your laptop doesn’t have wireless built in (or it’s an older tech-
nology and you want to update), then you can go down the USB route, or an
adapter.
USB devices for laptops work the same way as they do on desktops, except
that you want something that’s small and unobtrusive. Before you buy, look
at where your USB ports are. If you dock your laptop, consider whether or
not you need wireless while docked.
The other option for laptops is a peripheral card, much like the PCI card
from a desktop. Laptops are a bit more refined, though; they have standard
card types that plug into the side of the computer.
Book II
Chapter 2
Choosing Hardware
47
Dealing with Wired Devices
There are currently two popular types of laptop cards — the PC Card (some-
times called CardBus) and the ExpressCard. ExpressCards are a newer (and
by newer I mean faster) version of PC Cards. The name is also better, don’t
you think?
Laptops have been shipping with ExpressCard since at least 2005, so chances
are you already have an ExpressCard slot. You might also have a PC Card slot.
The two types of cards are available in the same width (and not compatible),
so it’s not obvious from looking which one you have.
If you look at the pins inside the slot for the card (you might need a flash-
light, and will certainly need to pop out the plastic holder), you find that PC
Cards have a wide connector, almost 2 inches wide, and have protruding
pins. The ExpressCard’s connector is slightly over an inch wide and has
more of a card interface.
To make things even more confusing, ExpressCards come in two widths. One
is the ExpressCard/34 which is slightly over an inch wide (34 millimeters for
those of you who understand metric), and ExpressCard/54, which is about
2 inches wide. The connector is the same, but you can’t use the 54mm card
in a 34mm slot! There should be a plastic guide inside the slot, though, that
allows you to use the 34mm card in the 54mm adapter. Figure 2-7 shows the
two ExpressCard variants.
Figure 2-7:
PC Card
and PC
ExpressCard
compared.
48
Dealing with Wired Devices
When in doubt, check out the documentation that came with your computer,
especially the sales brochure.
Bridging a computer
Bridging is remarkably simple — you buy a device that speaks wireless on
one side and has a network jack on the other. This device bridges the wire-
less to the wired, so that the computer thinks it’s on a wired network, but
everything it sends goes out to the wireless network.
This option is great for video game consoles, where you may not have flex-
ibility in what you can add. Some models can behave as a bridge for use at
home and a standalone access point if you and a bunch of friends decide to
get together with your consoles or computers and play multiplayer games.
Chapter 3: Setting Up Routers
In This Chapter
✓ Unpacking your hardware
✓ Plugging equipment together
✓ Configuring your router
I
f you’re ready to set up your router, you likely have all the equipment
you need. For most of you, this will be the most foreign part of the whole
process. Don’t worry! In terms of difficulty, I rank this as easier than setting
up a home entertainment system and slightly harder than falling off a log.
In this chapter, I discuss the router. If you bought some network adapters,
you can set those aside for now. First, you get acquainted with the equip-
ment, and then I explain how to put it together and get it going!
For those of you with foggy memories, or who skipped ahead, the router is
the device that connects your home network to the Internet. The router hides
all your internal computers and acts as a firewall, which helps to protect you
from the bad guys out there. Your router probably has wireless built in, so it’s
going to take care of getting your wireless computers connected.
Unpacking the Box
Clear off a table and start unpacking the router box. You should see
✦ A router (if you don’t see this, then pack everything up and take it back
to the store)
✦ A power supply
✦ A network cable (3-inch to 6-inch long, with a square plug on each end)
✦ CDs and documentation
✦ Antennae, depending on the router you bought
Your box might come with some other goodies, such as a network card, if
you bought a combination package, or some other odds and ends that the
manufacturer threw in.
50
Figuring Out Where to Put the Router
Figuring Out Where to Put the Router
The router needs to be placed close to where your Internet service provider’s
equipment (such as a cable modem or an ADSL modem) is located. Ideally,
this area is as close to the center of your house as possible, to maximize the
wireless range.
So, you’ve found a central location with a bit of breathing room for the
router. It’s near a power outlet, and is out of the way enough that you’re not
going to trip over it.
Grab some masking tape and a marker before you start setting things up.
Tag your cables as you go along so that someone looking for a free outlet
doesn’t pull your cable modem’s plug, or you don’t forget which port plugs
into what, should they get separated.
Plugging Everything Together
Before you start hooking equipment up, throw together a quick picture of
what you’re trying to build. Figure 3-1 shows an example of a network.
Starting on the left, you have your cable modem, which is probably already
plugged into your phone or cable line. The cable modem hooks into the exter-
nal side of your router. Your router connects wirelessly to your workstations,
and optionally through a wired interface to any devices that need it.
While you’re configuring your network, you can connect your PC to the
router using an Ethernet cable. After you’ve set up the router, you can begin
using your wireless network.
Handle with care
If your cable or DSL modem isn’t in a good spot,
then you might consider moving it somewhere
better.
Moving a cable modem means that you have
to find another cable jack in the house and
plug the cable modem into that jack. Be care-
ful, though, especially if you had someone from
the cable company come out and set up your
equipment. The installers for cable modems
optimize your house wiring to give the best
signal to the modem, so changing jacks might
hurt your Internet speeds. Thankfully, you can
just move things back if something goes wrong,
or call your provider for a signal check if you’re
unsure.
For ADSL setups, you can move your modem
to any phone jack. You have to make sure that
all the other phones in your house have a filter
on them, which prevents noise from the phone
from interfering with the Internet signal.
Book II
Chapter 3
Setting Up Routers
51
Plugging Everything Together
Figure 3-1:
The plan for
your new
network.
ComputerWireless
Router
Internet
Port
Cable/DSL
Modem
Internet
Connecting the router to the Internet
Your cable or DSL modem will have one Ethernet cable coming out the back of
it. To help you find it, I’ve taken a picture of my cable modem in Figure 3-2. An
Ethernet jack looks a lot like a regular telephone jack, except the Ethernet jack
is wider than the phone jack.
Figure 3-2:
Finding the
Ethernet
jack on
a cable
modem.
52
Plugging Everything Together
Your router has several Ethernet jacks on it. Your router connects your
internal network to the Internet. It’s expecting the Internet to be on a certain
port. This port might be labeled:
✦ Internet
✦ Outside
✦ WAN
✦ External
Whatever it’s called, this port is marked differently than the other ports.
1. Plug the router’s Internet port into your cable or DSL modem’s
Ethernet port.
2. Hook up the power adapter to your router and give it a few minutes to
get started.
You should see lights on both your cable or DSL modem and the
router, indicating that a connection was made. Sometimes the light
is right underneath the port itself, sometimes it’s on the front of the
device.
3. Unplug the power from your router until you’re ready to set it up.
When plugging in an Ethernet cable, it should click. Give the cable a gentle
tug. It should not fall out of the port that it’s plugged in.
Plugging your computer into the router
Now that you’ve found the Internet port on the router, the inside ports
should be pretty easy. They are likely numbered and in a group, possibly
with a label like Ethernet.
Plug a cable from your computer’s Ethernet port into the first Ethernet port
on the router. Now you should have something like Figure 3-3.
Congratulations, the hardest part is over! It’s time to configure the router.
Book II
Chapter 3
Setting Up Routers
53
Configuring the Router
Figure 3-3:
The laptop,
router,
and cable
modem all
hooked up.
Configuring the Router
With your router at default settings, you might be able to turn your router on
and be on the Internet in a matter of minutes. Even if everything works for
you, going through the configuration steps is a good idea. Doing so improves
your security, you can upgrade your router’s software to the latest version,
and you might even find it fun!
Depending on the router you buy, it may come with a CD that takes you
through the configuration section. Feel free to use it, because they gener-
ally do a good job. You should still read through this section because it
describes the settings you want to look at, and you may have to resort to the
method we describe below.
I’m also using a Netgear router. If you have something different, the screens
will look different but the process will be similar.
If you are having problems with a step here, jump over to Chapter 8 for some
troubleshooting information.
54
Configuring the Router
Logging into the router
Your router is configured by using your Web browser by entering a URL
pointing to the gateway. The URL you enter is either printed on the router
or is in the manual that came with your router.
Maybe your dog ate your instruction manual before you got a chance to
copy down the URL, and it’s not on your router. That’s fine — there’s a way
to find it.
1. From the Windows Start menu, click on Run.
A pop-up box appears above the Start button, asking which program you
want to run.
2. Type in cmd and press the Enter key.
A black window opens.
3. Type ipconfig and press the Enter key.
I’ve pasted what I see.
Your window should look something like Figure 3-4. Look for the line starting
with Default Gateway. The gateway is 192.168.1.1, which is the address of my
router.
Figure 3-4:
Determining
your IP
address and
gateway.
If you don’t have an address, or it starts with 169.254, then make sure that
your computer is properly connected to the router. You see a status light on
both the router and the computer’s Ethernet port if you have a connection.
Whichever way you find it, open up your Web browser and enter the address
of your router. On my Netgear router it is , but
it works just as well with http://192.168.1.1 that I learned earlier from
the ipconfig command.
After connecting, you are challenged to log in, as shown in Figure 3-5.
Book II
Chapter 3
Setting Up Routers
55
Configuring the Router
Figure 3-5:
The login
screen from
a router.
The password is printed on the router or in the manual. You can also try a
username of admin and a password of passwordfor many models.
If you lost your manual, the site www.routerpasswords.com has the
default username and password for many models of routers.
After you’ve logged in, your router will probably check for software updates.
If you are prompted to upgrade your router, you should do so. If you got an
error that no Internet connection could be found, don’t panic! You might
need to make the changes in the next section.
After the router upgrade completes, for better or worse, you are sent to the
wizard (no, not the pointy hat kind! I mean the menus that help you set up
your Internet connection).
Setting up the Internet connection
The first stage of the configuration wizard is the Internet setup. Figure 3-6
shows the initial question that asks if you want the router to determine the
Internet connection type.
Let the detection process proceed, because it can save you some time. After
the detection runs, you are given an option to review your settings and to fill
in any missing information about your Internet connection. Figure 3-7 shows
the configuration screen for the Internet connection.
56
Configuring the Router
Figure 3-6:
To auto-
configure,
or not?
Figure 3-7:
Internet
configura-
tion screen.
Book II
Chapter 3
Setting Up Routers
57
Configuring the Router
The Does Your Internet Connection Require A Login option is set to No. The
Internet IP address is filled in (but grayed out) because the router detected
the Internet connection properly.
Do you need to log in?
Cable Internet generally doesn’t require a login. If you have ADSL, it depends
on your provider. If your ISP gave you a username and password when you
signed up, or if the detection failed, then you probably need a login. If you
had to run software such as the WinPoET on your computer to get on the
Internet, then you need a login.
If you do need a login, follow these steps.
1. Select Yes at the Does Your Internet Connection Require a Login
question.
Your screen changes to something such as Figure 3-8.
2. If your ISP is listed in the ISP section, select it.
North American users typically use the PPP over Ethernet (PPPoE)
protocol to log in, which means you select Other for your ISP. For those
in Europe or Australia, you probably use PPTP (Point to Point Tunneling
Protocol). When in doubt, call your ISP and ask.
Figure 3-8:
Entering
your login
information.
58
Configuring the Router
3. Enter the login information your Internet service provider gave you,
and then scroll to the bottom and select Apply.
Doing so resets your router.
4. Confirm you have an Internet address by selecting Router Status from
the main menu.
If all went well you see an address on the Internet port. The status light
on the router corresponding to the Internet port also changes to green.
If you ran software on your PC to log in to your ISP, then you can uninstall it
now. Your router is taking care of logging in for you.
Congratulations, you’re on the Internet!
Working with your ISP
Some Internet service providers are picky about who they let on the Internet
and will not let you on from a different computer. This situation is most
often the case with cable modems, because the ADSL service with a login
identifies people by the login. From the ISP’s perspective, your router is now
the only person using the Internet because all your local devices are hidden
behind it.
The first thing to do is to reboot your cable modem. Doing this clears out any
computer associations should the restriction be made on the cable modem.
If that doesn’t work, try plugging your computer directly into the cable
modem (another reason I told you to label your cables!). If your computer
works but the modem doesn’t, then you need your ISP to intervene.
Give your ISP a call and tell them that you just installed a new router and are
having problems connecting. Ask if you’re being restricted based on your
computer. Also let them know the outcome of plugging in the computer.
If you aren’t getting anywhere with your ISP, and your computer works but
the router doesn’t, you can tell the router to act like your computer. Go back
to the Basic Settings menu and scroll all the way to the bottom to the Router
MAC Address section shown in Figure 3-9.
Increasing security
Security is a tradeoff between the risk of something bad happening and the
frustration you’re going to encounter trying to prevent it. We could talk for
hours about all the things you could do to keep bad guys out, but in the next
couple of sections, I focus on some simple fixes that can make a big difference.
Remember, you’re never truly secure; all you can do is make your network
hard enough to break into that the bad guys go somewhere else.
Book II
Chapter 3
Setting Up Routers
59
Configuring the Router
Figure 3-9:
Changing
your router’s
MAC
address.
Changing the router login information
Most routers come with a default username and password of admin and
password, respectively. Want to guess the first thing someone is going to
try? That’s right . . . “password” is a good way to describe what the word is,
but as a password, it makes a bad one.
Change that admin password!
The screen to change your password is found under the Set Password menu
item, as shown in Figure 3-10. You are prompted for your old password,
which is probably “password” in case you’ve forgot.
Here’s my advice for choosing a good password:
✦ Make it at least 8 characters.
✦ Put at least one number and one uppercase character in your password.
Passwords are case-sensitive, so G and g are not the same.
✦ Make it memorable, but not obvious. If your name is Sarah, you might
try something like saraH500. Maybe you like cats, so try 100Meows.
✦ Avoid too many letters that look the same, such a zero and a capital O,
or the number 1 and a lowercase l.
60
Configuring the Router
Figure 3-10:
Changing
your
adminis-
trator
password.
Finally, write the password down and put it somewhere safe (and some-
where that you’ll remember). That’s right, I told you to write the password
down! Doing this is often frowned upon, but think of it this way:
✦ You’re not protecting Fort Knox, it’s your home network. That’s not
saying your personal stuff isn’t important, but with a password that’s
good enough, you’re still making it harder to get in. Remember that
security is a tradeoff between safety and convenience.
✦ You’re going to store the password somewhere safe, like a filing cabinet.
You’re not going to tape a sign to your front window with the password
on it.
✦ Someone has to first get on your network before they’re going to be able
to log in to the router.
✦ If you’re still paranoid, ignore my advice and make up a complex pass-
word. I won’t be offended, really.
Keeping others out of your network
If someone could connect to your wireless network, he can surf the Internet
from your ISP. That’s not such a big deal, but you’re now responsible for
what they do. If something bad happens, the police will track the perpetrator
back to your house. Then you get to explain to the police why it wasn’t you.
Book II
Chapter 3
Setting Up Routers
61
Configuring the Router
Secondly, software is available that can intercept your network traffic. At
best they see which Web sites you browse to, at worst they pretend to be
your bank and rob you blind.
Protect your Network!
Figure 3-11 shows the Wireless Settings screen. At the top is the name of the
wireless network called the SSID (Service Set Identifier). This makes your
network unique. When you start off, it’s usually set to the name of the manu-
facturer, such as Linksys or Netgear. Not only is a default SSID a magnet for
hackers, it could cause conflicts if your neighbor is at the defaults, too. This
setting is not a secret, so choose something obvious enough that if you saw
it in a list, you’d recognize it.
Leave the channel at Auto — your router will choose the best channel to use.
For the mode, pick one of the higher ones. The options I get are 45 Mbps, 145
Mbps, and 300 Mbps. This is a wireless-N router, so it’s capable of the full
300, but I’m in an area with some interference from neighbors so I dialed it
back to 145. Try different settings and see which one works the best for you.
The security options dictate what sort of encryption level is used. None is
the default and means that anyone can connect without a password. We
know that’s a bad thing.
Figure 3-11:
Protecting
your
wireless
network.
62
Configuring the Router
WEP (Wired Equivalent Privacy) is old and broken. Someone sitting outside
your house could break your password in a matter of a few minutes. I’m not
even sure why vendors bother offering it; only ancient computers don’t sup-
port anything better.
WPA and WPA2 (Wi-Fi Protected Access versions 1 and 2, respectively) are
the current standards. WPA2 is newer and somewhat better, but some com-
puters only support the original WPA. I recommend enabling both WPA and
WPA2 — clients that support WPA2 will use it, and others will use WPA.
You see the box for the passphrase when you select one of the WPA options.
A good password is the key to your network’s security. You can write it
down, but this Netgear router leaves it as plain text so you can look it up
easily. (You have changed the admin password for your router, right?)
Dispelling a couple of myths
Wireless has come a long way since it first came out, and people have
learned a lot about security over the years. The following list explains what
not to do.
✦ Don’t use WEP, use WPA2, or WPA if your computer doesn’t support
WPA2.
✦ Don’t bother with restricting clients by MAC address. These addresses
can easily be spoofed by bad guys.
✦ Don’t hide your SSID; you just make it harder on yourself, and it’s still
easy for someone parked outside your house to find your SSID. Even the
credit card companies have taken this restriction out of their require-
ments for businesses that take credit cards.
Contents
Chapter 3: Setting Up Routers 49
Unpacking the Box 49
Figuring Out Where to Put the Router 50
Plugging Everything Together 50
Configuring the Router 53
Chapter 4: Deciphering DHCP
In This Chapter
✓ Discovering what a DHCP server is
✓ Configuring your DHCP server
✓ Finding out about the other settings that DHCP provides
I
n Chapter 3, I explain how to set up your wireless router. And in Chapters
6 and 7, you discover how to set up wireless printers, computers, and
even network-attached storage. But, before you can do this, you must first
find out about addressing — the topic of this chapter.
The Internet works because everything on it has a unique address, and the
devices that run the Internet are very good at getting information between
two addresses. Before your computers and printers are ready to talk on
your network, you have to make sure they have an address.
There’s a protocol called DHCP, the Dynamic Host Configuration Protocol,
that not only is the way to automatically address the computers on your
network, but knowing the acronym is a great way to impress your geek
friends.
Later in the chapter, I go over other related services that might come in
handy some day.
Understanding DHCP
To first understand DHCP, you must know a bit about addresses. The most
popular analogy is the snail mail system.
Through rain, sleet, or snow
To send a letter, you first put your message in an envelope, then you write
your return address on the corner of the envelope and your recipient’s
address in the middle, and finally drop it in a mailbox. There’s a stamp
involved in there, too, but the Internet doesn’t need stamps; they gum up
all the gears.