Tài liệu Fix your own computer for seniors for dummies- P12 docx
Bạn đang xem bản rút gọn của tài liệu. Xem và tải ngay bản đầy đủ của tài liệu tại đây (849.15 KB, 30 trang )
➟
315
Chapter 19: Relieving Hard Times for Hard Drives
Whichever method you use, the command-prompt
window opens.
You won’t be able to work on your computer while
this utility is running.
2.
Enter one of the following commands:
• To view detailed information about your hard
drive, type chkdsk driveletter: and then press
Enter. (You enter the drive letter in place of
driveletter. To check drive C:, for example, type
the command chkdsk c:.)
• To find and repair errors, locate bad sectors, and
recover readable information that may have been
lost to an application, type chkdsk driveletter:/r
and then press Enter. (Substitute the actual drive
letter for driveletter. To check drive C:, for example,
type chkdsk c:/r.)
Programs such as chkdsk can be executed (run) with
command switches that tell the program to conduct
special tasks. You enter a switch after the program
name, preceded by a slash (/). The /r switch, for
example, tells Chkdsk to find and repair errors.
If the current drive is in use (which is often the case
in a PC that has just one drive), Chkdsk informs you
that it can’t run the test with the specified repairs
now and offers to conduct it the next time the com-
puter starts. Type Y (for yes) and then press Enter.
The next time you start your computer, Chkdsk will
run its test before Windows loads.
3.
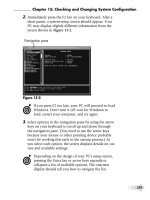
Wait for Chkdsk to finish doing its thing and display
details on what it found (see Figure 19-5).
Please purchase PDF Split-Merge on www.verypdf.com to remove this watermark.
➟
316
Part V: Troubleshooting Your PC
Result of a Chkdsk scan
Figure 19-5
Here are the possibilities and their meanings:
Exit Code Description
0 No errors were found.
1 Errors were found and fixed.
2 Disk cleanup, such as garbage collection, was performed, or cleanup
wasn’t performed because the
/f
switch wasn’t specified. (
/f
is the
error-fix switch that’s included in the
/r
switch, which I discuss earlier
in this section.)
3 Chkdsk couldn’t check the disk or couldn’t fix errors because the
/f
switch wasn’t specified.
4.
What you do next depends on the result of the test. If
you asked Chkdsk to fix errors, for example, it may dis-
play an exit code or ask for verification before it performs
a repair or recovery task. To continue the process, type Y
and then press Enter.
Please purchase PDF Split-Merge on www.verypdf.com to remove this watermark.
➟
317
Chapter 19: Relieving Hard Times for Hard Drives
5.
Type exit and press Enter to close the command-prompt
window.
Again, if Windows is using one or more of the files
on the hard drive, you see the following message:
Chkdsk cannot run because the volume
is in use by another process. Would
you like to schedule this volume to
be checked the next time the system
restarts? (Y/N) Type Y and press Enter to
schedule the disk check; then restart your computer.
Take Out the Garbage with Disk Cleanup
1.
Choose Start➪My Computer or Start➪My Computer to
open the My Computer/Computer window.
2.
Right-click the drive you want to check, and choose
Properties from the shortcut menu to open the drive’s
Properties dialog box (refer to Figure 19-3, earlier in this
chapter).
3.
Click the General tab, if it isn’t already open.
4.
If you want, check the Compress This Drive to Save Disk
Space check box. This option compresses old files that
you haven’t used for a while.
Choosing the Compress option generally is a good
idea, although some users (including me) would
rather not touch older files and compensate by add-
ing more storage. (See Chapter 11 for details on add-
ing or replacing a hard drive.)
5.
Click the Disk Cleanup button. The system churns away
for a while, examining your drive and calculating how
much garbage it can locate.
Please purchase PDF Split-Merge on www.verypdf.com to remove this watermark.
➟
318
Part V: Troubleshooting Your PC
Finally, the Disk Cleanup dialog box opens (see Figure
19-6), indicating how much junk is sitting around in
places like the folders for downloaded program files,
temporary Internet files, and the Recycle Bin, and sug-
gesting files to delete.
Disk space that will be recovered
if you delete these files
Figure 19-6
6.
Clear the check boxes next to any files that you want to
keep; check the check boxes next to any additional files
that you want to clear off the disk.
For most users, it’s best to delete only the recom-
mended files. If you choose to go further, click each
file and read its description before proceeding.
Please purchase PDF Split-Merge on www.verypdf.com to remove this watermark.
➟
319
Chapter 19: Relieving Hard Times for Hard Drives
7.
Click OK.
8.
When Windows asks you to confirm that you want to
delete these files permanently, click Yes (Windows XP) or
Delete Files (Vista and Windows 7).
How often you should run the Disk Cleanup utility
depends on your habits. If you do a lot of Internet
browsing, and disk space is running low, run the util-
ity. Otherwise, every few months is probably often
enough.
Please purchase PDF Split-Merge on www.verypdf.com to remove this watermark.
➟
320
Part V: Troubleshooting Your PC
Please purchase PDF Split-Merge on www.verypdf.com to remove this watermark.
Fixing Common
Problems
A
s Claude Rains advised in Casablanca,
when things go awry, the first thing to do
is round up the usual suspects. The same is
true for computers. Although there are
uncountable possible combinations of hard-
ware, software, and settings, most problems
can be traced to a relatively small number of
causes.
In this chapter, I give you tips for trouble-
shooting some of the most common PC
problems.
20
Get ready to . . .
➟
Start a Computer That
Won’t Start ...................... 322
➟
Solve Basic Hardware
Problems .......................... 324
➟
Troubleshoot Common
Windows Woes................ 327
➟
Solve Basic Software
Problems .......................... 329
➟
Get Back on the Internet .... 331
➟
Chapter
Please purchase PDF Split-Merge on www.verypdf.com to remove this watermark.
➟
322
Part V: Troubleshooting Your PC
Start a Computer That Won’t Start
1.
Check the computer’s power source and connections.
• Make certain that the power cord is plugged into
the computer and into a source of power. The
power cord runs from the back of the computer
and plugs into an electrical socket in the wall; into
a surge protector (a good thing); or (even better)
into an uninterruptible power supply (UPS),
which is basically a large battery that is continu-
ously recharged by wall current (see Figure 20-1).
Figure 20-1
• Test the source of power to see whether it’s live. To
do that, plug a lamp, radio, or fan into the same
outlet, surge protector, or UPS that you’re using for
Please purchase PDF Split-Merge on www.verypdf.com to remove this watermark.
➟
323
Chapter 20: Fixing Common Problems
your computer, and see whether that device works
properly. If not, the wall outlet may have blown a
fuse or the surge protector may have failed (which
is its job if a power spike comes along). For more
details on dealing with a power problem, see
Chapter 9.
• Try an alternative source of power, such as a differ-
ent wall socket. Then turn the computer back on
and hope for a return to normalcy.
2.
Push the start button or click the power switch, and listen
for the computer’s cooling fan. A silent machine plugged
into a live power outlet may indicate a failure in the
power supply or circuitry. For details on replacing a failed
power supply (or directing a technician to do it for you),
see Chapter 9.
3.
Listen and watch for beeps, other alert tones, or flashing
lights on the front panel after the PC’s fan comes to life.
These alerts during start-up (your computer’s instruction
manual may explain them) may indicate a problem with
internal hardware, such as memory or the hard disk
drive. If you need to replace hardware, turn to Part III.
If you just installed new memory or made other
changes inside the case, the sound or light codes may
be telling you that something went wrong with your
work. Try removing whatever you just installed and
returning the computer to the condition it was in
before you touched the hardware (see Chapter 16).
4.
Watch for onscreen messages before Windows is loaded.
These messages could warn you of a hardware failure or
an error resulting from a problem with setup
instructions.
Please purchase PDF Split-Merge on www.verypdf.com to remove this watermark.
➟
324
Part V: Troubleshooting Your PC
Sometimes, you can get past a hardware error by
instructing Windows to open in safe mode (see
Chapter 17), which loads only the most critical com-
ponents of Windows. If Windows will load this way,
you can check Device Manager for clues about which
component failed; for details, see Chapter 18.
Solve Basic Hardware Problems
➟
Your computer is suddenly silent. Make sure you
haven’t muted the sound. The sound card or adapter
inside your PC has failed or is no longer adequate
for your needs.
Solution: Instead of opening the case, plug in an
external sound adapter such as Creative’s USB
SoundBlaster Live! 24-Bit External, which attaches to
a USB port on almost any desktop or laptop
computer.
➟
Your PC needs new or better wireless capability.
You want to give your computer the ability to com-
municate wirelessly with other devices, or you need
to upgrade an outdated or malfunctioning built-in
Wi-Fi adapter.
Solution: Several manufacturers offer external Wi-Fi
adapters and antennas that connect to your PC
through (you’re getting the pattern here, right?) the
USB port. One advantage of using an external Wi-Fi
adapter is that it usually comes with a more substan-
tial antenna than its internal equivalent, and you can
adjust the placement of that antenna to get the best
transmission and reception in your home or office.
The latest “N” Wi-Fi technology adapters, like the
one shown in Figure 20-2, have a small footprint
and offer better coverage than earlier models do.
Please purchase PDF Split-Merge on www.verypdf.com to remove this watermark.
➟
325
Chapter 20: Fixing Common Problems
Figure 20-2
Please purchase PDF Split-Merge on www.verypdf.com to remove this watermark.
➟
326
Part V: Troubleshooting Your PC
➟
You can’t install programs on a computer with no
CD/DVD drive. If you own a minimalist netbook or
a small desktop computer, the tiny size and low cost
often come at the expense of things like a CD/DVD
drive. But without a CD/DVD drive, how do you
install new programs?
Solution: A couple of simple work-arounds are
available:
• Use the Internet. The first and most obvious solu-
tion is to download programs or data over the
Internet or across a local area network, or to use a
device such as a flash memory drive to transfer
program content to the computer. You can pur-
chase very large flash drives to store up to 256GB
worth of programs or data. Figure 20-3, for exam-
ple, shows a Kingston 128GB USB flash drive.
Old-timers like me find it hard to believe that you
can get so much storage in such a small package.
Figure 20-3
• Install an external CD/DVD drive. Another
option is to install an external drive. Drives of this
type are small units, similar to those used in full-
feature laptops, that draw electrical power from
Please purchase PDF Split-Merge on www.verypdf.com to remove this watermark.