Microsoft SQL Server 2005 Developer’s Guide- P2 pps
Bạn đang xem bản rút gọn của tài liệu. Xem và tải ngay bản đầy đủ của tài liệu tại đây (1 MB, 20 trang )
Chapter 1: The Development Environment 19
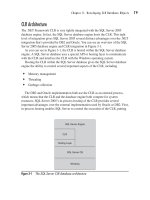
event handlers, and one tab for viewing the contents of a package. A fifth tab that
appears at run time allows you to view the execution progress of a package. After the
package completes its run, the execution results can be viewed. The SSIS Designer
is shown in Figure 1-11.
Separate design surfaces exist for building the control flow, data flows, and event
handler elements in packages. Dialog boxes and windows, such as the variable
window and the breakpoint window, are also included to help you add and configure
variables and to troubleshoot your project. Wizards are included to add functionality
and advanced features.
Import Analysis Services 9.0 Database The Import Analysis Service 9.0 Database
project enables you to create a new SQL Server 2005 Analysis Services project by
importing the definitions for an existing SQL Server 2000 Analysis Services or SQL
Server 7 OLAP Server database.
Report Project, Report Project Wizard, and Report Model Project The BI Development
Studio contains the Report Project template, the Report Project Wizard template,
Figure 1-11 SSIS Designer
20 Microsoft SQL Server 2005 Developer’s Guide
and the Report Model Project template to create Reporting Services projects. These
reporting templates are used to design reports and control their deployment. Reporting
Services project templates start the Reporting Services Designer, where you can select
data sources and visually lay out reports. Reporting Services projects, the Report
Designer, and the Report Project Wizard are covered in more detail in Chapter 9.
Properties
Like the Properties window in SQL Server Management Studio, the BI Development
Studio Properties window allows you to view the properties of files, projects, or
solutions. The Properties window shown in the bottom-right corner of Figure 1-9
is used at design time to set the properties of the objects selected in the Solution
Explorer. If the Properties window is not already displayed, you can show it by
selecting the View | Properties Window option from the BI Development Studio
menu. The Properties window displays different types of editing fields, depending on
the type of object selected.
Toolbox
The Toolbox window in the BI Development Studio is shown on the left side of the
screen in Figure 1-11. The Toolbox is used by the SSIS Designer and the Reporting
Services Designer to drag and drop components onto their respective design surfaces.
Output Window
The Output window displays the results when a solution is built. You can see the
Output window in the lower-middle portion of Figure 1-9.
Summary
The separate administrative tools that were used to manage the previous versions of
SQL Server have been combined into one integrated environment, allowing the DBA
to focus on managing the server objects more efficiently. In this chapter, you got a look
at the new SQL Server Management Studio, which combines the four previous tools:
Enterprise Manager, Query Analyzer, Profiler, and Analysis Manager. This chapter also
gave you a view of the new Business Intelligence (BI) Development Studio, which
is used to create Analysis Services databases, DTS packages, and Reporting Services
reports. These environments definitely improve your effectiveness in developing SQL
Server objects and managing SQL Server administration tasks.
21
CHAPTER
2
Developing with T-SQL
IN THIS CHAPTER
T-SQL Development Tools
Creating Database Objects Using T-SQL DDL
Querying and Updating with T-SQL DML
Copyright © 2006 by The McGraw-Hill Companies. Click here for terms of use.
22 Microsoft SQL Server 2005 Developer’s Guide
S
QL (Structured Query Language) is the standard language for relational
database management systems (RDBMSs), and T-SQL is Microsoft’s version
of the SQL language. T-SQL includes Data Definition Language (DDL)
statements to create databases as well as database objects such as tables, views,
indexes, and stored procedures. In addition, T-SQL also includes Data Manipulation
Language (DML) statements that are used to query and update relational data stored.
In the first part of this chapter you’ll learn about the tools that Microsoft provides
for developing, debugging, and deploying T-SQL scripts. Next, with an understanding
of the tools under your belt, you’ll learn in the second part of this chapter how T-SQL
can be used to create database objects as well as how you can build T-SQL statements
to query and update data.
T-SQL Development Tools
Microsoft provides two primary tools for developing T-SQL scripts. First, as a part
of SQL Server 2005’s SQL Server Management Studio (SSMS), there’s the Query
Editor, which provides a basic T-SQL development environment and is primarily
intended to develop T-SQL DDL statements, perform performance tuning with
graphical showplans, and run ad hoc queries. Next, to create more sophisticated
T-SQL projects such as stored procedures and functions, Microsoft provides the new
Database Project that’s part of Visual Studio 2005 Professional Edition and higher.
The Database Project takes up where the Query Editor leaves off. In addition to the
ability to create and execute T-SQL, the Database Project also offers the ability to
debug T-SQL, where you can single-step through the code in your T-SQL projects. In
the next section of this chapter you’ll see how to develop T-SQL management scripts
using the SSMS Query Editor and then Visual Studio 2005’s Database Project to
develop and debug a T-SQL stored procedure.
NOTE
In addition to these two tools, you can also develop T-SQL scripts using a text editor like Notepad
and then execute the scripts using the command-line SqlCmd or osql utilities. However, this basic
level of development doesn’t offer any of the more advanced development features, such as
project management, color-coded syntax, or source control, that are available in the Query Editor
or Visual Studio.
SQL Server Management Studio
The primary T-SQL development tool that’s supplied with SQL Server 2005 is the
Query Editor, which is a part of the SQL Server Management Studio (SSMS). You start
Chapter 2: Developing with T-SQL 23
the Query Editor by selecting the New Query option from the SSMS toolbar to
display an editing window like the one shown in Figure 2-1.
SSMS and the Query Editor are built on the Visual Studio 2005 IDE and have
a similar look and feel. The editor is very capable, providing color-coded syntax
and cut-and-paste capabilities. It provides support for source control via SourceSafe
as well as organizing your projects into solutions. However, it does not support
IntelliSense or code snippets.
To use the Query Editor, you enter your T-SQL code into the Query Editor and
then press f
5 or click the green arrow in the toolbar. For query operation the results
will be displayed in the Results window that you can see in the lower half of Figure 2-1.
By default the Results window displays the results in a grid format, but you can also
choose to display the results as text output or write the results to a file. The output
options are set using the Query | Options menu option.
TIP
SSMS is quite different from the Enterprise Manager or Query Analyzer that were provided in the
previous releases of SQL Server. You might not notice it at first, but the SSMS menus dynamically
change depending on the window that has focus. For instance, if the focus is on the Object
Explorer, the menu options will show the basic management options. If the focus moves to the
Query Editor, then the Query And Community menu option will appear.
Figure 2-1 The SQL Server Management Studio Query Editor
24 Microsoft SQL Server 2005 Developer’s Guide
In addition to outputting the result data, the Query Editor can also display the
execution plan that the SQL Server engine uses for a given query. By examining
a query’s execution plan, you can see how long the query is taking to execute, as
well as if the query is using the appropriate indexes. To display the execution plan
for a query, select the Query | Include Actual Execution Plan and then run the query.
This will display a window like the one shown in Figure 2-2.
A graphical representation of the query’s execution plan is shown in the Results
window. In this example, you can see that the simple select * query is satisfied using
the clustered index built over the Person.Address table. You can also output the
showplan data in XML format.
Using the Query Builder
In addition to the standard Query Editor, which allows you to write and execute
T-SQL queries that you build, SSMS also provides a Query Builder that enables you
to visually design a query for which Query Builder will output the T-SQL source
code. To run Query Builder, put your focus in the Query Editor window to display
the Query menu on the SSMS toolbar and then select the Design Query In Editor
option. This will display a Query Builder window like the one shown in Figure 2-3.
Figure 2-2 Displaying a query’s execution plan
Chapter 2: Developing with T-SQL 25
When the Query Builder first starts, it displays an Add Table dialog that enables
you to select the tables that you want to query. Multiple tabs enable you to include
views, functions, and synonyms. You add objects by selecting them and clicking
Add. After you’ve selected the database objects that you want to include in the
query, click Close.
Clicking the check box in front of each column name includes that column in the
query. You indicate the desired join conditions by dragging and dropping column
names from one table or view onto like columns from another table or view. The
included tables and joins are used as a basis for building a T-SQL Select statement.
Sort conditions are indicated by right-clicking the column names in the Table pane and
then selecting the Sort Ascending or Sort Descending options from the pop-up menu.
Using the Columns pane, you can apply filters to the row selection criteria by
putting a value in the filter column. Filters are translated into a T-SQL Where clause.
You can also reorder the result set columns by dragging them up or down to a new
location in the Columns pane.
Figure 2-3 Query Builder
26 Microsoft SQL Server 2005 Developer’s Guide
As you graphically build the query, the generated T-SQL statement is continually
updated in the SQL pane that you can see at the bottom of Figure 2-3. Clicking OK
completes the Query Builder, and the T-SQL query is written into the Query Editor,
where it can be further edited or executed. The Query Builder is a two-way tool in
that it enables you to graphically build a query by selecting database objects, plus
it allows you to go the other way. By highlighting an existing text-based query in
the Query Editor and then selecting the Design Query In Editor option, you can
view a graphical representation of the text-based query in Query Builder—even if
you didn’t originally build the query using Query Builder. Unlike most of the other
dialogs in SSM, the Query Builder dialog is modal, and you can’t leave it until
you’ve finished designing your query.
Using Projects
Another capability that SSMS derives from its Visual Studio roots is the ability to
organize related source files into projects. For instance, you might use a project to
group together all of the related T-SQL scripts to build a database and its objects.
SSMS projects are particularly useful for grouping together related code from different
sorts of source files, such as you might find in a Notification Services project, where
a combination of T-SQL and XML files combine to form a single application. You can
create a new project in SSMS by selecting the File | New | Project option, which allows
you to select a SQL Server, Analysis Services, or SQL Mobile project template from
the New Project dialog. You can also manually build a project by selecting the View |
Solution Explorer option and then right-clicking in Solution Explorer to add files. You
can see an example of the SSMS Solution Explorer in Figure 2-4.
Figure 2-4 SQL Server Management Studio’s Solution Explorer
Chapter 2: Developing with T-SQL 27
SSMS projects are organized into Connections, Queries, and Miscellaneous.
Connections defines the database connection properties, Queries generally contain
T-SQL scripts, and Miscellaneous contains other types of source files, including
XML and XSD files. SSMS projects are saved using the extension of .ssmssln (SQL
Server Management Studio Solution).
Source Control
SSMS is also fully integrated with Microsoft’s Visual SourceSafe version control
system. Using version control enables you to ensure that multiple developers are not
working on the same piece of source code at the same time—thus eliminating the
possibility of overwriting one another’s changes. Using source control also enables
you to create and track database release versions, clearly separating all of the code
that’s used to create each given version of the database.
In order to use Visual SourceSafe with SSMS and SQL Server, a Visual SourceSafe
server system must be installed and configured. In addition, the SourceSafe client
code must be installed on the computer that’s running SSMS. You install the Visual
SourceSafe client code by running the netsetup program, which will display an
installation wizard to step you through the client installation process. After the client
code has been installed, a Visual SourceSafe snap-in will be available to SSMS. You
can view the source control snap-in using the Tools | Options | Source Control Plug-in
Selection option.
Visual Studio 2005
The SSMS Query Editor is most useful for developing administrative scripts and
running ad hoc queries. However, its lack of debugging capabilities limits its use
for developing more complex T-SQL functions and stored procedures. Fortunately,
Visual Studio 2005 extends its support for database development by including a new
Database Project type that fully supports T-SQL development and debugging. The
Database project stores database references; can develop, run, and debug T-SQL
scripts; and can be used to create batch files to run multiple scripts. Like SSMS,
Visual Studio 2005 provides integrated source control via Visual SourceSafe and is
able to organize multiple related files into projects that you can manage using the
Solution Explorer. To create a new Database project, open Visual Studio 2005 and
select the File | New | Project option, which will display a New Project dialog like
the one shown in Figure 2-5.
To create a new Database Project, expand the Other Project Types node in Project
Types pane and then open up the Database node. Under the Templates pane, select
the Database Project template. Give your project a name and click OK. In Figure 2-5
you can see the project is named MyStoredProcedure. Clicking OK displays the Add
Database Reference dialog that is shown in Figure 2-6.
28 Microsoft SQL Server 2005 Developer’s Guide
Figure 2-5 New Database Project
Figure 2-6 Add Database Reference
Chapter 2: Developing with T-SQL 29
If you have created previous database projects or SQLCLR solutions that connect to
SQL Server, you’ll have existing connections as shown in Figure 2-6. You can either
choose an existing connection or click Add New Reference to create a new database
reference. In the example shown in Figure 2-6 you can see that an existing connection
to the AdventureWorks database on a SQL Server system named SQL2005-2 has been
selected. Clicking OK creates a new Visual Studio solution. The Visual Studio 2005
Solution Explorer will be shown on the right side of the screen; it provides an overview
of the connections, projects, and files inside a solution. To get an SSMS-like view of the
SQL Server databases and their objects, you can open the Server Explorer by selecting
the View | Server Explorer option from Visual Studio 2005’s IDE. A Visual Studio
project will appear like the one shown in Figure 2-7.
The Solution Explorer shown on the right-hand portion of Figure 2-7 is divided
into four sections: Change Scripts, Create Scripts, Queries, and Database References.
When a project is first created, all of these items will be empty, except for Database
References, where you can see the database connection that you selected earlier.
Figure 2-7 The New Visual Studio 2005 solution
30 Microsoft SQL Server 2005 Developer’s Guide
The Server Explorer window enables you to browse through the objects in the
SQL Server database. In addition, you can right-click the different objects shown
in the Server Explorer to display a context menu that allows you to work with the
objects. For instance, right-clicking a stored procedure will display a context menu
that enables you to work with stored procedures. The available options are: Add
New Stored Procedure, Open, Execute, Step Into Stored Procedure, Generate Create
Script to Project, Copy, Delete, Refresh, and Properties.
To create a new stored procedure, click Add New Item from the Project menu or
right-click a stored procedure in the Server Explorer and select the Add New Stored
Procedure option to display the Add New Item dialog you can see in Figure 2-8.
Visual Studio 2005 has a number of different database project templates that you
can see in Figure 2-8. These templates essentially supply you with the starter code
for your project. The existing templates can be customized, or you can also add your
own custom templates if you’ve developed your own set of starter code. To create
a stored procedure, select the Stored Procedure Script template, name the script, and
click OK. In Figure 2-8 you can see that the example stored procedure script will be
named MyStoredProcedure.sql.
After you click OK, Visual Studio 2005 will generate the stub code to drop and
create a stored procedure. However, the generated code is just a shell. It is up to you
to name the stored procedure and fill in the required logic. You can see the complete
example stored procedure in Figure 2-9.
Figure 2-8 Database Project: Add Item
Chapter 2: Developing with T-SQL 31
NOTE
Visual Studio supports the same Query Builder that was presented earlier in this chapter in the
section “SQL Server Management Studio.” To open the Query Builder in Visual Studio 2005, right-
click in the editing window and select the Insert SQL option from the context menu.
In Figure 2-9 you can see that the stored procedure has been named uspRead
PersonContactName. This example stored procedure reads through the Person
.Contacts table on the AdventureWorks database. The complete code to create the
uspReadPersonContactInfo stored procedure is shown in the following code listing:
IF EXISTS (SELECT * FROM sysobjects WHERE type = 'P' AND name =
'uspReadEmpMgrs')
BEGIN
DROP Procedure 'uspReadEmpMgrs'
END
GO
Figure 2-9 Editing a stored procedure in Visual Studio 2005
32 Microsoft SQL Server 2005 Developer’s Guide
CREATE Procedure 'uspReadEmpMgrs'AS
BEGIN
DECLARE @ThisEmp int
DECLARE EmpCursor CURSOR FOR
SELECT EmployeeID FROM AdventureWorks.HumanResources.Employee
OPEN EmpCursor
WHILE @@FETCH_STATUS = 0
BEGIN
FETCH NEXT FROM EmpCursor INTO @ThisEmp
PRINT 'EmployeeID:' + RTRIM(CAST(@ThisEmp AS VARCHAR(10)))
EXEC uspGetEmployeeManagers @ThisEmp
END
CLOSE EmpCursor
DEALLOCATE EmpCursor
END;
At the top of this code listing, you can see where an IF EXISTS test is used to
determine whether the stored procedure named uspReadEmpMgrs is present in the
AdventureWorks database. If so, then the procedure is dropped so that the following
create statement can proceed with no errors. This code and the following CREATE
PROCEDURE statement were both generated by Visual Studio’s stored procedure
template.
The code within the uspReadEmpMgrs stored procedure declares a variable to
hold the information read from the HumanResources.Employee table, and a cursor
is declared that enables the stored procedure to read through the HumanResources
.Employee table one row at a time. For each row read, the uspGetEmployeeManagers
stored procedure is called, passing the value of EmployeeID from the current row. At
the end of the routine, the cursor is closed and then released.
NOTE
More information on creating stored procedures and other T-SQL coding techniques is presented
later in this chapter. In general, using cursors limits application scalability, and therefore, they
should normally be avoided. However, in this case a cursor was used to make it easier to illustrate
the debugging and code-stepping techniques in Visual Studio 2005’s T-SQL debugger.
To create the stored procedure, save your script and then select the Run option from
Visual Studio 2005’s Project menu. This will delete and re-create the stored procedure
name uspReadEmpMgrs in the AdventureWorks database. Visual Studio 2005’s Output
window will show the result of the DROP and CREATE PROCEDURE statements.
To see the new stored procedure, go to the Server Explorer window and expand
the Data Connections node. Then expand the connection you are using, right-click the
Stored Procedure node, and select Refresh. The stored procedure you have created
should now be visible in the list of procedures.
Chapter 2: Developing with T-SQL 33
Executing and Debugging T-SQL with Visual Studio 2005
To execute a stored procedure using Visual Studio 2005, first open up Server Explorer
and expand the Data Connections node for the desired database connection. The example
that this chapter has used is sql2005-2.AdventureWorks. Next open the Stored Procedures
node, right-click the stored procedure that you want to run, and select Execute from the
pop-up menu. Visual Studio 2005 will execute the selected stored procedure, and the
results will be shown in the Output pane at the bottom of the Visual Studio IDE.
Debugging a stored procedure from Visual Studio is very similar. You can debug
a stored procedure from the Server Explorer. To debug a T-SQL stored procedure using
the Server Explorer, first open the Server Explorer, expand the desired Data Connections
node, expand the Stored Procedures node, and right-click the stored procedure that you
want to debug. This will display the context menu. From the context menu, select the
Step Into Stored Procedure option. If the stored procedure uses input parameters, Visual
Studio 2005 will display a Run Stored Procedure dialog that allows you to pass in the
required parameter values. In the case of the uspReadEmpMgrs stored procedure, no
input parameters are required and Visual Studio 2005 opens up into the stored procedure
debugger that you can see in Figure 2-10.
Figure 2-10 Debugging T-SQL stored procedures
34 Microsoft SQL Server 2005 Developer’s Guide
Visual Studio loads the stored procedure source code into the IDE, and execution
of the stored procedure stops at the first line of code. You can step through the T-SQL
source code by clicking the Step Into, Step Over, or Step Out icon on the toolbar or
by pressing f
10.You can inspect the contents of a variable using Visual Studio 2005’s
DataTips feature by moving the mouse over the variable, causing the DataTips windows
to automatically display. This is shown in Figure 2-10, where the contents of the
@ThisEmp variable are displayed in the DataTips window. You can also use one of the
Visual Studio debugging windows to see the contents of a T-SQL variable. The Visual
Studio 2005 debugging windows are displayed using the Debug | Windows option, and
the following windows are available:
᭤
Immediate Allows you to enter commands and change variables.
᭤
Locals Displays variables within the current scope.
᭤
Breakpoints Displays the set breakpoints.
᭤
Output Displays the output of the executing code.
᭤
Autos Displays variables used in the current statement.
᭤
Call Stack Displays the code call stack.
᭤
Threads Displays the ID of the current thread.
᭤
Watch Displays a watch window for watch variables that you defi ne.
As you step through the code, the output will be displayed in the Output window that
you can see at the bottom of Figure 2-10.
If the stored procedure you are debugging calls another stored procedure, you can
press f
11 when stepping over the line of code that calls the other procedure. This will
automatically load the called stored procedure into the debugger. You can then step
through the code in that procedure by pressing f
10 or clicking the Step Into or Step
Over icon in the Visual Studio 2005 toolbar. Clicking the Step Out icon will return
the debugger to the caller.
Creating Database Objects Using T-SQL DDL
This part of the chapter covers the basic features of the Data Definition Language
(DDL) parts of SQL. You see how to create several kinds of SQL objects, such as
databases, tables, views, and indexes.
Chapter 2: Developing with T-SQL 35
Databases
A database is the main container for tables, views, indexes, stored procedures, and
other database objects. Using the CREATE DATABASE statement, you can create
a new database along with the files used to store the database, you can create a database
snapshot, or you can attach a database using the detached files of a previously created
database. You can create 32,767 databases on an instance of SQL Server. The following
statement creates a database:
CREATE DATABASE MyNewDatabase
When a database is created, two files are also created: a primary file ( an .mdf file)
and a transaction log file (an .ldf file). It is recommended that you keep these files
in different drives from each other to simplify recovering your database in case your
database becomes corrupted. You can also specify multiple data and transaction log
files. The next code listing shows designating the .mdf and .ldf file locations in the
CREATE DATABASE statement:
CREATE DATABASE MyNewDatabase
ON PRIMARY
(Name ='MyDB_Data',
FileName= 'C:\DBData\MyDB_Data.Mdf',
Size=100MB,
MaxSize=200MB,
FILEGROWTH=10%)
LOG ON
(Name = 'MyDB_Log',
FileName= 'D:\DBLogs\MyDB_Log.Ldf',
Size=30MB,
MaxSize=50MB
,
FILEGROWTH=10%)
You can also use the CREATE DATABASE statement to create a database snapshot.
A database snapshot is a read-only, static view of an existing database at the time the
snapshot was created and does not create a log file. Database snapshots are a good way to
create backup copies of your database. The following code creates a database snapshot:
CREATE DATABASE MyDBSnapshot
ON
(NAME = MyDatabase_data,
FILENAME = 'C:\temp\MyDatabase_data.ss')
AS SNAPSHOT OF MyNewDatabase
36 Microsoft SQL Server 2005 Developer’s Guide
Tables
In your database, tables are objects that actually contain the data. In SQL Server
2005, you can create up to two billion tables per database and 1024 columns per
table. The total size of the table and the number of rows are restricted only by the
available storage, and the maximum number of bytes per rows is 8060. However, the
row restriction has been adapted for tables with column types of varchar, nvarchar,
varbinary, or sql_variant, or CLR user-defined types where the total combined table
width can possibly exceed 8060 bytes. Each of the individual columns must stay
within the 8060 byte limit, but the database engine moves the record column with
the largest width to another page in the ROW_OVERFLOW_DATA allocation unit
and maintains a 24-byte pointer on the original page.
The CREATE TABLE statement creates a database table. In the CREATE TABLE
statement you must specify the table name and the column names and column
definitions for the table. You can optionally specify other table creation options, such
as the database name, schema name, filegroup, and setup constraints. The following
code listing shows a basic CREATE TABLE statement for a new Warehouse table:
CREATE TABLE Sales.Warehouse
(HouseID INT PRIMARY KEY,
HouseName Char(50))
When this statement executes, a Warehouse table is created in the current database,
in the Sales schema. It contains two columns, a HouseID column that is defined as
an integer type and a HouseName column that is defined as a character type with
a length of 50. The HouseID column is also set as a primary key.
Constraints
Constraints let you define the rules regarding the values that go into columns in your
tables and help enforce the integrity of your database. The following list shows the
constraint options:
᭤
NOT NULL specifi es that the column cannot accept NULL values.
᭤
CHECK constraints limit the values that can be put in a column by evaluating
a search condition that is applied to the values that are entered for the column,
and returning True, False, or unknown.
᭤
UNIQUE constraints do not allow two rows in the table to have the same value
for the columns.
Chapter 2: Developing with T-SQL 37
᭤
PRIMARY KEY constraints identify the column or set of columns that have
values that uniquely identify a row in a table. The value of NULL cannot be
entered into a primary key column.
᭤
FOREIGN KEY constraints reference relationships between tables.
There are two types of constraints: column constraints and table constraints.
A column constraint is defined as part of a column definition in the CREATE TABLE
statement and applies to only that column. A table constraint is declared using the
CONSTRAINT keyword in the CREATE TABLE statement and can apply to more
than one column in a table.
Temporary Tables
You can create two types of temporary tables: local and global. Local temporary
tables are only visible in the current session, but global temporary tables are visible
to all sessions. Temporary tables are useful when you need to create a specific index
on them in your session, and they are automatically dropped when they go out of
scope.
Local temporary table names are designated with single number sign (#table_name)
prefix, and global temporary table names are designated with a double number sign
(##table_name) prefix. Temporary table names have a limit of 116 characters.
The next listing shows how to create a temporary table:
CREATE TABLE #tempWarehouse
(HouseCode Char(5) PRIMARY KEY,
HouseID INT)
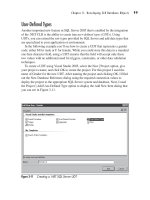
Data Types
With SQL Server 2005, not only will the CREATE TYPE statement allow you to
create an alias data type that is based on a SQL Server native data type, but you can
also create a user-defined data type (UDT) that is implemented through a class of an
assembly in the Microsoft .NET Framework common language runtime (CLR).
Creating aliases of native SQL Server data types gives more meaningful names
to data types that have specific characteristics for your users. This example shows
creating an alias type based on the native varchar type:
CREATE TYPE EMAILADDRESS FROM varchar(128) NOT NULL
38 Microsoft SQL Server 2005 Developer’s Guide
The following table shows the native SQL Server data types on which you can
base your alias data type:
bigint binary(n) bit char(n)
datetime decimal float image
int money nchar(n) ntext
numeric nvarchar(n | max) real smalldatetime
smallint smallmoney sql_variant text
tinyint uniqueidentifier varbinary(n | max) varchar(n | max)
To create a UDT from a CLR assembly, you must first register the assembly
in SQL Server using the CREATE ASSEMBLY statement. You can then use the
CREATE TYPE statement to create the UDT. The following listing shows creating
an assembly and then creating a UDT based on that assembly:
CREATE ASSEMBLY EmailAddress
FROM 'C:\temp\EmailAddress.dll'
CREATE TYPE EMAILADDRESS
EXTERNAL NAME EmailAddress.[EmailNameSpace.EmailClass]
A full description of creating an assembly for a UDT and deploying it to the
server is covered in Chapter 3.
Indexes
Creating indexes on your database objects can effectively save on I/O operations
and quicken processing time. Indexes can be created on tables, views, and temporary
tables, or an XML index can be given on a table. An index can even be created before
there is data in the table. The common types of indexes are NONCLUSTERED,
CLUSTERED, and UNIQUE. The maximum size for an index key is 900 bytes.
Indexes provide an ordered lookup of information for your queries and are
generally placed on key fields in your tables. However, a new feature of SQL Server
2005 allows you to include nonkey columns in your nonclustered indexes.
The following example shows a common CREATE INDEX statement. This
statement creates a nonunique, nonclustered index on the TerritoryID column of the
Sales.SalesPerson table:
CREATE INDEX IdxTerritoryID ON Sales.SalesPerson (TerritoryID)