Microsoft SQL Server 2005 Developer’s Guide- P5 docx
Bạn đang xem bản rút gọn của tài liệu. Xem và tải ngay bản đầy đủ của tài liệu tại đây (480.7 KB, 20 trang )
Chapter 3: Developing CLR Database Objects 79
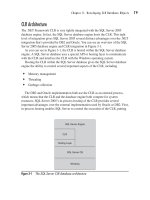
CLR Architecture
The .NET Framework CLR is very tightly integrated with the SQL Server 2005
database engine. In fact, the SQL Server database engine hosts the CLR. This tight
level of integration gives SQL Server 2005 several distinct advantages over the .NET
integration that’s provided by DB2 and Oracle. You can see an overview of the SQL
Server 2005 database engine and CLR integration in Figure 3-1.
As you can see in Figure 3-1, the CLR is hosted within the SQL Server database
engine. A SQL Server database uses a special API or hosting layer to communicate
with the CLR and interface the CLR with the Windows operating system.
Hosting the CLR within the SQL Server database gives the SQL Server database
engine the ability to control several important aspects of the CLR, including
᭤
Memory management
᭤
Threading
᭤
Garbage collection
The DB2 and Oracle implementation both use the CLR as an external process,
which means that the CLR and the database engine both compete for system
resources. SQL Server 2005’s in-process hosting of the CLR provides several
important advantages over the external implementation used by Oracle or DB2. First,
in-process hosting enables SQL Server to control the execution of the CLR, putting
SQL Server Engine
SQL Server OS
Windows
CLR
Hosting Layer
Figure 3-1 The SQL Server CLR database architecture
80 Microsoft SQL Server 2005 Developer’s Guide
essential functions such as memory management, garbage collection, and threading
under the control of the SQL Server database engine. In an external implementation
the CLR will manage these things independently. The database engine has a better
view of the system requirements as a whole and can manage memory and threads
better than the CLR can do on its own. In the end, hosting the CLR in-process will
provide better performance and scalability.
Enabling CLR Support
By default, the CLR support in the SQL Server database engine is turned off. This
ensures that update installations of SQL Server do not unintentionally introduce
new functionality without the explicit involvement of the administrator. To enable
SQL Server’s CLR support, you need to use the advanced options of SQL Server’s
sp_configure system stored procedure, as shown in the following listing:
sp_configure 'show advanced options', 1
GO
RECONFIGURE
GO
sp_configure 'clr enabled', 1
GO
RECONFIGURE
GO
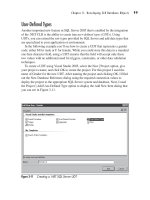
CLR Database Object Components
To create .NET database objects, you start by writing managed code in any one of
the .NET languages, such as VB, C#, or Managed C++, and compile it into a .NET
DLL (dynamic link library). The most common way to do this would be to use Visual
Studio 2005 to create a new SQL Server project and then build that project, which
creates the DLL. Alternatively, you create the .NET code using your editor of choice
and then compiling the code into a .NET DLL using the .NET Framework SDK.
ADO.NET is the middleware that connects the CLR DLL to the SQL Server database.
Once the .NET DLL has been created, you need to register that DLL with SQL
Server, creating a new SQL Server database object called an assembly. The assembly
essentially encapsulates the .NET DLL. You then create a new database object such as
a stored procedure or a trigger that points to the SQL Server assembly. You can see an
overview of the process to create a CLR database object in Figure 3-2.
Chapter 3: Developing CLR Database Objects 81
SQL Server .NET Data Provider
If you’re familiar with ADO.NET, you may wonder exactly how CLR database
objects connect to the database. After all, ADO.NET makes its database connection
using client-based .NET data providers such as the .NET Framework Data Provider
for SQL Server, which connects using networked libraries. While that’s great for
a client application, going through the system’s networking support for a database
call isn’t the most efficient mode for code that’s running directly on the server. To
address this issue, Microsoft created the new SQL Server .NET Data Provider. The
SQL Server .NET Data Provider establishes an in-memory connection to the SQL
Server database.
Assemblies
After the coding for the CLR object has been completed, you can use that code to
create a SQL Server assembly. If you’re using Visual Studio 2005, then you can
simply select the Deploy option, which will take care of both creating the SQL
Server assembly as well as creating the target database object.
If you’re not using Visual Studio 2005 or you want to perform the deployment
process manually, then you need to copy the .NET DLL to a common storage
location of your choice. Then, using SQL Server Management Studio, you can
execute a T-SQL CREATE ASSEMBLY statement that references the location of the
.NET DLL, as you can see in the following listing:
CREATE ASSEMBLY MyCLRDLL
FROM '\\SERVERNAME\CodeLibrary\MyCLRDLL.dll'
Code database object using
managed code and complie to DLL
Register DLL with SOL Server using
T-SQL create assembly
Create database object using
T-SQL Create
Figure 3-2 Creating CLR database objects
82 Microsoft SQL Server 2005 Developer’s Guide
The CREATE ASSEMBLY command takes a parameter that contains the path
to the DLL that will be loaded into SQL Server. This can be a local path, but more
often it will be a path to a networked file share. When the CREATE ASSEMBLY is
executed, the DLL is copied into the master database.
If an assembly is updated or becomes deprecated, then you can remove the
assembly using the DROP ASSEMBLY command as follows:
DROP ASSEMBLY MyCLRDLL
Because assemblies are stored in the database, when the source code for that
assembly is modified and the assembly is recompiled, the assembly must first
be dropped from the database using the DROP ASSEMBLY command and then
reloaded using the CREATE ASSEMBLY command before the updates will be
reflected in the SQL Server database objects.
You can use the sys.assemblies view to view the assemblies that have been added
to SQL Server 2005 as shown here:
SELECT * FROM sys.assemblies
Since assemblies are created using external files, you may also want to view
the files that were used to create those assemblies. You can do that using the sys.
assembly_files view as shown here:
SELECT * FROM sys.assembly_files
Creating CLR Database Objects
After the SQL Server assembly is created, you can then use SQL Server
Management Studio to execute a T-SQL CREATE PROCEDURE, CREATE
TRIGGER, CREATE FUNCTION, CREATE TYPE, or CREATE AGGREGATE
statement that uses the EXTERNAL NAME clause to point to the assembly that you
created earlier.
When the assembly is created, the DLL is copied into the target SQL Server
database and the assembly is registered. The following code illustrates creating the
MyCLRProc stored procedure that uses the MyCLRDLL assembly:
CREATE PROCEDURE MyCLRProc
AS EXTERNAL NAME
MyCLRDLL.StoredProcedures.MyCLRProc
The EXTERNAL NAME clause is new to SQL Server 2005. Here the
EXTERNAL NAME clause specifies that the stored procedure MyCLRProc will
Chapter 3: Developing CLR Database Objects 83
be created using a .SQL Server assembly. The DLL that is encapsulated in the SQL
Server assembly can contain multiple classes and methods; the EXTERNAL NAME
statement uses the following syntax to identify the correct class and method to use
from the assembly:
Assembly Name.ClassName.MethodName
In the case of the preceding example, the registered assembly is named
MyCLRDLL. The class within the assembly is StoredProcedures, and the method
within that class that will be executed is MyCLRProc.
Specific examples showing how you actually go about creating a new managed
code project with Visual Studio 2005 are presented in the next section.
Creating CLR Database Objects
The preceding section presented an overview of the process along with some
example manual CLR database object creation steps to help you better understand
the creation and deployment process for CLR database objects. However, while
it’s possible to create CLR database objects manually, that’s definitely not the most
productive method. The Visual Studio 2005 Professional, Enterprise, and Team
System Editions all have tools that help create CLR database objects as well as
deploy and debug them. In the next part of this chapter you’ll see how to create each
of the new CLR database objects using Visual Studio 2005.
NOTE
The creation of SQL Server projects is supported in Visual Studio 2005 Professional Edition and
higher. It is not present in Visual Studio Standard Edition or the earlier releases of Visual Studio.
CLR Stored Procedures
Stored procedures are one of the most common database objects that you’ll want to
create using one of the managed .NET languages. One of the best uses for CLR stored
procedures is to replace existing extended stored procedures. T-SQL is only able to
access database resources. In order to access external system resources, Microsoft has
provided support in SQL Server for a feature known as extended stored procedures.
Extended stored procedures are unmanaged DLLs that run in the SQL Server process
space and can basically do anything a standard executable program can do, including
84 Microsoft SQL Server 2005 Developer’s Guide
accessing system resources that are external to the database, such as reading and
writing to the file system, reading and writing to the Registry, and accessing the
network. However, because extended stored procedures run in the same process space
as the SQL Server database engine, bugs, memory violations, and memory leaks in the
extended stored procedure could potentially affect the SQL Server database engine.
CLR stored procedures solve this problem because they are implemented as managed
code and run within the confines of the CLR. Another good candidate for CLR stored
procedures is to replace existing T-SQL stored procedures that contain complex
logic and embody business rules that are difficult to express in T-SQL. CLR stored
procedures can take advantage of the built-in functionality provided by the classes in
the .NET Framework, making it relatively easy to add functionality such as complex
mathematical expressions or data encryption. Plus, since CLR stored procedure
are compiled rather than interpreted like T-SQL, they can provide a significant
performance advantage for code that’s executed multiple times. However, CLR stored
procedures are not intended to be used as a replacement for T-SQL stored procedures.
T-SQL stored procedures are still best for data-centric procedures.
To create a CLR stored procedure in Visual Studio 2005, first select the New | Project
option and then select the SQL Server Project template as is shown in Figure 3-3.
Give your project a name and click OK to create the project. In this example you
can see that I’ve used the name usp_ImportFile for my stored procedure. This stored
Figure 3-3 Creating a new SQL Server stored procedure project
Chapter 3: Developing CLR Database Objects 85
procedure shows how you can replace an extended stored procedure with a CLR
stored procedure. In this case the CLR stored procedure will read the contents of a
file and store it in a SQL Server column. After naming the project, click OK. Before
Visual Studio generates the project code, it displays the New Database Reference
dialog that you can see in Figure 3-4.
Visual Studio 2005 uses the New Database Reference dialog to create a connection
to your SQL Server 2005 system. That connection will be used to both debug and
deploy the finished project. Drop down the Server Name box and select the name
of the SQL Server that you want to use with this project. Then select the type of
Figure 3-4 The New Database Reference dialog
86 Microsoft SQL Server 2005 Developer’s Guide
authentication that you want to use and the database where the CLR stored procedure
will be deployed. In Figure 3-4 you can see that I’ve selected the SQL Server system
named SQL2005. The project will connect using Windows authentication, and the
stored procedure will be deployed to the AdventureWorks database. You can verify
the connection properties by clicking the Test Connection button. Once the connection
properties are set up the way you want, click OK. All of the required references will
automatically be added to your SQL Server project, and Visual Studio 2005 will
generate a SQL Server starter project.
NOTE
While Visual Studio 2005 lets you group multiple stored procedures, triggers, and other CLR database
objects in a single DLL, it’s really better to create each CLR database object as a separate DLL. This
gives you more granular control in managing and later updating the individual database objects.
Next, to create the CLR stored procedure, you can select the Project | Add Stored
Procedure option to display the Visual Studio installed templates dialog that’s shown
in Figure 3-5.
Figure 3-5 Adding a CLR stored procedure
Chapter 3: Developing CLR Database Objects 87
From the Add New Item dialog, select the Stored Procedure option from the list
of templates displayed in the Templates list and then provide the name of the stored
procedure in the Name field that you can see at the bottom of the screen. Here you can
see that the stored procedure will be created using the source file usp_ImportFile.vb.
Visual Studio 2005 will add a new class to your project for the stored procedure. The
generated class file is named after your stored procedure name and will include all of
the required import directives as well as the starter code for the stored procedure. You
can see the SQL Server CLR stored procedure template in Figure 3-6.
By default the SQL Server .NET Data Provider is added as a reference, along with
an include statement for its System.Data.SqlServer namespace. Plus, you can see the
System.Data reference, which provides support for ADO.NET and its data-oriented
objects such as the DataSet and the System.Data.SqlTypes namespace that provides
support for the SQL Server data types.
Figure 3-6 The CLR stored procedure template
88 Microsoft SQL Server 2005 Developer’s Guide
It’s up to you to fill in the rest of the code that makes the stored procedure work.
The following example illustrates the source code required to create a simple CLR
stored procedure that imports the contents of a file into a varchar or text column:
Imports System
Imports System.Data
Imports System.Data.Sql
Imports System.Data.SqlTypes
Imports Microsoft.SqlServer.Server
Imports System.IO
Partial Public Class StoredProcedures
<Microsoft.SqlServer.Server.SqlProcedure()> _
Public Shared Sub usp_ImportFile _
(ByVal sInputFile As String, ByRef sColumn As String)
Dim sContents As String
Try
Dim stmReader As New StreamReader(sInputFile)
sContents = stmReader.ReadToEnd()
stmReader.Close()
sColumn = sContents
Catch ex As Exception
Dim sp As SqlPipe = SqlContext.Pipe()
sp.Send(ex.Message)
End Try
End Sub
End Class
The first important point to note in this code is the directive that imports the
Microsoft.SqlServer.Server namespace. This enables the usp_ImportFile project to
use the SQL Server .NET Data Provider without always needing to reference the
fully qualified name. The second thing to notice is the <Microsoft.SqlServer.Server.
SqlProcedure()> attribute that precedes the method name; it tells the compiler this
method will be exposed as a SQL Server stored procedure. Next, you can see that
the default class name for this stored procedure is set to StoredProcedures. This
class contains a shared method named usp_ImportFile that accepts two parameters:
a string that specifies the name of the file that will be imported and a second input
parameter that specifies the name of a column that will contain the contents of the
file. For C#, the method must be defined as static. For VB.NET code, the method
would need to be defined as Shared.
Inside the usp_ImportFile method, a new string object named sContents is
declared that will contain the contents of the file. Next, a Try-Catch loop is used to
Chapter 3: Developing CLR Database Objects 89
capture any errors that may occur during the file import process. Within the Try-
Catch loop a new StreamReader named stmReader is created that will be used to
read the file from the operating system. The name of the file that will be read is
passed into the StreamReader’s instantiation call. Then the stmReader’s ReadToEnd
method is used to read the entire contents of the file into the sContent string variable.
After the contents of the file have been read, the stmReader StreamReader is closed
and the contents of the sContents variable are assigned to the SQL Server column.
If any errors occur while the input file is being read, then the code in the Catch
portion of the Try-Catch structure is executed. Within the Catch block a SqlPipe object
named sp is created and then used to send those errors back to the caller of the stored
procedure. This code block uses the SqlPipe object, which represents a conduit that
passes information between the CLR and the calling code. Here, the SqlPipe object
enables the stored procedure to pass error information to the external caller.
Setting the Stored Procedure Security
At this point the code is finished for the stored procedure, but because of security
concerns, it still can’t execute. By default SQL Server CLR objects can only access
database resources, and they cannot access external resources. In the case of the
usp_ImportFile example, the stored procedure needs to access the file system, so
the default security settings need to be changed. To enable external access, you need
to open the project’s properties and click the Database tab. Then in the Permissions
Level drop-down you need to change the value from Safe to External. More
information about the CLR security options is presented later in this chapter.
Deploying the Stored Procedure
After the CLR stored procedure source code has been compiled into an assembly,
you can then add that assembly to the database and create the CLR stored procedure.
You can do this in two ways. If you’re using Visual Studio 2005 to create the SQL
Server CLR database objects, then you can interactively deploy the CLR stored
procedure directly from Visual Studio. To deploy the stored procedure to SQL
Server, select the Build | Deploy Solution option from the Visual Studio menu.
You can perform the deployment manually as was shown in the earlier section
“Creating CLR Database Objects”. To do this, you essentially need to move the
compiled DLL to a directory or file share where it can be accessed by SQL Server.
Then run the CREATE ASSEMBLY statement to register the DLL and copy it into
the database.
create assembly usp_ImportFile
from 'C:\temp\usp_ImportFile.dll'
WITH PERMISSION_SET = EXTERNAL
90 Microsoft SQL Server 2005 Developer’s Guide
The CREATE ASSEMBLY statement copies the contents of the usp_ImportFile.dll
file in the c:\temp directory into the SQL Server database. The WITH PERMISSION
SET clause is used to specify that this assembly can access resources that are external
to the SQL Server database. That’s needed here because the stored procedure reads an
external file.
CREATE PROCEDURE usp_ImportFile
@filename nvarchar(1024),
@columnname nvarchar(1024) OUT
AS
EXTERNAL NAME usp_ImportFile.[usp_ImportFile.StoredProcedures]
.usp_ImportFile
The CREATE PROCEDURE statement is used to create a new SQL Server
stored procedure that uses the CLR assembly. This CLR stored procedure uses two
parameters. The first is an input parameter, and the second is an output parameter.
The EXTERNAL NAME clause uses a three-part name to identify the target method
in the DLL. The first part of the name refers to the assembly name. The second part
refers to the class. If the class is part of a namespace, as is the case here, then the
namespace must preface the class name and both should be enclosed in brackets.
Finally, the third part of the name identifies the method that will be executed.
Using the Stored Procedure
After the CLR stored procedure has been created, it can be called exactly like any
T-SQL stored procedure, as the following example illustrates:
DECLARE @myColumn ntext
EXEC usp_ImportFile 'c:\temp\testfile.txt' @myColumn
User-Defi ned Functions
Creating .NET-based user-defined functions (UDFs) is another new feature that’s
enabled by the integration of the .NET CLR. User-defined functions that return
scalar types must return a .NET data type that can be implicitly converted to a
SQL Server data type. Scalar functions written with the .NET Framework can
significantly outperform T-SQL in certain scenarios because unlike T-SQL functions,
.NET functions are created using compiled code. User-defined functions can also
return table types, in which case the function must return a result set.
To create a UDF using Visual Studio 2005, select the New | Project option and
then select the SQL Server Project template as shown in Figure 3-7.
Chapter 3: Developing CLR Database Objects 91
As in the Stored Procedure example that was presented earlier, first give your project
a name and click OK to create the project. In the example shown in Figure 3-7, you can
see that I’ve used the name ufn_GetDateAsString for my user-defined function. This
function returns a string value containing the system date and time. After naming the
project, click OK to display the New Database Reference dialog for the CLR Function
project, which will resemble the one shown in Figure 3-8.
NOTE
The Add Database Reference dialog is shown instead of the New Database Reference dialog when
a database reference has already been created. This would be the case if you created the
ufn_GetDateAsString function immediately after the usp_ImportFile project.
The New Database Reference dialog defines the connection between your Visual
Studio project and SQL Server. The project will connect to the SQL Server system
named sql2005, and the function will be deployed to the AdventureWorks database.
Once the Visual Studio project has been created and the connection has been
defined, you use the Project | Add Function menu option to display the Add New
Item dialog that you can see in Figure 3-9.
Figure 3-7 Creating a new SQL Server UDF project
92 Microsoft SQL Server 2005 Developer’s Guide
Visual Studio uses the SQL Server Function project template to create a starter
project that includes the reference to the SQL Server .NET Data Provider and a
basic function wrapper for your source code. It’s up to you to fill in the rest of
the code. The following code listing shows the completed CLR function, ufn_
GetDateAsString, that performs a basic date-to-string conversion:
Imports System
Imports System.Data
Imports System.Data.Sql
Figure 3-8 The New Database Reference dialog
Chapter 3: Developing CLR Database Objects 93
Imports System.Data.SqlTypes
Imports Microsoft.SqlServer.Server
Partial Public Class UserDefinedFunctions
<Microsoft.SqlServer.Server.SqlFunction()> _
Public Shared Function ufn_GetDateAsString() As SqlString
Dim dtDataTime As New DateTime
Return dtDataTime.ToString()
End Function
End Class
Here, the Microsoft.SqlServer.Server namespace is not needed, as this particular
function does not perform any data access. Next, Visual Studio 2005 generated
the UserDefinedFunctions class to contain all of the methods that this assembly
will expose as UDFs. You can also see that the <Microsoft.SqlServer.Server.
SqlFunction()> attribute is used to identify the ufn_GetDateAsString method as a
UDF. The code in this simple example just converts the system date to a string data
type that’s returned to the caller.
Figure 3-9 Adding a CLR user-defined function
94 Microsoft SQL Server 2005 Developer’s Guide
Deploying the Function
To create the function in a SQL Server database, the assembly must first be created,
as you saw in the stored procedure example. Then if you’re using Visual Studio
2005, you can simply select the Build | Deploy Solution option and you’re done.
If you’re doing this manually, you’ll need to copy the ufn_GetDataAsString.
dll file to a location that’s accessible by the SQL Server system and then create the
assembly, followed by the function. The following CREATE ASSEMBLY statement
can be used to copy the contents of ufn_GetDateAsString.dll into the SQL Server
database:
CREATE ASSEMBLY ufn_GetDataAsString
FROM '\\MyFileShare\Code Library\ufn_GetDataAsString.dll'
The CREATE FUNCTION statement is then used to create a new SQL Server
function that executes the appropriate method in the assembly. The following listing
illustrates how the CREATE FUNCTION statement can create a .CLR user-defined
function:
CREATE FUNCTION ufn_GetDateAsString()
RETURNS nvarchar(256)
EXTERNAL NAME
ufn_GetDateAsString.UserDefinedFunctions.ufn_GetDateAsString
For user-defined functions, the CREATE FUNCTION statement has been
extended with the EXTERNAL NAME clause, which essentially links the user-
defined function name to the appropriate method in the .NET assembly. In this
example, the ufn_GetDateAsString function is using the assembly named ufn_
GetDateAsString. Within that assembly, it’s using the UserDefinedFunctions class
and the ufn_GetDateAsString method within that class.
Using the Function
After the function has been created, it can be called like a regular SQL Server function.
You can see how to execute the GetDateAsString function in the following example:
SELECT dbo.GetDateAsString()
Triggers
In addition to stored procedures and user-defined functions, the new .NET integration
capabilities found in SQL Server 2005 also provide the ability to create CLR triggers.
To create a trigger using Visual Studio 2005, you start your project as you saw in the
Chapter 3: Developing CLR Database Objects 95
earlier examples. To create a trigger using Visual Studio 2005, select the New | Project
option, give your project a name, and click OK to create the project. For this project,
I used the name ti_ShowInserted for my trigger. This trigger essentially retrieves the
values of the row being inserted in a table and displays them. After naming the project
and clicking OK, I filled out the New Database Reference dialog using the same values
that were shown in the previous examples. Next, I used the Project | Add Trigger menu
option that you can see in Figure 3-10 to create a starter project for the CLR trigger.
As you saw in the earlier example of CLR database objects, you select the Trigger
option from the list of templates and then provide the name of the trigger in the
name prompt. Visual Studio 2005 will generate a starter project file that you can add
your code to. The starter project includes the appropriate import directives as well as
generating a class, in this case appropriately named Triggers, and a method named
ti_ShowInserted with its appropriate method attribute. The following code listing
shows the completed code for the CLR trigger named ti_ShowInserted:
Imports System
Imports System.Data
Imports System.Data.Sql
Imports System.Data.SqlTypes
Figure 3-10 Adding a CLR trigger
96 Microsoft SQL Server 2005 Developer’s Guide
Imports Microsoft.SqlServer.Server
Imports System.Data.SqlClient
Partial Public Class Triggers
' Enter existing table or view for the target and uncomment
the attribute line
<Microsoft.SqlServer.Server.SqlTrigger(Name:="ti_ShowInserted", _
Target:="Person.ContactType", Event:="FOR INSERT")> _
Public Shared Sub ti_ShowInserted()
Dim oTriggerContext As SqlTriggerContext = _
SqlContext.TriggerContext
Dim sPipe As SqlPipe = SqlContext.Pipe
If oTriggerContext.TriggerAction = TriggerAction.Insert Then
Dim oConn As New SqlConnection("context connection=true")
oConn.Open()
Dim oCmd As New SqlCommand("Select * from inserted", oConn)
sPipe.ExecuteAndSend(oCmd)
End If
End Sub
End Class
The example CLR trigger displays the contents of the data that is used for an
insert action that’s performed on the Person.ContactTypes table in the Adventureworks
database. The first thing to notice in this code listing is the Attribute for the ti_
ShowInserted subroutine (the code enclosed within the < > markers). The Attribute
is used to name the trigger and identify the table the trigger will be applied to as well
as the event that will cause the trigger to fire. When the Visual Studio 2005 trigger
template initially generates this Attribute, it is prefaced by a comment symbol—
essentially making the line a comment. This is because the trigger template doesn’t
know how or where you want the trigger to be used. In order for Visual Studio 2005
to deploy the trigger, you need to uncomment the Attribute line and then fill in the
appropriate properties. The following table lists the properties used by the Visual
Studio 2005 trigger template:
Property Name Description
Name The name the trigger will use on the target SQL Server system.
Target The name of the table that the trigger will be applied to.
Event The action that will fire the trigger. The following trigger events are supported:
FOR INSERT, FOR UPDATE, FOR DELETE, AFTER INSERT, AFTER UPDATE, AFTER
DELETE, INSTEAD OF INSERT, INSTEAD OF UPDATE, INSTEAD OF DELETE
Chapter 3: Developing CLR Database Objects 97
In this example, the resulting trigger will be named ti_ShowInserted. It will be
applied to the table named Person.ContactType, which is in the AdventureWorks
database, and the trigger will only be fired for an insert operation.
The primary code for the trigger is found within the ti_ShowInserted subroutine.
This code example makes use of another new ADO.NET object: SqlTriggerContext.
The SqlTriggerContext object provides information about the trigger action that’s
fired and the columns that are affected. The SqlTriggerContext object is always
instantiated by the SqlContext object. Generally, the SqlContext object provides
information about the caller’s context. Specifically, in this case, the SqlContext
object enables the code to access the virtual table that’s created during the execution
of the trigger. This virtual table stores the data that caused the trigger to fire.
Next, a SqlPipe object is created. The SqlPipe object enables the trigger to
communicate with the external caller, in this case to pass the inserted data values to
the caller. The TriggerAction property of the SqlContext object is used to determine
if the trigger action was an insert operation. Using the TriggerAction property is
quite straightforward. It supports the following values:
TriggerAction Value Description
TriggerAction.Insert An insert operation was performed.
TriggerAction.Update An update action was performed.
TriggerAction.Delete A delete action was performed.
If the TriggerAction property equals TriggerAction.Insert, then an insert was
performed and the contents of the virtual trigger table are retrieved and sent to the
caller using the SqlPipe object’s Execute method. In order to retrieve the contents
of the virtual table, a SqlConnection object and a SqlCommand object are needed.
These objects come from the System.Data.SqlClient namespace. You should note
that when used with server-side programming, the Connection String used by the
SqlConnection object must be set to the value of “context Connection=true”. Then
a SqlCommand object named oCmd is instantiated that uses the statement “Select *
from inserted” to retrieve all of the rows and columns from the virtual table that
contains the inserted values. Finally, the ExecuteAndSend method of SqlPipe object
is used to execute the command and send the results back to the caller.
Deploying the Trigger
Once the code has been created, you can either deploy it to the database using the
Visual Studio 2005 Build | Deploy solution option or manually drop and re-create
the assembly and any dependent objects you saw in UDF examples earlier in this
chapter.
98 Microsoft SQL Server 2005 Developer’s Guide
To manually deploy the code, you’d need to copy ti_ShowInserted.dll to the SQL
Server system or to a share that’s accessible to the SQL Server system and then
execute the following T-SQL Server commands:
Use AdventureWorks
create assembly ti_showinserted
from 'C:\temp\ti_ShowInserted.dll'
go
CREATE TRIGGER ti_ShowInserted
ON Person.ContactType
FOR INSERT
AS EXTERNAL NAME ti_ShowInserted.[ti_ShowInserted.Triggers].ti_ShowInserted
go
This example assumes that ti_ShowInsert.dll was copied into the c:\temp directory
on the SQL Server system. First, the Create Assembly statement is used to copy the
DLL into the SQL Server database and then the Create Trigger statement is used with
the As External Name clause to create a trigger named ti_ShowInserted and attach it
to the Person.ContactTypes table. As in the earlier examples, the As External Name
clause identifies the assembly using a three-part name: asssembly.class.method. Pay
particular attention to the class portion of this name. For triggers you must bracket the
class name and include the namespace just before the class name. In this example, the
assembly is named ti_ShowInserted. The Namespace is ti_ShowInserted. The class is
named Triggers, and the method is named ti_ShowInserted.
Using the Trigger
After the CLR trigger has been deployed, it will be fired for every insert operation
that’s performed on the base table. For example, the following INSERT statement will
add a row to the Person.ContactType table, which will cause the CLR trigger to fire:
INSERT INTO Person.ContactType VALUES(102, 'The Big Boss',
'2005-05-17 00:00:00.000')
The example trigger, ti_ShowInserted, performs a select statement on the inserted
row value. Then it uses the SqlPipe object to send the results back to the caller. In this
example the trigger will send the contents of the inserted row values back to the caller:
ContactTypeID Name ModifiedDate
21 The Big Boss 2005-05-17
00:00:00.000
(1 row(s) affected)
(1 row(s) affected)