Microsoft SQL Server 2005 Developer’s Guide- P4 pot
Bạn đang xem bản rút gọn của tài liệu. Xem và tải ngay bản đầy đủ của tài liệu tại đây (303.16 KB, 20 trang )
Chapter 2: Developing with T-SQL 59
The code block that you can see at the top of this listing essentially creates a new table
named dbo.FirstHalfDept. This table is based on the rows in the HumanResources
.Department table where the DepartmentID is less than or equal to 8. The next code
block creates a second new table named dbo.SecondHalfDept using the rows in the
HumanResources.Department table where the DepartmentID is greater than 8. The
UNION statement will then take these two results sets and join them back together into
a single result set.
The results of the union of the dbo.FirstHalfDept table and the dbo.SecondHalfDept
table are shown in the following listing. As you can see, the UNION operation
merged the two tables together back into a single table with the same contents as the
original HumanResources.Department table that was used as a basis to create the
other two tables:
(8 row(s) affected)
(8 row(s) affected)
DepartmentID Name GroupName
1 Engineering Research and Development
2 Tool Design Research and Development
3 Sales Sales and Marketing
4 Marketing Sales and Marketing
5 Purchasing Inventory Management
6 Research and Development Research and Development
7 Production Manufacturing
8 Production Control Manufacturing
9 Human Resources Executive General and Administration
10 Finance Executive General and Administration
11 Information Services Executive General and Administration
12 Document Control Quality Assurance
13 Quality Assurance Quality Assurance
14 Facilities and Maintenance Executive General and Administration
15 Shipping and Receiving Inventory Management
16 Executive Executive General and Administration
(16 row(s) affected)
Using Subqueries
A subquery is a query that’s nested inside of another T-SQL query. Subqueries can be
nested within SELECT, INSERT, UPDATE, or DELETE statements. More information
about using INSERT, UPDATE, and DELETE statements is presented later in this chapter.
60 Microsoft SQL Server 2005 Developer’s Guide
The following example illustrates using a subquery to retrieve all of the names of the
employees in the AdventureWorks database who have the title of Tool Designer:
SELECT FirstName, LastName, e.Title
FROM Person.Contact c
Join HumanResources.Employee e
On e.ContactID = c.ContactID
WHERE EmployeeID IN
(SELECT EmployeeID FROM
HumanResources.Employee WHERE Title = 'Tool Designer')
The SELECT statement specifies that the result set will contain three columns.
The FirstName and LastName columns come from the Person.Contact table, while
the Title column comes from the HumanResources.EmployeeID table. The Person.
Contact table and the HumanResources.EmployeeID table are joined on the ContactID
column. The subquery then further restricts the result set by specifying that only the
rows from the HumanResources.EmployeeID table will be used where the value in
the Title column is equal to ‘Tool Designer’.
FirstName LastName Title
Thierry D’Hers Tool Designer
Janice Galvin Tool Designer
(2 row(s) affected)
NOTE
In many cases, the same results that are produced using subqueries can also be produced
using joins.
Row-at-a-Time Processing Using Cursors
T-SQL is a set-at-a-time language that is designed for dealing with sets of data
at one time. However, there are circumstances where you may need to deal with
the data contained in a table or result set on a row-by-row basis. Cursors are the
T-SQL mechanism that enable single-row processing. Cursors limit scalability
because they hold locks on the table while the cursor is open; however, they do
provide a great deal of flexibility in dealing with individual results in a result set.
The following example illustrates using a cursor to process a result set based on
the HumanResources.Department table one row at a time.
Chapter 2: Developing with T-SQL 61
DECLARE @ThisDept INT
DECLARE DeptCursor CURSOR FOR
SELECT DepartmentID from HumanResources.Department
OPEN DeptCursor
WHILE @@FETCH_STATUS = 0
BEGIN
'Processing Department: ' + RTRIM(CAST(@ThisDept AS VARCHAR(10)))
FETCH NEXT FROM DeptCursor INTO @ThisDept
END
CLOSE DeptCursor
DEALLOCATE DeptCursor
At the top of this listing you can see where two variables are declared. The first
variable, named @ThisDept, will be used to store the value of the DepartmentID
column that’s returned by the cursor. The next variable is a handle for the cursor
named DeptCursor. The rows this cursor will operate over are defined in the following
SELECT statement, which returns just the DepartmentID column for all of the rows
in the HumanResources.Department table. After the cursor has been defined, it’s
then opened using the OPEN statement, and then a WHILE loop is used to process
all of the rows returned from the HumanResources.Department table. The WHILE
loop will continue processing until the value of the @@FETCH_STATUS variable
is not equal to zero, indicating that all of the rows have been read from the result set.
BEGIN and END statements delimit the block of T-SQL statements that will perform
the processing. In this example a simple PRINT statement is used to print the value of
the DepartmentID column read, and then a FETCH NEXT operation is used to read the
next row from the table. The output from this cursor processing example is listed here:
Processing Department: 1
Processing Department: 2
Processing Department: 3
Processing Department: 4
Processing Department: 5
Processing Department: 6
Processing Department: 7
Processing Department: 8
Processing Department: 9
Processing Department: 10
Processing Department: 11
Processing Department: 12
Processing Department: 13
Processing Department: 14
Processing Department: 15
Processing Department: 16
62 Microsoft SQL Server 2005 Developer’s Guide
SQL Server 2005 supports a number of different cursor types. The most common
ones are presented in Table 2-3. For a complete listing, refer to Books On-Line.
Using Common Table Expressions (CTE)
Another new T-SQL feature is support for common table expressions (CTEs). CTEs are
a lot like views; however, they are embedded in a query. The main reason Microsoft
Cursor Type Description
INSENSITIVE Defines a cursor that makes a temporary copy of the data to be used by the cursor. All
requests to the cursor are answered from this temporary table in tempdb. Modifications made
to base tables are not reflected in the cursor.
SCROLL Specifies that all fetch options (FIRST, LAST, PRIOR, NEXT, RELATIVE, ABSOLUTE) are available.
SCROLL cannot be specified if FAST_FORWARD is also specified.
READ ONLY Defines the cursor as read-only. The cursor cannot be referenced in a WHERE CURRENT OF
clause in an UPDATE or DELETE statement.
UPDATE Defines updatable columns that can be used with the cursor.
FORWARD_ONLY Specifies that the cursor can only be scrolled from the first to the last row. FETCH NEXT is the
only supported fetch option.
STATIC Defines a cursor that makes a temporary copy of the data to be used by the cursor. All
requests to the cursor are answered from this temporary table in tempdb. Modifications made
to base tables are not reflected in the cursor.
KEYSET Specifies that the membership of the rows in the cursor is fixed when the cursor is opened. The
set of keys that uniquely identify the rows are built into a table in tempdb.
DYNAMIC Defines a cursor that reflects all data changes made to the rows in its result set. The data
values, order, and membership of the rows can change on each fetch.
FAST_FORWARD Specifies a FORWARD_ONLY, READ_ONLY cursor with performance optimizations enabled.
FAST_FORWARD cannot be specified if SCROLL or FOR_UPDATE is specified.
READ_ONLY Defines the cursor as read-only. The cursor cannot be referenced in a WHERE CURRENT OF
clause in an UPDATE or DELETE statement.
SCROLL_LOCKS Specifies that positioned updates made through the cursor are guaranteed to succeed. SQL
Server locks the rows as they are read into the cursor to ensure their availability for updating.
OPTIMISTIC Specifies that positioned updates made through the cursor do not succeed if the row has been
updated, since it was read into the cursor. SQL Server does not lock rows. Instead it uses
timestamp column values or a checksum value to determine whether the row was modified. If
the row was modified, the attempted update will fail.
Table 2-3 Cursor Types
Chapter 2: Developing with T-SQL 63
introduced CTEs to SQL Server 2005 is to provide a mechanism for handling recursive
queries. Recursion is achieved by the fact that a CTE is allowed to refer to itself. To
avoid the possibility of overwhelming the system with a poorly constructed recursive
query, SQL Server implements a server-wide limit on the maximum depth of recursion
allowed, with a default maximum of 100 levels. A CTE is implemented as a part of
the WITH keyword and can be used with SELECT, INSERT, UPDATE, and DELETE
statements. To implement recursive queries using the new CTE, you must use a special
syntax as shown in the simple code example that follows. This example performs a
simple recursive query using the HumanResources.Employee table in the example
AdventureWorks database:
USE AdventureWorks
WITH EmployeeChart(EmployeeID, ManagerID, Title)
AS
(SELECT EmployeeID, ManagerID, Title
FROM HumanResources.Employee
WHERE EmployeeID = 3
UNION ALL
SELECT L2.EmployeeID, L2. ManagerID, L2.Title
FROM HumanResources.Employee AS L2
JOIN EmployeeChart
ON L2.ManagerID = EmployeeChart.EmployeeID)
SELECT * FROM EmployeeChart
To use a CTE, you first write a WITH clause, which you use to name the CTE
and specify the columns to bind to a SELECT statement. There must be a semicolon
in front of the WITH keyword if it is not the first statement in a batch. The first
SELECT statement is called the anchor member, and it must not refer to itself. In
this case, it retrieves the EmployeeID, ManagerID, and Title columns from the
AdventureWorks Employee table. The second SELECT statement references the
CTE and is called the recursive member. In this case it retrieves the same columns
and is joined to the anchor member on the ManagerID column. You can see the
results of this CTE in the following listing:
EmployeeID ManagerID Title
3 12 Engineering Manager
4 3 Senior Tool Designer
9 3 Design Engineer
11 3 Design Engineer
158 3 Research and Development Manager
263 3 Senior Tool Designer
64 Microsoft SQL Server 2005 Developer’s Guide
267 3 Senior Design Engineer
270 3 Design Engineer
5 263 Tool Designer
265 263 Tool Designer
79 158 Research and Development Engineer
114 158 Research and Development Engineer
217 158 Research and Development Manager
(13 row(s) affected)
Using PIVOT and UNPIVOT
The addition of the PIVOT and UNPIVOT relational operators is another new feature
found in SQL Server 2005’s T-SQL. The new PIVOT and UNPIVOT operators are most
useful for OLAP scenarios where you’re dealing with tabular data rather than relational
data. The PIVOT operator transforms a set of rows into columns. As you might expect,
the UNPIVOT operator reverses the PIVOT operator, transforming the pivoted columns
back into rows. However, depending on the situation, the UNPIVOT operation may not
exactly reverse the PIVOT operation. This situation occurs because the PIVOT operation
is often set up such that it will omit certain values. If a value is omitted during the PIVOT
operation, it obviously cannot be unpivoted. Therefore, the UNPIVOT operator doesn’t
always result in an exact mirror image of the original pivot condition.
Using SQL Server 2005’s new PIVOT operator, you can transform this result set,
which lists each year vertically, into a result set that lists the years horizontally for
each customer and sums up the number of orders for each year. The sample PIVOT
operation is shown in the following listing:
SELECT VendorID, [244] AS POCount1, [231] AS POCount2, [266] AS POCount3
FROM
(SELECT PurchaseOrderID, EmployeeID, VendorID
FROM Purchasing.PurchaseOrderHeader) p
PIVOT
(
COUNT (PurchaseOrderID)
FOR EmployeeID IN
( [244], [231], [266] )
) AS pvt
ORDER BY VendorID
Here the PIVOT operation is used with the SELECT statement to create a new result
set. The first value of the pivot operator identifies the value that will be placed in the
pivot column. In this example the COUNT(OrderID) aggregation sums up the number of
Chapter 2: Developing with T-SQL 65
orders for each pivot value. The FOR keyword identifies the column whose values will
be pivoted. This example shows the pivot operation being performed on the OrderYear
column. The values identified by the IN keyword list are the values from the pivoted
column that will be used as column headings. You can see the pivoted result set in the
following listing:
CustomerID 2000 2001 2002 2003 2004
1 3 2 1 1 1
Warning: Null value is eliminated by an aggregate or other SET operation.
(1 row(s) affected)
Modifying Data
SQL’s Data Manipulation Language (DML) provides data retrieval and update
capabilities for a relational database system such as SQL Server. In this part of the
chapter you will see how to use the Insert, Update, and Delete statements of DML.
The Insert statement inserts new rows into tables or views. The Update statement is
used to modify column values in existing rows. The Delete statement clears existing
data from rows in a table or view. You’ll also see how to use the BULK INSERT
statement to load data from a data file into a table and how to commit or roll back
database actions using transactions.
Insert
The INSERT statement is used to insert data into a table or a view. You can insert
data into your tables several different ways. You can insert data into a table by
simply specifying the table name, the columns into which you are inserting the data,
and the actual value of the data to insert. You can insert data into a table by using
a SELECT statement inside the INSERT statement to retrieve data from another
table and store the results into your table. You can also use the EXECUTE statement
inside the INSERT statement to execute a stored procedure and store the results in
your table. For the examples in the following sections of this chapter, we will create
a table called OrderSum. The code for creating our example table is listed here:
CREATE TABLE OrderSum
(OrderID INT,
CustomerID INT,
OrderDate NCHAR(10))
The example table OrderSum has two integer columns, OrderID and CustomerID,
and one character column, OrderDate.
66 Microsoft SQL Server 2005 Developer’s Guide
INSERT . . . VALUES To simply insert data into a table, you can specify the table
name, columns, and values in the INSERT statement. The following example inserts
one row of data into the example OrderSum table:
INSERT INTO OrderSum
(OrderID, CustomerID, OrderDate)
VALUES
(100, 1, '01/28/2005')
The results from the insert are shown here:
SELECT * FROM OrderSum
OrderID CustomerID OrderDate
100 1 01/28/2005
(1 row(s) affected)
When you insert a value into every column of the table, you can omit the list of
column names from the INSERT statement, but for clarity and to reduce errors, it is
recommended that you include the list of column names.
INSERT . . . SELECT Another way to insert data into your tables is to use a nested
SELECT statement within the INSERT statement. Using the SELECT statement,
you can retrieve data from another table and populate your table with the results. The
code for using a nested SELECT statement is shown here:
INSERT OrderSum
(OrderID, CustomerID, OrderDate)
SELECT
SalesOrderID,
CustomerID,
CONVERT(nchar(10), OrderDate, 101)
FROM Sales.SalesOrderHeader
WHERE SalesOrderID > 75120
As you can see, the SELECT statement is selecting three columns from the Sales
.SalesOrderHeader table where the SalesOrderID value is greater than 75120, and
the result of the select is inserted into the OrderSum table. The OrderSum table is
shown here:
Chapter 2: Developing with T-SQL 67
SELECT * FROM OrderSum
OrderID CustomerID OrderDate
100 1 01/28/2005
75121 15251 07/31/2004
75122 15868 07/31/2004
75123 18759 07/31/2004
(4 row(s) affected)
INSERT . . . TOP Using the TOP keyword, you can specify a certain number or
percent of rows to insert into your table. What follows is an example of using the
TOP keyword to insert only the top five rows into the OrderSum table from the
Sales.SalesOrderHeader table:
INSERT TOP (5) INTO OrderSum
(OrderID, CustomerID, OrderDate)
SELECT
SalesOrderID,
CustomerID,
CONVERT(nchar(10), OrderDate, 101)
FROM Sales.SalesOrderHeader
The results of the TOP keyword insert are shown here:
OrderID CustomerID OrderDate
100 1 01/28/2005
75121 15251 07/31/2004
75122 15868 07/31/2004
75123 18759 07/31/2004
43659 676 07/01/2001
43660 117 07/01/2001
43661 442 07/01/2001
43662 227 07/01/2001
43663 510 07/01/2001
(9 row(s) affected)
INSERT . . . EXECUTE The next example shows how to use an EXECUTE expression in
the INSERT statement to execute a stored procedure that returns rows to be inserted into
68 Microsoft SQL Server 2005 Developer’s Guide
the table. The stored procedure, usp_GetOneSalesOrder, takes one input parameter and
retrieves a row from the Sales.SalesOrderHeader table. The code to create the stored
procedure is shown here:
CREATE PROCEDURE usp_GetOneSalesOrder
(@InID int)
AS
(SELECT
SalesOrderID,
CustomerID,
CONVERT(nchar(10), OrderDate, 101)
FROM Sales.SalesOrderHeader
WHERE SalesOrderID = @inID)
The next code listing shows how to call the stored procedure in the INSERT
statement and the results of the insert:
INSERT OrderSum
(OrderID, CustomerID, OrderDate)
EXECUTE usp_GetOneSalesOrder 43670
SELECT * FROM OrderSum
OrderID CustomerID OrderDate
100 1 01/28/2005
75121 15251 07/31/2004
75122 15868 07/31/2004
75123 18759 07/31/2004
43659 676 07/01/2001
43660 117 07/01/2001
43661 442 07/01/2001
43662 227 07/01/2001
43663 510 07/01/2001
43670 504 07/01/2001
(10 row(s) affected)
Bulk Insert
You can use a BULK INSERT statement to load an entire database table or view from
a data file. In SQL Server 2005, BULK INSERT has been enhanced to enforce stricter
data validation and data checks of data read from a file. Forms of invalid data, such as
Chapter 2: Developing with T-SQL 69
uneven byte length for Unicode data, that could be bulk-loaded in earlier versions of
SQL Server might not load into the table now. In previous versions of SQL Server, the
data would be loaded into the table, and an error would be returned to the user during
the query if the data was invalid. By validating the data during the load, query failures
on invalid data are kept to a minimum.
The BULK INSERT statement allows you to specify the database, schema, and
table or view name to which the data is being loaded and the data file where the data
is being loaded from. The data file is in a user-defined format, and you can specify
to the BULK INSERT statement how the data is formatted. For example, you can
specify a field terminator character, specify a row terminator character, set the first
row and the last row of the data file to start and end the loading, specify the code
page of the data in the data file, and set to check constraints on the table or view
during the load process.
The following code listing shows the OrderSumFile.txt text file that contains data
to load to the OrderSum table:
100,1,01/28/2005
75121,15251,07/31/2004
75122,15868,07/31/2004
75123,18759,07/31/2004
43659,676,07/01/2001
43660,117,07/01/2001
43661,442,07/01/2001
43662,227,07/01/2001
43663,510,07/01/2001
43670,504,07/01/2001
The next listing shows the BULK INSERT statement for the OrderSumFile.txt
file. You can see that the location, including the full path for the file, is specified in
the FROM clause and that the FIELDTERMINATOR character is set to a comma (,)
and the ROWTERMINATOR character is set to the newline character (\n).
BULK INSERT OrderSum
FROM 'C:\temp\OrderSumFile.txt'
WITH
(
FIELDTERMINATOR =',',
ROWTERMINATOR ='\n'
)
(10 row(s) affected)
70 Microsoft SQL Server 2005 Developer’s Guide
Update
The UPDATE statement is used to modify the data in one or more columns in a table
or view. Updating data is typically straightforward, in that you state what object you
want to update and then state what you want to update it with. A simple update is
shown in the following listing:
UPDATE OrderSum
SET OrderID = 42530,
CustomerID = 510,
OrderDate = '09/22/2005'
You can see in this code listing that the OrderSum table is being updated and the
SET clause is used to set the values of 42530, 510, and 09/22/2005 into all the rows
of the table. In this case all of the rows are updated because no WHERE clause is
used that would filter the rows. The result is shown here:
OrderID CustomerID OrderDate
42530 510 09/22/2005
42530 510 09/22/2005
42530 510 09/22/2005
42530 510 09/22/2005
42530 510 09/22/2005
42530 510 09/22/2005
42530 510 09/22/2005
42530 510 09/22/2005
42530 510 09/22/2005
42530 510 09/22/2005
(10 row(s) affected)
The WHERE clause is used in the UPDATE statement to specify only certain rows
to be updated. In the next example, we will update the OrderDate field in the OrderSum
table where the value of the OrderDate column is 07/01/2001, setting it to 07/01/2005.
UPDATE OrderSum
SET OrderDate = '07/01/2005'
WHERE OrderDate = '07/01/2001'
(6 row(s) affected)
Chapter 2: Developing with T-SQL 71
Another way to modify data in your table or view is to update the data from another
table. The following example shows updating the OrderDate field of the OrderSum table
with the SalesOrderHeader.OrderDate information for rows that match OrderSum
.OrderID to SalesOrderHeader.SalesOrderID and the OrderID/SalesOrderID value is
between 43659 and 43670:
UPDATE OrderSum
SET OrderDate = CONVERT(nchar(10), soh.OrderDate, 101)
FROM Sales.SalesOrderHeader AS soh
JOIN OrderSum AS oSum
ON soh.SalesOrderID = oSum.OrderID
WHERE soh.SalesOrderID BETWEEN 43659 AND 43670
(6 row(s) affected)
The TOP clause allows you to specify a number of rows to modify or a percentage
of random rows to modify. The following code adds one (1) to four of the rows from
the OrderSum table:
UPDATE TOP (4) OrderSum
SET OrderID = OrderID + 1
Delete
You can use the DELETE statement to delete one or more rows from a table or view.
Any table that has all rows removed remains in the database. The DELETE statement
removes only rows from the table, not the table from the database. To remove the table
from the database, you use the DROP TABLE statement.
An example of the simplest form of the DELETE statement deletes all the rows
from a specified table as shown here:
DELETE FROM OrderSum
You can delete a set of rows from your table by using the WHERE clause and
specifying the criteria by which the rows are selected for removal. This code listing
shows deleting rows from the OrderSum table where the OrderID is less than 44000:
DELETE FROM OrderSum
WHERE OrderID < 44000
(4 row(s) affected)
72 Microsoft SQL Server 2005 Developer’s Guide
You can also delete rows from your table according to a subquery that is run against
another table. In the following example, rows from the OrderSum table will be deleted
where the OrderID column value matches the returned results of the SELECT query on
the Sales.SalesOrderHeader table:
DELETE FROM OrderSum
WHERE OrderID IN
(SELECT SalesOrderID
FROM Sales.SalesOrderHeader
WHERE TaxAmt > 2000.00)
(2 row(s) affected)
Using the TOP keyword in the DELETE statement is another way to delete rows
from your table. The TOP keyword allows you to specify a number of rows to delete
or a percentage of random rows to delete. The following code deletes 2.5 percent of
the rows from the OrderSum table.
DELETE TOP (2.5) PERCENT
FROM OrderSum
(2 row(s) affected)
INSTEAD OF Triggers
New to SQL Server 2005 is an INSTEAD OF trigger that you can define on an UPDATE
or DELETE statement. Earlier versions of SQL Server supported only AFTER triggers
defined on UPDATE and DELETE statements. If you define an INSTEAD OF trigger on
an UPDATE or DELETE action, the trigger is executed instead of the action, allowing
you to enforce business rules and data integrity.
The following example shows how to add a DML trigger named NoInsert to the
INSERT DDL statements:
CREATE TRIGGER NoInsert
ON OrderSum
INSTEAD OF INSERT
AS
If @@rowcount >= 10 BEGIN
PRINT 'Cannot insert any more rows in OrderSum table'
RETURN
END
result:
Cannot insert any more rows or in OrderSum table
A message is printed out if a user tries to insert rows into the OrderSum table.
Chapter 2: Developing with T-SQL 73
Using Transactions
Using transaction processing, you can maintain database integrity by ensuring that
batches of SQL operations execute completely or not at all. You start a transaction
by using the BEGIN TRANSACTION statement. You then process SQL statements
until you commit the transaction to be written or roll back the transaction to its state
before the transaction started.
The following shows an example of the BEGIN TRANSACTION statement and
a COMMIT TRANSACTION statement:
BEGIN TRANSACTION
DELETE OrderSum WHERE OrderID = 24550
DELETE SalesOrderHeader WHERE SalesOrderID = 24550
COMMIT TRANSACTION
In this example, order number 24550 is deleted completely from the database.
This involves updating two tables, the OrderSum table and the SalesOrderHeader
table. A transaction block is used to ensure that the order is not partially deleted.
The COMMIT statement writes the change to the tables only if no errors occur. In
other words, if the first DELETE worked but the second DELETE did not work, the
DELETE transactions would not be committed.
The ROLLBACK TRANSACTION statement undoes all data modifications made
from the start of the transaction. Resources held by the transaction are also freed.
The following example undoes a DELETE statement on the OrderSum table:
BEGIN TRANSACTION
DELETE OrderSum
ROLLBACK TRANSACTION
Using Output
Another new T-SQL feature found in SQL Server 2005 is the ability to produce output
from T-SQL INSERT, UPDATE, and DELETE DML statements. The new OUTPUT
clause returns the modified data. For instance, the following DELETE statement
removes all of the rows from the OrderSum table:
DECLARE @MyOrderSumTVar TABLE(
OrderID int,
CustomerID int,
OrderYear nchar(10));
DELETE FROM OrderSum
OUTPUT DELETED.* INTO @MyOrderSumTVar
SELECT * FROM @MyOrderSumTVar
74 Microsoft SQL Server 2005 Developer’s Guide
Here the OUTPUT DELETED.* clause specifies that all deleted rows will be
output. With earlier versions of SQL Server, you would just see the number of rows
that were affected by the statement. You can see the results of the new T-SQL DML
Output clause here:
OrderID CustomerID OrderDate
75121 15251 07/31/2004
75122 15868 07/31/2004
75123 18759 07/31/2004
(3 row(s) affected)
Error Handling
Another important advance embodied by T-SQL in SQL Server 2005 is improved
transaction abort handling. With SQL Server 2005, a new Try-Catch model has
been added to the transaction. The new Try-Catch structure enables transaction
abort errors to be captured with no loss of the transaction context. With SQL Server
2000, although you can abort a transaction, there’s no way to maintain the context
of the transaction so that you can completely recover the aborted transaction. SQL
Server 2005’s new Try-Catch transaction abort handling enables you to maintain the
complete context of the aborted transaction, giving you the option to re-create the
transaction. The following code listing shows the basic T-SQL Try-Catch structure:
BEGIN TRY
SELECT 1/0
END TRY
BEGIN CATCH
SELECT
ERROR_NUMBER() AS ErrorNumber,
ERROR_SEVERITY() AS ErrorSeverity,
ERROR_LINE() as ErrorLine,
ERROR_MESSAGE() as ErrorMessage,
ERROR_STATE() as ErrorState,
ERROR_PROCEDURE() as ErrorProcedure
END CATCH
The SELECT statement in the Try block produces a simple divide by zero error.
The error is caught in the Catch block, and the information about the error is shown
in the results here:
Chapter 2: Developing with T-SQL 75
(0 row(s) affected)
ErrorNumber ErrorSeverity ErrorLine ErrorMessage
8134 16 2 Divide by zero error encountered.
(1 row(s) affected)
Summary
T-SQL is SQL Server 2005’s core development language. T-SQL can be used to create
custom management scripts capable of creating and managing all of the SQL Server
operations. In addition, you can use T-SQL to create datacentric stored procedures,
functions, and triggers that make up the core of most database applications. In this
chapter you learned how to use SQL Server Management Studio and Visual Studio
2005 to develop and debug T-SQL scripts. You also saw how to use T-SQL DDL
to create all of the core SQL Server database objects. Then you saw how to use the
basic T-SQL DML statements to query and join data as well as perform updates, use
transactions, and perform error handling.
This page intentionally left blank
77
CHAPTER
3
Developing CLR Database
Objects
IN THIS CHAPTER
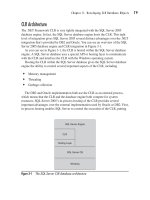
Understanding CLR and SQL Server 2005 Database Engine
Creating CLR Database Objects
Debugging CLR Database Objects
Copyright © 2006 by The McGraw-Hill Companies. Click here for terms of use.
78 Microsoft SQL Server 2005 Developer’s Guide
T
he integration of the .NET Framework’s Common Language Runtime
(CLR) with SQL Server 2005 is arguably the most significant new develop-
ment featured in the SQL Server 2005 release. The integration of the CLR
brings with it a whole host of new capabilities, including the capability to create
database objects using any of the .NET-compatible languages, including C#,
Visual Basic, and managed C++. In this chapter you’ll learn about how Microsoft
has implemented the new .NET CLR integration with SQL Server as well as see how
to create CLR database objects.
Understanding CLR and SQL Server 2005
Database Engine
The integration of the CLR with SQL Server extends the capability of SQL Server
in several important ways. While T-SQL, the existing data access and manipulation
language, is well suited for set-oriented data access operations, it also has
limitations. Designed more than a decade ago, T-SQL is a procedural language, not
an object-oriented language. The integration of the CLR with SQL Server 2005
brings with it the ability to create database objects using modern object-oriented
languages like VB.NET and C#. While these languages do not have the same
strong set-oriented nature as T-SQL, they do support complex logic, have better
computation capabilities, provide access to external resources, facilitate code reuse,
and have a first-class development environment that provides much more power than
the old Query Analyzer.
The integration of the .NET CLR with SQL Server 2005 enables the development of
stored procedures, user-defined functions, triggers, aggregates, and user-defined types
using any of the .NET languages. The integration of the .NET CLR with SQL Server
2005 is more than just skin deep. In fact, the SQL Server 2005 database engine hosts
the CLR in-process. Using a set of APIs, the SQL Server engine performs all of the
memory management for hosted CLR programs.
The managed code accesses the database using ADO.NET in conjunction with
the new SQL Server .NET Data Provider. A new SQL Server object called an
assembly is the unit of deployment for .NET objects with the database. To create
CLR database objects, you must first create a DLL using Visual Studio 2005. Then
you import that DLL into SQL Server as an assembly. Finally, you link that assembly
to a database object such as a stored procedure or a trigger. In the next section you’ll
get a more detailed look at how you actually use the new CLR features found in SQL
Server 2005.