Microsoft SQL Server 2005 Developer’s Guide- P8 pptx
Bạn đang xem bản rút gọn của tài liệu. Xem và tải ngay bản đầy đủ của tài liệu tại đây (360.7 KB, 20 trang )
Chapter 5: Developing with Notification Services 139
2005’s efficient relational database engine to join the rows from the events table with
the rows in the subscriptions table in order to match events to subscriptions.
Developing Notification Services Applications
In the first part of this chapter you got an overview of the new SQL Server 2005
Notification Services. In this next section, you learn about the actual steps required
to develop SQL Server 2005 Notification Services applications. First, you’ll see
a quick overview of the development process, and next we’ll dive in and build a
sample Notification Services application.
The process for developing Notification Services applications begins with
defining the rules that govern how the application works. Next, you must compile
the application. Then you need to construct an interface that allows the user to add
subscriptions to the application. Finally, you’ll need to add any custom components
that may be needed by the application. Let’s look at each of these steps in more detail.
Defi ning the Application
The Notification Services developer uses a combination of XML and T-SQL to
define the application’s schema and rules. When you define the schema and the
rules for a Notification Services application, you are essentially describing the
events that the application will monitor as well as the application’s subscriptions, its
notifications, and the logic that will be used to match the events to the subscriptions.
The Notification Services application’s rules are primarily defined in two files—an
application definition file and an instance configuration file. Although you can also
define them using the Notification Management Objects (NMO) API interface, the
application definition file and the instance configuration file are typically created
using a standard text editor or an XML-aware editor such as Visual Studio 2005 or
XMLSpy. More detailed information about the specific contents of the application
definition file and the instance configuration file is presented later in this chapter.
Compiling the Application
After the schema and the rules have been created, the next step in building
a Notification Services application is to compile all of the code and register a service
that will run the Notification Services applications. To compile the application, you
can use the Notification Services node in the SQL Server Management Studio or the
nscontrol command-line utility. These tools create the Notification Services instance
and database, if required.
140 Microsoft SQL Server 2005 Developer’s Guide
Building the Notifi cation Subscription Management Application
The first two steps build the core engine of the Notification Services application.
However, users still need a way of adding their own subscription information to the
application. To enable users to enter their subscription information, the Notification
Services application needs a subscription management interface, which is typically
a Web or Windows application built using ASP.NET, VB.NET, or C# technologies.
This application updates entries to the Notification Services subscription database.
Adding Custom Components
Finally, the last step in building your Notification Services application is to optionally
add any custom components that might be needed by the application. Custom
components would include any required custom event providers, content formats,
or notification delivery protocols that are not included in the base SQL Server 2005
Notification Services product.
Notification Services Application Sample
The sample Notification Services application that is presented in the next part of this
section represents a simple shipping notification application. In this example, events
consist of shipment information, which identifies a store ID that will receive the
shipment as well as the date, the product ID, the product name, and the number of
units that are being shipped. Subscribers will select a store ID where they want to be
notified about the incoming shipments.
To make all of this work, an event will be created that is fired if the value of the
store ID for a shipment matches a store ID that has been registered by a subscriber.
The user must enter a subscription for that event, and a rule must be added to allow
the Notification Services engine to match the events to the subscriptions. When
an event matches the event rule, the distribution provider will create a file-based
notification. Now that you’ve got an overview of the sample Notification Services
application, let’s see how it’s built.
Creating the ICF File
Notification Services applications consist of two primary files: an application
definition file (ADF) and an instance configuration file (ICF)—both XML files that
must be built in accordance with their XSD schemas. The XSD schemas serve to make
sure that both documents possess the required elements and attributes. The ICF and
Chapter 5: Developing with Notification Services 141
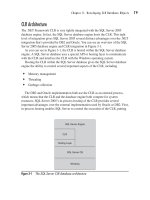
ADF files are essentially the source code for a Notification Services application.
The ADF file is the core file for the Notification Services; the different sections
of the ADF describe the event, subscription, rules, and notification structure that
will be employed by the Notification Services application. The ICF file defines the
name of the Notification Services application as well as its instance name and the
application’s directory path. The instance name is essentially the name of a Windows
service that runs the Notification Services application.
Fortunately you’re not required to build these files from scratch. SQL Server 2005
Notification Services provides two templates that can be used as a starting point
for creating your own ADF and ICF files. The Minimal template includes only the
absolutely essential elements required by the ADF file. The Complete ADF template
includes all of the possible elements in the ADF template. However, if you’re tempted
to use the Complete template, be aware that some of the entries are actually conflicting
and cannot be present in the same file. In most cases it’s better to start with the Minimal
template and add in just those elements that your application requires. Both templates
can be found in the SQL Server BOL by searching for ADF Template.
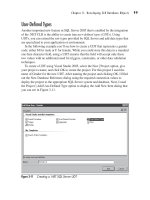
To create the ADF and ICF files using Visual Studio 2005’s XML editor, open
Visual Studio 2005 and then select the File | New | File option to display the New
File dialog shown in Figure 5-2.
Figure 5-2 Creating an ADF file in Visual Studio 2005
142 Microsoft SQL Server 2005 Developer’s Guide
The default filename is created as XMLFile1.xml. Select the File | Save XMLfile1
.xml As option and save the file into the desired target directory using the name of
icf.xml. Repeat the process for adf.xml, except that when you select the Save As
option, you’ll name the file adf.xml.
The following listing shows the ICF file, icf.xml, that’s used for this Notification
Services sample application:
<?xml version="1.0" encoding="utf-8"?>
<NotificationServicesInstance
xmlns:xsd=" />xmlns:xsi=" />xmlns=" />ConfigurationFileSchema">
<ParameterDefaults>
<Parameter>
<Name>_NSEngineInstance_</Name>
<Value>%COMPUTERNAME%</Value>
</Parameter>
<Parameter>
<Name>_ServerName_</Name>
<Value>%COMPUTERNAME%</Value>
</Parameter>
<Parameter>
<Name>_InstancePath_</Name>
<Value>c:\temp\</Value>
</Parameter>
</ParameterDefaults>
<InstanceName>NSAppInstance</InstanceName>
<SqlServerSystem>%_NSEngineInstance_%</SqlServerSystem>
<Applications>
<Application>
<ApplicationName>NSApp</ApplicationName>
<BaseDirectoryPath>%_InstancePath_%</BaseDirectoryPath>
<ApplicationDefinitionFilePath>
%_InstancePath_%\ADF.xml
</ApplicationDefinitionFilePath>
<Parameters>
<Parameter>
<Name>_ServerName_</Name>
<Value>%_ServerName_%</Value>
Chapter 5: Developing with Notification Services 143
</Parameter>
<Parameter>
<Name>_InstancePath_</Name>
<Value>%_InstancePath_%</Value>
</Parameter>
</Parameters>
</Application>
</Applications>
<DeliveryChannels>
<DeliveryChannel>
<DeliveryChannelName>FileChannel</DeliveryChannelName>
<ProtocolName>File</ProtocolName>
<Arguments>
<Argument>
<Name>FileName</Name>
<Value>%_InstancePath_%\NSAppNotification.htm</Value>
</Argument>
</Arguments>
</DeliveryChannel>
</DeliveryChannels>
</NotificationServicesInstance>
You can see that the ICF is a relatively simple document. This file can be created
using any text or XML-aware editor. The first section to notice is the Parameters
section, which enables you to more easily deploy the Notification Services application
to other systems by passing in environment variables to the creation scripts. In this
example the _NSEngineInstance_ and _ServerName_ variables are assigned the value
of the local computer name. The _InstancePath_ variable is assigned the value of
c:\temp. This designates where the ICF and ADF files will be located. The next section
contains the elements that define the Notification Services instance.
The most important points to notice are the SqlServerSystem, InstanceName,
ApplicationName, BaseDirectoryPath, and ApplicationDefinitionFilePath tags.
As you might guess, the SqlServerSystem name tag contains the name of the SQL
Server system that will host the Notification Services databases, the InstanceName
tag defines the instance name for the application, and the ApplicationName tag
defines the name of the Notification Services application. In both cases, the values
for these come from the parameter variables that were defined in the Parameters
section. You should note that when the parameter variables are used in the ICF or
ADF file, they are enclosed using % % symbols. The BaseDirectoryPath tells the
compiler where to find the ADF file, and the ApplicationDefinitionFilePath tag
144 Microsoft SQL Server 2005 Developer’s Guide
supplies the name of the XML document that contains the ADF code. One point to
notice here is that the Application section also contains a Parameters section that
defines the parameters that are passed to the ADF file. In order to use parameters in
the ADF file, they must be defined in the Application section of the ICF file. Here
you can see that the parameters are basically chained together. The Application
section defines a _ServerName_ variable that in turn gets its value from the %_
ServerName _% variable in the ICF file. Likewise an _InstancePath_ variable is
defined that gets its value from the %_ InstancePath _% variable.
In addition to these basic items, the ACF also uses the DeliveryChannel tag to
define how notifications will be delivered. In this example, the DeliveryChannel tag
uses the File protocol to deliver notifications to the file system, and notifications will
be output to the file named NSAppNotifications.htm in the directory c:\temp, which
was defined by the %_InstancePath_% variable.
Defi ning the ADF File
While the ACF file describes the server and the locations where the application
definition files are found, the core definitions that control how a Notification
Services application works are described in the ADF.
Defining the Events
The first thing that needs to be done to build the example application is to build
the schema for the events. The event defines the data that can be submitted to your
Notification Services application and is used to generate notifications. In the ADF
file the EventClasses element contains the XML code that’s used to define the
Notification Services events. The EventClasses element can contain multiple event
definitions. Each event definition is described in a separate EventClass subelement.
The following code section from the first part of the adf.xml file illustrates the XML
code used to define the schema and events for the NSApp sample application:
<?xml version="1.0" encoding="utf-8" ?>
<Application xmlns:xsd="
xmlns:xsi=" />xmlns=" />ApplicationDefinitionFileSchema">
<! Describe the Events >
<EventClasses>
<EventClass>
Chapter 5: Developing with Notification Services 145
<EventClassName>ShipData</EventClassName>
<Schema>
<Field>
<FieldName>StoreID</FieldName>
<FieldType>int</FieldType>
<FieldTypeMods>not null</FieldTypeMods>
</Field>
<Field>
<FieldName>Date</FieldName>
<FieldType>datetime</FieldType>
<FieldTypeMods>not null</FieldTypeMods>
</Field>
<Field>
<FieldName>ProductID</FieldName>
<FieldType>int</FieldType>
<FieldTypeMods>not null</FieldTypeMods>
</Field>
<Field>
<FieldName>ProductName</FieldName
<FieldType>nvarchar(40)</FieldType>
<FieldTypeMods>not null</FieldTypeMods>
</Field>
<Field>
<FieldName>Units</FieldName>
<FieldType>int</FieldType>
<FieldTypeMods>not null</FieldTypeMods>
</Field>
</Schema>
<IndexSqlSchema>
<SqlStatement>
CREATE INDEX ShipDataIndex ON ShipData ( StoreID )
</SqlStatement>
</IndexSqlSchema>
</EventClass>
</EventClasses>
All ADF files must begin with the application elements, which, as you might
guess, represent the Notification Services application. This code snippet shows the
beginning tag. (The ending tag is shown in a later code snippet.) The primary elements
within the application element that define the application are the EventClasses,
SubscriptionClasses, and NotificationClasses elements.
146 Microsoft SQL Server 2005 Developer’s Guide
NOTE
This is not the entire adf.xml file. The adf.xml file is continued in the following listings.
The definition of the event is shown in the EventClasses section of the ADF.
Because this sample application uses only a single event, the EventClasses element
contains only one EventClass element, named ShipData. The Schema section within
the EventClass element defines the event schema that the Notification Services
application will monitor. In this case, five columns are defined: the StoreID column,
which identifies a store ID to receive a shipment, a Date representing the shipment
date, ProductID and ProductName fields to contain the product identification, and
a Units field that shows the number of units in the shipment. Notification Services
uses these definitions to create a table in the Notification Services database. The
IndexSqlSchema tag is use to create an index over the StoreID column.
Defining the ADF Providers
After defining the events that the application will monitor, the next step in defining
the ADF application is to specify the provider that will deliver those events to the
application. What follows is the next section of the adf.xml file. Here you can see the
definition for the SQL Server event provider that is used to connect the Notification
Services application to SQL Server:
<Providers>
<HostedProvider>
<ProviderName>SQLData</ProviderName>
<ClassName>SQLProvider</ClassName>
<SystemName>%_ServerName_%</SystemName>
<Schedule>
<Interval>P0DT00H00M60S</Interval>
</Schedule>
<Arguments>
<Argument>
<Name>EventsQuery</Name>
<Value>SELECT StoreID, Date, ProductID, ProductName, Units
FROM ShipData</Value>
</Argument>
<Argument>
<Name>EventClassName</Name>
<Value>ShipData</Value>
</Argument>
</Arguments>
</HostedProvider>
</Providers>
Chapter 5: Developing with Notification Services 147
The Providers section of the ADF describes the event providers used by the
Notification Services application. In this example, the HostedProvider element
defines the SQL Server event provider. In other words, a SQL Server table will
be the source of the events that the application is monitoring. The ProviderName
element is used to assign a name to the provider, and the SystemName element
supplies the name of the SQL Server system that the provider will connect to. Here
you can see that the actual value is supplied by the %_ServerName_% variable that
was passed in from the ICF file.
The Schedule element defines how often the provider will connect to the system;
this interval is governed by the value defined in the Interval element. The value in
the Interval element uses the XML duration data type. The 0DT portion of this value
represents a date interval with a value of 0. The 00HR portion represents an hourly
interval with a value of 0. The 00M segment represents a minute interval with a
value of 0. The 60S portion represents a second’s interval with a value of 60. The
value of P0DT00H00M60S thus sets the polling interval to 60 seconds.
The Arguments element supplies the query that will be used to extract data from
the event source. In this example, the contents of the ShipData table will be retrieved
every 60 seconds for the event class named ShipData that was defined in the preceding
EventClass element.
Defining the ADF Subscription
Once the events have been described, the next step in creating the ADF file is defining
the subscriptions. When you define a subscription class, you are defining the schema
that will be used to store subscriptions. To create the subscription class, you define
fields for the subscription data you collect. As you saw earlier with the event class,
Notification Services uses the subscription class definitions to create database
objects like tables, views, indexes, and stored procedures for the subscription class.
The following code listing shows the next portion of the adf.xml file, which
describes the subscriptions used by the sample Notification Services application:
<! Describe the Subscription >
<SubscriptionClasses>
<SubscriptionClass>
<SubscriptionClassName>ShipStore</SubscriptionClassName>
<Schema>
<Field>
<FieldName>DeviceName</FieldName>
<FieldType>nvarchar(255)</FieldType>
<FieldTypeMods>not null</FieldTypeMods>
</Field>
148 Microsoft SQL Server 2005 Developer’s Guide
<Field>
<FieldName>SubscriberLocale</FieldName>
<FieldType>nvarchar(10)</FieldType>
<FieldTypeMods>not null</FieldTypeMods>
</Field>
<Field>
<FieldName>StoreID</FieldName>
<FieldType>int</FieldType>
<FieldTypeMods>not null</FieldTypeMods>
</Field>
</Schema>
<IndexSqlSchema>
<SqlStatement>
CREATE INDEX ShipStoreIndex ON ShipStore( StoreID )
</SqlStatement>
</IndexSqlSchema>
<EventRules>
<EventRule>
<RuleName>ShipEventRule</RuleName>
<EventClassName>ShipData</EventClassName>
<Action>
INSERT INTO ShipNotifications(SubscriberId,
DeviceName, SubscriberLocale, StoreId, Date,
ProductID, ProductName, Units)
SELECT s.SubscriberId, s.DeviceName, s.SubscriberLocale,
e.StoreID, e.Date, e.ProductID, e.ProductName, e.Units
FROM ShipData e,ShipStore s WHERE e.StoreId = s.StoreId;
</Action>
</EventRule>
</EventRules>
</SubscriptionClass>
</SubscriptionClasses>
Like EventClasses, the SubscriptionClasses section of the ADF document can
describe multiple subscriptions, where each subscription is described in a separate
SubscriptionClass element. This example uses a single SubscriptionClass named
ShipStore. The Schema section describes the data used by the subscription. The
DeviceName field identifies that target device type. The SubLocale is used to
optionally change the language that the subscriber will use to receive the notification.
Chapter 5: Developing with Notification Services 149
The StoreID field identifies the store for which events will be subscribed to. The
IndexSqlSchema element is used to create an index on the StoreID column. As you
saw with the event class, Notification Services uses the subscription class descriptions
to create database objects when the Notification Services application is generated.
After the subscriptions have been set up, the next section of code in the
EventRules element defines the logic that the Notification Services application will
use to match events to subscriptions. While the Event and Subscription information
is defined using XML, the event rules are created using T-SQL code that’s stored in
the EventRules Action element. In this example, the most important thing to notice
is that when the join condition is met, a row for the subscriber will be created. In
other words, when an event record is added where the StoreID matches the StoreID
from a subscription record, then a new row will be written to the ShipNotifications
table creating a notification. That notification will contain the information
from the subscription, including the SubscriberID, the DeviceName, and the
SubscriberLocale, as well as information from the event, including the StoreID, the
Date, the ProductID, the ProductName, and the number of Units.
Defining the ADF Notification Schema
The final part of the ADF file defines the notification as described in the
NotificationClasses section. The NotificationClasses describe how the notification
information will be delivered. The NotificationClasses element could describe
multiple notification types, where each type is described in its own NotificationClass
element. Because this sample application uses only one type of notification, the
NotificationClasses section contains a single NotificationClass element.
<! Describes the Notifications >
<NotificationClasses>
<NotificationClass>
<NotificationClassName>ShipNotifications</NotificationClassName>
<Schema>
<Fields>
<Field>
<FieldName>StoreID</FieldName>
<FieldType>int</FieldType>
</Field>
<Field>
<FieldName>Date</FieldName>
<FieldType>datetime</FieldType>
</Field>
150 Microsoft SQL Server 2005 Developer’s Guide
<Field>
<FieldName>ProductID</FieldName>
<FieldType>int</FieldType>
</Field>
<Field>
<FieldName>ProductName</FieldName>
<FieldType>nvarchar(40)</FieldType>
</Field>
<Field>
<FieldName>Units</FieldName>
<FieldType>int</FieldType>
</Field>
</Fields>
</Schema>
<! Specify the Content Format XSLT >
<ContentFormatter>
<ClassName>XsltFormatter</ClassName>
<Arguments>
<Argument>
<Name>XsltBaseDirectoryPath</Name>
<Value>%_InstancePath_%</Value>
</Argument>
<Argument>
<Name>XsltFileName</Name>
<Value>NSApp.xslt</Value>
</Argument>
</Arguments>
</ContentFormatter>
<Protocols>
<Protocol>
<ProtocolName>File</ProtocolName>
</Protocol>
</Protocols>
</NotificationClass>
</NotificationClasses>
<Generator>
<SystemName>%_ServerName_%</SystemName>
</Generator>
<Distributors>
Chapter 5: Developing with Notification Services 151
<Distributor>
<SystemName>%_ServerName_%</SystemName>
</Distributor>
</Distributors>
<! ApplicationExecutionSettings >
<ApplicationExecutionSettings>
<QuantumDuration>PT15S</QuantumDuration>
<DistributorLogging>
<LogBeforeDeliveryAttempts>false</LogBeforeDeliveryAttempts>
<LogStatusInfo>false</LogStatusInfo>
<LogNotificationText>false</LogNotificationText>
</DistributorLogging>
<Vacuum>
<RetentionAge>P1D</RetentionAge>
<VacuumSchedule>
<Schedule>
<StartTime>3:00:00</StartTime>
<Duration>P0DT02H00M00S</Duration>
</Schedule>
</VacuumSchedule>
</Vacuum>
</ApplicationExecutionSettings>
</Application>
In this listing you can see that the notification class is named ShipNotifications.
The ShipNotifications class’ Schema element defines the information that will
be sent to the subscriber. Here you can see that the values of the StoreID, Date,
ProductID, ProductName, and Units will be sent as part of the notification.
The ContentFormatter element defines how the notification will be formatted
when it is sent to the subscriber. This example illustrates using the built-in
XSLTFormatter. The Arguments element describes the directory where the XSLT
file is found as well as the name of the file. In this listing you can see that the XSLT
file is found in the %_InstancePath_% directory (which, as you saw in the ICF file,
points to C:\temp) and is named NSApp.xslt. The value of File in the Protocols
section indicates that the notification will be generated in the file system.
The Generator, Distributor, and ApplicationExecutionSettings elements specify
the SQL Server system that will be used to generate notifications, the system that
will be used to distribute notifications, the interval at which system performance
counters will be updated, and the interval at which the notification tables will be
cleaned up of undelivered notifications, respectively.
152 Microsoft SQL Server 2005 Developer’s Guide
Formatting the Notification Output
In the preceding listing you saw that the notification was formatted using the
NSApp.xslt style sheet. You can see what that example style sheet looks like in the
following listing:
<?xml version="1.0" encoding="UTF-8" ?>
<xsl:stylesheet version="1.0"
xmlns:xsl=" /><xsl:template match="notifications">
<HTML>
<BODY>
<xsl:apply-templates />
<I>
This message was generated using
<BR/>Microsoft SQL Server Notification Services
</I><BR/><BR/>
</BODY>
</HTML>
</xsl:template>
<xsl:template match="notification">
<P>
There is a shipment for: <B><xsl:value-of select="StoreID"/></B>
<BR/>Date: <B><xsl:value-of select="Date"/></B>
<BR/>Product ID: <B><xsl:value-of select="ProductID"/></B>
<BR/>Product Name: <B><xsl:value-of select="ProductName"/></B>
<BR/>Units: <B><xsl:value-of select="Units"/></B>
</P>
</xsl:template>
</xsl:stylesheet>
The style sheet used to format the Notification Services application’s output is
a standard XSLT style sheet. In the template section you can see where the StoreID,
Date, ProductID, ProductName, and Units fields from the NotificationClass are
displayed in the notification.
Building the Notifi cation Services Application
After the required XML and T-SQL application code has been created, you’re ready
to build the Notification Services application. Notification Services applications can
be created interactively using the SQL Server Management Studio, or they can be
created using the nscontrol utility. First, you’ll see how to create them using the SQL
Server Management Studio, and then you’ll see how you can create Notification
Services applications using the nscontrol commands in the batch file.
Chapter 5: Developing with Notification Services 153
Building Notification Services Applications Using SQL Server Management Studio
After the icf.xml and adf.xml files that define the Notification Services have been
created, you can use them to build your Notification Services application from the SQL
Server Management Studio by first opening the Object Browser and right-clicking
the Notification Services node. Then you can select the New Notification Services
Instance option from the context menu to display a screen like the one in Figure 5-3.
To create a new Notification Services application using the New Notification
Services Instance dialog, you click Browse and navigate to the directory that contains
your application’s instance configuration file. For this example that file is named
icf.xml, so next you select the icf.xml file and click OK. If you want the application
Figure 5-3 The New Notification Services Instance dialog
154 Microsoft SQL Server 2005 Developer’s Guide
to be immediately enabled after it is created, you need to check the Enable Instance
After It Is Created check box. Clicking OK generates the Notification Services
application and displays the summary dialog that you can see in Figure 5-4.
At this point, although the application has been created and enabled, it’s still
not ready to be used. Before it can be used, the application must be registered and
then started. Registering the application creates a Windows service, and starting the
application starts that service. To register the newly created Notification Services
application, open the SQL Server Management Studio and then, in Object Explorer,
expand the Notification Services node. Right-click the name of your Notification
Services application; in this example, the name is NSAppInstance. Select the Tasks
option and then select Register. Then select the Create Windows Service check box
and enter the account and password that will be used to start the Windows service.
If you use SQL Server Authentication, you’ll need to enter the SQL Server login
information as well. Otherwise, just use the default value of Windows Authentication
and then click OK. This will register the Notification Services instance, create the
Windows service, and create a set of performance counters for the application.
Figure 5-5 illustrates registering the Notification Services application.
After the Notification Services application has been registered, you can go ahead
and start the application. To do so, go to SQL Server Management Studio, open
Object Explorer, and navigate to the Notification Services node. Right-click your
application, in this example NSAppInstance, and then choose Start.
Figure 5-4 The Notification Services Creation Status dialog
Chapter 5: Developing with Notification Services 155
NOTE
If the Notification Services application doesn’t start, the most likely problem is the account used by
the Notification Services Windows service. Check to make sure you are using a valid account and it
has permissions to access the Notification Services databases. Otherwise, you will need to recheck
the values used in your ADF.
Building Notification Services Applications Using nscontrol
As an alternative to using the SQL Server Management Studio to create Notification
Services applications, you can use the nscontrol commands. A command-line tool
that’s used to create and administer Notification Services applications, nscontrol
Figure 5-5 Registering the Notification Services application
156 Microsoft SQL Server 2005 Developer’s Guide
understands a number of different action commands that you can use to work with
Notification Services applications. Table 5-1 lists the available nscontrol action
commands.
Creating a Notification Services application is a multistep process. First, the
application needs to be created using the nscontrol create command. This creates the
database used by the Notification Services application. Then the application needs
to be registered using the nscontrol register command. This creates the service that
is used to run the application. Finally, the application needs to be enabled using
the nscontrol enable command. The following batch file illustrates the command
sequence needed to create the example NSSample Notification Services application:
echo off
cls
set NSdir="C:\Program Files\Microsoft SQL Server\90\NotificationServices\9.0.242\bin"
echo ========================================
echo Beginning NSAppInstance Creation
echo ========================================
echo .
echo Create the application databases
%NSdir%\nscontrol create -in ICF.xml
echo Register the application
%NSdir%\nscontrol register -name NSAppInstance –service
nscontrol Command Description
nscontrol create Creates a Notification Services application and its databases.
nscontrol delete Deletes a Notification Services application and its databases.
nscontrol disable Disables a Notification Services application.
nscontrol displayargumentkey Displays the key used to encrypt event data.
nscontrol enable Enables a Notification Services application.
nscontrol listversions Displays the version of Notification Services and any registered applications.
nscontrol register Registers a Notification Services application.
nscontrol status Displays the status of a Notification Services application.
nscontrol unregister Unregisters a Notification Services application.
nscontrol update Updates a Notification Services application.
Table 5-1 Nscontrol Commands
Chapter 5: Developing with Notification Services 157
echo Enable the application
%NSdir%\nscontrol enable -name NSAppInstance
echo start the NS app as a service
net start NS$NSAppInstance
echo Display the status of the app
%NSdir%\nscontrol status -name NSAppInstance
The nscontrol create command’s –in argument specifies the name of the Notification
Services ICF. In this example, the ICF is named icf.xml. Running the nscontrol create
command creates two databases on the server, NSSampleInstanceMain and NSSamp
leInstanceNSSample, which store the Notification Services application definition and
data events.
The nscontrol register command uses the –name argument to identify the instance
name of the Notification Services application to register. The –service switch directs
it to register a service named NS$NSSampleInstance.
The nscontrol enable command uses the –name parameter to identify the instance
name of the application that will be enabled.
Once the application is enabled, its service can be started using the net start
command. For testing, you can also execute the NS$NSSampleInstance application
from the command prompt or the Run dialog.
Updating Notification Services Applications
Like all other applications, Notification Services applications need to be updated
and changed from time to time. To re-create the Notification Services application,
you could delete the entire application instance and then re-create, enable, and
register the application. However, in most cases there’s no need for that many steps.
Instead, to update a Notification Services application, you can make changes to your
application definition file and then save those changes. Next, open up SQL Server
Management Studio and then use Object Explorer to navigate to your Notification
Services application listed under the Notification Services node. First, disable the
application by right-clicking it and then selecting Disable. Next, right-click the
application again and then select Tasks | Update.
As you may have guessed, you can also update a Notification Services application
using the nscontrol commands.
158 Microsoft SQL Server 2005 Developer’s Guide
Building a .NET Subscription/Event Application
While the core logic of a Notification Services application is defined using the ICF
and the ADF files, subscribers, devices, and subscriptions are typically created by
client applications that use the Notification Services API. You can see an example
Notification Services client application in Figure 5-6.
The sample application shown in Figure 5-6 adds subscribers, devices, and
subscriptions to the Notification Services application using the Subscribers tab. The
Event tab is used to generate event data, and the Notification tab is used to display
the resulting notification.
Client applications connect to Notification Services using the managed code APIs
that Microsoft provides with SQL Server 2005 Notification Services. Microsoft’s
.NET Framework APIs enable you to add, update, and delete subscribers, as well
as subscriber devices and subscriptions. While the Notification Services API is
provided via managed code classes, you can also access the API from unmanaged
code by using Win32-based COM applications.
The Notification Services API is located in Microsoft.SqlServer.NotificationServices
.dll, which must be added to your .NET project as a reference. Then you can use the
Notification Services classes to manage subscriptions to your Notification Services
applications. To add a reference to the Notification Services API, select the Project |
Add Reference menu option to display the Add Reference dialog. Scroll through the
list until you see Microsoft.SqlServer.NotificationService, and then select the object,
as shown in Figure 5-7. Clicking OK adds the reference to your project.
Figure 5-6 The Subscription/Event application