Microsoft SQL Server 2005 Developer’s Guide- P20 ppt
Bạn đang xem bản rút gọn của tài liệu. Xem và tải ngay bản đầy đủ của tài liệu tại đây (454.23 KB, 20 trang )
Chapter 10: SQL Server Integration Services 399
Package Security
SSIS packages can contain sensitive authentication information, and saving those
packages opens up the possibly of a security exposure. To protect against this
possibility, SSIS supports the encryption of sensitive information. SSIS uses the Triple
Data Encryption Standard (3DES) cipher algorithm with a key length of 192 bits, and
packages are encrypted either when they are created or when they are exported. SSIS
package encryption is controlled using the package’s ProtectionLevel property, which
supports the following values:
ProtectionLevel Value Description
DontSaveSensitive Sensitive data is not saved in the package. When the package is opened, the
sensitive data will not be present and the user will need to provide the sensitive
data.
EncryptSensitiveWithUserKey Sensitive data is saved as a part of the package and is encrypted with a key that’s
based on the user who created or exported the package. Only that user will be
able to run the package. If another user opens the package, the sensitive data will
not be available.
EncryptSensitiveWithPassword Sensitive data is saved as a part of the package and is encrypted with a user-
supplied password. When the package is opened the user must provide a password
to access the sensitive data. If the password is not provided, the package will be
opened without the sensitive data.
EncryptAllWithPassword The entire contents of the package will be encrypted with a user-supplied password.
When the package is opened, the user must provide the package’s password. If the
password is not provided, the package will not be able to be opened.
EncryptAllWithUserKey The entire contents of the package will be encrypted with a key that’s based on
the user key for the user who created or exported the package. Only the user who
created the package will be able to open it.
ServerStorage The package is not encrypted. Instead, the package’s contents are secured
according to the database’s object access security. If the ServerStorage value
is used, the package must be saved to the sysdtspackages90 table in the msdb
database. It cannot be saved to the file system.
Deploying Packages
SSIS supports the deployment of packages through the use of the package configurations
and the ability to easily deploy packages using the package deployment utility. In the
next section you’ll see how to create a configuration for an SSIS package as well as how
to use the package deployment utility.
400 Microsoft SQL Server 2005 Developer’s Guide
Creating Confi gurations
Configuration information enables an SSIS package to automatically load external
information at run time. You can use configurations to pass in variable values and
connection information to an SSIS package at run time. For variables, the Value
property is assigned with the value that is passed in when the package is run.
Likewise, for connection information the Connection Manager’s properties such as
ConnectionString, ServerName, and InitialCatalog can be assigned to dynamically
change the server system that will be used by an SSIS package.
SSIS configurations are created by using the Package Configuration Organizer,
which is started from BIDS. To create a package configuration for an Integration
Services project, select the SSIS | Package Configurations option in BIDS. This will
start the Package Configurations Organizer tool that is shown in Figure 10-24.
You can create multiple configurations for a single package. The configurations are
applied to the package in the order that they are displayed in the Package Organizer.
You can use the directional arrows shown on the right side of Figure 10-24 to move
a configuration up or down in the list.
You can also create a single configuration that can be applied to multiple
packages. For example, if you want to deploy a package to several systems where
the only difference in the package properties is the server name, you could create
a configuration that uses an environment variable to supply the server name.
Figure 10-24 The Package Configuration Organizer
Chapter 10: SQL Server Integration Services 401
To create a configuration, first check the Enable Package Configurations check
box and then click Add to start the SSIS Configuration Wizard. The Configuration
Wizard steps you through creating a package configuration. Click past the Wizard
welcome screen to display the Configuration Type dialog shown in Figure 10-25.
The Configuration Type drop-down enables you to select the data source that will
be used by the configuration. SSIS package configuration supports the following
configuration types:
᭤
XML confi guration fi le
᭤
Environment variable
᭤
Registry entry
᭤
Parent package variable
᭤
SQL Server
Figure 10-25 Configuration Type
402 Microsoft SQL Server 2005 Developer’s Guide
In Figure 10-25 you can see that the type of Environment variable has been
selected, along with the COMPUTERNAME variable. XML file configurations and
SQL Server configurations support the selection of multiple properties in a single
configuration object. The other configuration types permit only one configurable
property per configuration. Click Next to display the dialog shown in Figure 10-26,
which shows where you select the package’s properties or variables that will have
their values set by the configuration when the package is run.
In Figure 10-26 you can see that the properties for the OLE DB Connection Manager
named SQL2005-2.AventureWorks1 have been expanded and that the ServerName
property has been selected. This will enable the COMPUTERNAME environment
variable to be substituted for the OLE DB Connection Manager’s ServerName in the
connection string when this package attempts to use the OLE DB connection. Clicking
Next displays the configuration summary screen, which allows you to view and confirm
your selections. If you need to make changes, you can use the Back button to page back
through the Configuration Wizard and make any needed changes. Otherwise, clicking
Next adds the configuration to the package and will display the Package Configuration
Organizer with your configuration as you can see in Figure 10-27.
Figure 10-26 Select Target Property
Chapter 10: SQL Server Integration Services 403
Later if you need to modify a configuration, click Edit to rerun the Configuration
Wizard and select different objects and different properties.
Using the Package Deployment Utility
SSIS contains a handy feature called the Package Deployment Utility that allows you
to assemble your SSIS packages, package configurations, and supporting files into
a deployment folder and build an executable setup file to install your packages. To
create the Package Deployment Utility, right-click the project properties in the BIDS
Solution Explorer pane and then select the Properties option to display the Property
Pages dialog box as shown in Figure 10-28.
Set the CreateDeploymentUtility option to True on the project property page.
Then build your project by selecting the Build Solution option on the BIDS
menu. Building the project creates the DTSDeploymentManifest.xml file and
copies the project along with the DTSInstall.exe utility to the bin/Deployment
folder or to the location specified in the DeploymentOutputPath property. The
DTSDeploymentManifest.xml file lists the packages and the package configurations
in the project. The DTSInstall.exe program runs the Package Installer Wizard.
Figure 10-27 The completed package configuration
404 Microsoft SQL Server 2005 Developer’s Guide
Programming with the SQL Server
Integration Services APIs
In addition to providing a graphical development environment, SSIS also provides an
object model API for both the DTR and the DTP that enables you to programmatically
create and execute SSIS packages. Programming the data flow engine enables you to
automate the creation and configuration of the SSIS tasks, transformations, and data
flow tasks, and to create custom components. The run-time engine is exposed both
as a native COM object model and as a fully managed object model. The SSIS data
flow engine is written in native code, but it can be controlled programmatically using
a managed .NET object model. In this next section you’ll see an example of how you
can use the SQL Server Integration Services API in a console application to create and
execute a new SSIS package.
The SQL Server Integration Services API is located in a number of different
assemblies: Microsoft.SqlServer.ManagedDTS.dll, SqlServer.DTSPipelineWrap
.dll, and SqlServer.DTSRuntimeWrap.dll. To use these assemblies in your program,
you need to add references for each of them in your project. Then you can use
Figure 10-28 Package Deployment Utility
Chapter 10: SQL Server Integration Services 405
the Integration Services classes to create both SSIS DTP and DTR objects in your
application. To add references to your project, select the Project | Add Reference menu
option to display the Add Reference dialog. Scroll through the list until you see the
Microsoft.SqlServer.DTSPipelineWrap, Microsoft.SqlServer.DTSRuntimeWrap, and
Microsoft.SqlServer.ManagedDTS assemblies listed in the Component Name list.
Select these assemblies as is illustrated in Figure 10-29. Click OK to add the references
to your project.
Next, add import directives for the SSIS assembly namespaces to the Declarations
section of your project. Using import directives enables you to use the classes in the
imported namespaces without having to fully qualify the names. The following code
listing shows how to create import directives for the SSIS namespace:
Imports Microsoft.SqlServer.Dts.Runtime
Imports Microsoft.SqlServer.Dts.Pipeline.Wrapper
Imports SSISRuntime = Microsoft.SqlServer.Dts.Runtime.Wrapper
NOTE
To avoid compile-time errors due to common object names, it’s best to use an alternative import
name when importing both Microsoft.SqlServer.DtsPipeline.Wrapper and Microsoft.SqlServer
.DtsRuntime.Wrapper. That’s why the third Imports statement uses the name SSISRuntime.
Figure 10-29 Adding references to SSIS assemblies
406 Microsoft SQL Server 2005 Developer’s Guide
After adding the SSIS references to your project and import directives for the
appropriate namespaces, you’re ready to begin using the SSIS APIs in your application.
The following code sample shows how you can create a package using the SSIS APIs:
Module CreateSSISPackage
Sub Main()
' Create the Package
Console.WriteLine("Creating the MySSIS Package")
Dim myPackage As New Package()
myPackage.PackageType = DTSPackageType.DTSDesigner90
myPackage.Name = "MySSISPackage"
myPackage.Description = "Created using the SSIS API"
myPackage.CreatorComputerName = System.Environment.MachineName
myPackage.CreatorName = "Otey"
'Add the OLE DB and Flat File Connection Managers
Console.WriteLine("Creating the MyOLEDBConnection")
Dim cnOLEDB As ConnectionManager = _
MyPackage.Connections.Add("OLEDB")
cnOLEDB.Name = "MyOLEDBConnection"
cnOLEDB.ConnectionString = _
"Provider=SQLNCLI;Integrated Security=SSPI;" _
& "Initial Catalog=AdventureWorks;Data Source=SQL2005-2;"
Console.WriteLine("Creating the MyFlatFileConnection")
Dim cnFile As ConnectionManager = _
myPackage.Connections.Add("FLATFILE")
cnFile.Properties("Name").SetValue(cnFile, "MyFlatFileConnection")
cnFile.Properties("ConnectionString").SetValue _
(cnFile, "c:\temp\MySSISFileExport.csv")
cnFile.Properties("Format").SetValue(cnFile, "Delimited")
cnFile.Properties("ColumnNamesInFirstDataRow") _
.SetValue(cnFile, False)
cnFile.Properties("DataRowsToSkip").SetValue(cnFile, 0)
cnFile.Properties("RowDelimiter").SetValue(cnFile, vbCrLf)
cnFile.Properties("TextQualifier").SetValue(cnFile, """")
Near the top of this listing you can see where a new SSIS package object named
myPackage is created. Next, the package’s properties are assigned values. The most
important of these are the PackageType and Name properties, where the values of
DTSpackageType.DTSdesigner90 and MySSISPackage are used.
After creating the package object, the next step is to create Connection Managers
for the package. In this example, the package will be performing a simple export from
SQL Server to the file system, which requires two Connection Managers: an OLE DB
Chapter 10: SQL Server Integration Services 407
Connection Manager to connect to SQL Server, and a Flat File Connection Manager
to write the export file. First, the OLE DB Connection Manager is created and named
MyOLEDBConnection. The Connection’s Add method is then used to add the new
ConnectionManager object to the package’s Connections collection. Then the OLE DB
ConnectionManager’s ConnectionString property is assigned a connection string that
will connect to the AdventureWorks database on the server named SQL2005-2 using
integrated security. After that, a similar process creates a Flat File ConnectionManager
object named MyFlatFileConnection and adds it to the package’s Connections collection.
Then the ConnectionString property of the MyFlatFileConnection is assigned the value
of c:\temp\MySSISFileExport.csv. The following property assignments set up a delimited
file type for the export operation.
After the creation of the package and Connection Manager objects, the next step
to the creation of a Data Flow task is shown in the following code listing:
'Add a Data Flow Task
Console.WriteLine("Adding a Data Flow Task")
Dim taskDF As TaskHost = _
TryCast(myPackage.Executables.Add("DTS.Pipeline"), TaskHost)
taskDF.Name = "DataFlow"
Dim DTP As MainPipe
DTP = TryCast(taskDF.InnerObject, MainPipe)
' Add the OLE DB Source
Console.WriteLine("Adding an OLEDB Source")
Dim DFSource As IDTSComponentMetaData90
DFSource = DTP.ComponentMetaDataCollection.New()
DFSource.ComponentClassID = "DTSAdapter.OLEDBSource"
DFSource.Name = "OLEDBSource"
' Connect, populate the Input collections and disconnect
Dim SourceInst As CManagedComponentWrapper = _
DFSource.Instantiate()
SourceInst.ProvideComponentProperties()
DFSource.RuntimeConnectionCollection(0).ConnectionManagerID _
= myPackage.Connections("MyOLEDBConnection").ID
DFSource.RuntimeConnectionCollection(0).ConnectionManager _
= DtsConvert.ToConnectionManager90 _
(myPackage.Connections("MyOLEDBConnection"))
SourceInst.SetComponentProperty("OpenRowset", "[Sales].[Customer]")
SourceInst.SetComponentProperty("AccessMode”, 0)
SourceInst.AcquireConnections(Nothing)
SourceInst.ReinitializeMetaData()
SourceInst.ReleaseConnections()
408 Microsoft SQL Server 2005 Developer’s Guide
Near the top of this listing you can see where a new Data Flow task named taskDF is
created. Here the Data Flow task must be set up to read from the OLE DB Connection
Manager that will be the source of the data and then write to the flat file connection
that acts as the data destination. After creation of the Data Flow task, an OLE DB data
adapter for the source data is created that’s named DFSource. The DFSource object’s
ComponentClassID is set to DTSADpater.OLEDBSource, defining it as an OLE DB
connection, and the Name of the data flow source is set to OLEDBSource. Next, an
instance of the DFSource object is created in order to populate the input connections.
This enables the downstream data flow components to see the input metadata. Here
the OLE DB connection is set to the Sales.Customer table from the AdventureWorks
database. After the input metadata has been collected, the connection is released.
The next step is to define the data flow destination as is shown in the following listing:
' Add the Flat File Destination
Console.WriteLine("Adding a Flat File Destination")
Dim DFDestination As IDTSComponentMetaData90
DFDestination = DTP.ComponentMetaDataCollection.New()
DFDestination.ComponentClassID = _
"DTSAdapter.FlatFileDestination"
DFDestination.Name = "FlatFileDestination"
' Create an instance of the component
Dim DestInst As CManagedComponentWrapper = _
DFDestination.Instantiate()
DestInst.ProvideComponentProperties()
DFDestination.RuntimeConnectionCollection(0).ConnectionManagerID _
= myPackage.Connections("MyFlatFileConnection").ID
DFDestination.RuntimeConnectionCollection(0).ConnectionManager _
= DtsConvert.ToConnectionManager90 _
(myPackage.Connections("MyFlatFileConnection"))
' Map a connection between the source and destination
DTP.PathCollection.New().AttachPathAndPropagateNotifications _
(DFSource.OutputCollection(0), DFDestination.InputCollection(0))
' Add columns to the FlatFileConnectionManager
Dim MyFlatFilecn As _
SSISRuntime.IDTSConnectionManagerFlatFile90 = Nothing
For Each cm As ConnectionManager In myPackage.Connections
If cm.Name = "MyFlatFileConnection" Then
MyFlatFilecn = TryCast(cm.InnerObject, _
SSISRuntime.IDTSConnectionManagerFlatFile90)
DtsConvert.ToConnectionManager90(cm)
End If
Next
Chapter 10: SQL Server Integration Services 409
' Get the columns from the source
Dim InColumns As IDTSVirtualInputColumnCollection90 _
= DFDestination.InputCollection(0).GetVirtualInput() _
.VirtualInputColumnCollection()
Dim col As SSISRuntime.IDTSConnectionManagerFlatFileColumn90
Dim name As SSISRuntime.IDTSName90
For cols As Integer = 0 To InColumns.Count - 1 Step 1
col = MyFlatFilecn.Columns.Add()
' Set the last column delimiter to CRLF
If cols = InColumns.Count - 1 Then
col.ColumnDelimiter = vbCrLf
Else
col.ColumnDelimiter = ","
End If
col.ColumnType = "Delimited"
col.DataType = InColumns(cols).DataType
col.DataPrecision = InColumns(cols).Precision
col.DataScale = InColumns(cols).Scale
name = TryCast(col, SSISRuntime.IDTSName90)
name.Name = InColumns(cols).Name
Next
DestInst.AcquireConnections(Nothing)
DestInst.ReinitializeMetaData()
Dim wrapper As CManagedComponentWrapper = _
DFDestination.Instantiate()
Dim vInput As IDTSVirtualInput90 = _
DFDestination.InputCollection(0).GetVirtualInput()
For Each vColumn As IDTSVirtualInputColumn90 In _
vInput.VirtualInputColumnCollection
wrapper.SetUsageType(DFDestination _
.InputCollection(0).ID, vInput, vColumn.LineageID, _
DTSUsageType.UT_READONLY)
Next
' Match the input and output columns
Dim exCol As IDTSExternalMetadataColumn90
For Each InCol As IDTSInputColumn90 In _
DFDestination.InputCollection(0).InputColumnCollection
exCol = DFDestination.InputCollection(0) _
.ExternalMetadataColumnCollection(InCol.Name)
wrapper.MapInputColumn(DFDestination _
.InputCollection(0).ID, InCol.ID, exCol.ID)
Next
DestInst.ReleaseConnections()
410 Microsoft SQL Server 2005 Developer’s Guide
Here the data flow destination named DFDestination is created. Its ComponentClassID is
set to DTSAdapter.FlatFileDestination, defining it as an OLE flat file in the file system,
and the Name of the data flow source is set to FlatFileDestination. Next, an instance of
the DFDestination object name DestInst is created in order to map the input columns to
the columns in the destination output file.
You create the precedence between the data flow source and destination using
the DTP object’s AttachPathAndPropagateNotifications method. The next section of
code adds the column to the FlatFile ConnectionManager. It does this by reading the
metadata that was previously retrieved from the OLE DB Source connection. The
DFDestination object’s GetVirtualInput method populates the input collection, and
then a For-Each loop is used to set the attributes for each of the output columns.
Once the collection of the columns has been created, the next step is to map the
input columns from the OLE DB Source to the flat file output columns. Here a one-
to-one mapping is used, and a simple For-Each loop reads through the input metadata,
associating each column to the corresponding output column. After the mappings have
been set up, the connection is released using the ReleaseConnections method.
This completes the code needed to create the SSIS package. In the next section of
code you can see how to validate, save, and execute the package:
' Validate the package
Console.WriteLine("Validating the MySSISPackage")
Dim pkgStatus As DTSExecResult = myPackage.Validate _
(Nothing, Nothing, Nothing, Nothing)
System.Console.WriteLine("Validation result: " & _
pkgStatus.ToString())
' Save the package
Console.WriteLine("Saving the MySSISPackage")
Dim SSISExe As New Application()
SSISExe.SaveToXml("c:\temp\MySSISPAckage.dtsx", myPackage, Nothing)
' Execute the Package
If pkgStatus = DTSExecResult.Success Then
Console.WriteLine("Executing the MySSISPackage")
Dim pkgResult As DTSExecResult = myPackage.Execute()
Console.WriteLine("MySSISPackage results: " _
& pkgResult.ToString)
Else
Console.WriteLine("Package validation failed")
End If
Console.ReadKey()
End Sub
End Module
Chapter 10: SQL Server Integration Services 411
Calling the SSIS package object’s Validate method causes the SSIS engine to parse
the package, ensuring that all of the settings are valid. Here the results of the Validate
method are assigned to the status variable.
Next, regardless of the status, the package is saved to the file system by creating
an instance of the SSIS Application object and then using that object’s SaveToXML
method. The first argument of the SaveToXML method specifies the filename to save
the package under, and the second argument passes in an instance the package object.
Finally, the contents of the pkgStatus object are checked to ensure that the package
was valid. If it is, then the package’s Execute method is called to run the SSIS package
and perform the data export. The execution results are returned in the pkgResult variable.
After the SSIS package has been successfully executed, a file containing the
exported data named MySSISFileExport.csv along with an SSIS package named
MySSISPAckage.dtsx will be found in the c:\temp directory. Double-clicking the
MySSISPackage.dtsx package in the file system will launch the Execute Package
Utility that you can see in Figure 10-30. The Execute Package Utility allows you to
browse the package’s properties, optionally changing properties and variables, as
well as to execute the package.
Figure 10-30 The newly created SSIS package
412 Microsoft SQL Server 2005 Developer’s Guide
The previous example illustrated creating and running an SSIS package. However,
as you can see in the following listing, if you just want to execute an existing SSIS
package, the code is much simpler. The following code listing shows how to execute
an SSIS package from a console application that has a reference added for the
Microsoft.SqlServer.Dts.Runtime assembly:
Imports Microsoft.SqlServer.Dts.Runtime
Module Module1
Sub Main()
Dim sPath As String
Dim oPkg As New Package
Dim oApp As New Application
Dim oResults As DTSExecResult
sPath = "C:\temp\MySSISPackage.dtsx"
pkg = oApp.LoadPackage(sPath, Nothing)
oResults = oPkg.Execute()
Console.WriteLine(oResults.ToString())
Console.ReadKey()
End Sub
End Module
At the top of this listing you can see an import directive for the Microsoft
.SqlServer.Dts.Runtime assembly. Within the Sub Main procedure you can see
where the DTS Application object’s LoadPackage method is used to load the
MySSISPackage.dtsx package file to the c:\temp directory in the file system. In this
example the MySSISPackage.dtsx package was created using the code from the
previous listings. After loading the package, the Execute method is used to run the
package. The results are then displayed on the console.
Summary
SQL Server Integration Services is an all-new subsystem in SQL Server 2005 that
completely replaces the older Data Transformation Services subsystem that was
present in the older versions of SQL Server. In this chapter you learned about SSIS’s
Chapter 10: SQL Server Integration Services 413
simple SSIS Import and Export Wizard for performing basic data transfer operation
as well as how to create more complex, multistep packages using the SSIS Designer.
You saw how to use package checkpoints for recoverability and transactions to
ensure data integrity, as well as how to create configurations for flexible package
deployments. In addition, you also saw how to use the SSIS APIs to programmatically
create SSIS packages from a .NET application.
This page intentionally left blank
415
CHAPTER
11
Developing BI Applications
with ADOMD.NET
IN THIS CHAPTER
Analysis Services Overview
Building a BI Application with ADOMD.NET
Copyright © 2006 by The McGraw-Hill Companies. Click here for terms of use.
416 Microsoft SQL Server 2005 Developer’s Guide
A
DOMD.NET is a .NET data provider that enables the development of database
applications that communicate with multidimensional data sources, such as
SQL Server 2005 Analysis Services. SQL Server Analysis Services (SSAS)
delivers online analytical processing (OLAP) and data mining functions for Business
Intelligence (BI) applications using server and client components. SSAS allows you
to analyze your data so as to look for patterns and trends that will help you serve your
customers and meet your business plans and goals.
The server component of SSAS runs as a Windows service. Clients communicate
with SSAS using a SOAP-based protocol, XML for Analysis (XMLA), which issues
commands and receives responses and is exposed as a Web service. A managed
provider, ADOMD.NET includes client objects to be used in applications, allowing
interaction with XMLA and SSAS.
In this chapter, you will see how to develop SQL Server database applications using
ADOMD.NET. The first part of the chapter provides you with a brief overview of the
Analysis Management Objects (AMO) used by the SSAS server-side Windows service.
Then an overview of the ADOMD.NET features and architecture will be presented.
In the second section of this chapter, you’ll get an understanding of classes used by
ADOMD.NET.
Analysis Services Overview
SQL Server 2005 Analysis Services provides OLAP analysis, Key Performance
Indicator (KPI) checks, and data mining functionality for your business data, which
allows you to more quickly and efficiently supply information to your users. Using
SSAS, you can show trends and summarized data, giving a clearer picture of how
your organization is meeting its business goals and in turn how to facilitate making
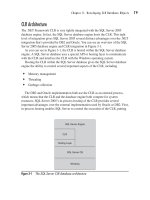
better business decisions. In Figure 11-1, you can see an overview of SQL Server
2005 Analysis Services.
Clients communicate with SSAS using the XML for Analysis (XMLA) protocol
over a TCP or HTTP connection. XMLA is used for issuing commands and receiving
responses and is exposed as a Web service. SSAS provides client object models that
you can use over XMLA, including a managed provider called ADOMD.NET. You can
issue query commands against an XMLA data source using SQL, Multidimensional
Expressions (MDX), or Data Mining Extensions (DMX).
Multidimensional data sources are different from other types of data sources in that
they use multiple, hierarchically structured dimensions to organize data. For example,
relational database tables each represent two-dimensional data. At the intersection
Chapter 11: Developing BI Applications with ADOMD.NET 417
of each row and column in the table, a single element of data is represented. With
multidimensional data sources, data can be represented by structures of more than
two dimensions. This structured data assumes a form called cubes that have multiple
dimensions and consist of measures based on one or more fact tables.
You can access and manipulate multidimensional objects and data using
Multidimensional Expressions (MDX). MDX is a statement-based scripting
language and has features that allow you to manage scope, context, and control
flow within an MDX script.
XML for Analysis
XML for Analysis (XMLA) is a Simple Object Access Protocol (SOAP)–based XML
protocol that allows you to access a multidimensional data source. XMLA is used for
all communications between a client application and an instance of Analysis Services.
XMLA is also used by both AMO and ADOMD.NET to interact with the instance of
Analysis Services. XMLA has two standard, accessible methods: a Discover method
and an Execute method.
The Discover method is used to retrieve metadata or detailed information about
objects in SSAS. Using the Discover method, you can obtain information including
lists of available data sources, lists of cubes, or metadata that describes the existing
objects in the data source.
The Execute method is used for executing commands against an XMLA data source.
The Execute method can execute SQL, MDX, or DMX statements and returns data from
the multidimensional data source in the form of a CellSet or AdomdDataReader. These
objects are discussed later in this chapter.
Analysis Management Objects (AMO) Overview
Analysis Management Objects (AMO) provides the ability to perform administrative
tasks on an Analysis Services instance. You can use AMO in a managed client
application to create or modify Analysis Services objects, such as databases, cubes,
Figure 11-1 SQL Server 2005 Analysis Services overview
TCP
ADOMD
.NET
Analysis
Services
Client
Application
IIS
HTTP
XMLA
418 Microsoft SQL Server 2005 Developer’s Guide
dimensions, and mining structures, using the interfaces in the Microsoft .NET
Framework. It is also useful for retrieving and manipulating data from the underlying
data sources, and for managing an Analysis Services instance by setting configuration
properties, managing instance security, and controlling the Windows service for the
Analysis Services instance.
ADOMD.NET Overview
ADOMD.NET is a .NET data provider built using managed code from the Microsoft
.NET Framework, which means you can use the .NET execution time environment
to build BI applications. ADOMD.NET consists of a set of classes within the .NET
Framework that provide data access and management capabilities to .NET applications.
Client applications can use ADOMD.NET to connect to multidimensional data sources
for retrieving, analyzing, and manipulating data and metadata. ADOMD.NET can also be
used for manipulating key performance indicators (KPIs) and data mining models.
Key Performance Indicators
Key performance indicators (KPIs) are used to measure and evaluate business goals.
KPIs are collections of calculations and are associated with either a single measure
group in a cube or with all measure groups in a cube. KPIs also contain metadata
to provide information about how client applications should show the results of
the KPI’s calculations. KPIs in Analysis Services are server-based, giving you the
performance benefit of executing sometimes complex calculations on the server
rather than on each client computer.
AMO Hierarchy
The AMO library provides a complete set of .NET Framework classes for managing
SSAS objects. It can also be used for administering security, processing cubes, and
mining data models.
The Server Class
The Server class is the main class in the AMO architecture and handles the methods
for connecting and disconnecting to Analysis Services, as well as adding or restoring
databases from a backup.
The Database Class
The Database class is used for processing and updating databases in Analysis Services.
You can use the Add method to add DataSources, DataSourceViews, Dimensions, and
Cubes to the database.