Microsoft SQL Server 2005 Developer’s Guide- P12 docx
Bạn đang xem bản rút gọn của tài liệu. Xem và tải ngay bản đầy đủ của tài liệu tại đây (309.92 KB, 10 trang )
Chapter 3: Developing CLR Database Objects 89
capture any errors that may occur during the file import process. Within the Try-
Catch loop a new StreamReader named stmReader is created that will be used to
read the file from the operating system. The name of the file that will be read is
passed into the StreamReader’s instantiation call. Then the stmReader’s ReadToEnd
method is used to read the entire contents of the file into the sContent string variable.
After the contents of the file have been read, the stmReader StreamReader is closed
and the contents of the sContents variable are assigned to the SQL Server column.
If any errors occur while the input file is being read, then the code in the Catch
portion of the Try-Catch structure is executed. Within the Catch block a SqlPipe object
named sp is created and then used to send those errors back to the caller of the stored
procedure. This code block uses the SqlPipe object, which represents a conduit that
passes information between the CLR and the calling code. Here, the SqlPipe object
enables the stored procedure to pass error information to the external caller.
Setting the Stored Procedure Security
At this point the code is finished for the stored procedure, but because of security
concerns, it still can’t execute. By default SQL Server CLR objects can only access
database resources, and they cannot access external resources. In the case of the
usp_ImportFile example, the stored procedure needs to access the file system, so
the default security settings need to be changed. To enable external access, you need
to open the project’s properties and click the Database tab. Then in the Permissions
Level drop-down you need to change the value from Safe to External. More
information about the CLR security options is presented later in this chapter.
Deploying the Stored Procedure
After the CLR stored procedure source code has been compiled into an assembly,
you can then add that assembly to the database and create the CLR stored procedure.
You can do this in two ways. If you’re using Visual Studio 2005 to create the SQL
Server CLR database objects, then you can interactively deploy the CLR stored
procedure directly from Visual Studio. To deploy the stored procedure to SQL
Server, select the Build | Deploy Solution option from the Visual Studio menu.
You can perform the deployment manually as was shown in the earlier section
“Creating CLR Database Objects”. To do this, you essentially need to move the
compiled DLL to a directory or file share where it can be accessed by SQL Server.
Then run the CREATE ASSEMBLY statement to register the DLL and copy it into
the database.
create assembly usp_ImportFile
from 'C:\temp\usp_ImportFile.dll'
WITH PERMISSION_SET = EXTERNAL
90 Microsoft SQL Server 2005 Developer’s Guide
The CREATE ASSEMBLY statement copies the contents of the usp_ImportFile.dll
file in the c:\temp directory into the SQL Server database. The WITH PERMISSION
SET clause is used to specify that this assembly can access resources that are external
to the SQL Server database. That’s needed here because the stored procedure reads an
external file.
CREATE PROCEDURE usp_ImportFile
@filename nvarchar(1024),
@columnname nvarchar(1024) OUT
AS
EXTERNAL NAME usp_ImportFile.[usp_ImportFile.StoredProcedures]
.usp_ImportFile
The CREATE PROCEDURE statement is used to create a new SQL Server
stored procedure that uses the CLR assembly. This CLR stored procedure uses two
parameters. The first is an input parameter, and the second is an output parameter.
The EXTERNAL NAME clause uses a three-part name to identify the target method
in the DLL. The first part of the name refers to the assembly name. The second part
refers to the class. If the class is part of a namespace, as is the case here, then the
namespace must preface the class name and both should be enclosed in brackets.
Finally, the third part of the name identifies the method that will be executed.
Using the Stored Procedure
After the CLR stored procedure has been created, it can be called exactly like any
T-SQL stored procedure, as the following example illustrates:
DECLARE @myColumn ntext
EXEC usp_ImportFile 'c:\temp\testfile.txt' @myColumn
User-Defi ned Functions
Creating .NET-based user-defined functions (UDFs) is another new feature that’s
enabled by the integration of the .NET CLR. User-defined functions that return
scalar types must return a .NET data type that can be implicitly converted to a
SQL Server data type. Scalar functions written with the .NET Framework can
significantly outperform T-SQL in certain scenarios because unlike T-SQL functions,
.NET functions are created using compiled code. User-defined functions can also
return table types, in which case the function must return a result set.
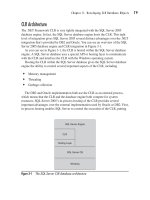
To create a UDF using Visual Studio 2005, select the New | Project option and
then select the SQL Server Project template as shown in Figure 3-7.
Chapter 3: Developing CLR Database Objects 91
As in the Stored Procedure example that was presented earlier, first give your project
a name and click OK to create the project. In the example shown in Figure 3-7, you can
see that I’ve used the name ufn_GetDateAsString for my user-defined function. This
function returns a string value containing the system date and time. After naming the
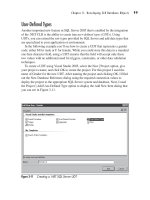
project, click OK to display the New Database Reference dialog for the CLR Function
project, which will resemble the one shown in Figure 3-8.
NOTE
The Add Database Reference dialog is shown instead of the New Database Reference dialog when
a database reference has already been created. This would be the case if you created the
ufn_GetDateAsString function immediately after the usp_ImportFile project.
The New Database Reference dialog defines the connection between your Visual
Studio project and SQL Server. The project will connect to the SQL Server system
named sql2005, and the function will be deployed to the AdventureWorks database.
Once the Visual Studio project has been created and the connection has been
defined, you use the Project | Add Function menu option to display the Add New
Item dialog that you can see in Figure 3-9.
Figure 3-7 Creating a new SQL Server UDF project
92 Microsoft SQL Server 2005 Developer’s Guide
Visual Studio uses the SQL Server Function project template to create a starter
project that includes the reference to the SQL Server .NET Data Provider and a
basic function wrapper for your source code. It’s up to you to fill in the rest of
the code. The following code listing shows the completed CLR function, ufn_
GetDateAsString, that performs a basic date-to-string conversion:
Imports System
Imports System.Data
Imports System.Data.Sql
Figure 3-8 The New Database Reference dialog
Chapter 3: Developing CLR Database Objects 93
Imports System.Data.SqlTypes
Imports Microsoft.SqlServer.Server
Partial Public Class UserDefinedFunctions
<Microsoft.SqlServer.Server.SqlFunction()> _
Public Shared Function ufn_GetDateAsString() As SqlString
Dim dtDataTime As New DateTime
Return dtDataTime.ToString()
End Function
End Class
Here, the Microsoft.SqlServer.Server namespace is not needed, as this particular
function does not perform any data access. Next, Visual Studio 2005 generated
the UserDefinedFunctions class to contain all of the methods that this assembly
will expose as UDFs. You can also see that the <Microsoft.SqlServer.Server.
SqlFunction()> attribute is used to identify the ufn_GetDateAsString method as a
UDF. The code in this simple example just converts the system date to a string data
type that’s returned to the caller.
Figure 3-9 Adding a CLR user-defined function
94 Microsoft SQL Server 2005 Developer’s Guide
Deploying the Function
To create the function in a SQL Server database, the assembly must first be created,
as you saw in the stored procedure example. Then if you’re using Visual Studio
2005, you can simply select the Build | Deploy Solution option and you’re done.
If you’re doing this manually, you’ll need to copy the ufn_GetDataAsString.
dll file to a location that’s accessible by the SQL Server system and then create the
assembly, followed by the function. The following CREATE ASSEMBLY statement
can be used to copy the contents of ufn_GetDateAsString.dll into the SQL Server
database:
CREATE ASSEMBLY ufn_GetDataAsString
FROM '\\MyFileShare\Code Library\ufn_GetDataAsString.dll'
The CREATE FUNCTION statement is then used to create a new SQL Server
function that executes the appropriate method in the assembly. The following listing
illustrates how the CREATE FUNCTION statement can create a .CLR user-defined
function:
CREATE FUNCTION ufn_GetDateAsString()
RETURNS nvarchar(256)
EXTERNAL NAME
ufn_GetDateAsString.UserDefinedFunctions.ufn_GetDateAsString
For user-defined functions, the CREATE FUNCTION statement has been
extended with the EXTERNAL NAME clause, which essentially links the user-
defined function name to the appropriate method in the .NET assembly. In this
example, the ufn_GetDateAsString function is using the assembly named ufn_
GetDateAsString. Within that assembly, it’s using the UserDefinedFunctions class
and the ufn_GetDateAsString method within that class.
Using the Function
After the function has been created, it can be called like a regular SQL Server function.
You can see how to execute the GetDateAsString function in the following example:
SELECT dbo.GetDateAsString()
Triggers
In addition to stored procedures and user-defined functions, the new .NET integration
capabilities found in SQL Server 2005 also provide the ability to create CLR triggers.
To create a trigger using Visual Studio 2005, you start your project as you saw in the
Chapter 3: Developing CLR Database Objects 95
earlier examples. To create a trigger using Visual Studio 2005, select the New | Project
option, give your project a name, and click OK to create the project. For this project,
I used the name ti_ShowInserted for my trigger. This trigger essentially retrieves the
values of the row being inserted in a table and displays them. After naming the project
and clicking OK, I filled out the New Database Reference dialog using the same values
that were shown in the previous examples. Next, I used the Project | Add Trigger menu
option that you can see in Figure 3-10 to create a starter project for the CLR trigger.
As you saw in the earlier example of CLR database objects, you select the Trigger
option from the list of templates and then provide the name of the trigger in the
name prompt. Visual Studio 2005 will generate a starter project file that you can add
your code to. The starter project includes the appropriate import directives as well as
generating a class, in this case appropriately named Triggers, and a method named
ti_ShowInserted with its appropriate method attribute. The following code listing
shows the completed code for the CLR trigger named ti_ShowInserted:
Imports System
Imports System.Data
Imports System.Data.Sql
Imports System.Data.SqlTypes
Figure 3-10 Adding a CLR trigger
96 Microsoft SQL Server 2005 Developer’s Guide
Imports Microsoft.SqlServer.Server
Imports System.Data.SqlClient
Partial Public Class Triggers
' Enter existing table or view for the target and uncomment
the attribute line
<Microsoft.SqlServer.Server.SqlTrigger(Name:="ti_ShowInserted", _
Target:="Person.ContactType", Event:="FOR INSERT")> _
Public Shared Sub ti_ShowInserted()
Dim oTriggerContext As SqlTriggerContext = _
SqlContext.TriggerContext
Dim sPipe As SqlPipe = SqlContext.Pipe
If oTriggerContext.TriggerAction = TriggerAction.Insert Then
Dim oConn As New SqlConnection("context connection=true")
oConn.Open()
Dim oCmd As New SqlCommand("Select * from inserted", oConn)
sPipe.ExecuteAndSend(oCmd)
End If
End Sub
End Class
The example CLR trigger displays the contents of the data that is used for an
insert action that’s performed on the Person.ContactTypes table in the Adventureworks
database. The first thing to notice in this code listing is the Attribute for the ti_
ShowInserted subroutine (the code enclosed within the < > markers). The Attribute
is used to name the trigger and identify the table the trigger will be applied to as well
as the event that will cause the trigger to fire. When the Visual Studio 2005 trigger
template initially generates this Attribute, it is prefaced by a comment symbol—
essentially making the line a comment. This is because the trigger template doesn’t
know how or where you want the trigger to be used. In order for Visual Studio 2005
to deploy the trigger, you need to uncomment the Attribute line and then fill in the
appropriate properties. The following table lists the properties used by the Visual
Studio 2005 trigger template:
Property Name Description
Name The name the trigger will use on the target SQL Server system.
Target The name of the table that the trigger will be applied to.
Event The action that will fire the trigger. The following trigger events are supported:
FOR INSERT, FOR UPDATE, FOR DELETE, AFTER INSERT, AFTER UPDATE, AFTER
DELETE, INSTEAD OF INSERT, INSTEAD OF UPDATE, INSTEAD OF DELETE
Chapter 3: Developing CLR Database Objects 97
In this example, the resulting trigger will be named ti_ShowInserted. It will be
applied to the table named Person.ContactType, which is in the AdventureWorks
database, and the trigger will only be fired for an insert operation.
The primary code for the trigger is found within the ti_ShowInserted subroutine.
This code example makes use of another new ADO.NET object: SqlTriggerContext.
The SqlTriggerContext object provides information about the trigger action that’s
fired and the columns that are affected. The SqlTriggerContext object is always
instantiated by the SqlContext object. Generally, the SqlContext object provides
information about the caller’s context. Specifically, in this case, the SqlContext
object enables the code to access the virtual table that’s created during the execution
of the trigger. This virtual table stores the data that caused the trigger to fire.
Next, a SqlPipe object is created. The SqlPipe object enables the trigger to
communicate with the external caller, in this case to pass the inserted data values to
the caller. The TriggerAction property of the SqlContext object is used to determine
if the trigger action was an insert operation. Using the TriggerAction property is
quite straightforward. It supports the following values:
TriggerAction Value Description
TriggerAction.Insert An insert operation was performed.
TriggerAction.Update An update action was performed.
TriggerAction.Delete A delete action was performed.
If the TriggerAction property equals TriggerAction.Insert, then an insert was
performed and the contents of the virtual trigger table are retrieved and sent to the
caller using the SqlPipe object’s Execute method. In order to retrieve the contents
of the virtual table, a SqlConnection object and a SqlCommand object are needed.
These objects come from the System.Data.SqlClient namespace. You should note
that when used with server-side programming, the Connection String used by the
SqlConnection object must be set to the value of “context Connection=true”. Then
a SqlCommand object named oCmd is instantiated that uses the statement “Select *
from inserted” to retrieve all of the rows and columns from the virtual table that
contains the inserted values. Finally, the ExecuteAndSend method of SqlPipe object
is used to execute the command and send the results back to the caller.
Deploying the Trigger
Once the code has been created, you can either deploy it to the database using the
Visual Studio 2005 Build | Deploy solution option or manually drop and re-create
the assembly and any dependent objects you saw in UDF examples earlier in this
chapter.
98 Microsoft SQL Server 2005 Developer’s Guide
To manually deploy the code, you’d need to copy ti_ShowInserted.dll to the SQL
Server system or to a share that’s accessible to the SQL Server system and then
execute the following T-SQL Server commands:
Use AdventureWorks
create assembly ti_showinserted
from 'C:\temp\ti_ShowInserted.dll'
go
CREATE TRIGGER ti_ShowInserted
ON Person.ContactType
FOR INSERT
AS EXTERNAL NAME ti_ShowInserted.[ti_ShowInserted.Triggers].ti_ShowInserted
go
This example assumes that ti_ShowInsert.dll was copied into the c:\temp directory
on the SQL Server system. First, the Create Assembly statement is used to copy the
DLL into the SQL Server database and then the Create Trigger statement is used with
the As External Name clause to create a trigger named ti_ShowInserted and attach it
to the Person.ContactTypes table. As in the earlier examples, the As External Name
clause identifies the assembly using a three-part name: asssembly.class.method. Pay
particular attention to the class portion of this name. For triggers you must bracket the
class name and include the namespace just before the class name. In this example, the
assembly is named ti_ShowInserted. The Namespace is ti_ShowInserted. The class is
named Triggers, and the method is named ti_ShowInserted.
Using the Trigger
After the CLR trigger has been deployed, it will be fired for every insert operation
that’s performed on the base table. For example, the following INSERT statement will
add a row to the Person.ContactType table, which will cause the CLR trigger to fire:
INSERT INTO Person.ContactType VALUES(102, 'The Big Boss',
'2005-05-17 00:00:00.000')
The example trigger, ti_ShowInserted, performs a select statement on the inserted
row value. Then it uses the SqlPipe object to send the results back to the caller. In this
example the trigger will send the contents of the inserted row values back to the caller:
ContactTypeID Name ModifiedDate
21 The Big Boss 2005-05-17
00:00:00.000
(1 row(s) affected)
(1 row(s) affected)