Microsoft SQL Server 2005 Developer’s Guide- P42 potx
Bạn đang xem bản rút gọn của tài liệu. Xem và tải ngay bản đầy đủ của tài liệu tại đây (585.91 KB, 10 trang )
Chapter 10: SQL Server Integration Services 389
In this case, it will also match the ProductID column of the Product table, which will
later be used to perform a data lookup. After all of the data type changes have been
made, click the OK button to save the Flat File property changes.
The next step is to set up the database lookup that will be used to verify that the
vendor-supplied product numbers are correct. In this example, the AdventureWorks
product number is supplied in the AdWProductID field that’s found in the FTP
output file. If the value for the AdWproductID matches a value from the Production
.ProductID column, then the data will be written to the SQL Server destination table.
Otherwise, the data will be written to an error file. To define the Lookup, double-
click the Lookup transformation on the data flow design surface. This will display
the Lookup Transformation Editor shown in Figure 10-15.
Figure 10-15 Lookup Transformation Editor: Select Connection Manager
390 Microsoft SQL Server 2005 Developer’s Guide
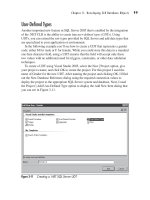
Under the Reference Table tab use the drop-down box to select the OLE DB
Connection Manager that was created earlier. Here you can see that the OLE DB
Connection Manager is set to SQL2005-2.AdventureWorks1. After assigning
the connection, the next step is to specify the table or query that will be used for
the lookup operation. This example uses the table Production.Product from the
AdventureWorks database. After selecting the table, the next step is to specify the
columns that will be used in the lookup. To select the columns, click the Columns
tab as is shown in Figure 10-16.
On the Columns tab first select the column from the list of Available Input columns
that you will use to perform the lookup. Then drag that column over to the matching
column in the Available Lookup Columns list. In Figure 10-16 you can see that the
value from the incoming AdWProductID column will be used to look up values in
the ProductID column from the Production.Product table that was selected earlier. If
you only want to perform a lookup operation, you can stop here. Click OK to save the
Lookup Transformation settings.
Figure 10-16 Lookup Transformation Editor: Match Columns
Chapter 10: SQL Server Integration Services 391
However, if you also want to build an error log to report lookup failures, then you
should add a new Flat File Connection Manager that will allow you to output the
Lookup transformation error output. As you saw earlier, to add a Flat File Connection,
right-click in the Connection Manager pane in the SSIS Designer and then select
New Flat File Connection from the pop-up menu to display the Flat File Connection
Manager as shown in Figure 10-17.
Give the Flat File connection a name. In this example it is named Product Lookup
Errors. Next, use the File Name prompt to specify the folder and file that will be used
to write the output. In Figure 10-17 you can see that the lookup errors will be written to
the file lookuperrors.csv in the c:\temp directory. The remainder of the prompts control
the formation of the output data. In Figure 10-17 all of the defaults have been accepted,
which will result in the creation of a comma-separated value (csv) file. Click OK after
specifying the properties for the Product Lookup Errors Flat File connection to save
the values.
Figure 10-17 Flat File Connection Manager for lookup error output
392 Microsoft SQL Server 2005 Developer’s Guide
After creating the new Flat File Connection Manager, drag a new Flat File
Destination from the data flow toolbox onto the design surface. Double-click the
new Flat File Destination to open the editor and then select the Product Lookup
Errors connection for the Connection property. Finally, drag the red line from the
Lookup Transformation to the Flat File Destination to connect the flat file to the
Error Lookup Transformation’s error output.
Next, to tell the Lookup Transformation to direct error rows to the flat file, double-
click the transformation to open the Lookup Transformation Editor. Then click the
Columns tab followed by the Configure Error Output button to display the Configure
Error Output dialog shown in Figure 10-18.
On the Configure Error Output dialog use the drop-down beneath Error and select
the Redirect Row option. This will redirect any error output to the flat file that was
defined using the Flat File Connection Manager. Then click OK.
The final step to complete the configuration of the SSIS package’s data flow is the
definition of the SQL Server destination. On the data flow design surface double-click
the SQL Server Destination object to open up the SQL Destination Editor that’s shown
in Figure 10-19.
Figure 10-18 Configure Error Output
Chapter 10: SQL Server Integration Services 393
The first step in defining the OLE DB Destination is to select the appropriate OLE
DB Connection Manager. Click the OLE DB Connection Manager drop-down and
then select the SQL2005-2.AdventureWorks1 OLE DB Connection Manager. Next,
in the Use A Table Or View drop-down select the table that will store the output.
In Figure 10-19 you can see that the Purchasing.ProductShipments table has been
selected.
NOTE
Testing the Execute SQL task that was previously created will produce a Purchasing
.ProductsShipments table that you can use to define the OLE DB Connection Manager.
At this point the configuration of the SSIS package has been completed. You can
optionally change the column mappings or view the contents of the ProductsShipments
file. Clicking OK will save the properties configurations of the OLE DB Destination and
close the SQL Destination Editor. The completed data flow is shown in Figure 10-20.
Figure 10-19 SQL Destination Editor
394 Microsoft SQL Server 2005 Developer’s Guide
The elements on the data flow designer reflect the flow of events that will happen
when the SSIS package executes the Data Flow task. Here you can see that the Flat File
source (which points to the c:\temp\MyData.csv file) will be read as input. For each row
read a lookup to the AdventureWorks Production.Products table will be performed. If
a match for the incoming ProductID is found in the Production.Products table, then the
data will be written to the Purchasing.ProductShipments table in the AdventureWorks
database. If the incoming ProductID has an error and doesn’t match any rows in the
Products table, then the data will be written to the Flat File Destination (which points to
the c:\temp\lookuperrors.csv file).
NOTE
If you want to view the data that’s being sent between any of the sources, transformations, or
destinations on the data flow designer, you can click either the green or red connection line to
display the Edit Data Path dialog. From the Edit Data Path dialog select Data Viewers and Add.
When data flows over the selected data path, it will be displayed in the data viewer.
Figure 10-20 The completed data flow
Chapter 10: SQL Server Integration Services 395
Running the Package
After the SSIS package has been designed, you can run it from the SSIS Designer
by clicking the green arrow on the toolbar, pressing f
5, or selecting the Debug | Start
Debugging option from the menu.
In order to execute the package, a file must be available for import that can be
found on the remote FTP server. The following listing shows the contents of the
sample import file that is capable of testing the SSIS package:
ShipProductID,AdwProductID,Name,ProductNumber,ShipDate,Units
10-504,504,Cup-Shaped Race,RA-2345,,38055
10-505,505,Cone-Shaped Race,RA-7490,,38055
10-506,506,Reflector,RF-9198,,38055
10-507,507,LL Mountain Rim,RM-M464,,38055
10-508,508,ML Mountain Rim,RM-M692,,38055
10-509,509,HL Mountain Rim,RM-M823,,38055
10-510,510,LL Road Rim,RM-R436,,38055
10-511,511,ML Road Rim,RM-R600,,38055
10-512,512,HL Road Rim,RM-R800,,38055
10-514,594,LL Mountain Seat Assembly,SA-M198,,38055
10-515,595,ML Mountain Seat Assembly,SA-M237,,38055
10-516,596,HL Mountain Seat Assembly,SA-M687,,38055
10-517,597,LL Road Seat Assembly,SA-R127,,38055
10-518,518,ML Road Seat Assembly,SA-R430,,38055
Four rows in this test file will produce error output. These are the rows with the
values 594, 595, 596, and 597, as there are no matching values for these in the
Production.Products table.
Running the SSIS package from the designer will show you the package’s run-time
status under the Execution Results tab as is shown in Figure 10-21, where you can see
the status of each of the different tasks that compose the FTPtoSQL2005 package. The
FTP task was completed first, at 11:20:52, followed by the Execute SQL task, which
was completed at 11:20:53, and the Data Flow task was completed last.
Using Breakpoints
The SSIS Designer provides a fully interactive development environment, and in
addition to being able to create SSIS packages it also offers the ability to debug them.
You can use the SSIS Designer to set breakpoints at the package level, the container
level, or the individual tasks level of an SSIS package.
Integration Services provides ten break conditions that you can enable on all tasks
and containers. In addition, some tasks and containers include additional task-specific
396 Microsoft SQL Server 2005 Developer’s Guide
breakpoint conditions. When a breakpoint is encountered, the package halts execution
and you can examine the contents of variables and other elements in the package.
To set a task breakpoint in an SSIS package, right-click the task and select the Edit
Breakpoints option from the pop-up menu to display the Set Breakpoints dialog that
you can see in Figure 10-22.
Figure 10-21 Package execution results
Figure 10-22 Set Breakpoints
Chapter 10: SQL Server Integration Services 397
You can set breakpoints on one or more of the conditions by placing a check mark
in the Enabled box. In addition, you can use the Hit Count to control if and how
frequently encountering the breakpoint will result in the halting of the packages. The
default value is Always, meaning the package will always stop when the condition is
encountered. However, by specifying a hit count, you can control how many times
the condition must be encountered before the package execution is paused.
Using Checkpoints
Checkpoints enable a failed SSIS package to be restarted at the spot where the execution
was ended. Using checkpoints can significantly improve the recoverability of packages
that contain complex operations. In addition, they can provide considerable time savings
for the recovery of packages that contain long-running tasks because the package doesn’t
need to reprocess all of the tasks prior to the checkpoint. When checkpoints are enabled,
information about the package’s execution is written to a checkpoint file. SSIS will
use the data in this file to determine which control flow tasks in the package have been
executed. If a package that is using checkpoints fails, the SSIS DTR engine can use the
checkpoint file to restart the package at the point of failure.
Checkpoints apply to the package’s control flow, not to the data flow. Control-flow
containers are the basic unit of checkpoint restartability. When the execution of a package
that uses checkpoints is restarted, the package execution begins with the failed control flow
task. If that control flow task uses any data flow within that task, then the data flow will
be rerun in its entirety—the task will not pick up from the last row transferred. Even with
this minor limitation, checkpoints offer a great improvement in package recoverability.
Checkpoints are enabled by setting the package’s SaveCheckpoints property to True in
the SSIS package properties. You can see the SaveCheckpoints property in Figure 10-23.
Once checkpoints are enabled, you also need to tell the SSIS package where to write
the checkpoint data. To do this, you must supply a filename to the CheckpointFileName
property. In addition, the way SSIS treats running packages where there is an existing
checkpoint file is controlled by the CheckpointUsage property. The CheckpointUsage
property supports the following values:
CheckpointUsage Value Description
Never The checkpoint file is not used, and the package always starts from the beginning
of the control flow.
Always The checkpoint file is always used, and the package restarts from the point of the
previous execution failure. The package’s execution will fail if the checkpoint file
is not present.
IfExists The package restarts from the point of the previous execution failure if the
checkpoint file exists. If there is no checkpoint file, execution starts at the
beginning of the control flow.
398 Microsoft SQL Server 2005 Developer’s Guide
Using Transactions
SSIS also supports database transactions. When using transactions, the database
changes performed by a package can be committed as a unit if a package runs
successfully, or the changes can be rolled back as a unit if the package execution
fails. Transactions can be enabled for all SSIS container types, including packages,
containers, loops, and sequence containers. You enable transaction support using the
container’s TransactionOption property, which you set using the SSIS Designer or
programmatically. The TransactionOption property supports the following values:
TransactionOption Values Description
Not Supported The container does not start a transaction and will not join an existing
transaction that was initiated by a parent container.
Supported The container does not start a transaction but will join an existing transaction
that was started by a parent container.
Required The container starts a transaction. If an existing transaction has already been
started by the parent container, the container will join it.
Figure 10-23 Enabling checkpoints