Beginning Game Programming (phần 7) pot
Bạn đang xem bản rút gọn của tài liệu. Xem và tải ngay bản đầy đủ của tài liệu tại đây (1.5 MB, 50 trang )
series of for loops. Tell me which one of these two sections of code is faster.
Ignore the
num++ part and just assume that ‘‘something useful’’ is happening
inside the loop.
for (int n=0; n<1000; n++) num++;
or
(for int n=0; n<250; n++) num++;
(for int n=0; n<250; n++) num++;
(for int n=0; n<250; n++) num++;
(for int n=0; n<250; n++) num++;
What do you think? It might seem obvious that the first code is faster because
there are fewer calls. Someone who is into optimization might think the second
code listing is faster because perhaps it avoids a few
if statements here and there
(it’s always faster to unroll a loop and put
if statements outside of them).
Unrolling a Loop
What do I mean when I say
unrolling a loop
? (This is not directly related to 3D, but helpf ul
nonetheless.) Take a look at the following two groups of code (from a fictional line-drawing
function, assume
x and y have already been defined):
for (x=0; x<639; x++)
if (x % 2 == 0)
DrawPixel(x, y, BLUE);
else
DrawPixel(x, y, RED);
and
for (x=0; x<639; x+=2)
DrawPixel(x, y, BLUE);
for (x=1; x<639; x+=2)
DrawPixel(x, y, RED);
The second snippet of code is probably twice as fast as the first one because the loops have been
unrolled and the
if statement has been remov ed. Try to think about optimization issues like this
as you work on a game because loops should be coded carefully. The
for loop
doesn’t actually
take up any processor time itself; it’s the code executed
by
the
for loop
that is important to
consider.
A quad is made up of two triangles. The quad requires only four vertices because
the triangles will be drawn as a triangle strip. Check out Figure 12.8 to see the
difference between the two types of triangle rendering methods.
280 Chapter 12
n
3D Graphics Fundamentals
Figure 12.9 shows some other possibilities for triangle strips. You can join any
two vertices that share a side.
Creating the Quad
Creating a quad requires even less effort than creating two attached triangles,
thanks to the triangle strip rendering process. To draw any polygon, whether it is
a triangle, quad, or complete model, there are two basic steps involved.
Introduction to 3D Programming 281
Figure 12.8
Triangle List and Triangle Strip rendering methods compared and contrasted
Figure 12.9
A triangle strip can take many forms. Note also that many more than two polygons can be used.
First, you must copy the vertices into a Direct3D vertex stream. To do this, you
first lock the vertex buffer, then copy the vertices to a temporary storage location
with a pointer variable, then unlock the vertex buffer.
void *temp = NULL;
quad->buffer->Lock(0, sizeof(quad->vertices), (void**)&temp, 0);
memcpy(temp, quad->vertices, sizeof(quad->vertices));
quad->buffer->Unlock();
The next step is to set the texture, tell Direct3D where to find the stream source
containing vertices, and then call on the
DrawPrimitive function to draw the
polygons specified in the vertex buffer stream. I like to think of this as a Star Trek-
esque transporter. The polygons are transported from the vertex buffer into the
stream and re-assembled on the screen!
d3ddev->SetTexture(0, quad->texture);
d3ddev->SetStreamSource(0, quad->buffer, 0, sizeof(VERTEX));
d3ddev->DrawPrimitive(D3DPT_TRIANGLESTRIP, 0, 2);
The Textured Cube Demo
Let’s get realistic here. No one cares about drawing shaded and colored triangles,
so I’m not going to waste time on the subject. Are you going to create a complete
3D game by programming triangles to assemble themselves into objects and then
move them around and do collision checking and so on? Of course not, so why
spend time learning about it? Triangles are critical to a 3D system, but not very
useful in the singular sense. Only when you combine triangles do things get
interesting.
The really interesting thing about modern 3D APIs is that it is easier to create a
textured quad than one with shading. I will avoid the subject of dynamic lighting
because it is beyond the scope of this book; ambient lighting will absolutely
suffice for our purposes here. Did you know that most retail games use ambient
lighting? Most of the dynamically-lit games are first-person shooters.
Modifying the Framework
What comes next? Well, now that you have all this great code for doing stuff in
3D, let’s just plug it into the Direct3D module in the game framework you’ve
been building in the book. And it’s about time, right? That ‘‘Direct3D’’ module
has been stuck in 2D land for several chapters now!
282 Chapter 12
n
3D Graphics Fundamentals
There is a lot of information here, and I don’t want to overwhelm you if this is
your first experience with Direct3D or in 3D graphics programming in general.
Anything that you do not fully grasp (or that I skim over) in this chapter will be
covered again in a little more detail in the next chapter, in accordance with my
‘‘learn by repetition’’ concept.
The unfortunate fact of the situation at this point is that the framework is getting
pretty big. There are now all of the following components in the framework that
has been developed in this book:
n dxgraphics.h
n dxgraphics.cpp
n dxaudio.h
n dxaudio.cpp
n dxinput.h
n dxinput.cpp
n winmain.cpp
n game.h
n game.cpp
In addition, the DirectX components need the following support files, which are
distributed with the DirectX SDK:
n dsutil.h
n dsutil.cpp
n dxutil.h
n dxutil.cpp
My goal is not to create some big game-engine type of library; it is just to group
reusable code in a way that makes it more convenient to write DirectX programs.
The problem is that many changes must be made to both the header and source
file for each struct, function, and variable. So what I’m going to do at this point is
just show you what code I’m adding to the framework, explain to you where it
goes, and then just encourage you to open the project from the CD-ROM. The
The Textured Cube Demo 283
‘‘open file and insert this code . . .’’ method is just too confusing, don’t you agree?
Due to the way compilers work, it’s just not a simple copy-and-paste operation
because variables need to be defined in the header (using
extern) before they are
‘‘declared’’ in the actual source file. It’s an unwieldy process to say the least.
That said, I encourage you to open up the cube_demo project from \sources\
chapter12 on the CD-ROM, which you should have copied to your hard drive
already.
dxgraphics.h
First, let’s add the definitions for the VERTEX and QUAD structures and the camera
to the dxgraphics.h file:
#define D3DFVF_MYVERTEX (D3DFVF_XYZ | D3DFVF_TEX1)
struct VERTEX
{
float x, y, z;
float tu, tv;
};
struct QUAD
{
VERTEX vertices[4];
LPDIRECT3DVERTEXBUFFER9 buffer;
LPDIRECT3DTEXTURE9 texture;
};
extern D3DXVECTOR3 cameraSource;
extern D3DXVECTOR3 cameraTarget;
Next, let’s add the following sections of code to dxgraphics.h. First, the function
prototypes:
void SetPosition(QUAD*,int,float,float,float);
void SetVertex(QUAD*,int,float,float,float,float,float);
VERTEX CreateVertex(float,float,float,float,float);
QUAD* CreateQuad(char*);
void DeleteQuad(QUAD*);
void DrawQuad(QUAD*);
void SetIdentity();
void SetCamera(float,float,float,float,float,float);
void SetPerspective(float,float,float,float);
void ClearScene(D3DXCOLOR);
284 Chapter 12
n
3D Graphics Fundamentals
I have not covered camera movement yet, but it is essential, and is not something
I intend to just ignore. I will explain how the camera works below in the section
on writing the actual cube_demo program.
dxgraphics.cpp
Now, opening up the dxgraphics.cpp source file, let’s first add the variable
declarations for
cameraSource and cameraTarget, which were previously defined
in the header file.
D3DXVECTOR3 cameraSource;
D3DXVECTOR3 cameraTarget;
Okay, how about some really great reusable functions for 3D programming? I
have gone over most of the basic code for these functions already. The rest are
really just support functions that are self-explanatory. For instance,
SetPosition
just sets the position of a vertex inside a particular quad (without affecting the
texture coordinates). The
SetVertex function actually sets the position and the
texture coordinates. These are very helpful support functions that will greatly
simplify the 3D code in the main program (coming up!).
void SetPosition(QUAD *quad, int ivert, float x, float y, float z)
{
quad->vertices[ivert].x = x;
quad->vertices[ivert].y = y;
quad->vertices[ivert].z = z;
}
void SetVertex(QUAD *quad, int ivert, float x, float y, float z, float tu, float tv)
{
SetPosition(quad, ivert, x, y, z);
quad->vertices[ivert].tu = tu;
quad->vertices[ivert].tv = tv;
}
VERTEX CreateVertex(float x, float y, float z, float tu, float tv)
{
VERTEX vertex;
vertex.x = x;
vertex.y = y;
vertex.z = z;
vertex.tu = tu;
The Textured Cube Demo 285
vertex.tv = tv;
return vertex;
}
QUAD *CreateQuad(char *textureFilename)
{
QUAD *quad = (QUAD*)malloc(sizeof(QUAD));
//load the texture
D3DXCreateTextureFromFile(d3ddev, textureFilename, &quad->texture);
//create the vertex buffer for this quad
d3ddev->CreateVertexBuffer(
4*sizeof(VERTEX),
0,
D3DFVF_MYVERTEX, D3DPOOL_DEFAULT,
&quad->buffer,
NULL);
//create the four corners of this dual triangle strip
//each vertex is X,Y,Z and the texture coordinates U,V
quad->vertices[0] = CreateVertex(-1.0f, 1.0f, 0.0f, 0.0f, 0.0f);
quad->vertices[1] = CreateVertex( 1.0f, 1.0f, 0.0f, 1.0f, 0.0f);
quad->vertices[2] = CreateVertex(-1.0f,-1.0f, 0.0f, 0.0f, 1.0f);
quad->vertices[3] = CreateVertex( 1.0f,-1.0f, 0.0f, 1.0f, 1.0f);
return quad;
}
void DeleteQuad(QUAD *quad)
{
if (quad == NULL)
return;
//free the vertex buffer
if (quad->buffer != NULL)
quad->buffer->Release();
//free the texture
if (quad->texture != NULL)
quad->texture->Release();
//free the quad
286 Chapter 12
n
3D Graphics Fundamentals
free(quad);
}
void DrawQuad(QUAD *quad)
{
//fill vertex buffer with this quad’s vertices
void *temp = NULL;
quad->buffer->Lock(0, sizeof(quad->vertices), (void**)&temp, 0);
memcpy(temp, quad->vertices, sizeof(quad->vertices));
quad->buffer->Unlock();
//draw the textured dual triangle strip
d3ddev->SetTexture(0, quad->texture);
d3ddev->SetStreamSource(0, quad->buffer, 0, sizeof(VERTEX));
d3ddev->DrawPrimitive(D3DPT_TRIANGLESTRIP, 0, 2);
}
void SetIdentity()
{
//set default position, scale, and rotation
D3DXMATRIX matWorld;
D3DXMatrixTranslation(&matWorld, 0.0f, 0.0f, 0.0f);
d3ddev->SetTransform(D3DTS_WORLD, &matWorld);
}
void ClearScene(D3DXCOLOR color)
{
d3ddev->Clear(0, NULL, D3DCLEAR_TARGET | D3DCLEAR_ZBUFFER, color, 1.0f, 0 );
}
void SetCamera(float x, float y, float z, float lookx, float looky, float lookz)
{
D3DXMATRIX matView;
D3DXVECTOR3 updir(0.0f,1.0f,0.0f);
//move the camera
cameraSource.x = x;
cameraSource.y = y;
cameraSource.z = z;
//point the camera
cameraTarget.x = lookx;
cameraTarget.y = looky;
The Textured Cube Demo 287
cameraTarget.z = lookz;
//set up the camera view matrix
D3DXMatrixLookAtLH(&matView, &cameraSource, &cameraTarget, &updir);
d3ddev->SetTransform(D3DTS_VIEW, &matView);
}
void SetPerspective(float fieldOfView, float aspectRatio, float nearRange,
float farRange)
{
//set the perspective so things in the distance will look smaller
D3DXMATRIX matProj;
D3DXMatrixPerspectiveFovLH(&matProj, fieldOfView, aspectRatio, nearRange,
farRange);
d3ddev->SetTransform(D3DTS_PROJECTION, &matProj);
}
The Cube_Demo Program
The next step is the main code, which uses all of these reusable functions you just
added to the dxgraphics module of the framework. The Cube_Demo program
(shown in Figure 12.10) draws a textured cube on the screen and rotates it in the
x and z axes.
288 Chapter 12
n
3D Graphics Fundamentals
Figure 12.10
The Cube_Demo program demonstrates everything covered in this chapter about 3D programming.
While it might seem like there are only eight vertices in a cube (refer to
Figure 12.11), there are actually many more, because each triangle must have its
own set of three vertices. But as you learned recently, a triangle strip works well to
produce a quad with only four vertices.
As you have just worked with triangles and quads up to this point, a short
introduction to cubes is in order. A cube is considered one of the simplest 3D
objects you can create, and is a good shape to use as an example because it has six
equal sides. As all objects in a 3D environment must be made up of triangles, it
follows that a cube must also be made up of triangles. In fact, each side of a cube
(which is a rectangle) is really two right triangles positioned side by side with the
two right angles at opposing corners. See Figure 12.12.
Note
A right triangle is a triangle that has one 90-degree angle.
The Textured Cube Demo 289
Figure 12.11
A cube might have only eight corners, but is comprised of many vertices.
Figure 12.12
A rectangle is made up of two right triangles.
After you have put together a cube using triangles, you end up with something
like Figure 12.13. This figure shows the cube sub-divided into triangles.
game.cpp
Well, now it’s time to go over the main source code for the Cube_Demo pro-
gram. I encourage you to load the project off the CD-ROM (which should be
copied to your hard drive for convenience—and don’t forget to turn off the read-
only attribute so you can make changes to the files).
Nothing has changed in game.h since the last project, so you can just use one of
your recent copies of game.h for this project or follow along with the Cube_
Demo project itself. So much information has been covered that I elected to skip
over setting up the project and so on.
If you think it’s strange to create a 3D model using code as shown below, you
would be right on the mark. This is indeed very strange, but it is helpful at this
point to illustrate how vertices are used to build polygons, which then make up
models (also called meshes). It would be very difficult to create any type of
complex 3D model using code like this, so it’s only really useful in our simple
cube example. Soon we’ll learn how to load a mesh file into memory and render
models directly from a file.
#include "game.h"
#define BLACK D3DCOLOR_ARGB(0,0,0,0)
VERTEX cube[] = {
{-1.0f, 1.0f,-1.0f, 0.0f,0.0f}, //side 1
{ 1.0f, 1.0f,-1.0f, 1.0f,0.0f },
290 Chapter 12
n
3D Graphics Fundamentals
Figure 12.13
A cube is made up of six sides, with twelve triangles in all.
{-1.0f,-1.0f,-1.0f, 0.0f,1.0f },
{ 1.0f,-1.0f,-1.0f, 1.0f,1.0f },
{-1.0f, 1.0f, 1.0f, 1.0f,0.0f }, //side 2
{-1.0f,-1.0f, 1.0f, 1.0f,1.0f },
{ 1.0f, 1.0f, 1.0f, 0.0f,0.0f },
{ 1.0f,-1.0f, 1.0f, 0.0f,1.0f },
{-1.0f, 1.0f, 1.0f, 0.0f,0.0f }, //side 3
{ 1.0f, 1.0f, 1.0f, 1.0f,0.0f },
{-1.0f, 1.0f,-1.0f, 0.0f,1.0f },
{ 1.0f, 1.0f,-1.0f, 1.0f,1.0f },
{-1.0f,-1.0f, 1.0f, 0.0f,0.0f }, //side 4
{-1.0f,-1.0f,-1.0f, 1.0f,0.0f },
{ 1.0f,-1.0f, 1.0f, 0.0f,1.0f },
{ 1.0f,-1.0f,-1.0f, 1.0f,1.0f },
{ 1.0f, 1.0f,-1.0f, 0.0f,0.0f }, //side 5
{ 1.0f, 1.0f, 1.0f, 1.0f,0.0f },
{ 1.0f,-1.0f,-1.0f, 0.0f,1.0f },
{ 1.0f,-1.0f, 1.0f, 1.0f,1.0f },
{-1.0f, 1.0f,-1.0f, 1.0f,0.0f }, //side 6
{-1.0f,-1.0f,-1.0f, 1.0f,1.0f },
{-1.0f, 1.0f, 1.0f, 0.0f,0.0f },
{-1.0f,-1.0f, 1.0f, 0.0f,1.0f }
};
QUAD *quads[6];
void init_cube()
{
for (int q=0; q<6; q++)
{
int i = q*4; //little shortcut into cube array
quads[q] = CreateQuad("cube.bmp");
for (int v=0; v<4; v++)
{
quads[q]->vertices[v] = CreateVertex(
cube[i].x, cube[i].y, cube[i].z, //position
cube[i].tu, cube[i].tv); //texture coords
i++; //next vertex
The Textured Cube Demo 291
}
}
}
//initializes the game
int Game_Init(HWND hwnd)
{
//initialize keyboard
if (!Init_Keyboard(hwnd))
{
MessageBox(hwnd, "Error initializing the keyboard", "Error", MB_OK);
return 0;
}
//position the camera
SetCamera(0.0f, 2.0f, -3.0f, 0, 0, 0);
float ratio = (float)SCREEN_WIDTH / (float)SCREEN_HEIGHT;
SetPerspective(45.0f, ratio, 0.1f, 10000.0f);
//turn dynamic lighting off, z-buffering on
d3ddev->SetRenderState(D3DRS_LIGHTING, FALSE);
d3ddev->SetRenderState(D3DRS_ZENABLE, TRUE);
//set the Direct3D stream to use the custom vertex
d3ddev->SetFVF(D3DFVF_MYVERTEX);
//convert the cube values into quads
init_cube();
//return okay
return 1;
}
void rotate_cube()
{
static float xrot = 0.0f;
static float yrot = 0.0f;
static float zrot = 0.0f;
//rotate the x and Y axes
xrot += 0.05f;
yrot += 0.05f;
292 Chapter 12
n
3D Graphics Fundamentals
//create the matrices
D3DXMATRIX matWorld;
D3DXMATRIX matTrans;
D3DXMATRIX matRot;
//get an identity matrix
D3DXMatrixTranslation(&matTrans, 0.0f, 0.0f, 0.0f);
//rotate the cube
D3DXMatrixRotationYawPitchRoll(&matRot,
D3DXToRadian(xrot),
D3DXToRadian(yrot),
D3DXToRadian(zrot));
matWorld = matRot * matTrans;
//complete the operation
d3ddev->SetTransform(D3DTS_WORLD, &matWorld);
}
//the main game loop
void Game_Run(HWND hwnd)
{
ClearScene(BLACK);
rotate_cube();
if (d3ddev->BeginScene())
{
for (int n=0; n<6; n++)
DrawQuad(quads[n]);
d3ddev->EndScene();
}
d3ddev->Present(NULL, NULL, NULL, NULL);
Poll_Keyboard();
if (Key_Down(DIK_ESCAPE))
PostMessage(hwnd, WM_DESTROY, 0, 0);
}
The Textured Cube Demo 293
void Game_End(HWND hwnd)
{
for (int q=0; q<6; q++)
DeleteQuad(quads[q]);
}
What’s Next?
That’s a lot of information to digest in a single chapter, and I wouldn’t be
surprised if you needed to go over the information here again to really get a
grasp of it. 3D programming is no easy chore, and mastery of the subject can
take years. Don’t be discouraged, though, because there are a lot of great things
you can do before you have mastered it! For instance, this chapter has just
scratched the surface of what you can do with even a novice understanding of
Direct3D.
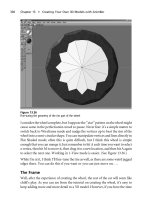
Figure 12.14 shows an image of a car that I created with Anim8or, a free 3D
modeling program that is included on this book’s CD-ROM. This powerful 3D
modeling tool supports the 3D Studio Max file format (.3DS). The next two
chapters will teach you how to create your own 3D models and how to load those
models from a file into your Direct3D program.
294 Chapter 12
n
3D Graphics Fundamentals
Figure 12.14
You will learn how to create and use your own 3D models in the next two chapters!
What You Have Learned
This chapter has given you an overview of 3D graphics programming. You have
learned a lot about Direct3D, and have seen a textured cube demo. Here are the
key points:
n You learned what vertices are and how they make up a triangle.
n You learned how to create a vertex structure.
n You learned about triangle strips and triangle lists.
n You learned how to create a vertex buffer and fill it with vertices.
n You learned about quads and how to create them.
n You learned about texture mapping.
n You learned how to create a spinning cube.
What You Have Learned 295
Review Questions
The following questions will help to reinforce the information you have learned
in this chapter.
1. What is a vertex?
2. What is the vertex buffer used for?
3. How many vertices are there in a quad?
4. How many triangles make up a quad?
5. What is the name of the Direct3D function that draws polygons?
On Your Own
296 Chapter 12
n
3D Graphics Fundamentals
The following exercises will help to challenge your retention of the information
in this chapter.
Exercise 1. The Cube_Demo program creates a rotating cube that is textured.
Modify the program so that the cube spins faster or slower based on keyboard
input.
Exercise 2. Modify the Cube_Demo program so that each of the six sides of the
cube has a different texture. Hint: You may need to copy the code from
DrawQuad
into your main source code file in order to use different textures.
On Your Own 297
This page intentionally left blank
Creating Your Own
3D Models with
Anim8or
This chapter will teach you how to create your own 3D models using a freeware
modeling program called Anim8or. This program is powerful and full-featured
and easy to learn and use. The interface is a study in interaction design (pio-
neered by Alan Cooper, see ), as the most commonly
used features are readily available, and below this layer are more complex features
(such as animation). This chapter will introduce you to Anim8or and go over the
basic features of the program, and then it will teach you how to create a simple
model of a car.
299
chapter 13
Here is what you will learn in this chapter:
n How to use Anim8or to create 3D models, meshes, and objects.
n How to manipulate a mesh into a desired shape.
n How to apply a material to the face of a mesh.
n How to create the components of a car and build it.
Introducing Anim8or
Anim8or is an advanced, modern, full-featured, absolutely free 3D modeling
program that you can use to use to create 3D models for just about anything you
want, including games. The current version of Anim8or at the time of this
writing is 0.85, with 0.9 just around the corner. The author of this program,
R. Steven Glanville, considers Anim8or to be still in beta stage, although it is fully
functional at this point and loaded with great features. As a software engineer for
NVIDIA—the company responsible for the mystical GeForce chips and
responsible for bringing ‘‘GPU’’ and ‘‘T&L’’ into consumer awareness, Steven
knows a thing or two about graphics. The primary goal of Anim8or is to make it
easy to create 3D animations. While it’s a great program for creating static
models for games, it also includes extensive support for key-frame animation of
models. Anim8or allows you to easily create, edit, and animate models with its
intuitive interface. See Figure 13.1.
Note
As this is just a qui ck overview of Anim8or and not a full reference of the program, I encourage
you to bookmark the following URL where the latest edition of the Anim8or manual may be
found: />Getting into 3D Modeling
First of all, I need to insert a disclaimer of sorts here: I am a programmer, not an
artist. Therefore, what you can expect is a very primitive tutorial in 3D modeling
that a modeler might find amusing. I make no apology for being a programmer;
I am simply not a modeler. However, as with programming, modeling is a skill
that can improve over time.
Why, then, should I include a chapter about 3D modeling if I’m an amateur at
the subject myself? Because coming up with artwork and models is one of the
most frustrating aspects of game programming on your own, but whatever you
300 Chapter 13
n
Creating Your Own 3D Models with Anim8or
can learn to do on your own is extremely valuable and timesaving. And even a
simple overview of a modeling tool and tutorial on how to create a model will
help you tremendously.
That being said, I want to encourage you to study the subject further if it interests
you. I have found that books on 3ds max 4 are particularly helpful because that
interface is sort of similar to Anim8or. By sort of I mean that the basic concepts are
similar enough that you can figure out what to do in Anim8or by reading a book
on 3ds max 4. Newer versions of 3ds max have been loaded with new features that
I find daunting. I know exactly where to direct you for the absolute best tutorial
for a beginner, though, and I don’t hesitate for a moment because I have found
this book to be outstanding. It is called Modeling a Character in 3DS Max, by Paul
Steed. Paul worked for id Software as a modeler on Quake III, so he knows what
he’s talking about. Paul will teach you step-by-step how to create a female
character the likes of which you might find in any modern game. There are other
Introducing Anim8or 301
Figure 13.1
Anim8or is a full-featured 3D modeling and animation program.
references available to you, too, and I strongly encourage you to look them up
because even a basic familiarity with 3D modeling will help wonderfully as you
hone your 3D programming skills.
If you do pick up a few books on 3D modeling but you don’t own a copy of 3ds
max, there are two immediate options that you can try. First, Discreet has provided
a free modeling tool called GMAX. This is a scaled-down version of 3ds max that
does not include any capability for creating animations or scenes with cameras and
so on. All you can do with GMAX is edit 3D models. That aspect of the program is
identical to 3ds max, and I particularly like it because the interface resembles 3ds
max 4, which is better for learning than the newer versions because it is simpler.
It is also very nice to be able to create your own models. It is a pain to try to locate
free models on the Web, mainly because almost none of the free models you are
likely to find will be suitable for your game. However, there is a lot of good stock
available for scenery and miscellaneous objects, for which I direct you to 3D Cafe
(located at ), where you can download free models and
purchase licenses for model sets that can be used in your games.
Another excellent source of models on the Web is 3D Modelworks, located at
. I particularly like this site because it includes a
Web-based model browser so that you can actually see the models on the screen,
rotate, and zoom in and out, before purchasing the model. The browser also
animates those models on the screen that are animated.
Features
There are four modes in Anim8or, three for editing and one for putting objects
into a scene. Anim8or lets you zoom in and out of the workspace to rotate, move,
and scale individual polygons as well as entire models; to group objects together;
and to edit the vertices of an object.
The Object Editor
The Object Editor is where you create and edit models. Anim8or can import the
following types of files into the Object Editor:
n 3D Studio (.3ds)
n LightWave (.lwo)
n Wavefront (.obj)
n Anim8or (.an8)
302 Chapter 13
n
Creating Your Own 3D Models with Anim8or
The Figure Editor
The Figure Editor is used to animate characters using bone animation techni-
ques. First, you define the structure of a character using jointed bones with
various properties (such as direction and limits of movement), and then add
polygons to the bones to construct a character that can be easily animated.
The Sequence Editor
The Sequence Editor lets you define segments of motion by manipulating a
model for each step; then these segments can be assembled into a sequence using
the Scene Editor.
The Scene Editor
The Scene Editor is where you construct animated or static scenes using objects,
figures, and sequences you have created in the other program modes. The scene is
where you can add cameras and create a movie that can be saved as an AVI file.
The Interface
Your mouse is the primary editing device in Anim8or. You move the mouse in a
left/right motion to manipulate the X axis, an up/down motion to manipulate
the Y axis, and the right mouse button along with up/down motion to manip-
ulate the Z axis. I’ll assume that you can navigate the Anim8or menus (after a
little practice) and can load and save files. Manipulating objects and using the
four modes are what really require some explanation.
Take a look at Figure 13.2, which shows the Object Editor as it appears when
Anim8or first starts up.
If you open the Mode menu (shown in Figure 13.3), you will find the four primary
parts of Anim8or: Object, Figure, Sequence, and Scene. The Browser is a feature
that allows you to browse all of the objects, figures, or sequences currently loaded
into Anim8or (meaning that yes, you can have many of each item in the scene).
I will go over each of the four modes in the following sections of this chapter.
Installing Anim8or
Anim8or does not need to be installed at all, and you will be surprised to know
that it comes as a single 1,200KB executable file, Anim8or.exe, without any setup
file, documentation files, or the like. You just copy the Anim8or.exe file to a
convenient place (such as your Windows Desktop) and run it; it’s as simple as
Introducing Anim8or 303
that. Anim8or uses OpenGL to render 3D graphics, so you will need a video card
with an OpenGL driver (I suspect you knew that already).
To install Anim8or, just copy the Anim8or.exe file from the CD-ROM; the file is
located in \Anim8or. Although 0.9 is the version covered in this chapter, I
encourage you to visit the main Anim8or home page, at ,
in order to download a newer version of the program that may be available.
Using Anim8or
I am going to give you a step-by-step tutorial now on how to create a model with
Anim8or’s Object Editor. You should be able to get the hang of Anim8or by
following along in this tutorial enough to be able to create your own models. If
Anim8or is not already in Object mode, then switch to it with the Mode menu.
You are presented with a blank object-editing screen, as shown in Figure 13.4.
304 Chapter 13
n
Creating Your Own 3D Models with Anim8or
Figure 13.2
Anim8or’s Object Editor is ready for some polygons.