Professional Information Technology-Programming Book part 40 docx
Bạn đang xem bản rút gọn của tài liệu. Xem và tải ngay bản đầy đủ của tài liệu tại đây (33.37 KB, 6 trang )
9.4. Matching a Knockout to Its Background
Hopefully, you have already collected the images you're going to include over the
background image in your composite. Of course, if it's a collage, matching the
background is probably pretty easy. In all likelihood, you won't even see a
background. If you do, just make sure it's a color that flatters the images you're
pasting on top it. Also, make sure it's not lit or patterned in such a way that it
detracts from the images, rather than enhancing them. Since that sort of thing is
always very subjective, it's hard to give you more specific advice than that.
On the other hand, if you're making a montage, there are lots of "gotchas" to pay
attention to if you expect your end result to really look as though the photo actually
happened, rather than being cut and pasted together.
9.4.1. Matching Exposure and Color Balance
The first thing you want to do is open the images at the same time and match
exposure (brightness and contrast) and color balance. Here are the steps for this
stage of the workflow. It may seem strange, but you'll want to do all the above-
mentioned adjustments within the image. So just start by dropping each image and
its layers onto your background image.
1. Go to the Layers palette and place it right alongside your composite image.
Double-click the Hand tool to make the image fill as much of the screen as
possible so that you can easily distinguish one image from the other.
2. Name each layer for the subject of its knockout. This ID process is important
because you will be doing a lot of work with layers and layer groups in this
compositing workflow. So you want to be able to easily find the objects
you're looking for. Also, you're going to be attaching a number of other
layers to each of these images and you want to group all those layers so they
can be easily identified and changed as the client requests.
3. Make your color balance and exposure adjustments. To keep complexity to a
minimum and to save space, try doing all of this with Levels adjustment
layer. Be sure you attach each of these adjustment layers to their respective
images with a Clipping Mask (right-click on the layer and choose Make
Clipping Mask). You'll find the recommended Levels routine in the "Levels
for Shadow, Highlight, and Overall Brightness" section in Chapter 6. At the
end of that routine, don't go back to the color layers to adjust color balance
until you've made the initial exposure adjustments for all the images.
4. Adjust the Levels for all the channels, the RGB channel, and overall
brightness for all the images, then go back to the Levels adjustment layer for
each image. Double-click the Adjustment icon and the Levels dialog will
appear for each image. From the Channel Menu, choose the channel whose
color will contribute the most to correcting the color balance to most closely
match what you want as the overall color balance for your composite image.
In other words, you want the color balance of your knockouts to match that
of the background image. (If you're making a collage, you'll want the color
balance of the images to match one another. However, the easiest way to do
that is to use one image as the image to which you want to match all others.)
Don't use the Match Color command for this job. More often
than not, you'll be very unhappy with the results.
5.
6. Repeat the step above for each of the other images.
7. Match exposure for all the images. You've already pretty much done that
with the Levels adjustment layer by adjusting the Midtone slider in the RGB
channel. However, you may need to have control over contrast in some areas
of the brightness range, so add a Curves layer to those images that need it.
Be sure to use a Clipping Mask on that layer to attach it to only the specific
image you're adjusting. Make the Curves adjustments as you've been
instructed in the "Curves for Adjusting Contrast in Specific Brightness
Areas" section in Chapter 6.
8. Repeat the step above for each of the other images.
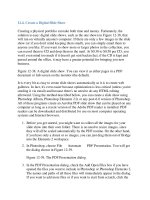
Figure 9-17 shows how the layer structure looks at this stage of the workflownot
taking into account any other layers you might have created in making each of
these images before they were included in the composite.
Figure 9-17. Because it's a collage, it's easy to exaggerate the effects and to show
what layer effects do for a collage. In a montage, the subject matter, scale, and
edge blending would be the only differences.
9.4.2. Lighting and Casting Shadows
One of the hardest things to keep consistent between imported objects and the
background photo is the hardness/softness of shadow edges and the predominant
directions of primary and secondary lighting. If you're lucky enough to have the
time to specifically shoot the objects you'll be importing or to specify assigning
them to others, make sure the photographer knows the time of day, year, and
location that the background photo was made. The photographer or his assignee
should also take along a copy of the background photo when shooting objects to be
added. That way, you can at least position the subject in regard to the lighting, put
up a scrim if the light needs softening, or move the subject into the shade if the
original was taken on a cloudy day.
Back to reality. All too often, it's just impossible to control all those elements when
the picture was shot. So what you have to do is to imitate lighting and perspective
in Photoshop. Following are some steps that will be helpful in most instances:
Shoot the incoming photos in flat lighting as much as possible. That is, in
the shade or on a cloudy day. If you have the time and the manpower, it's
also a good idea to use a soft reflector so that there are no deep shadows.
Take the photo from the same distance and angle at which it will be seen in
the photo.
Create a new layer above the imported object, fill it with 50 percent gray
(Edit Fill 50 percent gray), then change the Blend Mode of the gray
layer to Overlay, then add highlights by painting in white on the gray layer.
Add shadows by painting in black on the gray layer. Experiment with the
softness of the brush and the Opacity of the paint to create a believable
intensity of highlights and shadows.
To correct perspective (it only works if the photo was shot at something at
least close to the right distance and angle), select the layer for the incoming
object and then choose Filter Distort Lens Correction. The Lens
Correction dialog performs many tricks to correct lens distortion. All you
want to do at this point is to fool with the Vertical Perspective and
Horizontal Perspective sliders and the Angle dial (to rotate the image as
needed). The sliders are rather self-explanatory, but you should know that
the further you drag the cursor away from the angle ring after click on the
approximate angle, the easier it will be to change the angle in precise
increments.
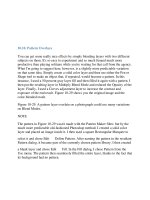
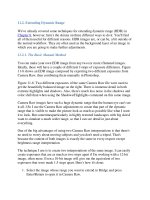
9.4.3. Fixing Focus
There will be times (but definitely not always) when you want to change the focus
in the background image in a montage to approximate a more shallow depth of
field. Doing so tends to emphasize the subject and is especially useful if you're
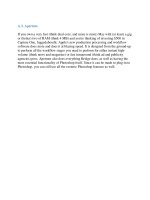
placing a head shot against a new background. Figure 9-18 illustrates that point.
Figure 9-18. A montage using depth of field simulated by the Lens Blur filter.
Notice that objects closer to the model are in sharper focus than those far away. On
the left, the image as it would have appeared without the Lens Blur filter.
If the subject is grounded (appears to be standing or resting on a flat surface) or
appears to be near another object that will be in sharp focus, you will definitely
want to use the Lens Blur filter (Filter Blur Lens Blur). The Lens Blur filter
allows you to simulate depth of field by keeping the area nearest the subject in
sharp focus while blurring the objects that are far away from the subject
considerably more. Figure 9-18 shows the result of using the lens blur filter on a
composited object.
Here's how to use the Lens Blur filter to blur the background:
1. Make your knockout and place it in the background image.
2. Light the knockout to match the lighting in the background image, as
instructed in the previous section.
3. Make an alpha mask that protects the areas you want to keep sharp and then
"graduates" to the area(s) that you want to blur. You can skip this step if
nothing in the picture is on the same plane as the subject. For instance, in a
head shot you rarely see any part of the model touching the objects in the
background.
4. Make a new layer at the top of the layer stack. Make a selection of the areas
that you want to keep in focus. Then feather the selection (Selection
Feather) so that it graduates from black to clear over as much distance as it's
going to take to keep the nearer objects relatively sharp compare to the
farthest objects. The area in which the farthest objects reside should be pure
black. In this image, I also used black and gray paint to paint over areas that
weren't in the primary plane of focus, such as the leaves overhead and the
park bench. The park bench is medium gray to ensure that it wouldn't be as
out of focus as more distant objects.
5. When you've finished painting the mask, turn off all the other layers and
select the entire image (Cmd/Ctrl-A). Open the Channels palette and click
the New Channel icon. A new channel, titled Alpha 1 will appear. Name this
channel Lens Blur. While it's still selected, press Cmd/Ctrl-V to paste the
mask into the channel. You can see the resultant mask as it looked over the
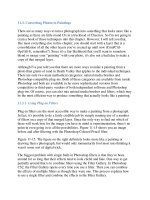
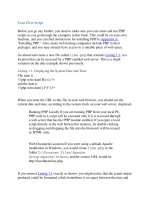
background in Figure 9-19.
Figure 9-19. This focus mask was painted onto a new, transparent layer after
the knockout image had been placed.
Notice that in Figure 9-19, I also painted a little spot of black at the bottom
of the image. I'd have done the same at the top of the image, but the need to
mask the leaves would have hidden the spot. If there's nothing but
transparency at the top and bottom of the layer, the mask will be centered in
the alpha channel when you paste it in. Once it's pasted in, simply use the
Eraser tool to remove the black spots.
6. Make sure the background image's layer is selected. This is where you use
the Lens Blur filter. Choose Filter Blur Lens Blur. The Lens Blur
dialog appears, as seen in Figure 9-20.
7. Choose Alpha 1 from the Source menu and click the More Accurate radio
button. The Hexagon Shape usually imitates the diaphragm shape in most
DSLR and 35mm cameras. Set the Blur Radius for the amount of blur you
want to have. Click the Gaussian radio button. Once you've done all that,
just click the OK button. You can see the result at the beginning of this
exercise in Figure 9-18.
The Lens Blur dialog
9.4.4. Matching Perspective
Matching the point of view and distance from which the background image and the
knockout(s) were shot is best done at the time of shooting, especially if the
knockout object is three-dimensional. If you have the opportunity to do this, make
sure you have approval on the background image first and make yourself a print of
same. If you're good at searching the stock sites and your own library of images,
you should be able to tell whether you've found knockout objects that will look
natural in the background setting.
I once assisted a photographer who wanted to shoot a proposal for a series of car
ads. We could rent the car for long enough to get a number of shots of it, but
didn't have the budget to take it on location with us. So we took along my car. In
every location where we wanted to show the car that would be in the ad, we took
a shot of the scenery with my old junker in place of the shiny, sexy new car. Then I
drove my car out of the scene and we reshot it without the car. So when we
rented the car, all we had to do was take it to an empty baseball stadium parking
lot. We held up the print of the scene with my car in it and then positioned the
camera in respect