Professional Information Technology-Programming Book part 46 docx
Bạn đang xem bản rút gọn của tài liệu. Xem và tải ngay bản đầy đủ của tài liệu tại đây (23.75 KB, 6 trang )
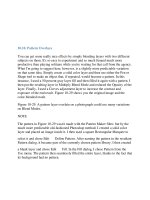
10.10. Pattern Overlays
You can get some really nice effects by simply blending layers with two different
subjects on them. It's so easy to experiment and so much funand much more
productive than playing solitaire while you're waiting for that call from the agency.
What I'm going to suggest here, however, is a slightly more predictable variation
on that same idea. Simply create a solid color layer and then use either the Pen or
Shape tool to make an object that, if repeated, would become a pattern. In this
instance, I used a 50 percent gray layer fill and then filled it again with a pattern. I
then put the res
ulting layer in Multiply Blend Mode and reduced the Opacity of the
layer. Finally, I used a Curves adjustment layer to increase the contrast and
exposure of the end result. Figure 10-29 shows you the original image and the
color-blended result.
Figure 10-29. A pattern layer overlain on a photograph could use many variations
on Blend Modes.
NOTE
The pattern in Figure 10-29 wasn't made with the Pattern Maker filter, but by the
much more predictable old-fashioned Photoshop method; I created a solid color
layer and placed an image inside it. I then used a square Rectangular Marquee to
select it and chose Edit
Define Pattern. After naming the pattern in the resultant
Pattern dialog, it became part of the currently chosen pattern library. I then created
a blank layer and chose Edit Fill. In the Fill dialog, I chose Pattern from the
Use menu. The pattern then seamlessly filled the entire layer, thanks to the fact that
its background had no pattern.
10.11. Photo Filters
The Photo Filters command in the Image Adjustments menu is a means for
making a sepia-toned image but it is also a way to make toned images based on all
the primary RGB colors and their complements. But the Photo Filters command's
most real and important function is imitating the glass color-balancing filters
traditionally used in film photography for warming and cooling the image (see
Figure 10-30).
Figure 10-30. Each of the Standard Photo Filters, applied to the same image at 25
percent.
10.12. Film Effects
The following effects are traditionally done to film, but they've become popular in
digital photography precisely because they bring back the nostalgia of film. They
can also separate a picture from a bunch of run of the mill images.
10.12.1. Velvia
Fujifilm made its mark with the famous Velvia film, endearing itself to many
photographers for bright, vivid colors. By far, the best way I've seen to create this
look is a very affordable (would you believe $25?) automation script from Fred
Miranda (www.fredmiranda.com). However, you can do an only slightly less
impressive version of the same thing by using the Hue/Saturation adjustment layer.
Just move up the Saturation slider by about 30 percent and then tweak with the
Hue Slider (see Figure 10-31).
Figure 10-31. On the right, Fred Miranda's Velvia Vision provides lots of latitude
for tweaking color saturation and extending dynamic range.
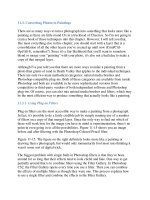
10.12.2. Cross Processing
Cross processing is a term used in tr
aditional darkroom photography for processing
film of one kind (e.g., Ektachrome) in the chemicals usually used for processing
another kind of film (e.g., Kodachrome) or paper. The results can vary quite a bit,
depending on the specific combination used, but generally end up looking
somewhat like the image in Figure 10-32. To apply this technique to your image:
Figure 10-32. The original image (left) and the result after simulated cross
processing.
1. If your image has a normal or flat tonal range and quiet colors, you'll
probably want to change that. Add a Curves adjustment layer and boost the
contrast. At the same time look for areas of tonal brightness you might want
to change. If you find any, press Cmd/Ctrl and move the cursor to the spot in
the image you want to brighten or darken and click. Then press the up arrow
key to brighten or the down key to darken.
If your image's colors are particularly intense, brighten them with a
Hue/Saturation adjustment layer by dragging the Saturation slider to the
right.
2. Duplicate the image (Image Duplicate) because you need to convert it to
Lab color, which will flatten it. Now choose Image Mode Lab Color.
3. In the Channels palette, select the B channel and choose Image
Adjustments Levels. When the Levels dialog opens, drag the Shadows
slider to the right until it reads "77" then click OK. Then repeat this step for
the A channel.
4. Select the Lab channel. You'll probably notice that your image is quite blue
(see Figure 10-33). Press Cmd/Ctrl-A to Select All, then Cmd/Ctrl-C to
copy
the selection to the clipboard.
Figure 10-33. The Lab version of the image after adjusting the A and B
channels.
5. Select your original image and press Cmd/Ctrl-V to Paste the blue Lab
image into your RGB image as a new layer. Put the new layer in Overlay
mode. Add a Hue/Saturation adjustment layer and move the Hue slider until
you see the cross-processing colors you want. You'll end up with something
approximating a cross-processed image.
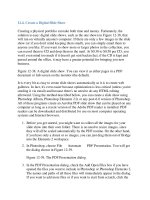
10.12.3. Aged Film
There are several filters on the market that will create an aged film effect, but
unless you do this a lot, it's probably going to be tough to justify the cost. After all,
it's not that hard to do a reasonably credible job in Photoshop. You can see the
result of the exercise that follows as it was applied to Paddy O'Connor's photo in
Figure 10-34. It will work equally well when you want to create an old-fashioned
look. To give an image an aged look:
Figure 10-34. The picture on the right definitely looks as though it's been around
for a while. If you want to make it look even more damaged, you could print it,
mistreat it with creases, tears, and scratches, and scan it or take a picture of it.
1. Duplicate and merge your original layers (of course). Rename the duplicate
Aged Film.
2. Open a Curves adjustment layer. Grab the bottom left of the curve line and
drag it up until the whole image fades, especially in the blacks. Then drag
the very top of the curve line to the left so that you block up some of the
whites.
3. Open a Color Balance
adjustment layer and add a bit of yellow and green. At
this point, your picture should look as though it spent a few years in the sun.
4. Optional: You could also use a Burn and Dodge gray layer to add some
lightening and darkening if you're trying to make it look as if some areas of
the image had faded from more light than others.
5. Adding a bit of noise to the image tends to make it look a bit older as well.
Before you do that, make a merged composite layer and add the noise (Filter
Noise Add Noise) to the composite layer. That way, you can turn it
off, blend it, change its opacity or blur it slightly just to tweak the variations
on the age effect.
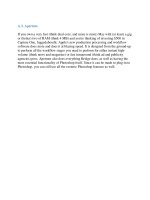
10.12.4. Solarization
In the liquid darkroom, one of the all-time classic processing effects was
solarization. It was done by giving the image half the development time, flashing
the image with white light while still in the developer, then continuing
development in the normal way. The result was that the image was half negative
and half positive. More accurately, the image was part negative and part positive,
depending on when and for how long you flashed the white light. The process for
simulating that effect in the digital darkroom is even more flexible, depending on
the Blend Mode used, whether you change the exposure of the blended layers that
make up the effect, and whether you do about a million other things. Of course, the
most important of all these things is the tonalities in the image you're processing.
Figure 10-35 shows the original and the result. The process to create this effect is
as follows:
Figure 10-35. Although the photo on the left is well-exposed and adjusted, the
"solarized" image on the right projects an "artier" feeling.
1. Open the image you want to solarize and duplicate it. All the steps in this
routine will be performed on the duplicate to protect the original.
2. Press Cmd/Ctrl-J twice to make two duplicates of the image.
3. Select the top duplicate image (Cmd/Ctrl-A) and copy it to the Clipboard
(Cmd/Ctrl-C).
4. Open the Channels palette and click the New Channel icon. A new Alpha
Channel will appear at the bottom of the palette. Press Cmd/Ctrl-V to paste
the image into the Alpha channel.
5. Go back to the Layers palette and select the top layer. Invert it (turn it into a
Negative) by pressing Cmd/Ctrl-I. Now add the Alpha Channel to that mask
and invert it, too. Choose Select
Load Selection and choose Alpha 1 from
the menu in the Load Selection dialog.
6. As soon as the selection appears on the image (you're still on the top layer,
right?) press Cmd/Ctrl- Shift-I to invert the selection (rather than its
contents) and click the Mask icon in the Layers palette to add a new mask to
that Layer. You'll notice that the mask is a Black and White negative of the
original image.
7. Select the second layer from the top and add the Alpha 1 channel.
8. Group all these layers and drag the group to the original image. Name the
Group Solarization. Your image layers should look like those in Figure 10-
36.
Figure 10-36. The Layers and Channels for the solarized image for this
exercise.
NOTE
Frankly, the easiest and best method I've found for Solarization is in the Nik Color
Efex filter set. You have a choice of either black and white or color solarization
and four different methods for each. These filters come in several different
sets and
edition at different prices; go to www.niksoftware.com for more information.