Professional Information Technology-Programming Book part 17 pptx
Bạn đang xem bản rút gọn của tài liệu. Xem và tải ngay bản đầy đủ của tài liệu tại đây (38.96 KB, 8 trang )
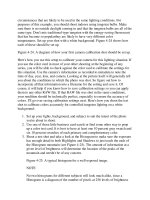
circumstances that are likely to be used in the same lighting conditions. For
purposes of this example, you should shoot indoors using tungsten bulbs. Make
sure there is no outside daylight coming in and that the tungsten bulbs are all of the
same type. Don't mix traditional-type tungsten with the energy-saving fluorescent
that has become so popularthey are likely to have very different color
temperatures. Set up your shot with a white background. Figure 4-24 shows how
each of these should be set up.
Figure 4-24. A diagram of how your first camera calibration shot should be set up.
Here's how you use this setup to calibrate your camera for this lighting situation. If
you use the color card in most of your other shooting at the beginning of any
series, you will be able to check against the color card to calibrate the settings for
this situation. Use the camera's information as recorded to metadata to note the
time of day, year, lens, and camera. Looking at the picture itself will generally tell
you about the conditions in which the photo was shot. So figure out how to
incorporate all that information into a filename for the setting and save it. Of
course, it will help if you know how to save calibration settings so you can apply
them to any other RAW file. If that RAW file was shot in the same conditions,
your rendition should be technically perfect, especially to ensure the accuracy of
colors. I'll go over saving calibration settings next. Here's how you shoot the test
shot to calibrate colors accurately for controlled tungsten lighting on a white
background:
1. Set up your lights, background, and subject to suit the intent of the photo
you're about to shoot.
2. Use one of those little business card easels or find some other way to prop
up a color test card. It is best to have at least one 10 percent gray swatch and
six 10 percent swatches of each primary and complementary color.
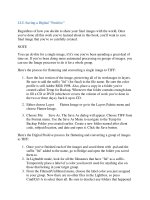
3. Shoot a test shot and take a look at the Histogram to make sure the exposure
has enough detail in both Highlights and Shadows to just touch the ends of
the Histogram mountain (see Figure 4-25). The amount of information at a
given level of brightness will determine the location of the peaks of the
mountain and needn't be of any concern.
Figure 4-25. A typical histogram for a well-exposed image.
NOTE
No two histograms for different subjects will look much alike, since a
Histogram is a diagram of the number of pixels at 256 levels of brightness
from black (left) to white (right).
4. Load the image onto your computer and use Adobe Bridge to open it in
Camera Raw.
5. From the Settings menu, choose Camera Raw Defaults.
6. In the Adjust tab, check all the Auto checkboxes.
7. Be sure to leave Saturation set at 0.
8. Click the Calibrate tab.
9. Place your color test card immediately alongside your instrumentally
calibrated monitor (this is a must; if you don't have a monitor calibration
spider, you can get the excellent ColorVision Spyder in its basic edition for
$79 by shopping around online). If this is your first time instrumentally
calibrating a monitor, you'll find it's very easy to do. Installing the software
and following the instructions will probably take you no more than 15
minutes.
10. If you have a neutral shadow on a neutral background, choose the White
Balance tool and click on it. If your shadows are on a colored background,
drag the shadow tint slider until it looks just right. You probably don't want
to move it so much that it noticeably changes any of the mid to bright colors
in the image.
11. Drag the Hue and Saturation sliders for each of the primary colors until all
the colors in the onscreen swatches exactly match those on the card. Be sure
that both the monitor and the card are lit to the same level of brightness. If
you have to shine a light on the card, make sure it doesn't hit the screen.
12. Once the colors match, you've got it. Now you need to save those settings
(see the upcoming section "Saving and retrieving settings").
4.3.5.1. Making situational calibrations
Situational calibrations are made in conditions that you commonly encounter when
shooting. Just be sure to have your color card in your camera case. When you
arrive on the scene to shoot a situation, place the color card into the scene where it
can be plainly seen and shares the same lighting as the subject you'll be shooting.
When you're back at the computer, calibrate the shot you took and give it a name
that can apply to similar situations when you don't have time to insert the color
card in the shot. Then, when you're calibrating your shoot, you can just look for a
settings title that matches the situation and apply that calibration to the new photos
taken in the same condition.
4.3.5.2. Saving and retrieving settings
Saving calibration settings is no different from saving any or all of the other
settings. The one difference is that when saving setting for calibration purposes,
you should return all the other settings for all the other tabs to their default settings.
The only real tricks to saving settings are:
Make sure they're stored in the Settings folder for the version of Adobe
Photoshop you're using (CS2 or later or Elements 4).
Come up with a system for naming these settings so they are coded in the
camera, for the lens, light temperature, background color, and lighting setup.
I try to put everything in a two-letter code and keep a chart in a Word or
Excel document that fully describes each code name.
Then, follow these steps to save the settings:
1. Click the small diamond in a circle just to the right of the Settings menu. A
drop-down menu will appear of commands for saving, exporting, and
loading Camera Raw settings from all the tabs, including those you just
made on the Calibrate tab.
2. Go to Preferences and make sure that the Save Settings menu is set to
"Sidecar XMP files."
3. Choose Save Settings Subset. The dialog shown in Figure 4-26 appears. Be
sure that Calibration is the only box checked. Then you can apply these
saved settings to any image and only the Calibration settings will be
affected.
Figure 4-26. The Camera Raw Preferences dialog.
4.3.5.3. Applying calibration settings to a collection
You can apply calibration settings to a whole series of images by opening them at
the same time in Camera Raw. If you have more than, say, 16 images (the exact
number depends on your installed RAM and on the size of the images), you may
have to repeat these instructions for additional batches:
1. When you open multiple images, the first image is shown in the Preview
window and the rest are shown thumbnails on the left side of the screen.
2. Click both the Select All and Synchronize buttons above the thumbnails.
3. Choose Calibration from the Synchronize menu in the Synchronize dialog
and click OK.
4. Select the setting you just saved in the "Saving and retrieving settings"
section from the Settings menu.
What if you have several hundred shots that you need to add the calibration
settings to before you adjust the settings? Easy. Open one of those files in Camera
Raw, apply the calibration settings and then click the Done button. Now, go back
to Bridge, select all your files and then, in Bridge, choose Edit Apply Camera
Raw Settings Previous Conversion. You may have to drum your fingers for a
few seconds, but all those images will have the calibration settings applied to them.
As you can see, it is possible to have dozens of calibrations for different lens,
camera, and lighting situations.
Don't apply other Camera Raw settings before you apply these
calibration settingsthey'll be replaced by the default settings you
saved with the calibration settings.
4.4. Automating in Camera Raw
One great benefit of working in the CS2 version of Camera Raw is its expanded
ability to automate the application of settings to numerous images at once. You can
do this by applying the previous setting to an entire folder of images or to any
highlighted image. Better yet, apply the settings to one image and then go back to
Bridge and apply the previously used settings to any and all selected thumbnails or
foldersall without ever even having to open Photoshop.
4.4.1. Winnowing While Processing Multiple Files in Camera RAW
NOTE
One of the giant advantages in working with Printroom, Aperture, or iView Media
Pro is that you can do winnowing at 100 percent magnification before you start
processing.
Winnowing is the process of sorting, classifying, ranking, and disposing of useless
images. This should be done before you start processing. However, since the
procedure is different when using Camera Raw than in Bridgee, I wanted to give it
to you separately to avoid confusion. Camera Raw will let you simultaneously
magnify all the images to any percentage of the original. Most handily, if you
double-click the magnifier while Select All is in effect, all the images will be
magnified to 100 percent. It is then very easy to move from one image to the next.
Figure 4-27 shows the Camera Raw workspace as it should be
set up while you are
winnowing.
Figure 4-27. The Camera Raw workspace set up as I like it while winnowing.
When you see an image that is unacceptably unsharp, hit the Delete key. The
thumbnail will stay in place until you leave Camera Raw, but a red X appears in
the upper corner of the affected thumbnail. If you change your mind about
eliminating that image, simply click on the red X to deselect the image for
deletion. You can zoom out by double-clicking the Hand icon. All the images will
appear in the Preview window, scaled to fit. Now you can review the images for
unacceptable characteristics, such as too much lens flare, an embarrassing facial
expression, awkward pose, or the unexpected appearance of someone in front of
the lens just at the "moment of click." Now that you've eliminated a lot of wasted
file space and processing time, you can save even more time by adjusting whole
groups of images simultaneously.
4.4.2. Tweaking Camera Raw Adjustments in Sync
You had a taste of synching in the "Using the Calibrate Tab Settings" section
earlier in this chapter. But the best part is that you can actually perform all the
Camera Raw adjustments simultaneously on all of the open images:
1. In Bridge, select the thumbs of all the images you think should be adjusted
the same way. These will generally be photos of the same or very similar
subjects in the exact same location, light source and angle, time of day, and
that were shot with the same camera and lens. When all the images you want
to process have been selected, press Return/Enter.
2. The selected images will open in Camera Raw. Camera Raw is technically a
Photoshop plug-in, so Photoshop will open first, with Camera Raw inside it.
3. At the top of the thumbnail column, you see two buttons: Select All and
Synchronize. Click them both. You'll notice that all the thumbnails are
highlighted to show they've been selected.
4. The Synchronize dialog will appear. Unless you want to apply only a subset
of the settings to this groupfor instance, you might decide later that you
could improve on noise reduction and vignettingsimply leave all the boxes
checked and click OK.
5. Make all the adjustments you want in the order you were given them.
6. When you're done making adjustments, note that the labeling of the Save
and Open buttons has changed to reflect the number of files that are
currently selected, minus those that have been selected for deletion. After
making all the adjustments in Camera Raw, save all your images to
Photoshop format by clicking the Save button. The Save dialog, shown in
Figure 4-28, appears. Now is a good time to rename your images so that you
can readily identify the subject and shoot.
Figure 4-28. The Save Options dialog.
7. Choose the folder where you want to save your PSD images. I like to keep
them in the same folder as the RAW files so that I can use Bridge to move
the adjusted PSD files immediately next to the corresponding original RAW
file. This makes it very easy to know which images are ready for the client
and which will need more work. In that case, choose "Save in Same
Location." However, you can choose "Save in New Location" or use the
Browse button to create a new subfolder.
8. Now comes the important part: naming your files logically. Because I
organize my folders by client and shoot date, that is usually enough to
identify the subject (see "Renaming Individual Files" in Chapter 3 for more
on this). To change the name, highlight the words "document name" in the
first filename field and enter the subject name. From the menu immediately
to the right, choose Document Name. Other automatic renaming processes in
Photoshop and Bridge also have a nearly identical dialog, so you'll get quite
used to this automatic naming process.
9. Choose the file type you want to save to. Normally, you will want to save to
the .psd format so you can continue editing in 16-bit mode for as long as
possible and also to take advantage of layersespecially nondestructive
Adjustment layers. Once you've done all that, press OK.
Converting Camera Raw Files to Other Formats
You can also use the Save button in Camera Raw to save as many files
as needed to .jpg, .tif, or .dng formats. You can save all these images into
most of the other popular file formats by choosing them from the menu.
This is a good option if time constraints hamper how much work you can
do on an image before sending it to your client for approval (most likely)
or straight out for publication (in very tight deadline circumstances).
4.4.3. Applying Camera Raw Settings in Adobe Bridge
If you have more than the suggested 16 images to process simultaneously or just
don't need to have all the files open as you process the first one, this is the fastest
way to apply the same settings to any number of RAW files:
1. Open the first, best, or most typical of the group in Camera Raw and do all
the processing recommended in this course.
2. Click the Done button at the bottom of the Camera Raw dialog. Clicking
Done closes Camera Raw and at the same time applies all the settings you've
made to the currently opened image(s).
3. Now you're back in Adobe Bridge. Simply Cmd/Ctrl-click each image to
which you want to apply the last settings made in Camera Raw.
4. Ctrl/Right-click any of the selected images. From the resulting in-context
menu (Figure 4-29), choose Previous Conversion. Since Camera Raw is
closed, processing happens more quickly. And while it's processing you can
do other thingssuch as selecting the next group of images you want to
process.
Figure 4-29. The in-context menu appears when you right-click on an image
in Photoshop Bridge.
NOTE
As soon as you've processed multiple images in Camera Raw and come back to
Bridge, empty your Trash/Recycle Bin to clear your available disk (and memory
swapping if you're cramped for disk space) for the complex work of image
processing.