Professional Information Technology-Programming Book part 49 docx
Bạn đang xem bản rút gọn của tài liệu. Xem và tải ngay bản đầy đủ của tài liệu tại đây (35.67 KB, 6 trang )
11.2. Extending Dynamic Range
We've already covered some techniques for extending dynamic range (HDR) in
Chapter 8, however, here's the skinny on three different ways to do it. You'll find
all of them useful for different reasons. HDR images are, or can be, a bit outside of
the normal workflow. They are often used as the background layer of an image in
which you are going to make further adjustments.
11.2.1. The Basic Manual Method
You can make your own EDR image from any two (or more) flattened images.
Ideally, these will have a couple of different f-stops of exposure difference. Figure
11-8 shows an EDR image composed by exporting two different exposures from
Camera Raw, then combining them manually in Photoshop.
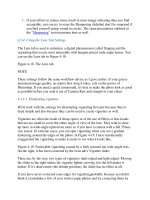
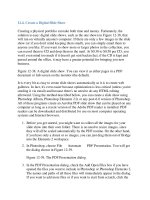
Figure 11-8. Two different exposures of the same Camera Raw file were used to
get the beautifully balanced image on the right. There is immense detail in both
extreme highlights and shadows. Also, there's much less noise in the shadows and
color shift than when using the Shadows/Highlights command on this same image.
Camera Raw images have such a huge dynamic range that the human eye can't see
it all. I So I use the Camera Raw adjustments to create that part of the dynamic
range that is visible to make the picture look as much as possible like what I want
it to look. But sometimesparticularly in highly textured landscapes with big skiesI
want to simulate a much wider range, so that I can see detail in just about
everything.
One of the big advantages of using two Camera Raw interpretations is that there's
no need to worry about moving subjects and you don't need a tripod. That's
because the content of both images is exactly the same in every respect except
brightness range interpretation.
The technique I use is to create two interpretations of the same image. I can easily
create exposures that are as much as two stops apart if I'm working with a 12-bit
image, often more. Even a 10-bit image will give me the equivalent of two
exposures that were made 1.5 steps apart. Here's how it's done:
1. Select the image whose range you want to extend in Bridge and press
Enter/Return to open it in Camera Raw.
2. Make adjustments that will allow you to see all the detail you want in the
highlights. Although it's wisest to be careful to exposure so that you don't
absolutely block highlights, you'll be amazed at how much you can "bring
back" if you drag the exposure slider until the highlight end of the
Histogram is inside its frame. Then adjust the other sliders so that you still
get as much overall detail as possible without affecting the highlights. When
you're done, click the Open button.
3. Go back to Bridge. Your image is still highlighted, so press Enter/Return
again. The image reopens in Bridge. Make your adjustments so that all the
darker areas of the image show a reasonable amount of detail. When you're
done, click the Open button.
4. When the brighter exposure opens, copy and paste the entire image into the
darker image. Label the layers Highlight and Shadow for future reference.
5. Open the Channels palette and press Cmd/Ctrl-Opt/Alt and then click on the
RGB channel. Everything brighter than 50 percent gray will be selected.
Now you have to decide about feathering. I always run a test to see how
minimal or no feathering will look. Just hit the Backspace/Delete key and
then press Cmd/Ctrl-H to hide the marquee or Cmd/Ctrl-D to delete it. If the
image looks good, rename it to reflect the stage it's been through and save it.
6. If the image looks solarized or the highlights and shadows don't blend
naturally, press Opt/Alt-Cmd/Ctrl-Z several times until you get back to the
original, undeleted selection. Now choose Select Feather and enter a
pixel radius of around 200 pixels. The exact radius will depend on the
resolution of your image. The criteria: if you see a halo when you delete the
contents of the selection, go back and feather over a larger radius.
Otherwise, you're done.
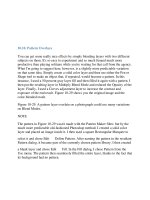
11.2.2. The Miranda Scripts for Merging Two Images
Fred Miranda, a photographer based in Los Angeles, has put considerable time into
developing a whole series of scripts for digital photographers. These routines are
either in the form of Actions or, more recently, converted to Adobe Scripts that run
under the File Automate command. Figure 11-9 shows the image as it was
originally exposed by Camera Raw and after the merge of one image that Camera
Raw exposed for the detail in the falls and another that was exposed for the details
in the trunks of the redwoods.
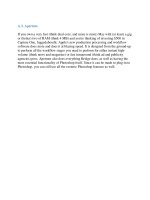
Figure 11-9. The auto-adjusted Camera Raw image and the result of merging two
Camera Raw exposures in DRI Pro (right).
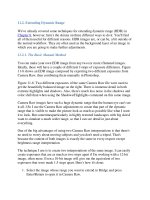
Here's the process for Fred Miranda's DRI Pro script (see Figure 11-10):
Figure 11-10. The Fred Miranda DRI Pro dialog, ready to rock.
1. Shoot or Camera Raw process a pair of images that are about two f-stops
apart. When you process or winnow them, be sure to name them and to
indicate in the name which image is over- and underexposed.
2. In Photoshop, choose File Automate DRI Pro. The DRI Pro dialog,
seen in Figure 11-10, will burst upon you.
3. Click the Browse button for the underexposed image. Use your OS's normal
file navigation system to locate the file and select it.
4. Click the Browse button for the overexposed image. Use your OS's normal
file navigation system to locate the file and select it.
5. Click the DRI Options button. It makes the right guess most of the time. If
you see a highlight halo around the highlight objects in the resultant image,
simply press Cmd/Ctrl-Opt/Alt-Z until you get back to the dialog and then
click the DRI Radius Tweak button. You'll then need to choose a radius
from the Choose Blending Radius menu and may have to repeat this
operation several times until you find the right radius.
11.2.3. Using Photoshop's Merge to HDR Script and the Exposure Command
The most advanced method of creating a combined high or expanded dynamic
range image is the Photoshop HDR command, which was greatly enhanced in CS2.
It combines images mathematically into a 32-bit image whose dynamic range far
exceeds anything that your sensor could record or that your eye can see.
NOTE
One of the giant advantages of using the Merge to HDR command is that you get
the same benefit you get from other HDR merging methodsless noise due to the
fact that the images are stacked atop one anotherso grain from one layer fills in
empty spaces between grains in other layers.
11.2.3.1. Shooting for HDR
Shooting for an HDR image so you get the best result requires following a few
rules. Don't auto-bracket unless you have to handhold the shot. Besides, auto-
bracketing only works on cameras that let you shoot at least three shots, and HDR
prefers five to seven shots. If you want to use auto-bracketing, you have to use a
camera that gives you at least a full f-stop between bracketed shots. You must also
be able to auto-bracket with the camera in A (Aperture Priority) mode. Never
change f-stops or ISO settings between bracketed shots because the depth of field
and noise must remain consistent between shots.
NOTE
There isn't much point in shooting RAW files for HDR interpretation unless you
just want to open up your interpretation options. It's easy to shoot seven frames for
an HDR at one stop apart without using a significant portion of the space on your
memory card. If you try to HDR multiple RAW interpretations, the program will
just tell you there's not enough dynamic range. If you combine JPEGsparticularly if
there are five or morethey will be combined into a 32-bit file that potentially has
far more dynamic range than a single RAW file.
Here's what I recommend you do almost all the time: put the camera on a tripod
and use a cable release or remote. Take an Aperture Preferred spot meter reading
from a gray card and note the settings. Set the camera in manual mode. Now, set
the aperture the same as it was set for the Aperture Priority shot. Set the shutter
three settings slower than the reading recommended. Now shoot, reduce the shutter
speed by another full stop and repeat four more times.
If you want to apply HDR to a scene that doesn't move too quickly but may not
remain static long enough for the routine suggested above, then use a camera that
lets you bracket at least three shots at least one full f-stop apart. Place the camera
in Aperture Priority mode and set your aperture to give you the desired depth of
field. Then set the camera to do a bracketed sequence, brace yourself, and let the
camera fire all three shots. Different camera models vary wildly in their bracketing
versatility. There's a fair chance your camera may not meet all these qualifications.
11.2.3.2. Merging to HDR
Using the Merge to HDR command seems complex at first, but is actually quite
easy. You can do it from either Photoshop (Automate Merge to HDR) or from
Bridge (Tools Photoshop Merge to HDR). Open three to seven images at
the same time (or select them in Bridge). A simple dialog appears that lets you
browse to choose the files you want to merge, Open File, or a folder of images.
You can then opt to click a box that offers to Auto Align the files. If you handheld
your bracketed shots, I suggest you check this box no matter how careful you were
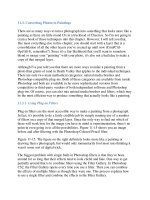
to keep the camera from moving. Figure 11-11 shows three images that were shot
with a Canon Rebel XT's Sequence button turned on and with the bracketing set to
+/- two full stops. On this camera, the sequence is limited to three shots when in
auto-bracket mode. The camera was set in Aperture Priority mode so as to keep the
depth of field consistent. You should never change your aperture when bracketing
for HDR images, whether you're going to use this brilliant new script or use either
of the methods described above.
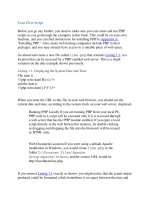
Figure 11-11. These three RAW exposures were bracketed two stops apart in
Aperture Priority mode.
NOTE
If you shot your HDR sequence as RAW images, open them all at once in Camera
Raw, select them all, and Synchronize Everything. Then turn off all the auto
selections. Otherwise, you'll get three versions of the image that have been
automatically adjusted to very similar tonal ranges.
HDR Merge behaves a bit differently, depending on whether you do it from Bridge
or Photoshop.
If you HDR Merge from Bridge, there's no checkbox to insure a match in
handheld shots. That's because there's no dialog at all until after the images
are already merged.
If you do the HDR Merge from the Photoshop menu (rather than Bridge's), a
preliminary HDR Merge dialog provides a checkbox that asks if you want
the program to Attempt to Automatically Align Source Images. If you shot
the images handheld, be sure to check this box. Also, if you shot the images
handheld, do not merge them from Bridge unless you want to see repeated
edges that look a bit like this was a special effects filter's stroboscopic
motion blur. This preliminary HDR dialog is shown in Figure 11-12. You
can adjust a wide overall brightness range by dragging the slider until you
see the values you want.
Figure 11-12. The Preliminary HDR dial.
If you shot the original images in Camera Raw, select all the images in the
sequence in Bridge and choose Tools Photoshop Merge to HDR. All the
images will open as they were originally shot, without adjustments, in the HDR
dialog and be processed automatically. Figure 11-13 shows the result of the merge
to a 32-bit file, after the initial adjustment of the slider in the HDR Merge dialog.
Dragging to the right darkens the highlights and, to a lesser degree, the rest of the
image. Don't worry; you can refine this interpretation using the Exposure
command when you convert the image to 16- or 32-bit mode.
Figure 11-13. The Merge to HDR dialog and slider.
If you do the HDR Merge from Photoshop, the Photomerge dialog provides a
checkbox that asks if you want the program to Attempt to Automatically Align
Source Images. If you shot from a really steady tripod and there's no chance the
camera moved at all between frames, then leave the box unchecked. It takes a lot
of extra time to attempt to align images manually.
11.2.3.3. Using the Exposure command
You now have your file in 32-bit format. Be sure to save it in this format so that if
you want another interpretation, you don't have to do the merge all over again.
However, there is so much brightness information in this file that it makes Camera
Raw look impotent. Of course, you can't use this file as it is because nothing
known to man can see this huge brightness range. First, you have to convert it to a
16- or 8-bit file. When you click OK in the Merge to HDR dialog, the Exposure
dialog immediately pops up to the screen, as shown in Figure 11-14.
Figure 11-14. Be sure you have the Preview box checked. Drag the Exposure and
Gamma sliders until you see the desired tonal values in the merged image.
NOTE
You can use the Exposure dialog on any image and, especially in conjunction with
a Curves adjustment layer, exert a huge amount of control over the interpretation
of highlight and shadow brightness and over the overall contrast of the image.
However, you're much more likely to get noise in the darker areas of the image and
to experience highlights that show no detail.
You have four choices on the HDR Conversion dialog's Method menu: Exposure
and Gamma, Highlight Correction, Equalize Histogram, and Local Area
Correction. I find Local Area Correction the most useful most of the time because
it lets you use the Curves dialog to match the Histogram.