Manning Windows Forms Programming (phần 6) pps
Bạn đang xem bản rút gọn của tài liệu. Xem và tải ngay bản đầy đủ của tài liệu tại đây (437.48 KB, 50 trang )
216 CHAPTER 7 DRAWING AND SCROLLING
Our focus in this section will be the Panel class. This class can contain and posi-
tion controls just like the
Form class, and supports automated scrolling since it inherits
from the
ScrollableControl class.
2
We will not position controls within a panel
in this chapter, but we will use this class to fix some of the problems we have seen when
drawing directly on the form. We will draw our photo directly in a
Panel, and solve
the following problems we noticed when drawing directly on the form:
• Our image was off-center vertically for the Scale to Fit display option. The
DisplayRectangle property included the vertical space occupied by the
scroll bar, which threw our calculations off. Here, we will use the panel’s
Dis-
playRectangle
property, so that the image will be centered exactly inside
the panel.
• The 3-D border we used for the
PictureBox control was gone. We could have
attempted to draw a border inside the form using the
Control-
Paint.DrawBorder3D
method, but a Panel provides a much easier solution.
The
Panel class provides a BorderStyle property much like the correspond-
ing
PictureBox property, so the .NET framework will draw the border for us.
• The status bar was part of the scrollable area. Since the
Form object managed
the scrolling, the
StatusBar control on the form was caught up in the scroll-
ing logic. In this section, the scrolling will be managed by the
Panel class
independent of the form and status bar. As a result, our status bar will return to
and remain at its natural position at the base of the form.
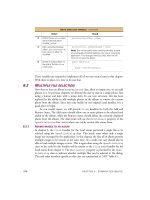
Before we get into the required changes, figure 7.5 shows how our three display
modes will appear by the end of this section. As you can see, the application looks
much more polished here than when we drew directly on the form. Note especially
the excellent centering, the fine border, and the well-behaved scroll bars.
2
For the curious, the GroupBox control inherits from the Control class and does not support scrolling.
Figure 7.5 This shows an image drawn inside a panel with the Scale to Fit, Stretch to Fit, and
Actual Size display modes.
PANELS 217
As you will see, the code to draw the image inside a panel is very similar to drawing the
image directly on the form. We will need to add a new panel, update some of our menu
handlers and the drawing of the status bar, and finally draw the image into the panel.
7. 4 . 1 A
DDING A PANEL
Adding a Panel object in Visual Studio is much like adding any other control. You
open the Toolbox and drag a
Panel onto the form. In the source code, the panel is
added using the
Control property of the parent form. We will look at both of these,
beginning with the use of Visual Studio.
Set the version number of the MyPhotos application to 7.4.
Take a look at the MainForm.cs source file to see how the panel is created. As you can
see, this code looks very similar to the code for other controls from prior chapters. A
private instance is created in the
MainForm class, initialized in the Initialize-
Component
method, and added to the form using the Form.Controls property.
private System.Windows.Forms.Panel pnlPhoto;
. . .
private void InitializeComponent()
{
. . .
this.pnlPhoto = new System.Windows.Forms.Panel ();
. . .
//
// pnlPhoto
//
this.pnlPhoto.BorderStyle = System.Windows.Forms.BorderStyle.Fixed3D;
this.pnlPhoto.Dock = System.Windows.Forms.DockStyle.Fill;
this.pnlPhoto.Name = "pnlPhoto";
this.pnlPhoto.Size = new System.Drawing.Size(292, 233);
this.pnlPhoto.TabIndex = 3;
. . .
this.Controls.AddRange(new System.Windows.Forms.Control[] {
this.pnlPhoto,
this.statusBar1});
ADD A PANEL TO THE FORM
Action Result
1 In the MainForm.cs [Design] window, drag a
Panel control from the Toolbox onto the form.
A
Panel control is added to the window.
2 Set the panel’s properties as shown.
Settings
Property Value
(Name) pnlPhoto
BorderStyle Fixed3D
Dock Fill
218 CHAPTER 7 DRAWING AND SCROLLING
The Panel class depends largely on its base classes for exported functionality, with
the
BorderStyle property just about the only new member added by the class. An
overview of the
Panel class appears in .NET Table 7.5.
7. 4 . 2 U
PDATING THE MENU HANDLERS
With our panel on the form, we need to update the code for drawing our image to
use the new panel rather than interacting with the form itself. We will begin with the
menu handlers for the Image submenu.
The
menuImage_Popup method simply sets the Enabled and Checked menu
properties as required for the current display mode. This behavior does not change, so
no modifications are required. The
menuImage_ChildClick method sets scrolling
properties for the form. Since our scrolling will be managed from the
Panel object now,
we need to use the corresponding
Panel members rather than those in the Form itself.
.NET Table 7.5 Panel class
The Panel class represents a scrollable control that acts as a container for other controls. This
class is often used to define a region of controls within a
Form. This class is part of the Sys-
tem.Windows.Forms namespace and inherits from the ScrollableControl class. See .NET
Table 7.1 on page 196 for a list of members inherited from the
ScrollableControl class.
Public
Properties
BorderStyle
Gets or sets the type of border to display around the
control.
DisplayRectangle
(inherited from
Control)
Gets the display area for the control. When scrolling is
enabled, this property represents the entire scrollable area
for the panel. The
ClientRectangle property represents
the visible portion of the control.
Enabled
(inherited from
Control)
Gets or sets whether the panel is enabled. Controls within
the panel are disabled whenever the panel itself is disabled.
Visible (inherited
from Control)
Gets or sets whether the panel is visible. Controls within
the panel are invisible if the panel itself is invisible.
UPDATE THE MENUIMAGE_CHILDCLICK METHOD TO USE THE NEW PANEL
Action Result
1 Locate the
menuImage_ChildClick method in
the MainForm.cs source window.
protected void menuImage_ChildClick
(object sender, System.EventArgs e)
{
. . .
2 Modify the code for the
ScaleToFit and StretchToFit
display mode to set drawing-related
properties on the
Panel rather than
the parent
Form.
case DisplayMode.ScaleToFit:
case DisplayMode.StretchToFit:
SetStyle(ControlStyles.ResizeRedraw,
true);
pnlPhoto.AutoScroll = false;
pnlPhoto.Invalidate();
break;
PANELS 219
That’s it for our menu handlers. The
SetStyle method is a protected member and
cannot be modified for our
Panel class, so we just force the redraw to happen at the
Form level as we did before. This will redraw the entire form and not just our panel,
but it gets the job done. In this case, the drawing required outside of our panel is not
overly complex, so this extra drawing should not be a problem.
On a more complex form, it would make sense to handle the
Resize event for
the
pnlPhoto object instead of setting a form-level style as we do here. Handling the
Resize event would allow us to only redraw the panel itself, and not the other parts
of the
Form.
The
AutoScroll property is a public member of the ScrollableControl
class, so we can set its value for the pnlPhoto object directly.
As you can see, because the
Panel and Form classes are based on a similar class
hierarchy, design changes like this are very easy to make in .NET. Let’s move on to
our owner-drawn status bar.
7. 4 . 3 D
RAWING THE STATUS BAR PANEL
Our status bar is drawn in the statusBar1_DrawItem method. This method must
calculate the percentage of the image shown in the window. Since the image will now
be displayed inside the
Panel object, we must modify this routine to use the Panel
client area rather than the MainForm one.
3 Modify the code for the
ActualSize display mode in a
similar manner.
case DisplayMode.ActualSize:
SetStyle(ControlStyles.ResizeRedraw,
false);
pnlPhoto.AutoScroll = true;
pnlPhoto.Invalidate();
break;
. . .
}
UPDATE THE MENUIMAGE_CHILDCLICK METHOD TO USE THE NEW PANEL
Action Result
UPDATE THE STATUSBAR1_DRAWITEM METHOD TO USE THE PANEL
Action Result
1 Locate the
statusBar1_DrawItem
method in the
MainForm.cs file.
protected void statusBar1_DrawItem
(object sender,
StatusBarDrawItemEventArgs sbdevent)
{
. . .
220 CHAPTER 7 DRAWING AND SCROLLING
Once again this change simply uses our private Panel field rather than the this
keyword. Our last change is to draw the image inside the panel rather than on the
form itself.
7. 4 . 4 D
RAWING THE IMAGE
When drawing the image on the form, we were able to override the protected
OnPaint method that raises the Paint event. For the Panel object, we do not have
access to protected members, so we must use the public
Paint event to update the
panel. Internally in the Windows Forms library, of course, the
Panel control will use
its own version of the
OnPaint method to invoke our event handler.
Note that the
Paint event handler receives a PaintEventArgs instance containing
the event data. As we saw earlier in the chapter, this class contains the
Graphics
object for drawing inside the panel. Our code uses this object in the same way as
when the image was drawn in the form. Continuing our previous steps:
2 Modify the calculation of
the
percent variable to
use the panel rather than
the form.
// Calculate percent of image shown
int percent = 100;
if (_selectedMode == DisplayMode.ActualSize)
{
Photograph photo = _album.CurrentPhoto;
Rectangle dr = pnlPhoto.ClientRectangle;
int imgWidth = photo.Image.Width;
int imgHeight = photo.Image.Height;
percent = 100
* Math.Min(dr.Width, imgWidth)
* Math.Min(dr.Height, imgHeight)
/ (imgWidth * imgHeight);
}
. . .
}
UPDATE THE STATUSBAR1_DRAWITEM METHOD TO USE THE PANEL (continued)
Action Result
ADD A PAINT HANDLER FOR THE PNLPHOTO OBJECT
Action Result
1 Add a
Paint event handler for the
panel.
How-to
Double-click the Panel control.
Note: The
Paint event is the default
event for the panel control in Visual
Studio. Other events can be added
via the Properties window.
Visual Studio generates the appropriate code in the
source file.
protected void pnlPhoto_Paint
(object sender,
System.Windows.Forms.PaintEventArgs e)
{
}
PANELS 221
TRANSFER THE DRAWING CODE INTO THE NEW PAINT HANDLER
Action Result
2 In the
pnlPhoto_Paint method,
use the given
Graphics to draw
the image when the album is not
empty.
protected void pnlPhoto_Paint
(object sender,
System.Windows.Forms.PaintEventArgs e)
{
if (_album.Count > 0)
{
// Paint the current photo
Photograph photo = _album.CurrentPhoto;
Graphics g = e.Graphics;
3 Copy the switch statement for
drawing the image from the
existing
OnPaint method.
switch (_selectedMode)
{
. . .
}
}
else
{
// No image to paint
}
}
4 Update this switch block to use
the
pnlPhoto object as
appropriate.
switch (_selectedMode)
{
default:
case DisplayMode.ScaleToFit:
// Preserve aspect ratio of image
g.DrawImage(photo.Image,
photo.ScaleToFit(
pnlPhoto.DisplayRectangle));
break;
case DisplayMode.StretchToFit:
// Fill entire panel with image
g.DrawImage(photo.Image,
pnlPhoto.DisplayRectangle);
break;
case DisplayMode.ActualSize:
// Draw portion of image
g.DrawImage(photo.Image,
pnlPhoto.AutoScrollPosition.X,
pnlPhoto.AutoScrollPosition.Y,
photo.Image.Width,
photo.Image.Height);
pnlPhoto.AutoScrollMinSize
= photo.Image.Size;
break;
}
5 If the album is empty, draw the
standard system control color
onto the panel.
else
{
// No image to paint
e.Graphics.Clear(SystemColors.Control);
}
}
222 CHAPTER 7 DRAWING AND SCROLLING
It may look like a lot of code, but the number of changes is actually quite small, as
indicated by the few number of bolded lines. The program is all set now. Verify that
your code compiles and runs properly. Change display modes, use different-sized
images, and resize the form to observe the effect.
TRY IT!
If you are feeling brave, try adding a Fit to Width menu item to the Image
submenu. This should preserve the aspect ratio of the image by scaling the
image to match the width of the panel window. You will need to add a
FitToWidth enumeration value to the DisplayMode enumeration.
Calculate the height using code similar to the
Photo-
graph.ScaleToFit
method where the width is preserved. The tricky
part is setting the
pnlPhoto.AutoScrollMinSize property appropri-
ately and drawing the image into this same rectangle.
7. 5 R ECAP
This chapter has looked at some drawing and scrolling aspects of the Form class. In
particular, we removed the
PictureBox control from our application and learned
6 Remove the corresponding
drawing code from the existing
OnPaint method.
The
OnPaint method now looks as follows:
protected override void OnPaint
(PaintEventArgs e)
{
if (_album.Count > 0)
{
// Paint the current image
Photograph photo = _album.CurrentPhoto;
// Update the status bar.
pnlFileName.Text = photo.Caption;
pnlFileIndex.Text
= String.Format("{0:#}/{1:#}",
_album.CurrentIndex+1,
_album.Count);
pnlImageSize.Text
= String.Format("{0:#} x {1:#}",
photo.Image.Width,
photo.Image.Height);
statusBar1.ShowPanels = true;
}
else
{
// Indicate the album is empty
statusBar1.Text = "No Photos in Album";
statusBar1.ShowPanels = false;
}
7 At the end of this method,
invalidate the panel to ensure it is
redrawn.
// Ensure contained controls are redrawn
pnlPhoto.Invalidate();
statusBar1.Invalidate();
base.OnPaint(e);
}
TRANSFER THE DRAWING CODE INTO THE NEW PAINT HANDLER (continued)
Action Result
RECAP 223
how to draw our image directly onto the form. We used the protected
OnPaint
method and made use of the automated scroll bars inherited by the Form class to scroll
our image. This did not work exactly as we wanted, so we modified our code to use the
Panel class instead as a way to draw the image independent of the rest of the form.
The next chapter will continue our investigation of the
Form class by looking at
dialog boxes.
224
CHAPTER 8
Dialog boxes
8.1 Message boxes 225
8.2 The Form.Close method 233
8.3 Modal dialog boxes 237
8.4 Modeless dialogs 252
8.5 Recap 262
So far we have only used a single window in our MyPhotos application. We have
changed its appearance in each chapter, adding controls such as a menu bar, status
bar, and panel, but all controls, events, painting, and other activities have occurred
within our one
Form window. In this chapter we branch out.
The previous chapter introduced the
Form class and demonstrated drawing and
scrolling in both it and the
Panel class. Both of these classes can be used to support
intricate drawing interfaces from those seen in basic drawing applications such as
Microsoft Paint to a full-fledged Internet browser window.
Another common use for
Form classes is the creation of dialog boxes. The Form
class
, as well as the Panel class, allows other controls to be positioned and managed
inside its boundaries. In this chapter we look at how dialog boxes are created for both
simple message boxes and more complex custom dialogs. This will consist of the fol-
lowing topics.
• Create simple message dialogs with the
MessageBox class.
• Discuss the use of
Close and Dispose for Form objects.
• Use the
OnClosing method to intercept when a form or dialog box closes.
MESSAGE BOXES 225
• Explain the difference between modal and modeless dialogs.
• Create dialog boxes using the
Form class.
Before we get into generating custom dialog boxes, we will first look at how simple
messages are displayed using the
MessageBox class.
8.1 MESSAGE BOXES
Developers, especially object-oriented developers, are always looking for shortcuts.
Classes such as
OpenFileDialog and SaveFileDialog not only provide a stan-
dard way to prompt a user for files, they also save programmers a lot of time and
effort by encapsulating the required window display and interaction code. Another
common task programmers face is the need to display a simple message to the user.
Our photo album application, for example, should really display an error message
when an album cannot be saved successfully, or it could pose a question by asking the
user if they would like to save the album to an alternate file location.
The .NET Framework provides a
MessageBox class for this purpose. This class
is very similar to the MFC function of the same name. This section will show how this
class is used to handle simple interactions with a user. While this class is not actually
a
Form object, it is the most basic type of modal dialog box.
All dialog boxes are either modal or modeless. A modal dialog box requires the
user to respond before the associated program will continue. Modeless or nonmodal dia-
log boxes allow the application to continue while the dialog box is displayed.
All
MessageBox windows are modal, while Form windows are modal if invoked
via the
Form.ShowDialog method and modeless if invoked via the Form.Show
method.
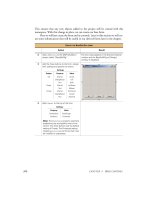
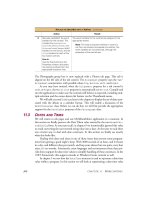
Figure 8.1 These examples show the four types of icons available to
MessageBox dialogs.
226 CHAPTER 8 DIALOG BOXES
Figure 8.1 shows some sample message boxes with various settings. Note the different
button configurations, and how the Question Icon dialog has defined No as the
default button. An overview of the
MessageBox class is provided in .NET Table 8.1.
.NET Table 8.1 MessageBox class
The MessageBox class represents a modal dialog box that displays a message or question to
the user and waits for their response. This class is part of the
System.Windows.Forms
namespace. A
MessageBox cannot be instantiated as an object with the new keyword;
instead the static
Show method is used to display the dialog.
By default, a message box displays with no icon and a single OK button. The
Show method
is overloaded to allow these and other settings to be customized. There are four enumera-
tions used for this purpose:
MessageBoxButtons, MessageBoxIcon, MessageBoxDefault-
Button, and MessageBoxOptions. In the following table, the enumeration values for some
of these four types are included, since these types are only used with the
MessageBox.Show
method.
Public Static
Methods
Show Displays a message box and returns the
DialogResult enumeration value corresponding to
the button selected by the user.
MessageBoxButtons
Enumeration Values
OK The message box should contain an OK button only.
OKCancel The message box should contain an OK and Cancel
button.
YesNo The message box should contain a Yes and No
button.
YesNoCancel The message box should contain a Yes, No, and
Cancel button.
MessageBoxIcon
Enumeration Values
Error The message box should contain an error symbol, a
white X in a red circle. Use this for unexpected
problems that prevent an operation from continuing.
Information The message box should contain an information
symbol, a lower case letter ‘i’ in a circle. Use this for
general messages about the application such as a
status or notification.
Question The message box should contain a question mark
symbol. Use this for Yes/No questions where a
choice by the user is required.
Warning The message box should contain a warning symbol,
an exclamation point in a yellow triangle. Use this for
problems that may interfere with the ability of an
operation to continue.
MessageBoxDefault-
Button Enumeration
Values
Button1 The first button in the message box is the default.
Button2 The second button is the default.
Button3 The third button is the default.
MESSAGE BOXES 227
8.1.1 T
HE MESSAGEBOX.SHOW METHOD
A MessageBox instance cannot be instantiated. Instead, the Show method is used to
create the message dialog and return the result. There are a number of overloads avail-
able for this method, from a version that takes a single message string to one that
accepts a parameter for everything from the title bar text to which button should be
the default. Various forms of this method are shown in the following signatures. The
comment preceding each signature refers to the characters in bold.
// The return value indicates which button was clicked by the user
public static DialogResult Show( string text );
// Displays the dialog in front of the specified window object
public static DialogResult Show( IWin32Window owner, string text );
// Accepts a message string and title bar caption
public static DialogResult Show( string text, string caption );
// Displays the dialog with the specified buttons
public static DialogResult Show( IWin32Window owner,
string text,
string caption,
MessageBoxButtons buttons );
// The penultimate Show method: an icon, default button, and options
public static DialogResult Show( IWin32Window owner,
string text,
string caption,
MessageBoxButtons buttons,
MessageBoxIcon icon,
MessageBoxDefaultButton defaultButton,
MessageBoxOptions options );
Turning back to our MyPhotos application, the addition of a message box would be
beneficial in some of the situations we have already encountered. These include:
• When an error occurs while trying to open an existing album.
• When an error occurs while trying to save the current album.
• When the current album has changed and is about to be discarded.
We will add a
MessageBox to our program for each of these instances.
8.1.2 C
REATING AN OK DIALOG
When we are unable to open a selected album, there is not much to do other than
inform the user that something is wrong. We will use an error dialog since a failure
here is not normally expected. The resulting dialog is shown in figure 8.2.
Figure 8.2
This message box is displayed when
the album contains an unrecognized
version number.
228 CHAPTER 8 DIALOG BOXES
Let’s add the code to create this dialog whenever an unexpected problem occurs while
opening the file
Set the version number of the MyPhotos application to 8.1.
In this code, we cheated a little by catching any and all Exception objects in the
catch block. It is normally safer to catch specific exceptions that may occur so you
can provide feedback or take actions based on the specific error. In this code, an
IOException will occur if an unexpected error occurs during a file I/O operation. If
you recall, the
PhotoAlbum.Open method throws an IOException explicitly if the
version number in the file is not recognized.
It is also worth noting that we ignore the result returned by the
Show method,
since there is only a single OK button in the dialog.
HANDLE EXCEPTION IN MENUOPEN_CLICK METHOD
Action Result
1 Locate the
menuOpen_Click method
in the MainForm.cs source
file.
private void menuOpen_Click
(object sender, System.EventArgs e)
{
. . .
2 Enclose the code to open
the album in a
try block.
if (dlg.ShowDialog() == DialogResult.OK)
{
try
{
// Open the new album.
_album.Open(dlg.FileName);
_album.FileName = dlg.FileName;
_bAlbumChanged = false;
this.Invalidate();
}
3 Catch any Exception that
occurs.
catch (Exception ex)
4 Display the dialog in the
catch block.
{
MessageBox.Show(this,
"Unable to open file " + dlg.FileName
+ "\n (" + ex.Message + ")",
"Open Album Error",
MessageBoxButtons.OK,
MessageBoxIcon.Error);
}
}
. . .
}
Note: The text string is constructed using the + (plus
sign) notation for strings. Also note that a new line is
inserted in the dialog with the
\n character.
MESSAGE BOXES 229
8.1.3 C
REATING A YESNO DIALOG
As an alternate example, what happens when an error occurs while saving an album?
We could simply display an OK dialog as we did while opening an album. This
would just duplicate the previous code, so we will do something different. Instead, we
will allow the user to save the album under an alternate file name. This permits the
user to save the album to an alternate location that is less likely to fail, or retry the
save to the same location. The new message box is shown in figure 8.3.
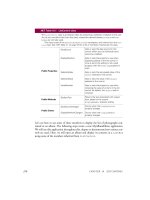
The steps required to generate this message dialog are shown in the following table:
Figure 8.3
This message box is
displayed when an
exception occurs in the
menuSave_Click method.
HANDLE EXCEPTION IN MENUSAVE_CLICK METHOD
Action Result
1 Locate the
menuSave_Click
method in the MainForm.cs file.
private void menuSave_Click
(object sender, System.EventArgs e)
{
. . .
2 Enclose the code to save the
album in a
try block.
else
{
try
{
// Save album in current file
_album.Save();
_bAlbumChanged = false;
}
3 Catch any exception that occurs.
catch (Exception ex)
{
4 Within the catch block, display
the dialog and record the
selected button.
string msg = "Unable to save file {0}"
+ " - {1}\nWould you like to save"
+ " the album in an alternate file?";
DialogResult result
= MessageBox.Show(this,
String.Format(msg,
_album.FileName, ex.Message),
"Save Album Error",
MessageBoxButtons.YesNo,
MessageBoxIcon.Error,
MessageBoxDefaultButton.Button2);
5 If the user wishes to save under
an alternate name, prompt the
user for the new file name.
How-to
Use the Save As menu handler.
if (result == DialogResult.Yes)
{
menuSaveAs_Click(sender, e);
}
}
. . .
}
230 CHAPTER 8 DIALOG BOXES
Unlike our message for the Open handler, this code makes use of the result returned
by the
Show method. This result is a DialogResult enumeration that indicates the
button pressed. The values in this enumeration are shown in .NET Table 8.2, and
correspond to the kinds of buttons typically found in Windows dialogs.
You can compile and run this code if you would like to see the message boxes we cre-
ated. You can generate an open error easily enough by selecting a file that is not, in
fact, an album file. A save error can be generated by attempting to save to a read-only
CD, or by filling up a floppy disk and then saving a file to it.
Our last example will generate a message box for closing an existing album.
8.1.4 Creating A YesNoCancel dialog
Our final example is the case where an album has changed but is about to be discarded.
This can occur when the application is about to exit, when loading a new album with
the Open menu item, and when creating a new album with the New menu item.
To handle these situations in a consistent
way, we will create a protected method to
gracefully close the current album for all three
cases using the dialog in figure 8.4. We will
call this method
CloseCurrentAlbum and
have it return a boolean value indicating
whether the album was closed or the user
clicked the Cancel button.
.NET Table 8.2 DialogResult enumeration
The DialogResult enumeration represents a value returned by a dialog box. This class is
part of the
System.Windows.Forms namespace, and is used with all dialog boxes in Win-
dows Forms. In particular, a
DialogResult is returned by the MessageBox.Show method as
well as the
ShowDialog method in both the Form class and common dialogs derived from
the
CommonDialog class. This enumeration is also used by the Button class to indicate the
result to automatically return from a modal dialog when the button is clicked.
Enumeration
Values
Abort
The dialog return value is Abort. Typically, this means the user
clicked an Abort button.
Cancel The dialog returns Cancel, typically from a Cancel button.
Ignore The dialog returns Ignore, typically from an Ignore button.
No The dialog returns No, typically from a No button.
None The dialog returns nothing, indicating that the dialog box is still
running.
OK The dialog returns OK, typically from an OK button.
Retry The dialog returns Retry, typically from a Retry button.
Yes The dialog returns Yes, typically from a Yes button.
Figure 8.4 This dialog is displayed when
an album is about to be discarded.
MESSAGE BOXES 231
The three buttons in our dialog will correspond to the following behavior in our
CloseCurrentAlbum method:
• Yes will save the album, then close the album and return
true.
• No will not save the album, then close the album and return
true.
• Cancel will not save or close the album and return
false to indicate that the
calling operation should be canceled.
To cl ose th e al bum ,
CloseCurrentAlbum will clear the album and related settings.
The following steps create this method:
We will use this new method in three different places to ensure that the user has the
option of saving any changes he or she might make to the album.
ADD A CLOSECURRENTALBUM METHOD
Action Result
1 Add the
CloseCurrentAlbum
method to the
MainForm.cs source code
window.
protected bool CloseCurrentAlbum()
{
2 Offer to save the album if it
has been modified.
if (_bAlbumChanged)
{
// Offer to save the current album
3 Define an appropriate
message to display.
Note: We vary the mes-
sage text depending on
whether the current album
has a name or not.
string msg;
if (_album.FileName == null)
msg = "Do you want to save the "
+ "current album?";
else
msg = String.Format("Do you want to "
+ "save your changes to \n{0}?",
_album.FileName);
4 Display the message box
and record the result.
DialogResult result
= MessageBox.Show(this, msg,
"Save Current Album?",
MessageBoxButtons.YesNoCancel,
MessageBoxIcon.Question);
5 Perform the action
requested by the user.
if (result == DialogResult.Yes)
menuSave_Click(this,EventArgs.Empty);
else if (result == DialogResult.Cancel)
{
// Do not close the album
return false;
}
}
6 Close the album and return
true.
Note: This action is only
performed if the Yes or No
button was selected.
// Close the album and return true
if (_album != null)
_album.Dispose();
_album = new PhotoAlbum();
SetTitleBar();
_bAlbumChanged = false;
return true;
}
232 CHAPTER 8 DIALOG BOXES
• In menuNew_Click to save the existing album before a new album is created.
• In
menuOpen_Click to save the album before a new album is selected.
• In
menuExit_Click to save the album before the application exits.
We will modify the handlers for the New and Open menus here. The Exit menu pre-
sents some additional issues, which we will take up in the next section. The following
table continues our previous steps.
These changes make our application much more user-friendly by interacting with the
user when they are about to discard a modified album.
TRY IT!
Before moving on, create a MessageBox dialog in the menuRe-
move_Click
method, where the current photograph is removed without
any confirmation by the user. Add a question box here to verify that the
user does indeed want to remove the current photo.
Another place where a message box could be used is at the beginning and
end of the album. Modify the Next and Previous menus to display an in-
formation dialog whenever the user tries to move before the beginning of
the album or past the end.
1
For the Exit menu, life is not so easy. We will pick up this topic in the next section.
UPDATE THE HANDLERS FOR THE NEW AND OPEN MENUS
Action Result
7 Modify the
menuNew_Click
method to use the
CloseCurrentAlbum method.
protected void menuNew_Click
(object sender, System.EventArgs e)
{
if (this.CloseCurrentAlbum() == true)
{
// Make sure the window is redrawn
this.Invalidate();
}
}
8 Modify the menuOpen_Click
method to use the
CloseCurrentAlbum method.
Note: The new code here
replaces the previous code in
this method to save the current
album. The remainder of this
method stays the same.
protected void menuOpen_Click
(object sender, System.EventArgs e)
{
// Save the existing album, if necessary
if (this.CloseCurrentAlbum() == false)
{
// Cancel this operation
return;
}
OpenFileDialog dlg = new OpenFileDialog();
. . .
}
1
The interface designers among us will argue that the Previous and Next commands should be disabled
at the beginning and end of the album, respectively. Why allow the user to invoke a menu item that
does not work? I would not disagree, and if you prefer this approach, please go right ahead.
THE FORM.CLOSE METHOD 233
8.2 THE FORM.CLOSE METHOD
In this section we pick up the thread of our previous discussion on the CloseCur-
rentAlbum
method by discussing the Close and Dispose methods. You may think
this is a little off-topic from dialog boxes, but in fact it is quite relevant. One of the
key issues for C# programming in .NET is when to call the
Dispose method to
clean up window handlers and other nonmemory resources. This section will discuss
this topic as it relates to dialog boxes, and introduce the
Closing event as a way to
intercept a user’s request to close a form.
8.2.1 The relationship between Close and Dispose
Before we return to the topic of calling
CloseCurrentAlbum when our application
exits, let’s look at the relationship between
Close and Dispose in .NET. It’s actu-
ally quite simple: they are the same. For all classes in the .NET Framework, a call to
Close is equivalent to calling the Dispose method, and a call to Dispose is equiv-
alent to calling the
Close method. The term “close” traditionally applies to objects
like files and windows, and .NET has preserved this terminology. When you are fin-
ished with a form or a file, it seems silly to require a call to both
Close and Dis-
pose
, so it makes sense to merge these two concepts together. The .NET design team
could have chosen to use a common name for all classes, but programmers naturally
expect to close objects such as forms and files, and closing objects like arrays or draw-
ing objects seems a bit odd. Instead, the designers chose to use both methods and
define them to be equivalent.
For
Form objects, the behavior of the form itself varies depending on whether the
object is displayed as a modal or modeless window. For a modeless window, displayed
with the
Form.Show method, the nonmemory resources are automatically cleaned up
when the form is closed. This makes life much easier for us programmers, since we do
not have to remember anything in this case. You cannot use a modeless
Form after it
is closed since all of its resources are gone. The
Hide method should be used if you
simply want to remove a
Form from the desktop and display it later via the Show
method. We will see this in chapter 13 when we use a tool bar button to hide the mod-
eless dialog created in section 8.4 of this chapter.
For modal windows, displayed with the
Form.ShowDialog method, there is a
problem in that the dialog is typically accessed after the window disappears. As a result,
a modal dialog must call
Dispose explicitly to release its nonmemory resources. Typ-
ically, a modal dialog is created and destroyed in the same block of code. For example:
{
MyModalDialog dlg = new MyModalDialog();
// Initialize any dlg settings
if (dlg.ShowDialog() == DialogResult.OK)
{
// Use dlg settings to do something
234 CHAPTER 8 DIALOG BOXES
}
dlg.Dispose()
}
In this code, if the resources for the dlg variable disappeared after the ShowDialog
method returned, you could not access any of its settings. For this reason, .NET only
calls the
Hide method after a user responds to a modal dialog, so that the dialog set-
tings may still be accessed. This can be a little confusing since we still say the user
closes the dialog, even though the dialog’s
Close method is not actually called.
Fortunately, modal dialog boxes tend to have deterministic scope, meaning that
you can predict when the dialog will be created and destroyed. The application waits
until the user responds to a modal dialog, so it’s clear where the
Dispose method
must be called. We have already seen this method used with
OpenFileDialog and
SaveFileDialog objects in chapter 6, both of which are modal dialogs.
The C# language provides a
using statement to call Dispose on our behalf in
deterministic situations such as this. We have seen how the
using directive defines
an alias or shortcut for an object or members of a namespace. The
using statement
defines the scope in which a given object should exist. The syntax is as follows:
using (object)
{
// Do something with object
}
At the end of the block of code associated with the statement, the identified object is
automatically disposed. For example, the previous code for the
My ModalDialog
object can be written as follows to cause Dispose to be called automatically at the
end of the block:
{
using (MyModalDialog dlg = new MyModalDialog)
{
// Initialize any dlg settings
if (dlg.ShowDialog() == DialogResult.OK)
{
// Use dlg settings to do something
}
}
}
As another example, here is how our menuSaveAs_Click handler looks with this
statement. The changes from our current implementation are shown in bold.
private void menuSaveAs_Click(object sender, System.EventArgs e)
{
using (SaveFileDialog dlg = new SaveFileDialog())
{
THE FORM.CLOSE METHOD 235
dlg.Title = "Save Album";
dlg.DefaultExt = "abm";
dlg.Filter = "abm files (*.abm)|*.abm";
dlg.InitialDirectory = PhotoAlbum.DefaultDir;
dlg.RestoreDirectory = true;
if (dlg.ShowDialog() == DialogResult.OK)
{
// Record the new album name
_album.FileName = dlg.FileName;
// Use Save handler to store the album
menuSave_Click(sender, e);
//Update title bar to include new name
SetTitleBar();
}
}
}
In general, any object that supports the IDisposable interface can be used with the
using statement in this manner. In particular, you will recall that we supported this
interface in our
PhotoAlbum and Photograph classes in chapter 5, so we could use
this statement with our album and photo objects.
For the remainder of the book, we will generally employ the
using statement in
our examples to dispose of nonmemory resources rather than calling the
Dispose
method explicitly.
8.2.2 I
NTERCEPTING THE FORM.CLOSE METHOD
Let’s get back to our application and the CloseCurrentAlbum method. Since our
application is a modeless dialog,
Close will be called when the application exits. In
fact, we call the
Close method explicitly in the Click handler for our Exit menu.
We could certainly use the
CloseCurrentAlbum method in our Click event
handler. While this would work for the Exit menu, it does not work for the case where
the application exits via the Alt+F4 keyboard shortcut or the Close option on the sys-
tem menu.
2
To handle both situations, the Form class provides a Closing event that occurs
whenever the form is about to close. The protected
OnClosing method is invoked
whenever the
Close method is called, and it in turn raises the Closing event by
invoking any registered event handlers. The signature for this method is as follows:
protected virtual void OnClosing(CancelEventArgs ce);
2
The system menu, as you may know, is the menu of operating system commands that appears when
you click the control box icon in the upper left corner of a window. You can also right-click an appli-
cation’s title bar or its entry in the task bar to display this menu.
236 CHAPTER 8 DIALOG BOXES
As you can see, this method receives a CancelEventArgs object. This class defines
a
Cancel property to help determine whether the application will actually exit. If
this property is set to
true by an override of the OnClosing method or a Closing
event handler, then the close operation is cancelled and the application will continue
to run. The
Cancel property has a default value of false, so that the close opera-
tion is not cancelled and the application will exit.
We will override the
OnClosing method in our MainForm class to make sure
the
CloseCurrentAlbum method is called regardless of how the application exits.
Set the version number of the MyPhotos application to 8.2.
Compile and run the application to see this method in action. Add a few photos and
try to exit the application using the Exit menu, the Alt+F4 key, and the Close option
from the system menu. In all cases, you should be queried by the
CloseCurrent-
Album
method with the question dialog for saving the current album. If you select
the Cancel button the application will not, in fact, exit.
OVERRIDE THE ONCLOSING METHOD
Action Result
1 Override the
OnClosing
method in the
MainForm.cs source
window.
protected override void OnClosing
(CancelEventArgs ce)
{
2 Within this method, call the
CloseCurrentAlbum
method to see if the
current album should be
saved.
if (this.CloseCurrentAlbum() == false)
3 If the user clicked the
Cancel button, then cancel
the close operation.
ce.Cancel = true;
Note: This cancels the Close operation so that the appli-
cation does not exit.
4 Otherwise, allow the
application to close.
else
ce.Cancel = false;
Note: Since false is the default value, these lines are
not strictly required. They are here simply to illustrate the
setting when the application is permitted to exit.
5 Remember to call
OnClosing in the base
class.
base.OnClosing(ce);
}
Note: This call ensures that logic internal to the Form
class is performed, and ensures that any
Closing event
handlers for the form are called before the application
exits. Of course, any registered handler can prevent the
application from exiting by setting
ce.Cancel to true.
MODAL DIALOG BOXES 237
Before we go on, we should point out that our
OnClosing override can be writ-
ten more succinctly by taking advantage of the boolean value returned by our close
album method.
protected override void OnClosing(CancelEventArgs ce)
{
ce.Cancel = (!this.CloseCurrentAlbum());
base.OnClosing(ce);
}
Now that we know all about closing a dialog box, let’s see how to create one of our own.
8.3 MODAL DIALOG BOXES
In earlier chapters, we added controls such as a Button, PictureBox, and Sta-
tusBar
to our main form, and displayed and managed these objects within the Form
class on behalf of our application. In this section we will see how a dialog box can be
created and displayed to further our understanding of the
Form object.
As a way to introduce this concept, we will add the ability to assign a caption to
an image. This caption will be a text string supplied by the user. The dialog box shown
in figure 8.5 will allow the user to modify this value. The base file name of the image
will be used as the default caption.
In order to support this dialog, we will need to modify three aspects of our application:
1 Data layer. Our Photograph class must support a caption on an image, and
our
PhotoAlbum class must store and retrieve these captions when saving and
opening files.
2 Presentation layer. We need a class to display our form as a dialog box. We will
call this class
CaptionDlg. This class must provide the interface and a means
for returning a new caption value set by the user.
3 Application layer.Our MainForm class must provide access to the new inter-
face, and the link between the interface layer in our
CaptionDlg class and the
data layer in our MyPhotoAlbum library.
We will address each of these layers separately in order to create our new dialog.
Figure 8.5
Our dialog box will contain three text
labels, a text box, and two buttons.
238 CHAPTER 8 DIALOG BOXES
8.3.1 ADDING CAPTIONS TO PHOTOS
Let’s begin with the data layer. In this section we will support captions on photo-
graphs, and in the next section store and retrieve captions in our photo album files. In
the Photograph class, we need to track the caption value, and allow external classes to
set and get this value. These changes are detailed by the following steps.
Set the version number of the MyPhotoAlbum library to 8.3.
We now have the ability to set captions for individual photographs. This will not do
us much good unless our album class preserves these captions in the album file. For
this we need to modify the
Open and Save methods.
ADD A CAPTION TO THE PHOTOGRAPH CLASS
Action Result
1 In the Photograph.cs file,
add a private
_caption
field to hold the caption for
the object.
private string _fileName;
private Bitmap _bitmap;
private string _caption;
2 Initialize the caption to the
base name of the file in the
constructor.
using System.IO;
. . .
public Photograph(string fileName)
{
_fileName = fileName;
_bitmap = null;
_caption = Path.
GetFileNameWithoutExtension(_fileName);
}
3 Add a Caption property.
public string Caption
{
4 Implement the get
accessor to return the
current caption.
get { return _caption; }
5 Implement the set
accessor to revert to the
default on
null, and
otherwise use the given
value.
set
{
if (value == null || value.Length == 0)
{
_caption = Path.
GetFileNameWithoutExtension(_fileName);
}
else
{
_caption = value;
}
}
}
Note: The value keyword is used as a string object
here since the containing property is of type
string.
How-to
a. Add a using System.IO
statement at the top of
the file.
b. Use the
Path class to
retrieve the base file
name.
MODAL DIALOG BOXES 239
Before we do, note that we can make immediate practical use of our caption in
the
MainForm class. The sbpnlFileName status bar panel has previously displayed
the entire path to the file, which may not fit when the window is small. The photo’s
caption seems like a much better choice here.
Set the version number of the MyPhotos application to 8.3.
8.3.2 Preserving caption values
Our new caption values must be saved whenever an album is saved to disk, and
loaded when an album is opened. To do this, we need to create a new version of our
album file, while still preserving the ability to read in our existing files. Fortunately,
we established a version number for these files in chapter 6, so the changes required
are not too extensive. First, let’s look at the changes to our
Save method.
Note that the rest of our
Save method works as before. In particular, the current ver-
sion number is written as the first line of the file. Since we updated the constant for
this number, the value written to our new album files is updated as well.
Next we need to modify our
Open method to read the new file format. We will also
preserve backward compatibility with our older version. This can be done by handling
DISPLAY THE CAPTION VALUE IN THE STATUS BAR
Action Result
6 Locate the
OnPaint
method in the
MainForm.cs source code.
protected override void OnPaint
(PaintEventArgs e)
{
. . .
7 Modify the
sbpnlFileName status bar
panel to display the
caption.
if (_album.Count > 0)
{
. . .
// Update the status bar.
sbpnlFileName.Text = photo.Caption;
. . .
}
. . .
}
UPDATE THE SAVE METHOD TO STORE CAPTIONS
Action Result
1 In the PhotoAlbum.cs file,
modify the version
constant to be 83.
private const int _CurrentVersion = 83;
2 Modify our foreach loop in
the
Save method to store
both the file name and
caption, each on a separate
line.
public void Save(string fileName)
{
. . .
// Store the data for each photograph
foreach (Photograph photo in this)
{
sw.WriteLine(photo.FileName);
sw.WriteLine(photo.Caption);
}
}
240 CHAPTER 8 DIALOG BOXES
our previous version number 66 in addition to our new one. We continue the previous
table with the following steps.
Our data layer is complete. We can add individual captions to photographs, and these
captions are preserved as the album is saved and opened. Next we turn our attention
to the new
Form required.
8.3.3 C
REATING THE CAPTIONDLG FORM
With our data layer ready, we can turn to the presentation layer. This requires the dia-
log previously shown in figure 8.5. In this section we create a new
Form class to hold
the dialog, and look at what settings should be set to turn the default form into a
standard dialog box. In the next section we will add some properties to this class so
that our
MainForm class can interact with the dialog.
In previous Windows development environments, an explicit class such as
CDialog created a dialog box directly. It would certainly be possible to create a
FormDialog class in .NET derived from the Form class for this purpose, and per-
haps Microsoft will do so in the future. Until this happens, you will have to create
your own dialog class or modify each dialog form separately to have dialog box
behavior. The following table summarizes the properties required to turn the default
Form into a somewhat standard dialog box.
UPDATE THE OPEN METHOD TO READ CAPTIONS
Action Result
3 Modify the
switch block in
the
Open method to
recognize both the old and
current version.
public void Open(string fileName)
{
. . .
switch (version)
{
case 66:
case 83:
{
string name;
4 Modify the do while
loop to read the caption
when a newer version of
the file is opened.
do
{
name = sr.ReadLine();
if (name != null)
{
Photograph p = new Photograph(name);
if (version == 83)
{
// Also read the caption string
p.Caption = sr.ReadLine();
}
this.Add(p);
}
} while (name!= null);
break;
. . .
}