Netframwork 2.0 (phần 6) pps
Bạn đang xem bản rút gọn của tài liệu. Xem và tải ngay bản đầy đủ của tài liệu tại đây (513.6 KB, 50 trang )
Lesson 3: Working with Connection Pools 225
Lesson 3: Working with Connection Pools
This lesson explains what connection pooling is and how to control connection pool-
ing options when creating and configuring connection objects.
After this lesson, you will be able to:
■ Configure a connection for connection pooling by configuring connection string
values.
Estimated lesson time: 30 minutes
What Is Connection Pooling?
Connection pooling enables the reuse of existing connections to reduce the overhead
of continuously creating and disposing of connections that have the same configura-
tion. In other words, opening and closing connections that use the same connection
string and credentials can reuse a connection that is available in the pool. Typical
applications use the same connection objects to continuously fetch and update data
from a database. Connection pooling provides a much higher level of performance by
eliminating the need for the database to constantly create and dispose of connections.
Connection pools are separated by process, application domain, and connection
string. For connection strings that use integrated security, a separate pool is created
for each unique identity.
Controlling Connection Pooling Options
Connection pooling is enabled by default when creating ADO.NET connection
objects. You can control connection pooling behavior (or disable pooling altogether)
by setting connection string keywords specific to connection pooling. For example, to
specifically disable connection pooling, you set Pooling=False in your connection
string. Table 5-7 provides a list of connection string keywords that can be used to con-
trol how a specific connection interacts with the connection pool. Not all keywords
are available for every provider. For example the OLE DB provider controls connec-
tion pooling (also known as resource or session pooling) based on the value set for
the OLE DB Services keyword in the connection string.
226 Chapter 5 Configuring Connections and Connecting to Data
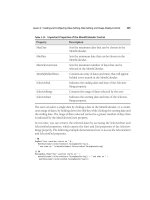
Table 5-7 Connection Pooling Connection String Keywords
Name Default Description
Connection Lifetime 0 When a connection is returned to the pool, if its
creation time was longer than x seconds ago,
with x being the value of this property, then the
connection is destroyed. Values are in seconds,
and a value of 0 indicates the maximum con-
nection timeout.
Connection Reset True Determines whether the database connection is
reset when being drawn from the pool. For SQL
Server 7.0, setting to False avoids making an
additional server round trip when obtaining a
connection, but the connection state, such as
database context, is not being reset.
Enlist True If you want to use a connection as part of a trans-
action you can set this to True and the pooler
will automatically enlist the connection in the
creation thread’s current transaction context.
Load Balance Timeout 0 The minimum number of seconds for the con-
nection to live in the connection pool before
being destroyed.
Max Pool Size 100 The maximum number of connections allowed
in the pool for this specific connection string. In
other words if your application continuously
connects to the database you might need to
increase the Max Pool Size. For example, if your
application has many users that all use the
same connection string and there is the possi-
bility of needing more than 100 connections
you would want to increase the Max Pool Size,
this may occur when many users are accessing
the database server using a common client or
Web page.
Lesson 3: Working with Connection Pools 227
Table 5-7 Connection Pooling Connection String Keywords
Name Default Description
Min Pool Size 0 The minimum number of connections allowed
in the pool.
Pooling True When true, the SqlConnection object is drawn
from the appropriate pool or, if it is required, is
created and added to the appropriate pool. Rec-
ognized values are True, False, Yes, and No.
In addition to connection string properties that control connection pooling behavior,
there are also methods available on connection objects that can affect the pool as well.
The available methods are typically used when you are closing connections in your
application and you know they will not be used again. This clears the connection pool
by disposing of the connections instead of returning them to the pool when they are
closed. Any connections that are already in the pool and open will be disposed of the
next time they are closed. Table 5-8 lists the available methods for interacting with
connection pools.
Table 5-8 Connection Pooling Specific Methods
Name Object Description
ClearAllPools SqlConnection and
OracleConnection
Empties all connection pools for a spe-
cific provider.
ClearPool SqlConnection and
OracleConnection
Empties the connection pool associated
with the specified connection.
ReleaseObject-
Pool
OleDbConnection
and OdbcConnection
Indicates that the object pool can be
released when the last underlying con-
nection is released.
Configuring Connections to Use Connection Pooling
By default, all .NET Framework Data Providers available in ADO.NET have connec-
tion pooling turned on, but the level of control available for working with connection
pooling varies based on the provider being used.
228 Chapter 5 Configuring Connections and Connecting to Data
Configuring Connection Pooling with SQL Server Connections
By default, the SqlConnection object automatically uses connection pooling. Each time
you call SqlConnection.Open with a unique connection string, a new pool is created.
Control connection pooling behavior by setting the connection pool keywords in the
connection string as described earlier in Table 5-7. For example, consider a connec-
tion where you want to set the minimum pool size. By assigning a value greater than
zero to the Min Pool Size keyword you ensure the pool will not be destroyed until after
the application ends. To set the minimum pool size to 5, use a connection string sim-
ilar to the following:
Data Source=SqlServerName;Initial Catalog=DatabaseName;
Integrated Security=True;Min Pool Size=5
The minimum pool size is 0 by default, which means each connection needs to be
created and initialized as they are requested, by increasing the minimum pool size in
the connection string the indicated number of connec tions are created and ready to
use, which can reduce the time it takes to establish the connection on those initial
connections.
Configuring Connection Pooling with OLE DB Connections
The OLE DB connection object (OleDbConnection) automatically pools connections
through the use of OLE DB session pooling. You control how OLE DB connections
use pooling by adding an OLE DB Services keyword to the connection string and set-
ting its value based on the combination of services you want to enable or disable for
the connection.
The following connection strings explicitly enable connection pooling by setting the
OLE DB Services keyword to -1.
OLE DB connection string for an Office Access database (assumes the Nwind.mdb
file exists in the following path: C:\DataSources\Nwind.mdb):
Provider=Microsoft.Jet.OLEDB.4.0;Data Source=C:\DataSources\Nwind.mdb;
OLE DB Services=-1
OLE DB Connection for a SQL Server database (replace ServerName and Database-
Name with valid values for your data source):
Provider=SQLOLEDB;Data Source=ServerName;OLE DB Services=-1;
Integrated Security=SSPI;Initial Catalog=DatabaseName
Lesson 3: Working with Connection Pools 229
The following connection strings disable connection pooling and automatic transac-
tion enlistment by setting the OLE DB Services keyword to -4.
Provider=Microsoft.Jet.OLEDB.4.0;Data Source=C:\DataSources\Nwind.mdb;OLE DB Services=-4
Table 5-9 lists the OLE DB Services values to set in an OLE DB connection string.
Table 5-9 Table 5-9 OLE DB Connection String Settings for OLE DB Services
OLE DB Service Connection String Keyword/Value
All services on “OLE DB Services = -1;”
All services except Pooling and AutoEn-
listment of transactions
“OLE DB Services = -4;”
All services except Client Cursor “OLE DB Services = -5;”
All services except Pooling, AutoEnlist-
ment, and Client Cursor
“OLE DB Services = -8;”
No services (all services disabled) “OLE DB Services = 0;”
Configuring Connection Pooling with ODBC Connections
To enable or disable connection pooling for connections that use the ODBC connec-
tion object (OdbcConnnection), you must use the ODBC Data Source Administrator
dialog box in Windows.
Access the ODBC Data Source Administrator dialog box by performing the following
steps:
1. In the Administrative Tools folder on your Start menu, open Data Sources (ODBC).
2. Select the Connection Pooling tab.
3. Double-click the driver from the list of available ODBC drivers that you want to
set connection pooling options for.
4. In the Set Connection Pooling Attributes dialog box, select the option to either
pool connections or not pool connections. If you select the option to pool con-
nections, you can also set the number of seconds for unused connections to
remain in the pool (the connection lifetime).
5. Click OK to save the settings and repeat for other drivers if desired.
230 Chapter 5 Configuring Connections and Connecting to Data
IMPORTANT ODBC settings
The settings for a particular ODBC driver are in effect for all applications/connections that use that
particular driver.
Configuring Connection Pooling with Oracle Connections
Connections that use the .NET Framework Data Provider for Oracle automatically use
connection pooling by default. You can control how the connection uses pooling by
setting connection string keywords.
Table 5-10 details the connection string keywords available for altering connection
pooling activities.
Table 5-10 Table 5-10 Oracle Connection String Settings for Connection Pooling
Name Default Description
Connection
Lifetime
0 When a connection is returned to the pool, its creation
time is compared with the current time, and the con-
nection is destroyed if that time span exceeds the value
specified. Values are in seconds and a value of 0 indi-
cates the maximum connection timeout.
Enlist True When true, the pooler automatically enlists the con-
nection in the creation thread’s current transaction
context. Recognized values are True, False, Yes, and No.
Max Pool Size 100 The maximum number of connections allowed in the
pool.
Min Pool Size 0 The minimum number of connections allowed in the
pool.
Pooling True When true, the OracleConnection object is drawn from
the appropriate pool or, if it is required, is created and
added to the appropriate pool.
Lesson Summary
■ Connection pooling is enabled by default.
■ Connection pooling options are set in the connection string except for the ODBC
provider, which uses the ODBC Data Source Administrator dialog box in Windows.
Lesson 3: Working with Connection Pools 231
Lesson Review
The following questions are intended to reinforce key information presented in this
lesson. The questions are also available on the companion CD if you prefer to review
them in electronic form.
NOTE Answers
Answers to these questions and explanations of why each choice is right or wrong are located in
the “Answers” section at the end of this book.
1. What determines the connection pool that a connection should use? (Choose all
that apply.)
A. A connection string
B. The identity or credentials of the user opening the connection
C. The database being connected to
D. The connection object used to connect to the database
2. What are the recommended techniques for enabling connection pooling on for
a SQL Server 2000 or SQL Server 2005 database? (Choose all that apply.)
A. Setting the OLE DB Services connection string keyword to -4
B. Opening a connection and not explicitly disabling pooling
C. Setting the connection string keyword Pooling = True in the connection
string
D. Using the Connection Pooling tab of the ODBC Data Source Administrator
dialog box
3. How do I explicitly turn on connection pooling for an OLE DB data source?
A. By setting the OLE DB Services connection string keyword to 0
B. By setting the OLE DB Services connection string keyword to -4
C. By setting the OLE DB Services connection string keyword to -1
D. By setting the OLE DB Services connection string keyword to -7
232 Chapter 5 Configuring Connections and Connecting to Data
Lesson 4: Handling Connection Errors
This lesson explains how to handle errors that are thrown while working with SQL
Server. ADO.NET provides two classes specifically for processing errors: the SqlExcep-
tion class and the SqlError class. Let’s see how to work with these classes and how to
catch and handle errors that may be returned from the data source.
After this lesson, you will be able to:
■ Handle exceptions when connecting to a database.
■ Use the SqlException class to detect connection errors.
■ Use the SqlError class to detect connection errors.
Estimated lesson time: 20 minutes
When SQL Server returns a warning or an error, the .NET Framework Data Provider
for SQL Server creates and throws a SqlException that you can catch in your applica-
tion to deal with the problem. When SqlException is thrown, inspect the SqlException
.Errors property to access the collection of errors that are returned from the SQL
server. The SqlException.Errors property is a SqlErrorCollection class (a collection of
SqlError classes) that always contains at least one SqlError object.
MORE INFO SQL Server errors
SqlConnection will remain open for messages with a severity level of 19 and below, but it will typi-
cally close automatically when the severity is 20 or greater.
Lab: Handling Database Connection Errors
In this lab you will practice catching a SqlException in your application.
� Exercise 1: Handling Database Connection Errors
In this lab you will practice working with database connection errors (specifically, the
SqlException and SqlError objects) in your application. To do this let's create a Win-
dows application.
1. Create a new Windows application and name it HandlingConnectionErrors.
2. Add 3 Buttons to the form and set the following properties:
Button1:
❑ Name = GoodConnectButton
❑ Text = Connect (valid connection string)
Lesson 4: Handling Connection Errors 233
Button2:
❑ Name = ConnectToInvalidUserButton
❑ Text = Connect to invalid user
Button3:
❑ <Name = ConnectToInvalidDatabaseButton
❑ <Text = Connect to invalid database
3. Double click each button to create the button click event handlers and switch to
code view.
4. Add an Imports statement (using in C#) for the System.Data.SqlClient namespace.
5. The following code creates a new connection based on the connection string
passed into it, attempts to open the connection, and then displays any errors it
encounters. Add this code below the button click event handlers:
' VB
Private Sub ConnectToDatabase(ByVal connectionString As String)
Dim connection As New SqlConnection(connectionString)
Try
connection.Open()
Catch ex As SqlException
Dim errorMessage As String = ""
' Iterate through all errors returned
' You can check the error numbers to handle specific errors
For Each ConnectionError As SqlError In ex.Errors
errorMessage += ConnectionError.Message & " (error: " & _
ConnectionError.Number.ToString & ")" & Environment.NewLine
If ConnectionError.Number = 18452 Then
MessageBox.Show("Invalid Login Detected, please provide valid
credentials!")
End If
Next
MessageBox.Show(errorMessage)
Finally
connection.Close()
End Try
End Sub
// C#
private void ConnectToDatabase(string connectionString)
{
SqlConnection connection = new SqlConnection(connectionString);
try
234 Chapter 5 Configuring Connections and Connecting to Data
{
connection.Open();
}
catch (SqlException ex)
{
string errorMessage = "";
// Iterate through all errors returned
// You can check the error numbers to handle specific errors
foreach (SqlError ConnectionError in ex.Errors)
{
errorMessage += ConnectionError.Message + " (error: " +
ConnectionError.Number.ToString() + ")" + Environment.NewLine;
if (ConnectionError.Number == 18452)
{
MessageBox.Show("Invalid Login Detected, please provide valid
credentials!");
}
}
MessageBox.Show(errorMessage);
}
finally
{
connection.Close();
}
}
6. Add the following code so the three button click event handlers look like the fol-
lowing:
' VB
Private Sub GoodConnectButton_Click _
(ByVal sender As System.Object, ByVal e As System.EventArgs) _
Handles GoodConnectButton.Click
' This is a valid connection string
Dim GoodConnection As String = _
"Data Source=.\sqlexpress;Initial Catalog=Northwind;Integrated Security=True;"
ConnectToDatabase(GoodConnection)
End Sub
Private Sub ConnectToInvalidUserButton_Click _
(ByVal sender As System.Object, ByVal e As System.EventArgs) _
Handles ConnectToInvalidUserButton.Click
' This connection string has invalid credentials
Dim InvalidUserConnection As String = _
"Data Source=.\sqlexpress;Initial Catalog=Northwind;User ID = InvalidUser"
ConnectToDatabase(InvalidUserConnection)
End Sub
Private Sub ConnectToInvalidDatabaseButton_Click _
(ByVal sender As System.Object, ByVal e As System.EventArgs) _
Handles ConnectToInvalidDatabaseButton.Click
Lesson 4: Handling Connection Errors 235
' This connection string has an invalid/unavailable database
Dim InvalidDatabaseConnection As String = _
"Data Source=.\sqlexpress;Initial Catalog=InvalidDatabase;Integrated
Security=True"
ConnectToDatabase(InvalidDatabaseConnection)
End Sub
// C#
private void GoodConnectButton_Click(object sender, EventArgs e)
{
// This is a valid connection string
String GoodConnection =
"Data Source=.\\sqlexpress;Initial Catalog=Northwind;Integrated Security=True;";
ConnectToDatabase(GoodConnection);
}
private void ConnectToInvalidUserButton_Click(object sender, EventArgs e)
{
// This connection string has invalid credentials
String InvalidUserConnection =
"Data Source=.\\sqlexpress;Initial Catalog=Northwind;User ID = InvalidUser";
ConnectToDatabase(InvalidUserConnection);
}
private void ConnectToInvalidDatabaseButton_Click(object sender, EventArgs e)
{
// This connection string has an invalid/unavailable database
String InvalidDatabaseConnection =
"Data Source=.\\sqlexpress;Initial Catalog=InvalidDatabase;Integrated
Security=True";
ConnectToDatabase(InvalidDatabaseConnection);
}
7. Run the application.
8. Click the Connect (valid connection string) button and no errors should be
raised.
9. Click the Connect To Invalid User button and the code to catch the specific login
error (error 18452) is executed.
10. Click the Connect To Invalid Database button and you can see that an error was
raised and is displayed in the MessageBox.
Lesson Summary
■ A SqlException object is created when an error is detected on the SQL server.
■ Every instance of a SqlException exception contains at least one SqlError warn-
ing that contains the actual error information from the server.
236 Chapter 5 Configuring Connections and Connecting to Data
Lesson Review
The following questions are intended to reinforce key information presented in this
lesson. The questions are also available on the companion CD if you prefer to review
them in electronic form.
NOTE Answers
Answers to these questions and explanations of why each choice is right or wrong are located in
the “Answers” section at the end of the book.
1. What types of errors will cause a SqlConnection object to close? (Choose all that
apply.)
A. Errors wth a severity level of 1 through 9
B. Errors wth a severity level of 10 through 19
C. Errors wth a severity level of 20 through 29
D. Errors wth a severity level of 30 or greater
2. What property contains the actual error message returned by SQL Server? (Choose
all that apply.)
A. SqlException.Source
B. SqlException.Message
C. SqlError.Class
D. SqlError.Message
Lesson 5: Enumerating the Available SQL Servers on a Network 237
Lesson 5: Enumerating the Available SQL Servers on a
Network
This lesson describes how to return a list of visible SQL Server instances on a network
comparable to the Server name drop-down list in the Add Connection dialog box.
After this lesson, you will be able to:
■ Enumerate through instances of SQL Server.
Estimated lesson time: 20 minutes
The .NET Framework offers applications a way to discover SQL Server instances on a
network so your programs can process this information when necessary. To retrieve the
list of available SQL Servers, use the Instance property of the SqlDataSourceEnumerator
class and call the GetDataSources method. The GetDataSources method returns a Data-
Table that contains information for each SQL server that is visible on the network. The
returned data table contains the columns listed in Table 5-11.
Table 5-11 Table 5-11 DataTable Schema Returned by the GetDataSources Method
Column Name Description
ServerName Name of the SQL server containing the visible instance
InstanceName Name of the server instance or empty for servers running
default instances
IsClustered Indicates whether the server is part of a cluster
Version The version number of the SQL server
Why Do Only Some or No SQL Servers Appear in My Grid?
Depending on how your network or even single machine is set up, the list of available
servers may or may not be complete. In addition to things such as network traffic and
timeout issues, the way your network implements security can cause servers to be hid-
den from the returned list as well. If you are running SQL Server 2005, there is a ser-
vice named SQL Browser that needs to be running to see SQL Server instances. And
even if your SQL Browser service is running, your firewall may be blocking the request
for SQL information; the firewall is likely to be blocking communication requests
through port 1433, which is the default port that SQL Server default instances are set
238 Chapter 5 Configuring Connections and Connecting to Data
up to use. There are obvious security implications concerning turning on the SQL
Browser service, as well as enabling communications through specific ports through
your firewall, but these are beyond the scope of this book. A good resource is the
“SQL Browser service” section of SQL Books Online, and I encourage you to read that
before changing any settings on your firewall or SQL Server configuration.
Lab: Returning the List of Visible SQL Servers
In this lab you will practice enumerating the SQL Servers on your network.
� Exercise 1: Enumerating the SQL Servers on a Network
To demonstrate how to retrieve the list of visible SQL servers, let’s create a small appli-
cation to display the information returned from the GetDataSources method in a Data-
GridView.
1. Create a new Windows application named SqlServerEnumerator.
2. Add a DataGridView to the form and name it VisibleSqlServers.
NOTE DataGridView
The DataGridView is the control typically used for displaying data. The DataGridView is dis-
cussed in more detail in Chapter 8.
3. Add a Button control below the grid and set its Name property to
GetDataSourcesButton.
4. Set the Button’s Text property to Get Visible Servers.
5. Double-click the Get Visible Servers button to create the Click handler and
switch to code view.
6. Add code so that the handler looks like the following:
' VB
Dim instance As System.Data.Sql.SqlDataSourceEnumerator = _
System.Data.Sql.SqlDataSourceEnumerator.Instance
isibleSqlServers.DataSource = instance.GetDataSources
// C#
System.Data.Sql.SqlDataSourceEnumerator instance =
System.Data.Sql.SqlDataSourceEnumerator.Instance;
VisibleSqlServers.DataSource = instance.GetDataSources();
Now run the application and click the Get Visible Servers button. All visible SQL
servers on your network will appear in the grid, looking similar to Figure 5-3.
Lesson 5: Enumerating the Available SQL Servers on a Network 239
Figure 5-3 Grid showing all visible SQL Servers on your network
Lesson Summary
■ You can use the SqlDataSourceEnumerator object to return a list of visible SQL
servers on a network.
■ The list of servers returned may not be complete due to factors such as firewall
settings and protocol configurations on the SQL Server services.
Lesson Review
The following questions are intended to reinforce key information presented in this
lesson. The questions are also available on the companion CD if you prefer to review
them in electronic form.
NOTE Answers
Answers to these questions and explanations of why each choice is right or wrong are located in
the “Answers” section at the end of this book.
1. What object is used to return the list of visible SQL Servers?
A. VisibleSqlServers
B. GetDataSources
C. SqlDataSourceEnumerator
D. ServerName
2. What factors can cause SQL servers to be invisible on the network? (Choose all
that apply.)
A. The computer’s firewall settings
B. The amount of network traffic
C. The availability of the SQL Browser service
240 Chapter 5 Configuring Connections and Connecting to Data
D. The Visible property of the SQL Server
3. Which of the following pieces of information is available through the SqlServer-
Enumerator object? (Choose all that apply.)
A. The name of the SQL server
B. The number of databases currently on the server
C. The version number of the server
D. The instance name for servers that are not running default instances
Lesson 6: Securing Sensitive Connection String Data 241
Lesson 6: Securing Sensitive Connection String Data
Because of the sensitive nature of most data in real-world scenarios, it is extremely
important to protect your servers and databases from unauthorized access. To ensure
limited access to your data source, it is a best practice to secure information such as
user IDs, data source names, and, of course, passwords. Storing this type of informa-
tion as plain text is not recommended because of the obvious security risk. It is also
worth noting that plain text saved in compiled applications is easily decompiled, ren-
dering your data accessible by persons with questionable intent.
After this lesson, you will be able to:
■ Protect access to a data source’s connection details.
Estimated lesson time: 45 minutes
Real World
Steve Stein
In another of my previous jobs (okay, I’ve had a few!), I took a position as a sys-
tem administrator for a local mortgage company. My first task was to get familiar
with the infrastructure of their company network. I immediately realized that
basically every employee was set up with an administrator account and had
access to the entire network. Although this story isn’t specific to securing con-
nection strings, it does provide insight into how important it is to lock down
your sensitive data!
The suggested method of implementing security in applications that access data is to
use Windows Authentication (also known as Integrated Security). To further protect
sensitive connection information when using Integrated Security, it is also recom-
mended that you set the Persist Security Information keyword to False in the connection
string. This ensures that the credentials used to open the connection are discarded
and not stored where someone might be able to retrieve them.
242 Chapter 5 Configuring Connections and Connecting to Data
Table 5-12 provides the key/value pairs to set in the connection string for implement-
ing integrated security in the four .NET Framework Data Providers.
Table 5-12 Table 5-12 Connection String Keywords for Turning on Integrated Security
Data Provider Key/Value pair
SqlClient Integrated Security=True
SqlClient and OleDb Integrated Security=SSPI
Odbc Trusted_Connection=Yes
OracleClient Integrated Security=Yes
As stated earlier, if you absolutely must use a connection string that contains sensitive
information, do not store the connection string in the compiled application. As an
alternative, you can use the application configuration file (app.config). The app.con-
fig file stores connection strings as XML, and your application gets its connection
information by querying this file at run time (as opposed to compiling the connection
string into the application itself). By default the application configuration file stores
it’s information unencrypted, as shown in Figure 5-4.
Figure 5-4 An unencrypted configuration file
Securing Data in Configuration Files
Now that you’ve moved your sensitive connection string data out of the compiled
application and into the application’s configuration file, the connection string is still
unencrypted and can be read by anyone with permission to open the configuration
file. Therefore, you still need a way to prevent unauthorized personnel from viewing
the connection information if they somehow gain access to your configuration file.
The suggested method of securing configuration files is to encrypt the sections that
contain sensitive information, as shown in Figure 5-5.
Lesson 6: Securing Sensitive Connection String Data 243
Figure 5-5 An encrypted configuration file
The suggested approach to encrypting configuration data is to use a protected-config-
uration provider. There are two protected-configuration providers available in the
.NET Framework as well as a base class you can use to implement your own if the two
available providers are not sufficient for your application.
Lab: Securing a Configuration File
In this lab you will practice encrypting and decrypting a configuration file.
� Exercise 1: Encrypting and Decrypting a Configuration File
In this lesson, you will see how to use the DpapiProtectedConfigurationProvider to
encrypt and decrypt the ConnectionStrings section of the app.config file.
1. Create a new Windows Application and name it SecuringConnectionStrings.
2. Add a reference to the System.Configuration namespace.
3. Add two buttons to the form, setting the Name and Text properties to the following:
Name property Text property
EncryptButton Encrypt
DecryptButton Decrypt
4. Create a data source and add a connection string to the application configura-
tion file by running the Data Source Configuration Wizard.
5. Create event handlers for the button-click events.
244 Chapter 5 Configuring Connections and Connecting to Data
6. Switch to code view and paste the following code into the editor:
The following code locates the connection string setting in the application’s con-
figuration file. The connection string setting is marked for encryption by calling
the ProtectSection method. Setting the ForceSave property to True ensures the con-
figuration file is saved whether changes are made or not; and the Configuration
.Save call saves the file once it has been encrypted.
' VB
Imports System
Imports System.Configuration
Public Class Form1
Private Sub EncryptConnectionString()
' Get the configuration file
Dim config As System.Configuration.Configuration = _
ConfigurationManager.OpenExeConfiguration(ConfigurationUserLevel.None)
' Create the provider name
Dim provider As String = _
"DataProtectionConfigurationProvider"
' Encrypt the ConnectionStrings
Dim connStrings As ConfigurationSection = _
config.ConnectionStrings
connStrings.SectionInformation.ProtectSection(provider)
connStrings.SectionInformation.ForceSave = True
config.Save(ConfigurationSaveMode.Full)
End Sub
Private Sub DecryptConnectionString()
' Get the configuration file
Dim config As System.Configuration.Configuration = _
ConfigurationManager.OpenExeConfiguration(ConfigurationUserLevel.None)
' Decrypt the ConnectionStrings
Dim connStrings As ConfigurationSection = _
config.ConnectionStrings
connStrings.SectionInformation.UnprotectSection()
connStrings.SectionInformation.ForceSave = True
config.Save(ConfigurationSaveMode.Full)
End Sub
Private Sub EncryptButton_Click(ByVal sender As System.Object, ByVal e As
System.EventArgs) Handles EncryptButton.Click
EncryptConnectionString()
End Sub
Private Sub DecryptButton_Click(ByVal sender As System.Object, ByVal e As
System.EventArgs) Handles DecryptButton.Click
DecryptConnectionString()
Lesson 6: Securing Sensitive Connection String Data 245
End Sub
End Class
// C#
using System;
using System.Collections.Generic;
using System.ComponentModel;
using System.Data;
using System.Drawing;
using System.Text;
using System.Windows.Forms;
using System.Configuration;
namespace SecuringConnectionsCS
{
public partial class Form1 : Form
{
public Form1()
{
InitializeComponent();
}
private void EncryptConnectionString()
{
// Get the configuration file
System.Configuration.Configuration config =
ConfigurationManager.OpenExeConfiguration(ConfigurationUserLevel.None);
// Create the provider name
string provider = "DataProtectionConfigurationProvider";
//Encrypt the connectionStrings
ConfigurationSection connstrings = config.ConnectionStrings;
connstrings.SectionInformation.ProtectSection(provider);
connstrings.SectionInformation.ForceSave = true;
config.Save(ConfigurationSaveMode.Full);
}
private void DecryptConnectionString()
{
//Get the configuration file
System.Configuration.Configuration config =
ConfigurationManager.OpenExeConfiguration(ConfigurationUserLevel.None);
// Decrypt the connectionStrings
ConfigurationSection connstrings = config.ConnectionStrings;
connstrings.SectionInformation.UnprotectSection();
connstrings.SectionInformation.ForceSave = True;
config.Save(ConfigurationSaveMode.Full);
}
private void EncryptButton_Click(object sender, EventArgs e)
{
246 Chapter 5 Configuring Connections and Connecting to Data
EncryptConnectionString();
}
private void DecryptButton_Click(object sender, EventArgs e)
{
DecryptConnectionString();
}
}
}
7. Run the application and click the Encrypt button.
8. While the application is running, navigate to the project’s folder and locate the
configuration file (SecuringConnectionStrings.vshost.exe.config).
9. Open the file and verify that the ConnectionStrings section is encrypted.
10. Now go back to the form and click the Decrypt button.
11. Reopen the .config file and notice that the connection string has reverted back to
plain text.
Lesson Summary
■ Windows Authentication (also called Integrated Security) is the suggested method
for connecting to data securely.
■ Store connection strings that contain sensitive information in the application
configuration file and encrypt all settings that contain confidential information.
Lesson Review
The following questions are intended to reinforce key information presented in this
lesson. The questions are also available on the companion CD if you prefer to review
them in electronic form.
NOTE Answers
Answers to these questions and explanations of why each choice is right or wrong are located in
the “Answers” section at the end of this book.
1. What is the connection string’s key/value pair for using Windows Authentica-
tion in SQL Server 2000 and SQL Server 2005? (Choose all that apply.)
A. Integrated security = yes
B. Integrated Security =SSPI
Lesson 6: Securing Sensitive Connection String Data 247
C. Integrated Security = True
D. Trusted_Connection = Yes
2. If you must use a user name and password to connect to a database, where
should you store the sensitive information?
A. Compiled in the application
B. In an encrypted application configuration file
C. In a resource file deployed with the application
D. In the registry
3. What is the recommended method for securing sensitive connection string
information?
A. Encrypting the data in the application configuration file
B. Using a code obfuscator
C. Using integrated security (Windows Authentication)
D. Querying the user for his or her credentials at run time
248 Chapter 5 Review
Chapter Review
To further practice and reinforce the skills you learned in this chapter, you can per-
form the following tasks:
■ Review the chapter summary.
■ Complete the case scenarios. These scenarios set up real-world situations involv-
ing the topics of this chapter and ask you to create a solution.
■ Complete the additional practices.
■ Take a practice test.
Chapter Summary
■ Connection objects are created by setting a valid connection string and enabling
communication between your application and a data source. ADO.NET provides
four primary connection objects that can be used to connect to almost any stan-
dard database.
■ Connection objects contain several properties, methods, and events that are
used for opening and closing connections to a data source, providing informa-
tion regarding the current state of the connection and surfacing warnings and
informational messages from a data source.
■ Connection objects enable connection pooling by default. By setting connec-
tion–pooling specific connection string keywords, you can control how connec-
tions interact with the connection pool.
■ By wrapping connection calls in a try-catch block, you can process errors
returned from SQL Server by using the SqlException and SqlError classes.
■ By using Windows Authentication and application configuration files, you can
protect sensitive information such as passwords in your programs.
Key Terms
Do you know what these key terms mean? You can check your answers by looking up
the terms in the glossary at the end of the book.
■ connection object
■ connection string
249 Chapter 5 Review
■ connection pool
■ encryption
■ integrated security
Case Scenarios
In the following case scenarios, you will apply what you’ve learned about configuring
connections and connecting to data. You can find answers to these questions in the
“Answers” section at the end of this book.
Case Scenario 1: Troubleshooting a SQL Connection
You just landed a sweet job at the Alpine Ski House and have been assigned to main-
tain the application that keeps track of inventory in the ski rental hut. The client appli-
cation connects to a SQL Server database where the inventory data is stored. You
decide to test the application before the season begins, and the first time you run the
application and try to check inventory, you get an unhandled exception originating
from the SQL server.
How can you modify the application so that users can better identify and trouble-
shoot connection problems?
Case Scenario 2: Securing Sensitive Data
You are working as an application developer at Contoso Pharmaceuticals and have
been tasked with rewriting their in-house research and development application. The
first thing you notice is that they store user name and password information in plain
text within the application code base.
Create a list of suggested remedies to present to upper management.
Suggested Practices
To gain further knowledge on the subject of working with connections, complete the
following practices.
■ Practice 1 Create an application that targets different databases, which can be
selected when the application starts.
■ Practice 2 Design a reusable block of code that can be used to handle SQL
Server errors of any severity.