From after effects to flash poetry in motion graphics - part 9 ppt
Bạn đang xem bản rút gọn của tài liệu. Xem và tải ngay bản đầy đủ của tài liệu tại đây (1.33 MB, 50 trang )
10. P
ress the Home key to return the playback head to the start of the timeline. You
are going to start with the
Glow Radius values. Add keyframes and change the value
at the following times:
Time Value Description
0:00:00:00 385 The glow seems to disappear.
0:00:01:00 102 You have the northern lights.
0:00:03:00 103
0:00:04:00 354 The lights are gone.
11. Press the Home key to return the playback head to the start of the timeline. You
are going to adjust the
Glow Intensity values. Add keyframes and change the value
at the following times:
Time Value
0:00:04:00 5
0:00:05:00: 0
Scrub through the timeline and you will see, as Figure 10-20 demonstrates, that
you have a nice little effect. Turn off the
Solo switch for the Deep layer and save the
project.
Figure 10-20. The text has
a “
glow on.”
FROM AFTER EFFECTS TO FLASH: POETRY IN MOTION GRAPHICS
380
7486CH10.qxd 11/10/06 5:31 PM Page 380
Now that the text is in place and the effect applied, you are now going to work on giving
t
he text some texture by adding some fractal noise to it. Follow these steps:
1. S
elect the
Black Solid 1 l
ayer. Open the
Noise and Grain f
older in the
Effects &
Presets
panel and drag a copy of the Fractal Noise effect onto the solid name in the
timeline. The words appear over the familiar smoke pattern.
2. Open the Effect Controls, twirl down the Fractal Noise effect, and use these settings:
Fractal Type: Dynamic Twist. The smoke develops some swirls.
Contrast: 224. The swirls become black and white.
Brightness: –32. The background turns black, and the swirls become more
distinct.
Twirl down
Transform and use these settings:
Uniform Scaling: Deselect. You are going to distort the swirls.
Scale Width: 260. The swirls appear to stretch.
Twirl up
Transform. Set Complexity to 7. The swirls become a bit more detailed.
3. Twirl up Fractal Noise in the Effect Controls panel. The next step is to hook the
letters in the
Deep layer to the effect you just applied to the solid.
4. Turn off the visibility of the TextDupe layer and change the Matte setting in the
TrkMat column of the Deep layer from None to Luma Matte. You will see the colored
text in
Deep has some texture.
5. The effect is rather static. You’ll give it some interest by adjusting the Brightness,
Scale Width, and Evolution values at a couple of points in the timeline. Select the
solid layer and press the E key to open
Fractal Noise and twirl it down.
6. Move the playback head to the 0:00:01:00 point on the timeline and add a
keyframe for the
Brightness value. Move the playback head to 0:00:03:00 and
change the
Brightness value to 0.0. Move the playback head to the 0:00:05:00 mark
and change the
Brightness value to –44.
7. To give the illusion of motion, you will have the Scale Width property change from
its current setting to a setting of
600% at the 0:00:04:00 mark. Twirl down the
effect’s
Transform properties. Move the playback head to the 0:00:01:00 mark and
add a keyframe to the
Scale Width. Move the playback head to the 4-second mark
on the timeline and change the
Scale Width value to 600%.
8. With the growth of the noise pattern, you’ll also have it look like the pattern is
changing. You do that by adjusting the
Evolution values. Add a keyframe to the
Evolution value at the 1-second mark. Move the playback head to the 0:00:05:00
mark and change the Evolution value to 1 x +180 degr
ees
. Scrub through the
timeline, and you will see the pattern in the words has changed (as shown in
Figure 10-21).
9. Save the project
.
Figure 10-21.
The final effect
TRACK MATTES ARE YOUR FRIEND
381
10
7486CH10.qxd 11/10/06 5:31 PM Page 381
Another spotlight effect
H
ere’s an interesting method of lighting up a short block of text. It is particularly effective
for stationary text on the Flash stage.
1. In After Effects, select the Text tool, click the Comp window, and enter the follow-
ing:
i
s a danger
. Name the layer D
anger
, and set the layer’s In point to 0
:00:05:00
and its Out point to 0:00:10:00.
2. Apply the Colorama effect to the text. In the Effect Controls panel, twirl down the
Output Cycle and select Caribbean from the Use Preset Palette pull-down menu. The
text turns blue. Drag the arrow that is pointing to the gradient in the
Output Cycle
to about the midpoint of the gradient. This will soften the blue color in the text.
3. Open the Project panel and drag a copy of the black solid to the timeline above the
Danger layer. Set the solid layer’s In and Out points to 5 and 10 seconds to match
the duration of the text in the
Danger layer. Open Effects & Presets ➤ Generate and
drag a copy of the
Beam effect onto the solid just added in the timeline. You will
see a sort of red beam appear over the text. This beam will be used to create the
spotlight effect.
4. Open the Effect Controls panel and make the following changes to the Beam effect:
Starting Point: 0.0, 120.0. The crosshairs move to the left side of the Comp.
Ending Point: 316, 120. The end point crosshairs move to the right edge of the
Comp.
Length: 95%. The bar will stretch across the Comp.
Starting Thickness: 10. This value is the thickness of the beam at its start point.
Ending Thickness: 32. The beam thickens on the right side and pulls away from
the right edge of the Comp.
5. Twirl up the Beam effect in the Effect Controls panel. Obviously, a red beam over
the text is going to look a bit cheesy. Instead, you’ll use the gradient in the beam to
give the text a bit of depth.
6. Select the Danger layer and change its Track Matte setting to Luma Matte. If you
scrub through the timeline, not much is happening. You’ll put the beam in motion
by changing its end point location at various times.
7. Select the solid on the timeline and press the E key to open the effect in the time-
line. Twirl down
Beam.
8. Move the playback head to 0:00:05:03, add a keyframe in the Ending Point prop
-
erty, and change the value to
285, 0.0. Move the playback head to 0:00:07:00 and
change the
Ending Point value to 303, 216. Move the playback head to 0:00:09:05
and change the value to 317, 119. Scrub the playback head across the timeline, and
you will see the beam sweep, from the top to the bottom, across the text, thanks
to the end point changes (see Figure 10-22). Save the project.
Figure 10-22.
Yet another way of calling the text to the
viewer’s attention
FROM AFTER EFFECTS TO FLASH: POETRY IN MOTION GRAPHICS
382
7486CH10.qxd 11/10/06 5:31 PM Page 382
Creating wavy text
Y
ou don’t always need to use a text animation preset to create text effects that can be
used in Flash. Here’s one technique:
1. In After Effects, select the Text tool, click once in the Comp window, and enter the
text
s
eeking you
. Rename the layer to S
eek
and drag a copy of the black solid from
the
Project panel above the Seek layer on the timeline. Set the In point for both the
Seek and solid layers to 0:00:10:00 and the Out point for both layers to 0:00:15:00.
2. Click the Solo switch for the Seek layer. Drag a copy of the CC Blobbylize effect
from
Effects & Presets ➤ Distort and drop it onto the text. You will see the text
“flatten” and take on a wavy look.
3. In the Effect Controls panel, do the following:
Twirl down
Blobbiness and change the property to Luminance. Set the following
values:
Softness: 12. The text appears to get smaller and look like it is dripping.
Cut Away: 12.
Twirl up
Blobbiness.
Twirl down
Light and change the Intensity value to 354. You won’t see a change
because the text is white. You’ll change that later.
Twirl up the
CC Blobbylize effect in the Effect Controls panel.
The text is a bit flat. You want to stretch it out and wrap it around a sphere. Here’s how:
4. Drag the Spherize effect from the open Distort folder and drop it onto the text.
Use these values in the
Effect Controls panel:
Radius: 44. The center of the text develops a bump.
Center of Sphere: 32, 123. The bump becomes less pronounced because the
sphere has been moved away from the text.
5. The text is static. You’ll put it into motion. Select the Seek layer and press the E key
to open the effect in the timeline. Twirl down
CC Blobbylize and move the playback
head to
0:0010:00.
6. Twirl down Blobbiness, add a keyframe in the Softness value, and change the value
to
11. Move the playback head to 0:00:14:00 and change the value to 80. The text
suddenly takes on a very rounded appearance.
7. Twirl up CC Blobbylize and twirl down Spherize.
8. Place the playback head at 0:00:10:00 and add a keyframe to the Center of Spher
e
property. Move the playback head to 0:00:14:00 and change the Center of
Sphere
value to 289, 123. Scrub the playback head across the timeline, and you will
see the text has become wavy. Turn off the
Solo switch for the Seek layer.
W
e could stop here, but the white text color doesn’t fit the feel of the piece so far
. Y
ou are
going to add a gradient to the text by applying a
Ramp effect to the solid.
TRACK MATTES ARE YOUR FRIEND
383
10
7486CH10.qxd 11/10/06 5:31 PM Page 383
9. Select the black solid above the Seek layer. Twirl down the Generate folder in the
Effects & Presets panel and drag a copy of the Ramp effect onto the solid in
the
Comp window. When you release the mouse, the gradient will appear.
10. Open the Effect Controls panel and make the following changes to the Ramp effect:
Start of Ramp: 14.6, 67.3
End of Ramp
: 316, 120
The gradient will now run from left to right rather than top to bottom.
11. The final step is to put the Ramp effect in motion by changing the Start of Ramp
and End of Ramp values in the timeline. Select the solid layer and press the E key to
open the
Ramp effect. Twirl down Ramp.
12. Move the playback head to 0:00:10:01, add a keyframe, and change the Start of
Ramp
value to 0, 120. Change the values at the following times:
Time Value
0:00:12:00 Add a keyframe.
0:00:13:05 0, 64.
0:00:14:05 298, 97.
13. Move the playback head to 0:00:10:01, add a keyframe to the End of Ramp prop-
erty, and change the value to
47, 120. Change the values at the following times:
Time Value
0:00:12:00
320, 120
0:00:14:05
310, 119
14. To “hook” the text into the changing gradient, set the Seek layer’s Track Matte set-
ting to
Luma Matte. Scrub across the timeline, and you will see the gradient move
through the letters as
shown in Figure 10-23. Save the project.
R
emember, the
Ramp e
ffect creates a color gradient, blending it with the original
image contents. In this case, it will be a simple grayscale gradient.
FROM AFTER EFFECTS TO FLASH: POETRY IN MOTION GRAPHICS
384
7486CH10.qxd 11/10/06 5:31 PM Page 384
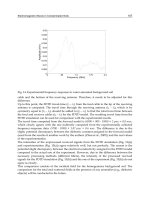
Figure 10-23. The project so far
This is yet another effective technique for grabbing a viewer’s attention in Flash. Just keep
in mind this technique uses the
CC Blobbylize effect, which converts text to a bitmap if you
are outputting the After effects file to a SWF file. If you do use this technique, output the
file to a video and convert it to an FLV file using the Flash 8 Video Encoder.
Text with balls
Before you start giggling, this exercise uses the CC Ball Action effect to give the text a
marble texture. Here’s how:
1. Select the Text tool and enter the following text: waiting for you. This will create a
new layer on the timeline.
2. Rename the new text layer to Waiting.
3. Drag a copy of the black solid from the Project panel and add it to the timeline
above the text you just entered. Set the In point of both layers to
0:00:15:00 and
the Out point to
0:00:20:00.
4. In the Effects & Presets panel, twirl down Simulation and drag a copy of the CC Ball
Action
effect onto the solid in the timeline. Open the Ef
fect Contr
ols
panel and use
these values:
Twist Angle: 0 x –75 degrees
Ball Size
: 68
Instability State
: 1 x +24 degrees
If you scrub across the timeline, you aren’t going to see much other than a couple
of white dots. You’ll fix that by playing with the
Scatter, Twist Angle, and Ball Size
properties on the timeline.
TRACK MATTES ARE YOUR FRIEND
385
10
7486CH10.qxd 11/10/06 5:31 PM Page 385
Before you proceed, it might be a good idea to review the settings:
Scatter:
Every ball is placed on an imaginary grid. The higher the number, the more
t
he balls are spread all over the stage
Rotation Axis: If the balls are spinning, use this pull-down to choose the spin axis.
Just don’t ask us what happens when you choose
X15Z. We don’t have a clue either.
Rotation: The whole number is the number of rotations that will be applied to the
entire effect, and the degree is the angle of the rotation.
Twist Property: The selections in this pull-down determine which property of the
balls will be used to distort them.
Twist Angle: Same thing as the rotation but applied to the Twist property.
Grid Spacing: How the balls are placed in the Comp. Lower values result in a tighter
ball pattern. Think of a piece of graph paper and a ball being placed where the
lines in the paper intersect. Really fine graph paper, lower grid spacing, results in
more balls.
Instability State: This only works if there is a Scatter value applied. This value deter-
mines how each ball in the grid moves in a random manner. If you are a control
freak, the odds are you won’t be using this feature all that often.
5. Open the effect on the timeline and twirl it down. Move the playback head to
0:00:15:00 and add a keyframe in the Scatter property. Move the playback head
to
0:00:17:00 and change the Scatter value to 107.
6. Return the playback head to 0:00:15:00 and add a keyframe to the Twist Angle.
Change the
Twist Angle value to the one shown at the following times:
Time Value
0:00:16:00 0 x +27
0:00:18:05 0 x +51
7. Return the playback head to 0:00:15:00 and add a keyframe to the Ball Size prop-
erty. Change the
Ball Size value to the one shown at the following times:
Time
Value
0:00:17:00 53
0:00:18:05
11
0:00:19:00 0
0:00:20:00 131
FROM AFTER EFFECTS TO FLASH: POETRY IN MOTION GRAPHICS
386
7486CH10.qxd 11/10/06 5:31 PM Page 386
If you scrub through the effect, you will see little balls moving through the text.
Y
ou are going to add a bit of “jazz” to the balls. You will notice they suddenly dis-
a
ppear because of their size increase. What you are going to do is to have those
balls morph into streaks. To achieve that, you are going to add the
CC Rain effect
to the solid.
8. Twirl down the Simulation folder in the Effects & Presets panel and drag a copy of
the
CC Rain effect onto the solid layer in the Comp. If you scrub through the solid,
you will see that yes, indeed, it is raining on the words and the entire solid. Not
exactly the desired effect. You want to fix that.
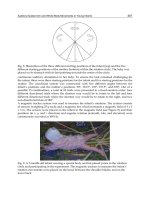
9. Click the Waiting layer once and change its Track Matte setting to Alpha Matte. When
you scrub through the layer, you will see the effect is restricted to the text but is
only visible when the text disappears (as shown in Figure 10-24).
Figure 10-24. You get some interesting results
when you use the effects in tandem.
This is a really interesting technique that demonstrates the interaction of a pair of effects
and an Alpha Matte in After Effects. Though you could use this as an FLV video in Flash,
another approach would be to do the effect in the solid, output that as a video, convert it
to an FLV file, and use the text in Flash to mask the effect in the FLV file.
Blinking text
No spook film that is worthwhile doesn’t have text that blinks on and off in such a way as
to scare the bejabbers out of the audience. This will hold true for our B film after you
complete these steps:
1. Click the Comp window and select the Text tool. Click once in the Comp window
and enter the following text:
WATCH OUT !!!. Rename the text layer Watch.
2. Drag the black solid from the Project panel to a new layer above the text layer just
created.
3. Set the In point for both layers to 0:00:20:00 and the Out point to 0:00:25:00.
4. Drag the CC Rain effect onto the solid.
5. In the Effects & Presets panel, twirl down the Stylize folder and drag a copy of the
Strobe Light effect onto the Comp. In the Effect Controls panel, twirl up the CC Rain
effect and twirl down Strobe Light. The effect does exactly what the name implies,
and the controls, listed here, allow you to do a lot with it:
Strobe Color: Pick a color for the light using the Color Picker.
Blend W
ith Original
: The percentage value you add here determines how
the
entire effect is applied to the layer.
Str
obe Duration
: Strobe lights turn and off
. This value specifies, in seconds, how
long the effect lasts.
TRACK MATTES ARE YOUR FRIEND
387
10
7486CH10.qxd 11/10/06 5:31 PM Page 387
Strobe Period: The time between light bursts is called the period. For example, if
t
he
S
trobe Duration
i
s set to
0
.1
s
econd and the
S
trobe Period
i
s set to
1
.0
s
ec-
o
nd, the layer will have the effect for
0.1 s
econd and then be without the effect
for
0.9 second. If this value is set lower than the Strobe Duration, the strobe
effect is constant.
Random Strobe Probability: Think of this as random flickering. Sort of like those
street lights in spook films that can’t seem to stay on and flicker on and off.
Strobe: You have two choices in this pull-down menu that determine how the
effect is applied.
Operates on Color Only performs the strobe operation on all
color channels.
Make Layer Transparent makes the layer transparent when a
strobe effect occurs.
Strobe Operator: Here you specify the blend mode to use when Operates on
Color Only
is selected from the Str
obe
menu. The default setting is Copy.
6. Change the Random Strobe Probability value from 0% to 32%. Twirl up the Strobe
Light
effect in the Effect Controls panel.
7. Select the solid layer and press the E key to open Effects in the timeline. Twirl down
CC Rain. The plan is to have the rain increase in intensity over a couple of seconds.
8. Drag the playback head to 0:00:20:00 and add a keyframe in the Amount setting.
Drag the playback head to
0:00:22:00 and add another keyframe. Place the play-
back head at
0:00:24:00 and change the amount to 590.
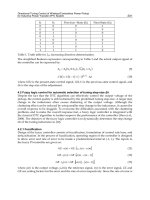
9. Select the Watch layer and change its Track Matte setting to Luma Matte. If you
scrub the playback head across the layer, as shown in Figure 10-25, you will see the
words blink on and off. When the words are in the off state, the rain shows
through. Save the project.
FROM AFTER EFFECTS TO FLASH: POETRY IN MOTION GRAPHICS
388
Figure 10-25. The Strobe Light and CC Rain effects combine to add a bit of a sinister look to the project.
7486CH10.qxd 11/10/06 5:31 PM Page 388
This is another one of those techniques that you can “sneak” into Flash. You can create the
e
ffect of a lightbulb flickering on and off in a random manner and render just the bulb by
c
ropping the video to the region of interest. The resulting FLV file placed into Flash will be
physically small, and so too will its file size. Couple the
Blink effect with a Glow effect, and
you could have a flickering light on a foggy wharf at night. Really spooky.
Bring in the blobs
In this final effect of the project, you will be revisiting the CC Mr Mercury effect. This time,
though, you are going to approach its use a bit differently. The blob will start out as a
jiggling sphere and then ooze out to create the effect. There will, of course, be text mask-
ing the effect, and the oozing will occur within the lettering.
1. Click the Comp window, select the Text tool, and enter Beware of the Blob. Rename
the layer
Beware.
2. Click the Text tool between the words of and the and press the Return/Enter key to
make a second line of text. Select all of the text, and in the
Character panel set the
size to
56 px and the Leading value to 44 px.
3. Create a new white solid. Set the In point for the solid and the Text layer to
0:00:25:00.
4. Select the white solid on the timeline, and select Effects & Presets ➤ Simulation.
Drag a copy of
CC Mr. Mercury onto the solid. Click the solid’s Solo switch to turn
off the other layers. If you scrub through the layer on the timeline, the blobs look
more like a white splotch. Let’s fix that.
5. In the Ef
fect Contr
ols
panel, make the following changes to the CC Mr Mer
cury
effect:
X Radius: 0. The blob rotates to the left.
Y Radius: 0. The blob rotates downwards.
Direction: 0 + 0 degrees. You don’t need the blob to move around.
Velocity: 0.2. The blob needs to ooze, and changing this value slows it down to a
gentle ooze.
Longevity: 3. Each blob is visible for 3 seconds, and the pattern on the solid will
shrink by a small amount.
Gravity: 0. This is the force that pushes the blob out. Notice how the shape in the
solid essentially transforms into what looks like a splat.
Animation: Select Jet Sideways from the pull-down. Notice how your blob starts
to look “blob-like.”
Blob Birth Size: 0. The blob becomes more rounded. This value determines the
size of the blob when it is created.
Blob Death Size: 1. This value determines the size of the blob when it reaches the
end of its
Longevity value.
TRACK MATTES ARE YOUR FRIEND
389
10
7486CH10.qxd 11/10/06 5:31 PM Page 389
The Light and Shading settings of the CC Mr Mercury effect are what add the third
d
imension to the blobs. The
L
ight
s
ettings determine how the object will be lit, the
c
olor of the light, intensity, and so on. You will be using the default values. The
Shading settings are what give the object its form. Twirl down the Shading settings
in the
Effect Controls panel and bring this blob to life by using this setting:
Ambient: 10. Notice how the blob suddenly looks like it has depth. Ambient light
is a second source of natural light, not the main source.
If you scrub the playback head across the layer, the blob almost looks like something
inside of it is trying to escape. Let’s help it escape by making some changes to the
Direction,
Velocity, and Blob Birth Size on the timeline.
6. Select the White Solid 1 layer on the timeline and press the E key to open the
effects. Twirl down
CC Mr Mercury, move the playback head to 0:00:28:00, and add
keyframes for the
Direction, Velocity, and Blob Birth Size properties.
7. Move the playback head to 0:00:32:00 and make the following changes:
Direction: 0 x +112 degrees.
Velocity: 9.8. You have blobs because they had enough “speed” to break out of
the initial shape.
Blob Birth Size: 2. All those blobs coalesce into one massive blob on the screen
(see Figure 10-26).
8. T
urn off the
Solo switch for the white solid and select the Bewar
e
layer. Change the
Beware layer’s Track Matte setting to Luma Matte. When you scrub across the layers,
you will see the blob form and explode within the confines of the lettering. Save
the project.
Plastic blobs are OK, but they don’t quite fit the sinister theme of this exercise. Y
ou are
going to give them some color, but instead of using a solid, you are going to apply it
through the use of an
Adjustment layer. The best way of thinking about an Adjustment layer
is to regard it as a
Null layer that has nothing but effects applied to it
. Just keep in mind
that anything that appears under the
Adjustment layer will also have the effect applied to
it
. In the case of this project
, you are going to have some color applied to the layer con
-
taining the
Strobe Light effect and to the blobs. Here’s how:
Figure 10-26.
That is one serious blob.
FROM AFTER EFFECTS TO FLASH: POETRY IN MOTION GRAPHICS
390
7486CH10.qxd 11/10/06 5:31 PM Page 390
1. S
elect
Layer ➤ New Adjustment Layer.
A layer with that name will appear in
Layer 1.
Set the
Adjustment layer’s In point to 0:00:22:00.
2. Select the Adjustment layer and drag the Colorama effect onto the Comp.
3. Open the Effect Controls panel, twirl down the Colorama effect’s Input Phase and
Output Cycle, and make these settings:
In the
Input Phase area, select Get Phase From. Select Alpha from the pull-down.
If you scrub across the effect, the blobs look a bit psychedelic.
In the Output Cycle area, select Use Preset Palette. Select Fire from the pull-
down. The blobs now look rather sinister.
4. Save the file.
In Chapter 6, we showed you how to have Flash text interact with a blob effect through
the use of a Flash blend mode. Though the Luma Matte applied over the blobs effectively
acts as a mask, you don’t necessarily need the t
ext layer. You could simply create the effect
with the
Adjustment layer and then output the blobs to a QuickTime movie, which is sub-
sequently encoded into an FLV file. The text can be added as a mask layer in Flash; you get
the same effect. Whether to do the whole thing in After Effects or to use a combination of
Flash and After Effects is more a personal decision than anything else. Still, if you were to
output only the blobs, you can change the text in the mask more readily than you could in
After Effects or even have a series of phrases mask the blob in Flash.
Summary
This chapter has taken the dragon hunt in a rather interesting direction. Up this point, our
journey has used Illustrator artwork and even masking layers to achieve some interesting
visual effects. This chapter ignored all of that and showed you how a track matte offers
you the same opportunity as other masking methods.
We started off the chapter by explaining what a track matte is and how you can use the
alpha channels you create in Adobe Fireworks and Adobe Photoshop as masks. We also
showed you a really cool technique where you can use an entire grayscale image and its
alpha channel as a mask for a video.
Having shown you the fundamentals, we then moved into some really complicated tech-
niques. In one of them, we used a video
’s Luma Matte, traced it
, and used that to create
the illusion of someone beaming up to the Starship Enterprise.
The next exercise was rather interesting. We explored the use of a Luma Matte to create a
reflection of a video in After Effects. We then repeated the exercise in Flash and showed
you that even though Flash does not have a Luma Matte feature, you can still create
reflections. The key is understanding the new bitmap cache feature of Flash and how to
apply a mask using ActionScript. We’ll bet you were a bit surprised to discover it involved
three simple lines of code.
TRACK MATTES ARE YOUR FRIEND
391
10
7486CH10.qxd 11/10/06 5:31 PM Page 391
The final project was presented as a series of techniques—rather than a long After Effects
p
roject—that you can use to support your Flash design efforts. You discovered how to use
a
few new effects—
Beam, Spherize, CC Ball Action—
to create a variety of effects from
another spotlight effect to wavy text.
The next chapter takes our dragon hunt into territory that is the Holy Grail of Flash: how
to integrate 3D content into a Flash movie.
FROM AFTER EFFECTS TO FLASH: POETRY IN MOTION GRAPHICS
392
7486CH10.qxd 11/10/06 5:31 PM Page 392
7486CH10.qxd 11/10/06 5:31 PM Page 393
7486CH11.qxd 11/10/06 5:38 PM Page 394
11 ADDING A THIRD DIMENSION
7486CH11.qxd 11/10/06 5:38 PM Page 395
If anything in After Effects 7 is designed to give you a creative jolt, it is the inclusion of 3D
l
ayers. The ability to move objects around in a 3D space can’t help but open a series of
c
reative possibilities. The thing to keep in mind is that even though lighting, camera
angles, and a Z-axis are available to you, After Effects is not a 3D modeling application.
Still, 3D is the Holy Grail of Flash and After Effects that gets you into the game.
To understand 3D in After Effects, let’s take it right back to the basics. You know that After
Effects works in a flat space. Everything you have done to this point in the book has essen-
tially involved working with objects that have length and width and nothing else. For
example, you have faked objects moving closer to the viewer by tweening the object’s size
property between keyframes, and you have moved objects from “here” to “there” by
changing the object’s
X and Y position. The X- and the Y-axis are the two dimensions of
movement. When you faked growth, you created the illusion of the object moving closer
to the viewer. In 3D, this is “depth” accomplished by moving the object along a third axis:
the Z-axis.
What you need to have a clear understanding of at this point is that After Effects is a two-
dimensional application that does not allow depth. When you activate a 3D layer in After
Effects, you introduce depth and can create some amazing work using the 3D viewing and
lighting tools. Even so, After Effects is not a 3D modeling application. You can’t create a
sphere, for instance, and turn it into Planet Earth. The best you can do is to take your 2D
objects in the Comp and move them around in a 3D space.
You can see this in Figure 11-1. Notice how, when the number is rotated toward you, it
flattens and, in the third panel, essentially disappears. This is because the object only has
those two dimensions. You can easily reproduce this effect in Flash by simply using the
Skew feature, shown in Figure 11-2, of the Transform panel.
FROM AFTER EFFECTS TO FLASH: POETRY IN MOTION GRAPHICS
396
Figure 11-1. Objects in the Comp can easily be rotated in After Effects.
Figure 11-2. Use the Transform panel in Flash if you need to rotate an object.
7486CH11.qxd 11/10/06 5:38 PM Page 396
To move an After Effects object from 2D to 3D is rather simple. All you have to do is to
c
lick the 3D switch in the timeline (see Figure 11-3). Once you do so, the
A
nchor
, P
osition
,
a
nd
Scale p
roperties for the object develop a Z-axis. A new property—
Orientation—
is
added to the properties and
Rotation splits into separate X Rotation, Y Rotation, and Z
Rotation
properties. As well, the object in the Comp window sprouts three colored arrows.
The red arrow is the X-axis, the green arrow is the Y-axis, and the blue arrow is the Z-axis.
You can move an object in the
Comp window by click-dragging an arrow. When you place
the cursor over an arrow, the letter
X, Y, or Z will appear beside the cursor.
Now that you understand what you will be looking at in After Effects, let’s start using the
tools.
Figure 11-3. Click the 3D layer switch and the timeline and selected object in the
Comp window develop a Z-axis.
ADDING A THIRD DIMENSION
397
11
7486CH11.qxd 11/10/06 5:38 PM Page 397
Creating a 3D button animation for Flash
Throughout this book we have been concentrating upon the creation of QuickTime
movies that are then subsequently converted into an FLV file and used on the Flash stage.
This exercise is going to show a couple of different ways of using an animation created in
After Effects.
Though we have been quite adamant throughout the pages of this book that embedding
an FLV animation on the Flash timeline is evil, this is not necessarily true. Short animations
of up to about 5 seconds can be embedded in Flash movies. The key, though, is to keep
the physical size of the video as small as humanly possible.
The other technique is a throwback to the early days of Flash. Prior to the introduction of
Flash video in Flash MX, video was essentially a hit or miss proposition. The video could be
embedded into the timeline, but the result was one seriously bloated SWF file. A couple of
developers, most notably Hillman Curtis, discovered a rather nifty way of faking video in a
movie clip. Instead of embedding the video, rotoscope the video—
rotoscoping converts
a video to a series of still images—and import the images into a Flash movie clip. Though
it sounds rather complex, you will discover Flash isn’t as dumb as it looks when it comes to
this technique. We start by creating a button that rotates in all three dimensions in space.
Here’s how:
1. Open After Effects and create a new Comp using these values:
Composition Name: Button
Width
: 140
Height
: 50
Frame Rate
: 15
Duration
: 0:00:03:15
Background Color
: #FFFFFF (white)
2. Select the Text tool and enter the text Click me. In the Character panel, set the font
to
Arial Black or Arial Bold, the size to 20 pixels, and the color to #FF0000 (red).
3. Open Effects & Presets ➤ Perspective and drag a copy of the Drop Shadow filter
onto the text in the
Comp window.
4. Open the Effect Controls panel and set the Distance value for the Drop Shadow filter
to
11 and the Softness value to 14.
5. Click the 3D switch for the T
ext
layer and twirl down the layer
’s
T
ransform
proper
-
ties. You now have the stage set to put the button in motion (see Figure 11-4).
Keep in mind that the effects are 2D effects that can be applied to 3D layers. That’s
the good news. The bad news is they can’t be applied to light and camera layers.
FROM AFTER EFFECTS TO FLASH: POETRY IN MOTION GRAPHICS
398
7486CH11.qxd 11/10/06 5:38 PM Page 398
Figure 11-4. Combine a drop shadow with a 3D layer for a little extra jazz.
What we are going to do is spin the text around the X-axis and then around the Y-axis, and
change the position to give the appearance of the text moving close to the viewer and
receding into the distance. What we are not concentrating on is beauty. This whole exer-
cise focuses on technique. Once you have that mastered, then you can start playing your
own “what if . . .” games and experimenting.
1. Place the playback head at 0:00:00:00 and add a keyframe to the X Rotation
property.
2. Move the playback head to 0:00:01:00 and change the X Rotation value to 1 x +0.0
degrees
. If you scrub across the timeline, you will see the words rotate on the
horizontal axis.
3. With the playback head still at 0:00:01:00, add a keyframe to the Y Rotation
property.
4. Move the playback head to 0:00:02:00 and change the Y Rotation value to 1 x +0.0
degrees
. Scrub the playback head across the timeline and the text rotates around
the vertical axis.
5. With the playback head at 0:00:02:00, add a keyframe to the Position property.
Change the
Z value
in the
Position strip at the following times:
0:00:02:10: 250. Notice how a positive value pushes the image further away
from the viewer.
0:00:03:05: –17. Negative values bring it closer.
0:00:03:14: 0. The words move back to their start position.
ADDING A THIRD DIMENSION
399
11
7486CH11.qxd 11/10/06 5:38 PM Page 399
6. C
lick the
Play b
utton in the
Time Controls p
anel to see your animation in action (as
shown in Figure 11-5). Save the project and quit After Effects.
We aren’t going to ask you to render the video or produce the FLV file. It just doesn’t
make sense to have you do the same thing twice in the same exercise. Instead, if you check
the
FlashButton folder found inside the Chapter 11 Exercise folder, you will see we have
already created an FLV file of the project. Let’s put it to good use:
1. Launch Flash and open a new Flash document. When the document opens, change
the stage size to
160✕70 pixels.
2. Select Insert ➤ New Symbol and when the Create New Symbol dialog box opens,
name the new symbol
Button and select Movie Clip as its Type. Click OK to close the
dialog box. When the dialog box closes, the Symbol Editor will open.
3. Add a new layer and name it Actions. Rename Layer 1 as Video.
The next couple of steps are going to walk you through the process of importing a video
into the Flash timeline. You can import a number of formats such as QuickTime and AVI. If
you do import these video formats, you will be walked through the conversion process
using the Video Wizard. Our advice is don’t use the Video Wizard if the file is in the
QuickTime or AVI format; use the Video Encoder. Here, you’ll go ahead and use the Video
Wizard to import the FLV file into the movie clip.
4. Select Frame 1 of the Video layer and select File ➤ Import ➤ Import Video. When you
release the mouse, the Video Wizard is launched (see Figure 11-6). Click the
Browse button and navigate to the FlashButton folder in your Chapter 11
Exercise folder
. Open it, select the
Button.flv file, and click Open. The dialog box
will close, and the path to the FL
V file will appear in the
File Path field.
If you must import video to a timeline, use a movie clip. Many Flash designers reserve
the main timeline for the actual movie. Everything else gets put into symbols. Though
there is no formal list of best practices in Flash, this is considered a best practice.
Figure 11-5.
Going for a spin on the Y-axis
FROM AFTER EFFECTS TO FLASH: POETRY IN MOTION GRAPHICS
400
7486CH11.qxd 11/10/06 5:38 PM Page 400
Figure 11-6. The path to the file to be imported is added to the Video Wizard.
5. Click the Next button to open the Deployment screen. You are going to be embed-
ding the FLV file into the final SWF animation, meaning your only choice is
Embed
video in SWF and play in timeline
. When you choose this option, the message shown
in Figure 11-7 on the right side of the screen appears to warn you, like we have, of
the evils of embedding video in the timeline.
The warning is dead on. The Flash timeline can contain up to a maximum of 16,000
frames. At 30 fps, a 9-minute video will require 16,200 frames. Do the math. If that
video contains sound, the size of the SWF file will go through the roof
. Also consider
the fact that a SWF file needs to completely load before it will play in a browser. All
these negatives are what contribute to really bad user experiences. In the case of this
FLV file, we know it is 4 seconds long at a frame rate of 15 fps. This means the file,
which doesn’t contain an audio track, will only require 60 frames in the movie clip.
That number is totally manageable.
ADDING A THIRD DIMENSION
401
11
7486CH11.qxd 11/10/06 5:39 PM Page 401
Figure 11-7. The path to the file to be imported is added to the Video Wizard.
6. Click the Next button to open the Embedding screen shown in Figure 11-8. Select
Embedded video as the Symbol type from the pull-down menu. Also make sure that
Expand Timeline if needed is selected. Right now the movie clip that is open has
about 600 frames. If you don’t select this option and the video is 900 frames, the
video will get trimmed. Not a good scenario.
Figure 11-8. Always be sure that the “Expand timeline if needed” option is selected.
7. Click Next to be taken to the Finish Video Import screen. There really is nothing
important here. Click the
Finish button. The Video Wizard
will close, the video will
appear on the stage (as you see in Figure 11-9), the layer will contain the content
across 60
frames, and the
Embedded V
ideo
icon will appear in the Library
. Select
the video on the stage, and, in the Property inspector, change its
X, Y location
to
0, 0.
FROM AFTER EFFECTS TO FLASH: POETRY IN MOTION GRAPHICS
402
7486CH11.qxd 11/10/06 5:39 PM Page 402
Figure 11-9. The video is embedded.
8. Select Frame 1 of the Actions layer, open the ActionScript Editor, and enter the
following code:
stop()
9. Add a keyframe in Frame 60 of the Actions layer, and add the following code:
gotoAndStop(1);
The first line stops the playback head on Frame 1 of the movie clip. This means the
user only sees the first frame of the video. The last line sends the playback head
back to Frame 1 of the movie clip and, in many respects, acts like an auto-rewind
button. The next step is what makes this movie clip act like a button.
10. Click the Scene 1 link to return to the main timeline and add an Actions layer. Drag
the movie clip from the Library to the stage and give it the instance name of
mcClick. Select the first frame in the Actions layer, open the ActionScript Editor, and
enter the following code:
mcClick.onPress = function() {
this.gotoAndPlay(2);
}
ADDING A THIRD DIMENSION
403
11
7486CH11.qxd 11/10/06 5:39 PM Page 403
The first line is not new. You know that movie clips can have mouse events
a
ttached to them. The second line, if you are new to ActionScript, may look a bit
o
dd. All it says is, “If the user clicks the movie clip, go to and play Frame 2 of the
movie clip that was just clicked.” That means it will move the playback head in
the movie clip containing the embedded video to Frame 2 of that movie clip. The
neat thing about that is, when the playback head in that clip hits Frame 60, it is shot
right back to Frame 1, and the animation stops.
11. Save the file and test it. Notice that when you roll over the movie clip, the cursor
changes to the pointing finger (as shown in Figure 11-10), which tells the viewer
the thing the mouse is over is “hot.” Click the mouse, and the video plays.
Rotoscoping a video
This technique, as we pointed out earlier, is how video was done in the early days of Flash.
It is an extremely effective technique if used for very short—1 or 2 seconds—videos.
Nothing gets people’s attention more than discovering something they rolled over is a
looping video. Here’s how:
1. Open the After Effects project you have been working on so far
.
2. Add the Comp to the Render Queue.
If you didn’t save it before heading off to Flash in the previous exercise, we have
included a copy
,
FlashButton.aep, in the FlashButton folder
.
If you were to publish this file, the SWF file would come in at exactly the same size as
the FLV file, which is 71K. The obvious conclusion from this is the size of the FLV file
embedded on a Flash timeline is added to the SWF animation. This is one of those
techniques that should be used with caution. In the case of this exercise, reducing the
effects, the physical size of the movie, and the time to 1 or 2 seconds will have a pro-
found effect upon the final size of the SWF file.
Want to physically reduce the size of the After Effects Comp and resulting QuickTime
movie from its current 140
✕50 size? Drop the point size of the text in the button to
12 or 14 pixels and remove the drop shadow. Always look for dead space or extrane-
ous effects in the Comp, and, if you can, remove the space and lose the effects.
Figure 11-10.
The button is clicked. Note the cursor
over the button.
FROM AFTER EFFECTS TO FLASH: POETRY IN MOTION GRAPHICS
404
7486CH11.qxd 11/10/06 5:39 PM Page 404