Wrox Professional Crystal Reports for Visual Studio NET Second Edition phần 5 pdf
Bạn đang xem bản rút gọn của tài liệu. Xem và tải ngay bản đầy đủ của tài liệu tại đây (1.83 MB, 38 trang )
Chapter 4
Speaking of different types of users, the next section deals with how to customize the appearance and
layout of the viewer itself. So in addition to showing them only the records they want to see, you could
also give them their own custom viewer with which to view the resulting report.
Customizing the Appearance and
Behavior of the Repor t Viewer
The CrystalReportViewer class contains all of the properties, methods, and events that relate to the
viewer itself, its appearance, the methods that are used to make the viewer perform certain actions (like
refresh or print a report), and events that can be used to determine when a particular event (such as
drill-down or refresh) has occurred. To start learning how to work with the viewer, we are going to start
with the basic properties and move on from there.
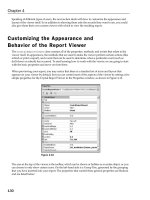
When previewing your report, you may notice that there is a standard set of icons and layout that
appears on your viewer by default, but you can control most of the aspects of the viewer by setting a few
simple properties for the Crystal Report Viewer in the Properties window, as shown in Figure 4-16.
Figure 4-16
The area at the top of the viewer is the toolbar, which can be shown or hidden as an entire object, or you
can choose to only show certain icons. On the left-hand side is a Group Tree, generated by the grouping
that you have inserted into your report. The properties that control these general properties are Boolean
and are listed below:
130
Report Integration for Windows-Based Applications
Property
Description
DisplayBackgroundEdge
For showing the off-set edge around your report when
previewing
DisplayGroupTree
For showing the group tree on the left side of the viewer
DisplayToolbar
For showing the entire toolbar at the top of the viewer
All of these properties default to True and you cannot change the position of any of these elements; they
are fixed in place on the viewer. You can, however, hide the default toolbar and create your own buttons
for printing, page navigation, and other functions, and we’ll look at that a little later in the chapter.
For the icons within the toolbar, you can also set simple Boolean properties to show or hide a particular
icon, as shown here:
❑
ShowCloseButton
❑
ShowExportButton
❑
ShowGotoPageButton
❑
ShowGroupTreeButton
❑
ShowPageNavigateButtons
❑
ShowRefreshButton
❑
ShowTextSearchButton
❑
ShowZoomButton
❑
ShowPrintButton
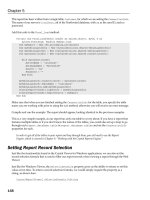
So a typical use of these properties is where you want to give users a view-only preview, with no printing or
exporting options and no option to refresh the report. Going back to our original report (ch4_worldsales),
we could easily set a few properties before you set your ReportSource property to make this happen.
Double-click anywhere on your form to open the code view and in the form’s Load method, enter the
following:
...
End With
myTableLogonInfo.ConnectionInfo = myConnectionInfo
myTableLogonInfo.TableName = “customers”
myTableLogonInfos.Add(myTableLogonInfo)
CrystalReportViewer1.LogOnInfo = myTableLogonInfos
CrystalReportViewer1.ReportSource = myReport
CrystalReportViewer1.DisplayGroupTree = False
CrystalReportViewer1.ShowExportButton = False
CrystalReportViewer1.ShowRefreshButton = False
CrystalReportViewer1.ShowPrintButton = False
CrystalReportViewer1.ReportSource = New ch4_worldsales_northwind()
End Sub
131
Chapter 4
When the report is previewed, it will appear as shown in Figure 4-17.
Figure 4-17
Keep in mind that you can set these properties any time prior to the report preview. You could store indi
vidual user or security settings in your application data and then set the appropriate properties prior to
viewing the report. This is just one example of where we can customize how a report is presented to the
user; the next section on the methods available within the viewer takes that discussion one step further.
Viewer Methods
When working with the Crystal Report Viewer, we have a number of methods available to us, which
will allow us to integrate specific viewer functions into our application. As we move through this
section, keep in mind that these methods can be used to create your own look and feel for the report
preview window, as shown in Figure 4-18.
During the course of this section, we will actually be looking at the code behind the custom viewer
shown here, so it is probably not a bad idea to start a new project within this chapter’s solution file. To
create a new project from within Visual Studio, select File → New → Project and from Visual Basic
Projects, select Windows Application and specify a name, as shown in Figure 4-19, (in the sample code,
we have called this project viewer_methods) and location for your project files. Remember to set this
project as your startup project.
132
Report Integration for Windows-Based Applications
Figure 4-18
Figure 4-19
133
Chapter 4
Once your sample project has been created, add the Crystal Report Viewer to the default form that is cre
ated and copy or add the ch4_worldsales.rpt to your project. Set the ReportSource property to
point to this report, using the property page shown in Figure 4-20. We are now ready to get started.
Figure 4-20
The first thing we need to do to emulate the custom viewer shown earlier is to set the DisplayToolbar
and DisplayGroupTree properties to False.
Next, we need to add additional buttons for some of the functions normally associated with the buttons
shown on the viewer toolbar — the buttons for the next page, previous page, print, export, and so on —
using the custom viewer shown in Figure 4-21 as a guide. We will walk through each of these later in
this chapter.
The tangible benefit of using the methods described subsequently and your own form design is that you
have more flexibility in how the report appears when viewed and you can match the viewer’s user inter
face to your own application.
Printing a Report
To print a report, there is a simple PrintReport method that will invoke a standard Windows printer
to select where you would like to print your report, how many copies, and other functions.
To add this code to your custom viewer, drag and drop a button onto your form, and name it
Print_Button. Change the Text property to Print. Double-click the Print button you have dropped
onto your form and enter the following code in its Click event:
CrystalReportViewer1.PrintReport
134
Report Integration for Windows-Based Applications
Figure 4-21
This will open a standard Windows print that will allow you to print your report. If you need to access
advanced print options (like printing two pages to separate paper trays) or if you want to control the
print process manually, you will need to use the Report Engine to do so, which is covered in Chapter 8,
“Formulas and Logic.”
Refreshing the Data in a Report
When a report is refreshed, it goes back to the database for the most current set of data available and
runs again. Drag and drop a button onto the form, and call it Refresh_Button. Change the text to
Refresh. To refresh from the Crystal Report Viewer, you can add RefreshReport method to the
Refresh button you have created on your custom viewer form:
CrystalReportViewer1.RefreshReport
If your report takes a while to run or if you are concerned about database traffic and load, you may want
to consider removing this as an option from your viewer, or even changing the properties of the standard
viewer so that the Refresh icon does not appear at all, using the syntax CrystalReportViewer1.
ShowRefreshButton = False.
135
Chapter 4
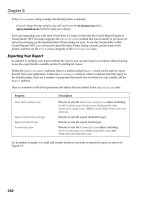
Exporting a Report
Crystal Reports .NET features a rich export functionality, which is partially exposed in the Crystal
Report Viewer. From the viewer, we can call the ExportReport method to open a Save as... and export
your report into one of four formats:
❑
Adobe Acrobat (PDF)
❑
Microsoft Excel (XLS)
❑
Microsoft Word (DOC)
❑
Rich Text Format (RTF)
In compatibility testing, the export formats for Microsoft Word and Excel work well
with Office 97+, and Rich Text Format can be used by just about any word-processing
application (including Word, WordPad, WordPerfect, and so on). For Adobe Acrobat,
a version 3.0 or above reader is recommended and the output is consistent across
version 3.0–6.0.
So, let’s put this functionality into our custom viewer. Drag and drop a button onto the form once more,
this time calling it Export_Button and setting the text to Export. Once again, click the button to open
its code event. Insert the following:
CrystalReportViewer1.ExportReport()
When the ExportReport method is used, the shown in Figure 4-22 will appear and allow you to select
an export format from a drop-down list and select where the file is to be saved.
Figure 4-22
136
Report Integration for Windows-Based Applications
Once the file has been saved, a message box will appear, advising you that the export is complete. You
can then use the associated application to open the exported file.
Page Navigation and Zoom
To start, you probably will want to know what page you’re are on at some point. Luckily for us, the
Crystal Report Viewer has a simple method called GetCurrentPageNumber that allows us to get the
page number of the page we are currently viewing.
In the custom viewer we are working with, we are going to place a label on the form (we’ll call it
PageNo_Label) that contains the page number. Initially, we’ll set this to Page: 1 using the Text prop
erty, but after that, this can be set dynamically using:
PageNo_Label.Text = “Page: “ &
CrystalReportViewer1.GetCurrentPageNumber.ToString
This method should be called after moving through the report pages, so it should be placed after the
code for each of the following buttons (and the Refresh button, of course — do this now).
So, we’ll create the following four buttons, and place them on our form.
Button Name
Button Text Property Value
FirstPage_Button
First Page
BackPage_Button
Back
NextPage_Button
Forward
LastPage_Button
Last Page
In order to navigate through the pages of our report, we have a number of methods that can be called
without any additional parameters, as shown subsequently:
❑
ShowFirstPage
❑
ShowLastPage
❑
ShowNextPage
❑
ShowPreviousPage
So to put code behind our navigation buttons on our custom form (in this case, the Forward button), we
could use the ShowNextPage method.
CrystalReportViewer1.ShowNextPage()
PageNo_Label.Text = “Page: “ &
CrystalReportViewer1.GetCurrentPageNumber.ToString
Compile and run this. You should be on page two of the report, and the label should inform you of this.
Now populate the remaining buttons with the code, remembering to set the correct method for each
button.
137
Chapter 4
These methods do not return a result, so to determine what page you are currently on, we would have to
use the GetCurrentPageNumber method immediately after calling the first method, which will return
the page you are currently viewing. Unfortunately, we don’t have a way to get the total page count,
unless you were to use ShowLastPage to go to the last page, use the GetCurrentPageNumber method,
and then store the number of the last page in a variable somewhere in your code, but that is a lot of
work for one little number.
For navigating to a specific page, ShowNthPage allows us to pass a specific page number to the method,
as shown here, emulating the functionality of the ShowNextPage method.
Dim CurrentPage
CurrentPage = CrystalReportViewer1.GetCurrentPageNumber
CrystalReportViewer1.ShowNthPage(CurrentPage + 1)
‘ This will take you to the next page
In the custom viewer we are working with, draw a text box onto the form, naming it PageNo_TextBox.
The point of this text box is to allow the user to enter a page number and then click the Go To button
to go to a specific page. Drag and drop a button on the form next to the text box, naming the button
GoTo_Button and labelling it Go To.
Assuming that the textbox you have drawn on your form is called PageNo_TextBox, the following code,
placed behind the Go To button, checks to see if a page number has been entered. If something has been
entered, the ShowNthPage method is then called to jump to a specific page.
If PageNo_TextBox.Text <> “” Then
CrystalReportViewer1.ShowNthPage(PageNo_TextBox.Text)
PageNo_Label.Text = “Page: “ &
CrystalReportViewer1.GetCurrentPageNumber.ToString
PageNo_TextBox.Text = “ “
Else
MsgBox(“Please enter a page number to jump to”,
MsgBoxStyle.Exclamation, “Please enter a page number”)
PageNo_TextBox.Text = “ “
End If
Compile and run, and you should see that this functionality is now implemented.
In addition to page navigation, you also have the ability to choose the zoom factor that is applied to your
report. By default, the zoom is set to 100% of the report size unless you specify otherwise. In the follow
ing example, we will add a combo box to the form to allow the user to select a particular zoom factor for
viewing.
The name of the combo box is ComboBox_Zoom. Assign the Text property with the value 100%, and
click the Items property. The String Collection Editor should now open. Enter the following strings, one
per line:
❑
❑
50%
❑
Full Size
❑
138
25%
200%
Report Integration for Windows-Based Applications
Now, we move on to the business of selecting and setting a zoom factor based on the index of the item
that has been selected. Double-click the combo box and enter the following code:
With CrystalReportViewer1
Select Case ComboBox_Zoom.SelectedIndex
Case 0
.Zoom(25)
Case 1
.Zoom(50)
Case 2
.Zoom(100)
Case 3
.Zoom(200)
End Select
End With
You also may want to consider adding the option to let users select their own zoom factor. Keep in mind
that 50% is about the lowest resolution at which a report can be read legibly with a 12-point font used in
the report itself — if you are concerned about how the report will appear when viewed, you may also set
the minimum zoom required to view the report as it should appear.
Searching Within a Report
Another powerful navigation feature can be found in the SearchForText method within Crystal
Reports .NET, which will allow you to search for a specific string that appears in your report. In our
custom viewer, we will add a textbox (SearchString_TextBox) for the user to enter a search string, as
well as a Search button (Search_Button) to kick off this method. Drag both of these items onto the
form, and set their properties appropriately.
The code behind the search button looks like this:
If SearchString_TextBox.Text <> “” Then
CrystalReportViewer1.SearchForText(SearchString_TextBox.Text)
PageNo_Label.Text = “Page: “ &
CrystalReportViewer1.GetCurrentPageNumber.ToString
SearchString_TextBox.Text = “ “
Else
MsgBox(“Please enter a search string to search for”,
MsgBoxStyle.Exclamation, “Please enter a string to search for...”)
SearchString_TextBox.Text = “ “
End If
We first check to see if a value is entered, and if so, the SearchForText method is called, passing the
search string that was entered. The Crystal Report Viewer will search the entire report and when the
value is found, go directly to the page on which it appears and highlight the value. This method can be
called repeatedly to find all of the occurrences of a particular string — each time it finds the string in
your report, it will jump to that page and highlight where the value appears.
Using our World Sales Report and searching on Hong Kong should jump to the first company with a
region of Hong Kong and highlight the value, as shown in Figure 4-23.
139
Chapter 4
Figure 4-23
Using Viewer Events
Viewer events provide the ability to track the firing of different events — for instance, when users navi
gate through the pages of the report, or when they refresh the report. These events can then be used to
fire other code from within your application.
Although all of the different events have their own unique properties and methods, they all inherit a
common property called Handled. This is a Boolean value that is used to determine whether the event
was fired and subsequently handled.
In the following section, we will be looking at all of the available events associated with the viewer and
their common uses. Again, because this is a new set of functionality contained within the viewer, we are
going to create another project to hold all of the code and forms related to this section.
To create a new project from within Visual Studio, select File → New → Project and from Visual Basic
Projects, select Windows Application and specify a name (in the sample code, we have called this project
viewer_events) for your project files. Set this as your startup project within the solution.
Once your sample project has been created, add the Crystal Report Viewer to the default form that is
created and copy or add the ch4_worldsales.rpt to your project. Set the ReportSource property to
point to this report and let’s get coding.
140
Report Integration for Windows-Based Applications
For all of these events, we are going to place the code behind our form and when a particular event is
fired, the code will be run.
Page Navigation Events
For page navigation, the NavigateEventArgs class provides the properties we need to work with the
Navigate event, including:
Property
Description
CurrentPageNumber
Returns the current page number
NewPageNumber
Gets or sets the new page number
In the following example, the Navigate event would fire when a user changed the page within the
viewer, resulting in a message box that would show the current page, and the page being navigated to.
Insert the following subroutine into your form:
Private Sub CrystalReportViewer1_Navigate(ByVal source As Object, ByVal
MyEvent As CrystalDecisions.Windows.Forms.NavigateEventArgs) Handles
CrystalReportViewer1.Navigate
If MyEvent.NewPageNumber <> 1 Then
MsgBox (“Current page: “ & MyEvent.CurrentPageNumber & “ New Page: “ &
MyEvent.NewPageNumber)
End If
End Sub
Compile and run with this code. When the form opens with the report, click the last page icon. You
should see a message box similar to the one in Figure 4-24.
Figure 4-24
This event could be used to determine when the first page was viewed, and pop up another form with
an explanation of the report and its contents, or used to perform a task in the background (like logging
page views) while the user is viewing the report.
141
Chapter 4
Refresh Events
The ReportRefresh event has no arguments other than the inherited Handled property. It can be used
to build metrics on how often a report is run or refreshed, and to pass information to users about the
report before they launch a refresh, as shown here:
Private Sub CrystalReportViewer1_ReportRefresh(ByVal source As Object, ByVal
MyEvent As CrystalDecisions.Windows.Forms.ViewerEventArgs) Handles
CrystalReportViewer1.ReportRefresh
MsgBox (“Please be advised this report takes up to 2 minutes to run.”)
End Sub
Refresh events are also key to improving application and data performance; if your database is only
updated once a day (or once a month), you can keep track of how many times a user attempts to hit the
database, and simply remind users with an information box that the data will remain the same during
the day, regardless of how many times they hit the refresh button!
Search Events
When a user searches for a report value, either through the standard icon on the toolbar or through your
own method call, the Search event is fired. The arguments for the Search event are:
Property
Description
Direction
Gets or sets the direction in which to search. This can be
either Backward or Forward.
PageNumberToBeginSearch
Gets or sets the page number on which to start searching.
TextToSearch
Gets or sets the text to search for in the report.
So by using these event arguments, you could keep a record of what values users searched for. An exam
ple of getting the text that is being used in the search is included in the following:
Private Sub CrystalReportViewer1_Search(ByVal source As Object, ByVal
MyEvent As CrystalDecisions.Windows.Forms.SearchEventArgs) Handles
CrystalReportViewer1.Search
MsgBox (“You searched for “ & MyEvent.TextToSearch )
End Sub
Viewer Events
The Load event is fired whenever the Report Viewer is initialized from a Windows Form and has no
other arguments except for Handled. You can use this event to fire other sections of code or launch addi
tional windows for help, or a description of the report, as shown here:
142
Report Integration for Windows-Based Applications
Private Sub CrystalReportViewer1_Load(ByVal sender As System.Object, ByVal
MyEvent As System.EventArgs) Handles CrystalReportViewer1.Load
MsgBox (“This report shows monthly sales broken down by region”)
End Sub
Again, you could also use this event for logging as well.
Zoom Events
For those times that the user changes the zoom factor for a particular report, the ViewZoom event fires
and has only one argument in ZoomEventArgs. The NewZoomFactor property will get or set the magni
fication factor for the viewer, as shown here:
Private Sub CrystalReportViewer1_ViewZoom(ByVal source As Object, ByVal
MyEvent As CrystalDecisions.Windows.Forms.ZoomEventArgs) Handles
CrystalReportViewer1.ViewZoom
Select Case MyEvent.NewZoomFactor
Case “25”
MsgBox (“You have selected 25%”)
Case “50”
MsgBox (“You have selected 50%”)
Case “100”
MsgBox (“You have selected full size”)
End Select
End Sub
Drilling into Report Details
If you are working with a report that has groups inserted, you can drill down within the viewer to show
the detailed records that make up that group. By default, these details are visible anyway, as shown in
Figure 4-25.
When you drill down into a group, a separate tab is opened within the preview window, showing only
the group you have selected. For summary reports, you may want to hide the details and allow users to
drill down if they need more information.
This provides an easy way to cut down on report development; instead of multiple reports for different
regions, for example, you could create one report and then let the users drill into it and print the section
they wanted to see. In the following example, the user has drilled down into Australia, which opens
another tab in the viewer, allowing the user to see the regions within Australia.
When you double-click a group or summary and drill down into a report, the Drill event is fired and
can be used to return the name of the group, the level, or other information. There are a number of
properties associated with DrillEventArgs, including:
143
Chapter 4
Figure 4-25
Property
Description
CurrentGroupLevel
Returns the group level that was drilled into
CurrentGroupName
Returns the name of the group that was drilled into
CurrentGroupPath
Returns the group number and group level that was drilled into
NewGroupLevel
Returns the target group level that is being drilled into
NewGroupName
Returns the target group name that is being drilled into
NewGroupPath
Returns the target group number and group level that is being
drilled into
CurrentGroupNamePath and NewGroupNamePath are included within DrillEventArgs, but
are reserved for future use.
144
Report Integration for Windows-Based Applications
To see the Drill event in action, you will need to have a report that has at least one group inserted and
a section where the details are hidden (not suppressed). In addition, in the Crystal Report Viewer, the
EnableDrillDown property must be True. The Drill event will fire whenever you drill down into one
of the groups on your report and can be used to determine the group name and what level has been
drilled into, among other things.
Drill events can be used to launch other forms or processes; for example, when a user drills down on a
Country group, you could display a form giving a background to the country, its currency, and other
pertinent information.
The following code demonstrates the Drill event being used to display an information box, containing
information on where the user was drilling from and the target they were drilling to.
Private Sub CrystalReportViewer1_Drill(ByVal source As Object, ByVal MyEvent
As CrystalDecisions.Windows.Forms.DrillEventArgs) Handles
CrystalReportViewer1.Drill
MsgBox(“You drilled into “ & MyEvent.NewGroupName() & (Chr(13) & Chr(10)),
MsgBoxStyle.Information, “Drill Down Event”)
End Sub
Drilling Down on Subreports
Multiple subreports can be inserted into a main report and provide a way of combining disparate infor
mation on a single report. A subreport within a Crystal Report is actually a report in its own right, with
its own page numbering, sections, and other information.
There are a number of subreport events that can be used as users drill through a report with subreports,
including:
Property
Description
CurrentSubreportName
Returns the name of the subreport that was drilled into
CurrentSubreportPageNumber
Returns the page number that the subreport is on
CurrentSubreportPosition
Returns the location in the viewer where the subreport is
NewSubreportName
Returns the name of the subreport that is being drilled into
NewSubreportPageNumber
Returns the page number to drill into the subreport
NewSubreportPosition
Returns the location in the viewer where the subreport is
to drill into
145
Chapter 4
Using the properties in the previous table, you could determine the name of a report that had been
drilled into and then use the same for logging and launching other forms. Our report does not contain a
subreport, but the methods remain the same.
For changing elements of a subreport, we would need to use functionality from the Crystal Report
Engine, covered in Chapter 9, “Working with the Crystal Reports Engine.”
Dealing with Report Exceptions
The HandleException event fires whenever you are viewing a report and the viewer encounters any
errors or exceptions. This could be caused by a datasource not being available, the report file itself being
moved to a different location (if external to your application), or any other error that may occur.
There are a number of arguments that are associated with this event, including
Property
Description
Exception
Returns the exception data for the exception that has occurred
UserData
Returns or sets any type of data that can be used to override what is
done in the handling of an exception
The UserData property is a generic object that can be used to override the error handling that the
viewer would normally do. For example, if you were using an Access database and it had been moved
and was no longer available, you could set the UserData property to a string containing the location to
the UserData, and that particular database location would be used.
So, to trap these and other types of errors, you can set up an error handler event and then use the excep
tion to return the error message:
Public Sub CrystalReportViewer1_HandleException(ByVal source As Object,
ByVal MyEvent As CrystalDecisions.Windows.Forms.ExceptionEventArgs)
Handles CrystalReportViewer1.HandleException
Dim err As Exception
err = myEvent.Exception
MsgBox(“An error has occurred with your report:” & (Chr(13) & Chr(10)) &
err.ToString, MsgBoxStyle.Critical, “Exception Event”)
End Sub
You also may want to consider tying context-sensitive help (where the help topic directly relates to the
error message produced) to the error as well, to give the user a more complete description of what the
error really means.
146
Report Integration for Windows-Based Applications
Summar y
In this chapter, you have had a look at integrating reports into Windows applications, starting with basic
integration with the Crystal Report Viewer for Windows forms. In terms of ease of use and functionality,
the Crystal Report Viewer provides most of the functionality you will need for view-only reporting
implementations. In addition to the standard viewer functionality, we also looked at how you could use
the properties, methods, and events of the viewer to customize the look and feel or even create your own
custom viewer that matches your own application’s user interface.
So what is next? For more advanced integration topics and greater control over the report itself, you may
want to consider flipping over to Chapter 8, “Formulas and Logic,” to start learning how the Report
Engine can be used to control your report’s contents and appearance.
If you also develop Web applications, you are probably keen to get into the next chapter, but keep in
mind that some of the same concepts we just covered in this chapter (and in Chapter 9, “Working with
the Crystal Reports Engine” with the Report Engine topics) will also apply to Web applications, which
we will be looking at next.
147
Repor t Integration for
Web-Based Applications
ASP .NET provides a flexible programming environment for developing enterprise-class Web
applications. Crystal Reports .NET can leverage this platform to create zero-client reporting appli
cations that don’t require anything installed on the client side. Using a viewer that has been cre
ated specifically for use with ASP .NET, you can quickly create Web-based applications that
integrate complex reports, which can include tables, charts, and more.
In this chapter, we are going to look at how to integrate and view reports from within Web-based
applications created with Visual Studio .NET. In addition, we will look at some of the run-time
customizations that can be made to your reports, as well as some issues around Web application
deployment. This will consist of:
❑
Determining the correct object model
❑
CrystalDecisions.Web namespace
❑
Using the Crystal Web Forms Viewer
❑
Customizing the Crystal Web Forms Viewer
❑
Passing information to the Web Forms Viewer
As we go through this chapter, we will be building forms for use in Web-based reporting applica
tions, which demonstrate many of the Crystal Reports .NET features that can be used in your own
Web applications.
Chapter 5
Obtaining the Sample Files
All the example reports and code used in this chapter are available for download. The download file can
be obtained from www.wrox.com. Once you have downloaded the files, place them in a folder called
Crystal.NET2003\Chapter05 on your hard drive.
In this chapter, all of the completed projects are included in the downloadable code as well as the reports
used throughout the chapter, so you can either browse through the finished projects or create your own
projects from scratch using the components provided.
You can use the code as you go through the chapter or cut and paste code samples into your own Web
application.
Planning Your Application
If you are developing Web applications with Visual Studio .NET, chances are you are well acquainted
with ASP .NET (and if you aren’t, you soon will be!). ASP .NET is not really a language, per se, but
rather a set of interrelated technologies and components that come together in one framework to deliver
robust Web applications. As a developer, you probably already know that the most important part of
creating an application is the planning and design of the application, before the coding actually starts.
The integration of Crystal Reports into Web applications is no different; a little bit of planning goes a
long way.
The first thing we will need to do, before we write a single line of code, is to determine what type of
reports we want to deliver in our Web application and how they are going to be used. Are they listing or
grouped reports? Are they used to check data entry in a form before submitting it? What will the reports
look like? Will users want to print the reports from their browser or export to another format such as
PDF, RTF, or Excel? All of these questions can help you gather the information you need to design your
reports and get a handle on how they are going to be delivered.
Even if you don’t have your own reports to work with, you can still work through this chapter; sample
reports are available in C:\Program Files\Visual Studio .NET 2003\Crystal
Reports\Samples\ or in the download files for this chapter.
Once you understand the type of functionality you would like to deliver to the user, you can sit down
and start planning how Crystal Reports will be integrated into your Web application. Crystal Reports
.NET uses a feature-rich report viewer, available out of the box, which can be inserted onto a Web Form
and used to view reports. The viewer itself has features that are similar to the Windows Form Viewer
and has an extensive object model, allowing you to set the source of the report, the appearance of the
viewer itself, and what happens when different events fire, among other things.
When working with Web applications, most users seem to prefer that we pop up an additional window
to display reports. This allows them to have the full browser area to view the report, and we can pass
properties like the report source and viewer settings to this Web Form. This allows us to use one report
viewing form throughout the Web application and just set the properties we need each time.
The options for working with reports are endless. Based on users’ access rights in your application,
you could set a specific record selection formula or allow users to set and retain parameters they use
150
Report Integration for Web-Based Applications
frequently, or even establish profiles of their favorite reports, so they can run it with all of their settings
in place with one click.
Like integrating reporting into Windows applications, the report integration should be driven by the
user’s requirements, but how these features are delivered is up to you. As you go through the rest of the
chapter, think about how the different customization features could be used in your development. If you
are not at a point where you can integrate these features into your application, the various properties,
methods, and events are grouped together by function to make it easier to come back and look them up.
A Brief Histor y of Cr ystal Web Development
When Crystal Reports was first released, the Internet was still in its infancy, and Crystal Reports has
grown right along with it. With the introduction of a Web component in Crystal Reports 7.0, based on
the Print Engine already in use with its Windows development tools, developers were able to integrate
reporting into their own Web applications through the use of ASP. This first implementation of Web
reporting provided a powerful tool for Web developers and enabled a whole new class of reporting
applications for the Web.
It wasn’t long before Web developers started pushing Crystal Reports on the Web to its limit. Although
version 7.0 of Crystal Reports provided a Web engine that was suitable for small workgroup applica
tions of 5–10 users, it lacked the power to handle the first of many large enterprise Web applications that
were being developed at the time.
A companion product, Seagate Info (formerly Crystal Info) was also introduced utilizing a similar frame
work, but adding multi-tier processing to the architecture, enabling reports to be processed on a separate
machine and then viewed by the user. Unfortunately, customizing the Seagate Info user interface, or cre
ating custom apps that accessed this technology, proved to be cumbersome, so it really didn’t take off
with developers.
With the release of version 8.0, the reporting technology took another massive leap forward, but some of
the same limitations persisted (such as scalability and security) until the advent of Crystal Reports 8.5
and the introduction of Crystal Enterprise 8.5. Leveraging the architecture and code base from Seagate
Info, Crystal Enterprise provided a robust application framework that developers could use to create
applications that could be scaled from 1 to 10 to 10,000 users and beyond. With subsequent releases,
Crystal Enterprise has grown in functionality to include a variety of distribution methods, including
e-mail, writing to a disk or FTP site, and now features integration with LDAP, Windows Security, Active
Directory, and other security providers.
So where does that leave you, the Crystal Reports .NET developer? Well, to start, you don’t need to buy
any additional tools or licenses to integrate reporting into your Web applications; Crystal Reports .NET
provides all of the tools you need to create Web-based workgroup applications.
To deploy applications beyond a workgroup implementation of 5–10 users to a large number of users,
you will need to purchase an additional license from Crystal Decisions. Also, if you need to offload pro
cessing in a true n-tier application or want to schedule or redistribute reports, you may want to con
sider moving your application to Crystal Enterprise. For more information on Crystal Enterprise, visit
the Crystal Decisions Web site at www.crystaldecisions.com.
151
Chapter 5
The other great news is that Crystal Reports .NET builds on the Web functionality found in previous
products and provides a feature-rich development environment and a rich user experience for viewing
reports on the Web. If you haven’t looked at the Crystal Reports Web technology in a while, you are
going to be pleasantly surprised.
Exploring the Development Environment
When creating ASP .NET Web applications, you don’t need a specialized editor to develop the required
components; you could just crack open Notepad and create all of the files required yourself. Thankfully,
Visual Studio .NET provides a feature-rich development environment that makes things a bit easier
when creating ASP .NET applications and there are a number of Crystal-specific components for use in
Web applications.
To start, in the toolbox under the Web Forms section, you will find the CrystalReportViewer, which
we will be working with a little later. When you drop or draw this viewer on a Web Form, you can set a
number of properties and use the viewer to display a What-you-see-is-what-you-get (WYSIWYG) pre
view of your report.
In addition to the CrystalReportViewer, there is also a ReportDocument component available in the
Components section of the toolbox. We use this component to add strongly typed and untyped reports
to a form. (If you just opened this book and flipped to this chapter, you may be wondering what a typed
report is; don’t worry, we’ll get to that a little later in the chapter.)
Finally, like most Windows applications, the majority of our report integration will take place in the code
view of the form.
Using the object models provided by Crystal Reports .NET, you have almost complete control over the
report’s appearance and behavior.
Before You Get Started
Before we can actually get into creating Web-based applications, you will need to check and see if you
have all of the required components installed to run these applications. ASP .NET Web applications run
on a Web server that can either be located on your local machine or on another server that you have
access to that has Internet Information Server (IIS) installed.
When you installed Visual Studio .NET, you may have received an error message if you did not have a
Web server installed on your machine at that time. If you are working on a computer that does not have
IIS installed and the required .NET components loaded, you will need to have access to a server that
does in order to create the forms and applications demonstrated in this chapter.
For more information on installing the .NET Framework and preparing a Web server for application
development, check out the Visual Studio .NET Combined Help Collection and search for “Configuring
Applications.”
152
Report Integration for Web-Based Applications
Starting a New Web Application with VB .NET
The first thing we need to do to get started is to create a new Web application using Visual Basic .NET.
Included with the download files for this chapter are a number of projects that are related to the differ
ent sections in this chapter. To walk through the examples that follow, you can either create a new solu
tion or open the one that is provided (the same applies to the other projects; you can either follow along
or create your own).
To create a new Web application, from within Visual Studio, select File → New → Project and from
Visual Basic Projects, select ASP .NET Web Application and specify the URL (web_viewer_basic) and
location for your project files. Because you are creating a Web application, the location will be a Web
server that you have access to and the name of your project will actually be used to create a virtual direc
tory on this server. (The good news is that Visual Studio .NET will automatically do this for you if you
are building the application from scratch; there is no need to create the folder and virtual directory prior
to creating a new project.)
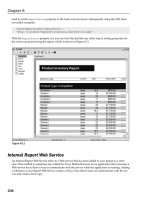
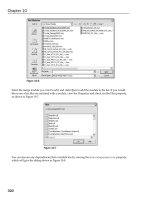
If, however, you choose to use the supplied download code, you should create a virtual directory (in our
case, this is C:\Crystal.NET2003\Chapter05\web_viewer_basic) by selecting Control Panel →
Administrative Tools → Internet Information Services, and then right-clicking Default Web Site. This
will open another menu, shown in Figure 5-1.
Figure 5-1
153
Chapter 5
Select New → Virtual Directory, and the virtual directory wizard will commence. Assign the new direc
tory the alias web_viewer_basic and set the path to C:\Crystal.NET2003\Chapter05\web_viewer
_basic. Make sure both read and write are enabled and finish the wizard.
Either way you choose to do it, the development environment will open with a default form that we will
be using in the section. Throughout the chapter, we will be using only one or two Web Forms to demon
strate different integration features, but the same concepts can be applied to your own Web applications.
Before you go any further, we need to get some basic architecture decisions for your Web application out
of the way, starting with a brief discussion of the object models available within Crystal Reports .NET.
Determining the Correct Object Model
When working with Web applications, there are two different object models to choose from, each with its
own capabilities and strengths. The first, contained within the Crystal Reports Web Forms Viewer object
model (CrystalDecisions.web), contains all of the functionality required to view a report in the
Crystal Reports Web Forms Viewer, including the ability to set database logon information, pass param
eters and record selection, control the viewer’s appearance, and view reports, including reports con
sumed from an XML Report Web Service.
Using the CrystalDecisions.Web object model, you are covered for most basic report integration
requirements, but you have no control over the report itself at run time. You won’t be able to change the
record selection for any subreports that appear in your report and you won’t have access to modify
report elements, like groups and sorting, or formula fields.
For complete control over the report and its content, you need to use the Crystal Reports Engine object
model (CrystalDecisions.CrystalReports.Engine) in conjunction with the viewer object model.
This will allow you complete control over your report and the objects and features contained within.
Using the Crystal Reports Engine means that you have a rich object model that can be used to modify
even the tiniest elements of your report.
You will also need to use the Report Engine object model if you are using ADO (.NET or Classic ADO)
as the data source for your report (covered in Chapter 7, “Working with .NET Data”).
It is important to note that the Crystal Reports Engine object model cannot stand alone; it provides no
way to view a report and relies on the Crystal Reports Web (or Windows) Forms Viewer to actually view
the report.
Crystal Decisions recommends that you do not overlap the two object models and try to use properties
and methods from both at the same time. An example would be where you are setting a parameter field
value in the Report Engine object model; you wouldn’t want to also try to set a parameter field in the
same report using the Crystal Reports Windows Forms Viewer object model. Try to pick an object model
based on your requirements and (as I recommended in Chapter 4, “Report Integration for WindowsBased Applications,” with the Windows Forms Viewer) stick with it!
154