Crystal Reports For Visual Studio 2005 phần 1 ppsx
Bạn đang xem bản rút gọn của tài liệu. Xem và tải ngay bản đầy đủ của tài liệu tại đây (372.69 KB, 53 trang )
Crystal Reports
For Visual Studio 2005
Walkthroughs
Walkthroughs
Copyright © 2004 Business Objects
Page 2
© 2004 Business Objects. All rights reserved.
Business Objects, the Business Objects logo, Crystal Reports, and Crystal Enterprise are
trademarks or registered trademarks of Business Objects SA or its affiliated companies in
the United States and other countries. All other names mentioned herein may be
trademarks of their respective owners.
Version 1.0
Walkthroughs
Copyright © 2004 Business Objects
Page 3
Contents
CrystalReportViewer Object Model Tutorials 6
Logging onto a Secure SQL Server Database 7
Reading and Setting Discrete Parameters 16
Reading and Setting Range Parameters for a Subreport 40
Filtering Data Using Selection Formulas 52
Customizing the CrystalReportViewer Control 65
ReportDocument Object Model Tutorials 100
Persisting the ReportDocument Object Model Using Session 101
Logging onto a Secure SQL Server Database Using SQL Authentication 113
Logging onto a Secure SQL Server Database Using Integrated Security 129
Logging onto a Secure SQL Server Database with a Subreport 141
Reading and Setting Discrete Parameters 148
Reading and Setting Parameters with a Subreport 176
Exporting to Multiple Formats 191
Printing and Setting Print Options 248
Filtering Data Using Selection Formulas 264
Displaying Report Parts with the CrystalReportPartsViewer Control 279
Reduced-Code Tutorials in Visual Studio 2005 288
Web Site Setup with Crystal Reports Using Smart Tasks 289
Windows Project Setup with Crystal Reports using Smart Tasks 295
Secure Database Logon in a Web Site 300
Parameter Setting in a Web Site 310
Exposing Report Data to Other Controls in a Web Site 319
Exposing Report Data to Other Controls in a Windows Application 325
Data Connectivity Tutorials 331
Connecting to ADO.NET DataSets 332
Connecting to IDataReader 347
Connecting to Object Collections 358
Walkthroughs
Copyright © 2004 Business Objects
Page 4
Other Tutorials 374
Configuring Multilingual Client Support 375
Creating a User Function Library 389
Populating a Drop Down List of Reports from the File Directory 403
Populating a Drop Down List of Reports from a Web Service 412
Triggered Export with the ReportExporter Control 428
Deployment Tutorials 432
Deploying a Windows Application with ClickOnce Deployment 433
Creating a New Web Site Deployment Project with Windows Installer 438
Creating a New Windows Application Deployment Project with
Windows Installer
441
Migrating a Project that Uses Crystal Reports for Visual Studio .NET
2002 or 2003 Merge Modules Deployment
444
Migrating a Project that Uses Crystal Reports for Visual Studio 2005
Merge Modules Deployment
446
Performing a Silent Installation with a Windows Installer 448
Deploying Web Sites with Merge Modules 450
Deploying Windows Applications with Merge Modules 453
Configuring Database Driver Installation Options 456
Appendix 458
Crystal Reports Product Keycode and Registration Number 459
Design Time Preview 461
Formula Reference 462
System Setup 531
What Needs to be Installed? 532
What Needs to be Verified? 535
Add New Item Dialog Box Includes Crystal Reports 536
64-Bit Development Configuration 537
Optional Installation: MSDE 538
MSDE Installation with Windows or SQL Server Authentication 539
Northwind Database Installation 542
Security: Creating a Limited Access Database Account 544
Walkthroughs
Copyright © 2004 Business Objects
Page 5
Sample Reports’ Directory 547
Tutorials’ Sample Code Directory 549
Viewers’ Virtual Directory 550
Location of Xtreme Sample Database 552
ODBC DSN Entry for Xtreme Sample Database 553
Project Setup 555
Additional Setup Requirements 564
Multilingual Client Support 576
Useful Addresses at a Glance 578
Which Persistence Approach Should I Use with Crystal Reports? 579
.NET Framework 2.0 587
Crystal Reports for .NET Framework 2.0 Windows Installer 588
Merge Modules Summary 589
Crystal Reports Merge Modules for Visual Studio 2005 591
Walkthroughs
Copyright © 2004 Business Objects
Page 8
Logging onto a Secure SQL Server Database
Introduction
When you use the CrystalReportViewer object model to log on to a secure SQL Server
database, you must use classes from the CrystalDecisions.Shared namespace.
The properties of the ConnectionInfo class are used to connect to the database server or
ODBC data sources. In this tutorial, you set the ServerName, DatabaseName, UserID and
Password properties. If you choose only to set the DatabaseName, UserID, and Password
properties, then you are logged on to the default server of the database that you have
specified within the report. However, if you choose to assign an alternate ServerName
property, you can redirect the report to a different server at runtime.
You retrieve the TableLogOnInfos instance from the LogOnInfo property of the
CrystalReportViewer control. Then, you assign the ConnectionInfo instance to each
TableLogOnInfo object in the TableLogOnInfos instance.
The logon code in this tutorial also works for subreports that are inserted into the main
report. For the ReportDocument object model, you must modify the code to work for
subreports. The ReportDocument object model is recommended over the
CrystalReportViewer object model.
Creating a Report Connected to a Secure SQL
Server Database
To begin, create a report that draws its information from the Northwind database.
Note Northwind is a sample database provided with SQL Server.
Some setup is required as a prerequisite to this tutorial.
Prerequisite Database Setup
1. SQL Server configuration:
If you have SQL Server (or the OEM version, MSDE) installed, it must be configured
to require SQL Server Authentication.
If you do not have SQL Server (or the OEM version, MSDE) installed, you must
install MSDE with SQL Server Authentication set to "True."
2. The Northwind database provided with SQL Server must be installed and verified that
it requires SQL Server Authentication.
3. A limited access account must be created for use within the Web site.
To install MSDE with SQL Server Authentication, or the Northwind database, go to the
following sections from Appendix: System Setup in this documentation:
Appendix: MSDE Installation with Windows or SQL Server Authentication
Appendix: Northwind Database Installation
Appendix: Security: Creating a Limited Access Database Account
Once you have configured SQL Server and the Northwind database according to the
sections above, you are ready to create a report that draws its information securely from
a Northwind database.
Walkthroughs
Copyright © 2004 Business Objects
Page 9
To create a report with secure data from the Northwind database
Note This procedure works only with a project that has been created from Appendix:
Project Setup. Project Setup contains specific namespace references and code
configuration that is required for this procedure, and you will be unable to complete
the procedure without that configuration. Therefore, before you begin this procedure,
you must first follow the steps in Appendix: Project Setup.
1. In Solution Explorer, right-click the project name that is in bold type, point to Add,
and then click Add New Item.
2. In the Add New Item dialog box, in the Templates view, select the Crystal Report
template.
3. In the Name field, enter the name "NorthwindCustomers.rpt", and then click Open.
Note If you have not registered before, you may be asked to register. To find out
how to register, see Appendix: Crystal Reports Registration and Keycode.
4. In the Create New Crystal Report Document panel of the Crystal Reports
Gallery dialog box, select Using a Report Wizard.
5. In the Choose an Expert panel, select Standard. Click OK.
The Standard Report Creation Wizard window appears.
6. In the Available Data Sources panel, expand the Create New Connection folder.
7. From the subfolder that opens, expand the OLE DB (ADO) folder.
The OLE DB (ADO) window appears.
8. Select Microsoft OLE DB Provider for SQL Server, and then click Next.
9. Enter the values for your database server, user id and password into the Server, User
ID and Password fields.
10. From the Database drop down list, select "Northwind."
Leave the Integrated Security checkbox unchecked because you are using SQL Server
authentication instead of NT authentication.
11. Click Finish.
The OLE DB folder is now expanded, showing your database server, and within it, the
Northwind database.
12. Expand the nodes Northwind, dbo, and Tables, and then select the Customers
table.
13. Click the > symbol to move the table into the Selected Tables panel, and then click
Next.
14. Expand the Customers table, and then hold down the Ctrl key while you click
CompanyName, ContactName and City.
15. Click the > symbol to move these fields into the Fields to Display panel, then click
Next.
16. In the Available Fields panel, under Report Fields, select Customer.City, then
click the > symbol to move the field into the Group By panel, and then click Finish.
The NorthwindCustomers report is created and loaded into the main window of Visual
Studio.
You are now ready to bind the report to the CrystalReportViewer control.
Walkthroughs
Copyright © 2004 Business Objects
Page 10
Binding the Report Without Logon Code
In Appendix: Project Setup, you have placed a CrystalReportViewer control on the Web or
Windows Form. In the previous step, you have added a NorthwindCustomers report to the
project.
In this section, you bind the file directory path of the NorthwindCustomers report to the
CrystalReportViewer control. Then you test whether the report displays correctly when the
database logon code has not been set.
To bind the file directory path of the NorthwindCustomers report to the
CrystalReportViewer control
1. Open the Web or Windows Form.
2. From the View menu, click Code.
3. Locate the
ConfigureCrystalReports()
method (that you have created in Appendix:
Project Setup).
4. Declare a string variable, name it reportPath, and assign to it a runtime path to the
local report. This path is determined differently for Web Sites and Windows projects:
For a Web Site, pass the name of the local report file as a string parameter into the
Server.MapPath()
method. This maps the local report to the hard drive file
directory path at runtime.
[Visual Basic]
Dim reportPath As String = Server.MapPath("NorthwindCustomers.rpt")
[end]
[C#]
string reportPath = Server.MapPath("NorthwindCustomers.rpt");
[end]
For a Windows project, concatenate the
Application.StartupPath
property with
a backslash and the local report file name. This maps the report to the same
directory as the Windows executable file.
Note At compile time you will copy the report to the directory containing the
executable file.
[Visual Basic]
Dim reportPath As String = Application.StartupPath & "\" &
"NorthwindCustomers.rpt"
[end]
[C#]
string reportPath = Application.StartupPath + "\\" +
"NorthwindCustomers.rpt";
[end]
5. Assign the file directory path of the NorthwindCustomers report to the ReportSource
property of the CrystalReportViewer control.
[Visual Basic]
myCrystalReportViewer.ReportSource = reportPath
[end]
Walkthroughs
Copyright © 2004 Business Objects
Page 11
[C#]
crystalReportViewer.ReportSource = reportPath;
[end]
You are now ready to build and run your project. It is expected that the report loading will
fail, because code has not yet been written to log onto the database.
To test the loading of the NorthwindCustomers report
1. From the Build menu, select Build Solution.
2. If you have any build errors, go ahead and fix them now.
3. If you use a non-embedded report in a Windows project, locate the compiled Windows
executable in the
\bin\debug\
subdirectory, and then copy the report to that
subdirectory.
Note To have the non-embedded report loaded by the Windows executable at
runtime, the report must be stored in the same directory as the Windows
executable.
4. From the Debug menu, click Start.
Note If you are developing a Web Site in Visual Studio 2005, and this is the first
time you have started debugging, a dialog box appears and states that the
Web.config file must be modified. Click the OK button to enable debugging.
The NorthwindCustomers report will not display. It will display after you add the
database logon code.
Note Results may vary, depending on the version of Crystal Reports that you
use. For example, if you have Crystal Reports 10 and up installed, you are
prompted for database logon information for that report. This is a new feature of
Crystal Reports Developer and Crystal Reports for Visual Studio 2005. If you are
running a previous version of Crystal Reports, an exception is thrown. In either
case, you must follow the next step procedure to create a fully functional
application.
5. Return to Visual Studio and click Stop to exit from debug mode.
Adding the Report Logon Code
You are now ready to add the logon code to the code-behind class. You begin by creating
a private helper method,
SetDBLogonForReport()
.
To create and code the SetDBLogonForReport() method
1. Return to the code-behind class for this Web or Windows Form.
2. At the bottom of the class, create a new private method named
SetDBLogonForReport()
with ConnectionInfo passed into the method signature.
[Visual Basic]
Private Sub SetDBLogonForReport(ByVal myConnectionInfo As ConnectionInfo)
End Sub
[end]
[C#]
private void SetDBLogonForReport(ConnectionInfo connectionInfo)
Walkthroughs
Copyright © 2004 Business Objects
Page 12
{
}
[end]
3. Within this method, retrieve the TableLogOnInfos instance from the LogOnInfo
property of the CrystalReportViewer class.
Note To make the TableLogOnInfos class accessible, include an
"Imports"
[Visual Basic]
or
"using" [C#]
statement at the top of the code-behind class for
the CrystalDecisions.Shared namespace. (You added this declaration in Appendix:
Project Setup.)
TableLogOnInfos is an indexed class that contains instances of the TableLogOnInfo
class.
[Visual Basic]
Dim myTableLogOnInfos As TableLogOnInfos =
myCrystalReportViewer.LogOnInfo
[end]
[C#]
TableLogOnInfos tableLogOnInfos = crystalReportViewer.LogOnInfo;
[end]
4. Create a
foreach
loop that loops through each TableLogOnInfo instance in the
TableLogOnInfos indexed class instance.
[Visual Basic]
For Each myTableLogOnInfo As TableLogOnInfo In myTableLogOnInfos
Next
[end]
[C#]
foreach(TableLogOnInfo tableLogOnInfo in tableLogOnInfos)
{
}
[end]
5. Within the
foreach
loop, set the ConnectionInfo property of TableLogOnInfo to the
ConnectionInfo parameter.
[Visual Basic]
myTableLogOnInfo.ConnectionInfo = myConnectionInfo
[end]
[C#]
tableLogOnInfo.ConnectionInfo = connectionInfo;
[end]
This step procedure has created a method to set the logon for the database. However, you
must modify the
ConfigureCrystalReports()
method to address this method, for the
report to be aware that it has database logon information.
Walkthroughs
Copyright © 2004 Business Objects
Page 13
Modifying the ConfigureCrystalReports() method requires two actions:
Configure the ConnectionInfo instance.
Call the SetDBLogonForReport() method.
To modify the ConfigureCrystalReports() method to address the database logon
code
1. In the
ConfigureCrystalReports()
method, create a couple of line breaks in the
code above the line that binds the report to the CrystalReportViewer control.
2. Within the line breaks, declare and instantiate the ConnectionInfo class.
[Visual Basic]
Dim myConnectionInfo As ConnectionInfo = New ConnectionInfo()
[end]
[C#]
ConnectionInfo connectionInfo = new ConnectionInfo();
[end]
3. Set the DatabaseName, UserID, and Password properties of the ConnectionInfo
instance.
Note For security reasons, it is important that you use a database account with
limited access permissions. For more information, see Appendix: Security:
Creating a Limited Access Database Account.
In the code that you write, replace the sample 1234 password (shown below) with
your own password.
[Visual Basic]
myConnectionInfo.DatabaseName = "Northwind"
myConnectionInfo.UserID = "limitedPermissionAccount"
myConnectionInfo.Password = "1234"
[end]
[C#]
connectionInfo.DatabaseName = "Northwind";
connectionInfo.UserID = "limitedPermissionAccount";
connectionInfo.Password = "1234";
[end]
4. Below the code that binds the CrystalReportViewer control, call the
SetDBLogonForReport()
method, by passing in the ConnectionInfo instance.
[Visual Basic]
SetDBLogonForReport(myConnectionInfo)
[end]
[C#]
SetDBLogonForReport(connectionInfo);
[end]
You are now ready to build and run your project. The report should load properly, because
you have added code to log on to the database.
Walkthroughs
Copyright © 2004 Business Objects
Page 14
To test the loading of the NorthwindCustomers report
1. From the Build menu, select Build Solution.
2. If you have any build errors, go ahead and fix them now.
3. From the Debug menu, click Start.
The NorthwindCustomers report displays successfully.
4. Return to Visual Studio and click Stop to exit from debug mode.
In the next section, you learn how to change the database location at runtime.
Adding Ability to Change Database Location at
Runtime
In this section, you learn how to change the database location at runtime. This requires
only a minor modification to the ConnectionInfo instance.
To change the database location at runtime
1. In the
ConfigureCrystalReports()
method, create a couple of line breaks in the
code after the line that declares and instantiates the ConnectionInfo class.
2. Within the line breaks, set the ServerName property of the ConnectionInfo instance.
Note In the code that you write, replace the sample server name DevDatabase
(shown below) with the name of your server.
[Visual Basic]
myConnectionInfo.ServerName = "DevDatabase"
[end]
[C#]
connectionInfo.ServerName = "DevDatabase";
[end]
You are now ready to build and run your project. The report should redirect to the
alternate database server at runtime.
To test that the report can be reset to an alternate database server at runtime
1. From the Build menu, select Build Solution.
2. If you have any build errors, go ahead and fix them now.
3. From the Debug menu, click Start.
The NorthwindCustomers report displays successfully.
4. Return to Visual Studio and click Stop to exit from debug mode.
Conclusion
You have successfully set your code to log onto the SQL Server database and change
database location at runtime.
When you can add subreports to your main report (NorthwindCustomer.rpt), you do not
need additional code.
Walkthroughs
Copyright © 2004 Business Objects
Page 15
Sample Code Information
Each tutorial comes with Visual Basic and C# sample code that show the completed
version of the project. Follow the instructions in this tutorial to create a new project or
open the sample code project to work from a completed version.
The sample code is stored in folders that are categorized by language and project type.
The folder names for each sample code version are as follows:
C# Web Site: CS_Web_CRVObjMod_DBLogon
C# Windows project: CS_Win_CRVObjMod_DBLogon
Visual Basic Web Site: VB_Web_CRVObjMod_DBLogon
Visual Basic Windows project: VB_Win_CRVObjMod_DBLogon
To locate the folders that contain these samples, see Appendix: Tutorials' Sample Code
Directory.
Walkthroughs
Copyright © 2004 Business Objects
Page 17
Reading and Setting Discrete Parameters
Introduction
A discrete parameter is a single value, as opposed to a range parameter, which refers to
a range of values. Text items (such as cities) are usually accessed through discrete
parameters. Numeric items (such as employee salaries) are usually accessed through
range parameters.
In this tutorial, you set a value for a discrete parameter to view a customer report that is
based on one field. The report displays only those customers who live in the cities you
have selected from a city list. The city list is derived from the default values for the City
parameter. Those default values for the City parameter are encapsulated within the
report.
To begin, you create a customer report with a city parameter. The report derives its data
from the sample database that is shipped with Crystal Reports for Visual Studio. When you
instantiate the report in the code, you create an ArrayList that contains city names (Paris,
Tokyo) and pass that ArrayList instance to a helper method that sets those city names as
the current values for the city parameter. You then bind the report to the
CrystalReportViewer control and view the report with only those customers that live in
Paris and Tokyo displayed.
In the next part of the tutorial, you do the following:
Create a method that gets all the default values and returns them in an ArrayList.
Add a ListBox control to the form and populate it from the ArrayList.
Add a Button control to redisplay the report based on ListBox selections.
In the final part of the tutorial, you code the button click event to retrieve any selected
items from the ListBox control and set those to be the current values for the city
parameter. The report redisplays and shows only those customers who live in the cities
that have been selected within the ListBox control.
This tutorial can also be completed with classes of the ReportDocument object model.
Creating a Report with Parameters
To begin, create a report that draws its information from the sample Microsoft Access
database that ships with Crystal Reports.
Note Xtreme.mdb is the sample database that is provided with Crystal Reports. To
locate xtreme.mdb on your hard drive for your version of Crystal Reports, see
Appendix: Location of Xtreme Sample Database. You need to connect to the database
through its ODBC DSN entry. To learn the name of this entry for your version of Crystal
Reports, see Appendix: ODBC DSN Entry for Xtreme Sample Database.
To create a report with parameters
Note This procedure works only with a project that has been created from Appendix:
Project Setup. Project Setup contains specific namespace references and code
configuration that is required for this procedure, and you will be unable to complete
the procedure without that configuration. Therefore, before you begin this procedure,
you must first follow the steps in Appendix: Project Setup.
Walkthroughs
Copyright © 2004 Business Objects
Page 18
1. In Solution Explorer, right-click the project name that is in bold type, point to Add,
and then click Add New Item.
2. In the Add New Item dialog box, in the Templates view, select the Crystal Report
template.
3. In the Name field, enter the name "CustomersByCity.rpt" and click Add.
Note In Visual Studio .NET 2002 or 2003, the button is named Open.
If you have not registered before, you are asked to register. To find out how to
register, see Appendix: Crystal Reports Registration and Keycode.
4. In the Create New Crystal Report Document panel of the Crystal Reports
Gallery dialog box, select Using a Report Wizard.
5. In the Choose an Expert panel, select Standard, and then click OK.
6. In the Available Data Sources panel of the Standard Report Creation Wizard
window, expand the Create New Connection folder.
Note In Visual Studio .NET 2002 or 2003 where Crystal Reports has not been
upgraded to Crystal Reports Developer, the Create New Connection folder does not
exist; the contents are shown at the top level.
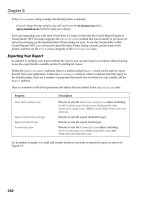
7. From the subfolder that opens, expand the ODBC (RDO) folder.
8. In the ODBC (RDO) window, select the correct ODBC DSN entry for your version of
Crystal Reports as explained in Appendix: ODBC DSN Entry for Xtreme Sample
Database, and then click Finish.
The ODBC (RDO) folder expands and shows the Xtreme Sample Database.
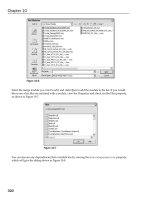
9. Expand the Tables node, double-click the Customer table to move the table to the
Selected Tables panel, and then click Next.
10. Expand the Customer table, then CTRL-click Customer Name, Contact Title,
Address1, Contact Last Name and City.
11. Click the > symbol to move these fields into the Fields to Display panel, then click
the Next button.
12. In the Available Fields panel, under Report Fields, double-click Customer.City to
move the field into the Group By panel, and then click the Finish button.
The CustomersByCity report is created and loaded into the main window of Visual
Studio.
You are now ready to add a parameter named City and populate it with default values.
The Field Explorer must be visible, because it provides access to the various features of
the report, including parameters. To make the Field Explorer visible, from the Crystal
Reports menu, click Field Explorer.
To add a City parameter
1. If the Field Explorer is not visible, on the Crystal Reports toolbar, click Toggle Field
View.
Note Another way to display the Field Explorer is to go to the Crystal Reports
menu, and then click Field Explorer.
2. In the Field Explorer, right-click Parameter Fields and select New
3. In the Create Parameter Field dialog box:
Set the Name to "City."
Walkthroughs
Copyright © 2004 Business Objects
Page 19
Set the Prompting Text to "Select one or more cities."
Set Value Type to String
Select Allow multiple values.
Select Discrete value(s).
Click Default Values
Note In Visual Studio .NET 2002 or 2003 where Crystal Reports has not been
upgraded to Crystal Reports Developer, this button is named Set Default
Values.
4. In the Set Default Values dialog box:
Set the Browse table to "Customer."
Set the Browse field to "City."
Click >> (the double right arrow) to move the entire cities list into the Default
Values list.
5. Click OK to close the Set Default Values dialog box.
6. Click OK to close the Create Parameter Field dialog box.
You have just set the Default Values to contain a large list of cities. Later in this tutorial,
you access this same list of default values programmatically, through the
ParameterFieldInfo property of the CrystalReportViewer class.
You now use the Select Expert to set a formula that connects the City database column to
your newly created City parameter field.
To connect the City parameter to the City database column
1. On the Crystal Reports toolbar, click Select Expert.
2. In the Choose Field dialog box, under Report Fields, select Customer.City, and
then click OK.
3. In the Select Expert dialog box, within the Customer.City tab, set the dropdown list
to "is equal to."
4. In the new dropdown list that appears to the right, select the first choice in the list,
{?City}, and then click OK.
Note This selection, {?City}, is the City parameter that you created earlier.
5. From the File menu, select Save All.
You are now ready to bind the report to the CrystalReportViewer control and set the city
parameter with two initial values, Paris and Tokyo.
Binding the Report
When you followed the instructions in Appendix: Project Setup to prepare for this tutorial,
you have placed a CrystalReportViewer control on the Web or Windows Form. In the
previous steps, you added a CustomersByCity report to the project.
In this section, you bind the file directory path of the CustomersByCity report to the
CrystalReportViewer control. Then you test whether the report displays correctly when
current values have not been set for its parameter field.
Walkthroughs
Copyright © 2004 Business Objects
Page 20
To bind the file directory path of the CustomersByCity report to the
CrystalReportViewer control
1. Open the Web or Windows Form.
2. From the View menu, click Code to view the code-behind class for this Web or
Windows Form.
3. Locate the
ConfigureCrystalReports()
method (that you have created in Appendix:
Project Setup).
4. Declare a string variable, name it reportPath, and assign to it a runtime path to the
local report. This path is determined differently for Web Sites and Windows projects:
For a Web Site, pass the name of the local report file as a string parameter into the
Server.MapPath()
method. This maps the local report to the hard drive file
directory path at runtime.
[Visual Basic]
Dim reportPath As String = Server.MapPath("CustomersByCity.rpt")
[end]
[C#]
string reportPath = Server.MapPath("CustomersByCity.rpt");
[end]
For a Windows project, concatenate the
Application.StartupPath
property with
a backslash and the local report file name. This maps the report to the same
directory as the Windows executable file.
Note At compile time you will copy the report to the directory containing the
executable file.
[Visual Basic]
Dim reportPath As String = Application.StartupPath & "\" &
"CustomersByCity.rpt"
[end]
[C#]
string reportPath = Application.StartupPath + "\\" +
"CustomersByCity.rpt";
[end]
5. Assign the file directory path of the CustomersByCity report to the ReportSource
property of the CrystalReportViewer control.
[Visual Basic]
myCrystalReportViewer.ReportSource = reportPath
[end]
[C#]
crystalReportViewer.ReportSource = reportPath;
[end]
You are now ready to build and run your project. It is expected that the report loading will
fail, because code has not yet been written to set a value for the City parameter field.
Walkthroughs
Copyright © 2004 Business Objects
Page 21
To test the loading of the CustomersByCity report
1. From the Build menu, select Build Solution.
2. If you have any build errors, go ahead and fix them now.
3. If you use a non-embedded report in a Windows project, locate the compiled Windows
executable in the
\bin\ [Visual Basic]
or
\bin\debug\ [C#]
subdirectory, and then
copy the report to that subdirectory.
Note To have the non-embedded report loaded by the Windows executable at
runtime, the report must be stored in the same directory as the Windows
executable.
4. From the Debug menu, click Start.
Note If you are developing a Web Site in Visual Studio 2005, and this is the first
time you have started debugging, a dialog box appears and states that the
Web.config file must be modified. Click the OK button to enable debugging.
The CustomersByCity report does not display. It displays after you add a value for the
City parameter field later in this tutorial.
Note Results may vary, depending on the version of Crystal Reports that you
use. In more recent versions, you can see a form requesting that you provide
parameter values for that report. In earlier versions, a "Missing parameter field
current value" exception is thrown. In either case, you must add further code to
create a fully functional application.
5. Return to Visual Studio and click Stop to exit from debug mode.
Setting Parameters Manually in Code
You are now ready to set two values ("Paris" and "Tokyo") into the City parameter field for
the CustomersByCity report.
This involves some coding, which you can separate into the following processes:
You need a PARAMETER_FIELD_NAME constant to hold the "City" parameter field
name.
The code to add current values to the City parameter is used at different locations in
this tutorial; therefore, you create this code as a separate helper method.
Within the
ConfigureCrystalReports()
method, you add the "Paris" and "Tokyo"
parameters to an ArrayList instance and pass in both the report and the ArrayList
instance to the helper method to be processed.
To create a PARAMETER_FIELD_NAME constant
1. Return to the code-behind class for this Web or Windows Form.
2. At the class level, create a new string constant, PARAMETER_FIELD_NAME, and set its
value to "City."
[Visual Basic]
Private Const PARAMETER_FIELD_NAME As String = "City"
[end]
[C#]
private const string PARAMETER_FIELD_NAME = "City";
[end]
Walkthroughs
Copyright © 2004 Business Objects
Page 22
You are now ready to create the helper method that adds current values to the parameter
in the report.
To create a helper method that adds current values to the parameter in the
report
1. Return to the code-behind class for this Web or Windows Form.
2. Above the class signature, add an
"Imports" [Visual Basic]
or "
using" [C#]
declaration to the top of the class for the System.Collections namespace (if this
namespace has not already been declared).
[Visual Basic]
Imports System.Collections
[end]
[C#]
using System.Collections;
[end]
Note This declaration is needed, to access the ArrayList class.
3. At the bottom of the class, create a new private method named
SetCurrentValuesForParameterField()
, with two variables in the method
signature: ParameterFields and ArrayList.
[Visual Basic]
Private Sub SetCurrentValuesForParameterField(ByVal myParameterFields As
ParameterFields, ByVal myArrayList As ArrayList)
End Sub
[end]
[C#]
private void SetCurrentValuesForParameterField(ParameterFields
parameterFields, ArrayList arrayList)
{
}
[end]
4. Within this method, declare and instantiate the ParameterValues that are indexed
class as the variable currentParameterValues.
Note For the ParameterValues class to be accessible, you must have included an
"Imports" [Visual Basic]
or
"using" [C#]
declaration at the top of the
code-behind class for the CrystalDecisions.Shared namespace. (You added this
declaration in Appendix: Project Setup.)
[Visual Basic]
Dim currentParameterValues As ParameterValues = New ParameterValues()
[end]
[C#]
ParameterValues currentParameterValues = new ParameterValues();
[end]
Walkthroughs
Copyright © 2004 Business Objects
Page 23
5. Create a
foreach
loop to retrieve all of the submitted values (as type Object) from the
ArrayList instance.
Note In this method, you retrieve values from the ArrayList. Later you write code
that adds values to the ArrayList.
[Visual Basic]
For Each submittedValue As Object In myArrayList
Next
[end]
[C#]
foreach(object submittedValue in arrayList)
{
}
[end]
6. Within the
foreach
loop, declare and instantiate the
ParameterDiscreteValue
class.
[Visual Basic]
Dim myParameterDiscreteValue As ParameterDiscreteValue = New
ParameterDiscreteValue()
[end]
[C#]
ParameterDiscreteValue parameterDiscreteValue = new
ParameterDiscreteValue();
[end]
7. Within the
foreach
loop, convert the
submittedValu
e to string and pass it to the
Value property of the
ParameterDiscreteValue
instance.
[Visual Basic]
myParameterDiscreteValue.Value = submittedValue.ToString()
[end]
[C#]
parameterDiscreteValue.Value = submittedValue.ToString();
[end]
8. Within the
foreach
loop, add the ParameterDiscreteValue instance into the
currentParameterValues indexed class.
[Visual Basic]
currentParameterValues.Add(myParameterDiscreteValue)
[end]
[C#]
currentParameterValues.Add(parameterDiscreteValue);
[end]
This completes the code within the
foreach
loop. You place the remaining code (from
the steps that follow) after the
foreach
loop.
Walkthroughs
Copyright © 2004 Business Objects
Page 24
9. Outside the
foreach
loop, retrieve the
ParameterField
instance from the
ParameterFields
indexed class that is based on the index entry of the
PARAMETER_FIELD_NAME constant.
[Visual Basic]
Dim myParameterField As ParameterField =
myParameterFields(PARAMETER_FIELD_NAME)
[end]
[C#]
ParameterField parameterField = parameterFields[PARAMETER_FIELD_NAME];
[end]
10. Pass the
currentParameterValues
instance to the
CurrentValues
property of the
ParameterField
instance.
[Visual Basic]
myParameterField.CurrentValues = currentParameterValues
[end]
[C#]
parameterField.CurrentValues = currentParameterValues;
[end]
This step procedure showed you how to create a method that retrieves submitted values
from an ArrayList instance and places them as current values into a ParameterField
instance. Now, you must call this method before your report is bound to the
CrystalReportViewer control, for the report to be aware that it has parameter settings.
To call the SetCurrentValuesForParameterField() method before the report is
bound to the CrystalReportViewer control
1. In the
ConfigureCrystalReports()
method, declare and instantiate an ArrayList
above the line that binds the report to the CrystalReportViewer control.
[Visual Basic]
Dim myArrayList As ArrayList = New ArrayList()
[end]
[C#]
ArrayList arrayList = new ArrayList();
[end]
2. Add the city names "Paris" and "Tokyo" as strings to the ArrayList instance.
[Visual Basic]
myArrayList.Add("Paris")
myArrayList.Add("Tokyo")
[end]
[C#]
arrayList.Add("Paris");
arrayList.Add("Tokyo");
[end]
Walkthroughs
Copyright © 2004 Business Objects
Page 25
3. Below the code that binds the CrystalReportViewer control, retrieve the
ParameterFields
instance from the
ParameterFieldInfo
property of the
CrystalReportViewer control.
[Visual Basic]
Dim myParameterFields As ParameterFields =
myCrystalReportViewer.ParameterFieldInfo
[end]
[C#]
ParameterFields parameterFields =
crystalReportViewer.ParameterFieldInfo;
[end]
4. Call the
SetCurrentValuesForParameterField()
method, and pass in the
ParameterFields instance, and the ArrayList instance.
[Visual Basic]
SetCurrentValuesForParameterField(myParameterFields, myArrayList)
[end]
[C#]
SetCurrentValuesForParameterField(parameterFields, arrayList);
[end]
You are now ready to build and run your project. It is expected that the report displays
successfully because there is now code written to set current values into the parameter
field.
To test the loading of the CustomersByCity report
1. From the Build menu, select Build Solution.
2. If you have any build errors, go ahead and fix them now.
3. From the Debug menu, click Start.
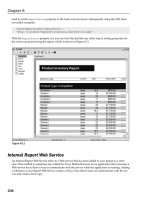
The CustomersByCity report displays successfully, showing listings for customers in
Paris and Tokyo.
4. Return to Visual Studio and click Stop to exit from debug mode.
In the next section, you learn how to retrieve the default values from the parameter field
and set those values into a ListBox control. These are used at the end of the tutorial to
select new cities dynamically and filter the report based on those newly selected cities.
Create a ListBox Control that Displays Default
Parameters
The remainder of the tutorial is concerned with displaying a complete list of default values
for the parameter field in a ListBox control, and based on selections that you make from
that ListBox control, refiltering the contents of the report.
In this section you learn how to populate the ListBox control from the default values of the
parameter field.
Note Remember that you set the Default Values, a large list of cities, when you
created this report at the beginning of the tutorial.
Walkthroughs
Copyright © 2004 Business Objects
Page 26
To do this, you must add and configure a ListBox control, and then create a helper method
to populate the ListBox control.
To create and configure a ListBox control on the form
1. Open the Web or Windows Form.
2. From the View menu, click Designer.
3. If you are developing a Web Site, do the following:
a) Click the CrystalReportViewer control to select it.
b) Press the LEFT ARROW on your keyboard so that a flashing cursor appears, and
then press ENTER.
The CrystalReportViewer control drops by one line.
4. If you are developing a Windows project, do the following:
a) Click the CrystalReportViewer control to select it.
b) From the Properties window, set Dock to "Bottom."
c) Resize the CrystalReportViewer control, so that you leave enough room above it
for a ListBox control.
d) From the Properties window, set Anchor to "Top, Bottom, Left, Right."
5. From the Toolbox, drag a ListBox control above the CrystalReportViewer control.
Note If a Smart Task appears on the ListBox (when using Visual Studio 2005),
press Esc to close it.
6. Click on the ListBox control to select it.
7. From the Properties window, do the following:
Set the ID or Name to "defaultParameterValuesList."
Set the SelectionMode to "Multiple" (in a Windows project, "MultiExtended").
8. From the File menu, select Save All.
You are now ready to create a helper method that retrieves the default values from the
parameter field.
To create a helper method that retrieves the default values from the parameter
field
1. Open the Web or Windows Form.
2. From the View menu, click Code.
3. At the bottom of the class, create a new private method named
GetDefaultValuesFromParameterField()
that returns an ArrayList instance, with
ParameterFields passed into the method signature.
[Visual Basic]
Private Function GetDefaultValuesFromParameterField(ByVal
myParameterFields As ParameterFields) As ArrayList
End Function
[end]
[C#]
Walkthroughs
Copyright © 2004 Business Objects
Page 27
private ArrayList GetDefaultValuesFromParameterField(ParameterFields
parameterFields)
{
}
[end]
4. Retrieve the
ParameterField
instance from the
ParameterFields
indexed class,
which is based on the index entry of the PARAMETER_FIELD_NAME constant.
[Visual Basic]
Dim myParameterField As ParameterField =
myParameterFields(PARAMETER_FIELD_NAME)
[end]
[C#]
ParameterField parameterField = parameterFields[PARAMETER_FIELD_NAME];
[end]
5. Retrieve a
ParameterValues
indexed class (as the variable
defaultParameterValues
) from the
DefaultValues
property of the
ParameterField
instance.
[Visual Basic]
Dim defaultParameterValues As ParameterValues =
myParameterField.DefaultValues
[end]
[C#]
ParameterValues defaultParameterValues = parameterField.DefaultValues;
[end]
6. Declare and instantiate an ArrayList.
[Visual Basic]
Dim myArrayList As ArrayList = New ArrayList()
[end]
[C#]
ArrayList arrayList = new ArrayList();
[end]
7. Create a
foreach
loop, to retrieve each
ParameterValue
instance from
defaultParameterValues
.
[Visual Basic]
For Each myParameterValue As ParameterValue In defaultParameterValues
Next
[end]
[C#]
foreach(ParameterValue parameterValue in defaultParameterValues)
{
Walkthroughs
Copyright © 2004 Business Objects
Page 28
}
[end]
Within the
foreach
loop, you now create a nested conditional block that checks for
discrete (as opposed to range) parameter values. Two versions of this conditional
block exist, because the API has changed slightly across versions of Crystal Reports for
Visual Studio. Check your API (using IntelliSense) to see which property is available
under ParameterValue:
8. If the available property is IsRange then, within the
foreach
loop, enter this code:
[Visual Basic]
If (Not myParameterValue.IsRange) Then
End If
[end]
[C#]
if(!parameterValue.IsRange)
{
}
[end]
9. Or, if the available property is Kind (DiscreteOrRangeKind, an enum with three values:
DiscreteValue, RangeValue, DiscreteAndRangeValue) then, within the
foreach
loop,
enter this code instead:
[Visual Basic]
If (myParameterValue.Kind = DiscreteOrRangeKind.DiscreteValue) Then
End If
[end]
[C#]
if(parameterValue.Kind == DiscreteOrRangeKind.DiscreteValue)
{
}
[end]
10. Within this nested conditional block, cast the ParameterValue instance to its extended
class, DiscreteParameterValue.
[Visual Basic]
Dim myParameterDiscreteValue As ParameterDiscreteValue =
CType(myParameterValue, ParameterDiscreteValue)
[end]
[C#]
ParameterDiscreteValue parameterDiscreteValue =
(ParameterDiscreteValue)parameterValue;
[end]