Adobe Illustrator CS5 bible PHẦN 8 potx
Bạn đang xem bản rút gọn của tài liệu. Xem và tải ngay bản đầy đủ của tài liệu tại đây (1.36 MB, 74 trang )
Part II: Putting Illustrator to Work
482
After an image is traced, you can modify the image in several ways. As explained in Chapter 14,
you can use the Live Paint tool to change the colors in the image. Even if you trace the image in
black and white, you can still colorize it. Another way to modify the traced image is to choose
Object ➪ Expand (or click the Expand button on the Control panel). If you expand the traced
image, it becomes an ordinary Illustrator object and is no longer live. This means that you can’t
make any additional changes with the Live Trace tool, but you can use the other drawing tools to
modify the image.
You can quickly trace a raster image and then expand it into editable paths by using the
Object ➪ Live Trace ➪ Make & Expand command. This saves you a step, but unlike the name, it
isn’t really live anymore — it’s just paths after you do this command.
Summary
In this chapter, you learned how to use the Live Trace tool, which can quickly create vector
graphics from raster-based images. Here are some important things you learned:
l
Live Trace has three modes for tracing raster images.
l
Live Trace has a number of presets that you can use to quickly trace raster images.
l
The Tracing Options dialog box offers an almost unlimited range of tracing options.
l
You can convert traced images into ordinary Illustrator objects by expanding them.
18_584750-ch13.indd 48218_584750-ch13.indd 482 6/3/10 9:00 PM6/3/10 9:00 PM
483
CHAPTER
Using Live Paint
IN THIS CHAPTER
Understanding Live Paint
Setting the Live Paint options
Using Live Paint
I
llustrator does its best to prove it’s indeed much smarter than you with
the Live Paint feature. Instead of requiring you to create the specific
shape you want to fill with color, Live Paint does this intelligently,
secretly creating those shapes so you don’t have to. It sounds really easy,
right?
Understanding Live Paint
Bitmap image–editing and creation programs have long had a fun yet often
frustrating tool that’s typically called Paint Bucket. With just a click of the
Paint Bucket tool, you can fill an enclosed area with a solid color. The Paint
Bucket tool icon is always some variation on paint spilling out of a paint can,
which seems like a very good icon for something that can be so hard to
control. A single missing pixel around the perimeter of the area that you
want to fill provides an escape route so that the fill spills out into areas you
don’t intend to paint. It’s almost like trying to paint a room when a nosy cat
is prowling around just waiting for a chance to cause some mischief.
When vector-based graphics applications, such as Illustrator, took on the
paint bucket metaphor, things were considerably different than they had
been in the bitmap world. For one thing, in a vector-based application,
objects are typically treated as a unit. If you want to change the fill color of
an object, you typically don’t have to worry about the dreaded missing pixel
paint spill because each object is independent.
So, at this point, you’re probably wondering how the Live Paint Bucket tool
improves on the Paint Bucket tool in previous versions of Illustrator. This
tool is better in a couple of subtle but very helpful ways. First, with the Live
19_584750-ch14.indd 48319_584750-ch14.indd 483 6/3/10 7:59 PM6/3/10 7:59 PM
Part II: Putting Illustrator to Work
484
Paint Bucket tool, it’s much easier to modify specific areas of an object, such as an image you
traced with the Live Trace tool. That’s because the Live Paint Bucket tool automatically detects the
various independent regions as you move the tool over an object. As it detects each region, the Live
Paint Bucket tool highlights the detected region, as shown in Figure 14.1. In this image, I used the
Live Trace tool to trace an old greeting card that I scanned. The highlighted areas are surrounded
with a bright contrast to show the detected regions.
The Live Paint Bucket tool allows you to easily fill individual regions within an object rather than
the object as a whole. Also, because the paint remains live, any changes you make to the regions
are also reflected in the paint fill.
FIGURE 14.1
This image shows how Live Paint highlights a region (in this case, her right lapel) as it’s detected.
19_584750-ch14.indd 48419_584750-ch14.indd 484 6/3/10 7:59 PM6/3/10 7:59 PM
Chapter 14: Using Live Paint
485
Note
Clicking a Live Trace object with the Live Paint Bucket tool converts the object into a Live Paint object. This
precludes making additional changes to the object using Live Trace, so it’s important to complete all your Live
Trace adjustments before you use the Live Paint Bucket tool.
In addition to the Live Paint Bucket tool, Illustrator offers the Live Paint Selection tool. This tool
allows you to select Live Paint regions without making any changes to those regions. In effect, the
Live Paint Selection tool could be called the selection-only portion of the Live Paint Bucket tool.
Using the Live Paint Selection tool, you can select more than one Live Paint region at a time, as
shown in Figure 14.2 (the selected regions are filled with a dotted pattern to show that they’re
selected). The highlighted area indicates the current region that’s added to the selection.
FIGURE 14.2
The Live Paint Selection tool allows you to select regions without immediately modifying them.
19_584750-ch14.indd 48519_584750-ch14.indd 485 6/3/10 7:59 PM6/3/10 7:59 PM
Part II: Putting Illustrator to Work
486
Tip
Clicking a Live Paint object with the Live Paint Selection tool makes it easier to preview the areas that the Live
Paint Bucket tool will modify without actually making those changes.
Setting the Live Paint Options
You should probably become familiar with the options that are available for controlling how the
Live Paint Bucket tool works before you use the tool. It has only a few options, but they can have
quite an effect on how well the tool meets your expectations.
The first set of Live Paint Bucket tool options is contained in the Live Paint Bucket Options dialog
box, as shown in Figure 14.3. Double-click the Live Paint Bucket tool in the Tools panel to display
the dialog box.
FIGURE 14.3
The Live Paint Bucket Options dialog box allows you to choose basic settings for the Live Paint Bucket
tool.
These settings are available in the Live Paint Bucket Options dialog box:
l
Paint Fills. When selected, this option allows the Live Paint Bucket tool to add the
current fill color or pattern to the fill of a region you click.
l
Paint Strokes. When selected, this option allows the Live Paint Bucket tool to add the
current stroke color to the stroke of a region you click.
l
Highlight. When selected, this option outlines the region that’s automatically detected as
you move the mouse pointer over a Live Paint object.
l
Color. This setting allows you to choose the color of the outline.
l
Width. Use this setting to set the width of the outline that the Live Paint Bucket tool
draws around the region.
19_584750-ch14.indd 48619_584750-ch14.indd 486 6/3/10 7:59 PM6/3/10 7:59 PM
Chapter 14: Using Live Paint
487
By default, the Paint Fills option is selected and the Paint Strokes option is deselected. Selecting
both options and using a contrasting color for the stroke color can produce some interesting
effects.
In addition to the options shown in the Live Paint Bucket Options dialog box, you can also control
how the Live Paint Bucket tool responds to gaps. Set the gap options in the Gap Options dialog
box, as shown in Figure 14.4. Choose Object ➪ Live Paint ➪ Gap Options to display this dialog box.
These settings are available in the Gap Options dialog box:
l
Gap Detection. Click this check box to turn on gap detection. This option is off by
default.
l
Paint stops at. Choose Small Gaps, Medium Gaps, or Large Gaps from the drop-down list
(popup menu). Illustrator finds fewer gaps when you choose a larger setting.
l
Custom. Click this check box if you want to specify the size of the gap rather than using
one of the preset options. If you select this option, use the text box to specify the size of
gap you want to detect.
l
Gap Preview Color. Choose a contrasting color to make the detected gaps stand out from
your artwork.
l
Close gaps with paths. Click this button to remove the gaps by inserting paths in place
of the gaps.
Depending on the result that you’re attempting to produce, using gap detection improves the
smoothness of the Live Paint Bucket tool’s results. With fewer gaps to contend with, the Live Paint
Bucket tool generally finds simpler paths than it would in a drawing with many gaps.
FIGURE 14.4
The Gap Options dialog box allows you to choose settings for how the Live Paint Bucket tool deals with
gaps in objects.
19_584750-ch14.indd 48719_584750-ch14.indd 487 6/3/10 7:59 PM6/3/10 7:59 PM
Part II: Putting Illustrator to Work
488
Using Live Paint
You can use the Live Paint Bucket tool to fill objects that you’ve drawn or you can use it to fill
images that you created using the Live Trace tool. Either way, you begin by creating a Live Paint
group so that Illustrator knows which objects you want to modify.
To create a Live Paint group, use the Selection tool to select the object (or objects) that you want to
include in the group. Then click the selected object with the Live Paint Bucket tool. After an object
is part of a Live Paint group, Illustrator displays outlines around the detected regions as you move
the Live Paint Bucket tool over the group. If the Paint Strokes check box is selected in the Live
Paint Bucket Options dialog box, the Live Paint Bucket tool’s icon changes when the tool is over a
stroke. Clicking the Live Paint Bucket tool over a stroke fills the stroke with the current stroke
color. Figure 14.5 shows an entire illustration that’s been converted to a Live Paint group and then
selected.
FIGURE 14.5
This shows the result of converting an entire image to a Live Paint object.
You can also click a region in a Live Paint group by using the Live Paint Selection tool to pick up
the color from that region. You may, for example, decide that you want to pick up a color from
one area to use to fill several other areas to reduce the clutter in a vector image traced by the Live
Trace tool.
19_584750-ch14.indd 48819_584750-ch14.indd 488 6/3/10 7:59 PM6/3/10 7:59 PM
Chapter 14: Using Live Paint
489
Summary
The Live Paint Bucket tool provides you with a flexible vector-based paint tool that’s considerably
more powerful than the paint bucket tools you find in bitmap-image editors. In this chapter, you
learned the following:
l
The Live Paint Bucket tool is the replacement for the Paint Bucket tool found in early
versions of Illustrator.
l
Live Paint groups remain live so that any changes you make to the paths are reflected in
the fill you added using the Live Paint Bucket tool.
l
Live Trace objects must be converted to Live Paint groups before you can use the Live
Paint Bucket tool on them. This prevents you from making further modifications with the
Live Trace tool.
l
You can use the gap detection options to control how the Live Paint Bucket tool deals with
gaps in the paths.
l
You can choose to have the Live Paint Bucket tool paint fills, strokes, or both.
19_584750-ch14.indd 48919_584750-ch14.indd 489 6/3/10 7:59 PM6/3/10 7:59 PM
19_584750-ch14.indd 49019_584750-ch14.indd 490 6/3/10 7:59 PM6/3/10 7:59 PM
Part III
Mastering Illustrator
IN THIS PART
Chapter 15
Working with Graphic Styles
and Effects
Chapter 16
Creating 3-D in Illustrator
Chapter 17
Customizing and Automating
Illustrator
20_584750-pp03.indd 49120_584750-pp03.indd 491 6/3/10 8:00 PM6/3/10 8:00 PM
20_584750-pp03.indd 49220_584750-pp03.indd 492 6/3/10 8:00 PM6/3/10 8:00 PM
493
CHAPTER
Working with
Graphic Styles
and Effects
IN THIS CHAPTER
Working with graphic styles
Using the Appearance panel
Working with effects
Experiencing the new Scribble
effect
P
robably some of the most amazing illustrations you see in Illustrator
come from using graphic styles and effects. Graphic styles can increase
your productivity with any type of repeating symbol or set of attributes
that you use daily. Set as a style, you can use it over and over again.
Those of you looking to create special effects, look no further. In this chap-
ter, you discover when to use effects.
Along with effects, you also see a variety of artwork that combines effects
with graphic styles.
Understanding How
Graphic Styles Work
Graphic styles have brought Illustrator to the front of the pack in illustration
software. Graphic styles give you the ability to save all of an object’s attri-
butes in a panel. You can use the Graphic Styles panel to quickly add the
attributes, such as transparency, effects, strokes, and fills, to another object.
Creating a style is pretty darn easy. Simply create the look you want on an
object. Then, with your object selected, choose New Graphic Style from the
Graphic Styles panel’s popup menu. That’s it! Now you can use that style
anytime you want. It seems like a breeze, but before diving headfirst into the
Graphic Styles panel, first check out the Appearance panel.
The Appearance panel houses all the information about a selected object.
The information includes the stroke information, fill information, any effects
from the Effect menu, and transparency information. In the Appearance
panel, you can continually edit, rearrange, and delete this style information.
21_584750-ch15.indd 49321_584750-ch15.indd 493 6/3/10 8:01 PM6/3/10 8:01 PM
Part III: Mastering Illustrator
494
Note
You can’t apply graphic styles to type unless you change the type to outlines. For more on changing type to
outlines, see Chapter 9.
Using the Appearance panel
The Appearance panel shows all strokes, fills, transparency, multiple fills, and any effects or
transformations applied to that selected object. You open the Appearance panel by choosing
Window ➪ Appearance. Figure 15.1 shows the Appearance panel.
FIGURE 15.1
With an object selected, the Appearance panel displays that object’s information.
Visibility icon
Add new stroke
Expand contents
Add new fill
Delete selected item
Duplicate selected item
Clear appearanceAdd new effect
The panel area shows the sequential order of the attributes that make up the object. Each time you
add to the object, it becomes listed above the previous entry. With this stacking order, you can
drag other information, such as stroke weight, above or below the other entries, creating a different
look to the object.
The Appearance panel’s pop-up menu, as shown in Figure 15.2, has a few options from which to
choose. To access this menu, simply click the triangle on the upper right of the panel. Under this
menu, you can find the following: Add New Fill, Add New Stroke, Duplicate Item, Remove Item,
21_584750-ch15.indd 49421_584750-ch15.indd 494 6/3/10 8:01 PM6/3/10 8:01 PM
Chapter 15: Working with Graphic Styles and Effects
495
Clear Appearance, Reduce to Basic Appearance, New Art Has Basic Appearance, Hide Thumbnail,
Redefine Graphic Style, and Show All Hidden Attributes. Each of these items is discussed in detail
later in this chapter.
FIGURE 15.2
The Appearance panel’s pop-up menu gives you additional options.
Editing and adding strokes and fills
Editing an item is as easy as clicking. Click the item you want to edit and then make your changes,
and the object immediately updates to your edits. When you click an effect in the Appearance
panel, Illustrator displays the dialog box for that particular effect.
You can click a stroke or a fill in the Appearance panel and then make edits in the miniature Stroke
or Fill panel that opens, as shown in Figure 15.3. To edit a stroke or a fill, click one time in the
Appearance panel to select the stroke or fill and then change the color of the stroke or fill and the
stroke weight.
To edit the stroke weight and color by using the Appearance panel, follow these steps:
1. Select the object with the Selection tool. For more on the Selection tool, see Chapter 6.
2. In the Appearance panel, change the stroke weight by clicking and holding it and
then choose a new stroke width and other stroke attributes in the miniature
Stroke panel.
3. In the Appearance panel, choose a new color by clicking and holding the drop-
down arrow to display the Color/Swatch miniature panel, as shown in Figure 15.4.
The color is automatically updated for the object.
21_584750-ch15.indd 49521_584750-ch15.indd 495 6/3/10 8:01 PM6/3/10 8:01 PM
Part III: Mastering Illustrator
496
FIGURE 15.3
When you click a stroke or a fill in the Appearance panel, Illustrator displays a minia-
ture panel for it.
FIGURE 15.4
Clicking and holding the drop-down arrow on the stroke allows you to quickly change
its color.
Duplicating and removing items
Under the Appearance panel’s pop-up menu is a menu item you can use to remove an item — such
as the stroke or the fill — in the object’s list. Click the item to select it and then choose Remove Item
from the pop-up menu (or click the Delete Selected Item button at the bottom of the panel). The item
is removed from the list and the object. Use this to edit a preset style to customize it.
21_584750-ch15.indd 49621_584750-ch15.indd 496 6/3/10 8:01 PM6/3/10 8:01 PM
Chapter 15: Working with Graphic Styles and Effects
497
You can also duplicate an object in the Appearance panel. Select the item you want to duplicate in
the list in the Appearance panel and then choose Duplicate Item from the pop-up menu or click the
Duplicate icon at the bottom of the panel. This comes in handy when you want to use some of
the item’s attributes but not all. Duplicate the item and then edit it as you want.
Clearing an appearance
Clearing an appearance removes the effects and changes the stroke and fill to None. If there are
multiple fills or strokes, all are reduced to one stroke and one fill. You find the Clear Appearance
option in the popup menu.
Reducing to basic appearance
Choosing Reduce to Basic Appearance from the Appearance panel’s pop-up menu removes all but
one stroke and one fill and all the effects. The remaining stroke and fill are assigned the default
attributes (typically the bottommost stroke and fill color and the stroke weight of the bottommost
stroke). If you didn’t use a stroke, Illustrator reduces the object to the original fill color only.
Similarly, if you didn’t use a fill, Illustrator reduces the object to the original stroke color and
weight. Figure 15.5 shows the object before and after applying Reduce to Basic Appearance. The
end result looks a bit bland compared to the original.
FIGURE 15.5
The object on the left has all its graphic styles and attributes. The object on the right has been reduced to a
basic appearance.
21_584750-ch15.indd 49721_584750-ch15.indd 497 6/3/10 8:01 PM6/3/10 8:01 PM
Part III: Mastering Illustrator
498
Note
Reducing an object to the basic appearance is not the same as clearing the appearance. Clearing the appear-
ance removes all the attributes, while reducing to basic appearance only simplifies the object to a single stroke
and fill.
Showing and hiding Appearance panel attributes
Clicking the eyeball to the left of any Appearance panel attribute, such as fill, stroke, opacity, and
any applied effect, allows you to temporarily hide that attribute. Click it again to show the hidden
attribute.
Setting New Art preferences
If you select the New Art Has Basic Appearance option (from the Appearance panel’s pop-up
menu), all art created afterward has a basic appearance of a white fill and a black stroke. If you
don’t select this option, as shown in Figure 15.6, all art created after using a style has the appear-
ance of the last used style.
FIGURE 15.6
If the New Art Has Basic Appearance option isn’t selected, all new art has the same attributes as the last
style used.
Viewing thumbnails
In the Appearance panel, you have the option to view a small thumbnail of the selected object’s
style. The thumbnail appears in the upper left of the Appearance panel. If you don’t want to see
this little thumbnail, choose Hide Thumbnail from the Appearance panel’s pop-up menu. To see
the thumbnail again, choose Show Thumbnail from the menu. I can’t think of a good reason to
hide the thumbnail, but the option is available if you want to use it.
Redefining graphic styles
The Redefine Graphic Style option is available only when you apply one of the preset styles from
the Graphic Styles panel. When you use the Redefine Graphic Style option, your new changes
overwrite the original, and any objects that use that style immediately update to your new changes.
21_584750-ch15.indd 49821_584750-ch15.indd 498 6/3/10 8:01 PM6/3/10 8:01 PM
Chapter 15: Working with Graphic Styles and Effects
499
In order to redefine a graphic style, you must first select the style you want to redefine in the
Graphic Styles panel. Then, select an object that has the characteristics that you want to apply to
the style. Finally, choose Redefine Graphic Style from the Appearance panel’s pop-up menu.
Caution
Redefining a style completely replaces that style with the new style. The existing name is retained, but all other
attributes are replaced. Unless you’re absolutely sure that you want to replace all the style’s attributes, it’s
probably safer to simply create a new graphic style by using the Graphic Styles panel.
Working with the Graphic Styles panel
Now that you understand the Appearance panel, it’s time to dive headfirst into the Graphic Styles
panel. This magnificent little panel contains lots of creativity and amazing preset effects. The
Graphic Styles panel, as shown in Figure 15.7, has but a few buttons: Break Link to Graphic Style,
New Graphic Style, and Delete Graphic Style. You find the guts of the panel in the pop-up menu,
which you access by clicking the triangle on the upper right of the panel. The following sections
explain all the options found in the Graphic Styles panel’s pop-up menu.
FIGURE 15.7
The Graphic Styles panel allows you to create and use graphic styles.
Creating a new graphic style
Click the New Graphic Style button to make your selected object’s attributes into a new style in the
Graphic Styles panel. You can also create a new style by choosing New Graphic Style from the
popup menu in the Graphic Styles panel. To create a new style, follow these steps:
1. Create an object. For more on creating objects, see Chapter 5.
2. Add color to the fill and/or stroke, a stroke weight, and a dash pattern if desired.
3. Add effects from the Effect menu. You can include transformations, twists, distortions,
or anything you want.
4. After the object looks just right, select the whole object.
5. Choose New Graphic Style from the popup menu in the Graphic Styles panel. This
displays the Graphic Style Options dialog box, as shown in Figure 15.8, so that you can
name the new style. Clicking the New Graphic Style button bypasses the Graphic Style
Options dialog box (unless you Alt [Option]+click the button) and simply gives the new
style a default name of Graphic Style x, where x is a number starting with 1.
21_584750-ch15.indd 49921_584750-ch15.indd 499 6/3/10 8:01 PM6/3/10 8:01 PM
Part III: Mastering Illustrator
500
FIGURE 15.8
The Graphic Style Options dialog box allows you to name the new style.
6. Type a name for the New Graphic Style and then click OK. This adds the new style to
the Graphic Styles panel. The new graphic style now appears in the Graphic Styles panel.
7. You can apply that new graphic style to any object you create.
Tip
Another way to create a new graphic style is to drag the object thumbnail from the Appearance panel into the
Graphic Styles panel. This automatically creates a new graphic style. If you want to name it, you can either double-
click it in the Graphic Styles panel or select it and then choose Graphic Style Options from the pop-up menu.
Duplicating and merging graphic styles
Using the Graphic Styles panel’s pop-up menu, you can duplicate a style. Select a style in the panel
and then choose Duplicate Graphic Style from the pop-up menu in the panel. This creates a dupli-
cate swatch at the end of the list of graphic style swatches. Use this to alter and create your own
custom style. You use Duplicate Graphic Style to duplicate a default swatch so that you don’t over-
write the original swatch.
You can also take two different styles and combine them as one. Use the Merge Graphic Styles
command found in the Graphic Styles panel’s pop-up menu. To combine two or more graphic
styles, follow these steps:
1. Press and hold Shift.
2. Click the graphic styles that you want to combine in the Graphic Styles panel. To
select noncontiguous graphic styles, press Ctrl (Ô) instead of Shift.
3. Choose Merge Graphic Styles from the pop-up menu in the Graphic Styles panel.
The new combined graphic style is added to the end of the swatches in the Graphic Styles
panel.
Deleting a graphic style
To delete a graphic style, select the graphic style in the Graphic Styles panel and then choose
Delete Graphic Style from the pop-up menu. Alternatively, you can click the Delete button (the
trash icon) at the bottom of the panel. A warning message appears asking “Delete the Style
Selection?” Click Yes to delete the style or No to cancel the action.
21_584750-ch15.indd 50021_584750-ch15.indd 500 6/3/10 8:01 PM6/3/10 8:01 PM
Chapter 15: Working with Graphic Styles and Effects
501
Breaking the link to a graphic style
You use the Break Link to Graphic Style option to break the graphic style’s connection to the
object. The object retains the appearance of the graphic style, but changes to the graphic style’s
definition no longer alter the object’s appearance. A good use of this option is to find a graphic
style that you like but want to change. Fill an object with that graphic style, click the Break Link to
Graphic Style button, and then alter the object as you want. When you have an object as you like
it, you can turn its attributes into a new style. Another good use for this option is when you want
several objects to have the same basic style, but you want to make some subtle changes to some of
them. If you break the link to the style for the objects that you don’t want to change, you can
quickly modify the remaining objects simply by modifying the style.
Understanding the other Graphic Styles panel options
Choosing Select All Unused selects all graphic styles that aren’t used in the document. You can
then choose to delete the unused graphic styles from the Graphic Styles panel.
Sort by Name sorts the graphic style swatches alphabetically. You probably won’t find this very
useful unless you choose one of the list views.
In the Graphic Styles panel, you can choose how you view the graphic style swatches. Choosing
Thumbnail shows you a swatch of the graphic style. Choosing Small List View displays a small
swatch next to the name of the graphic style. The Large List View displays a larger swatch next to
the name of the graphic style.
The Override Character Color option overrides the object’s original color with the graphic style. If
you want to retain the original color qualities, deselect the Override Character Color option in the
Graphic Styles panel’s menu.
The Graphic Style Options lets you name or rename a graphic style swatch. You may not want to
rename the standard swatches because doing so makes it harder to remember if you have a particu-
lar swatch open when you’re looking at the names in a library.
Opening and saving Graphic Style Libraries
After you create a bunch of cool styles, you should save them as a library for future use. To save a
Graphic Style Library, follow these steps:
1. Choose Save Graphic Styles as Library from the Graphic Styles panel’s pop-up
menu. The Save Graphics Styles as Library dialog box, as shown in Figure 15.9, opens.
(Your dialog box may look a little different if you choose to display the standard dialog
box instead of the Adobe dialog box.)
2. Type a name for the library in the File name (Save As) text box.
3. Click Save to save the file.
21_584750-ch15.indd 50121_584750-ch15.indd 501 6/3/10 8:01 PM6/3/10 8:01 PM
Part III: Mastering Illustrator
502
FIGURE 15.9
Use the Save Graphics Styles as Library dialog box to save your graphic styles in your
own library.
To open a saved library, follow these steps:
1. Choose Other Library from the Open Graphic Style Library under the Graphic
Styles panel’s pop-up menu. The Open dialog box opens.
2. Choose the saved file.
3. Click Open to open the library file.
Using Effects
Effects are an intense set of commands. They apply their magic to any of the appearance attributes.
Effects are fully editable at any time, and any effect you apply shows up in the Appearance panel,
where you can also edit any of the applied effects.
To quickly apply the last used effect to another object, choose Effect ➪ Apply Last Effect or press
Ctrl+Shift+E (Ô+Shift+E). If you like the effect but want to change some of the parameters, choose
Effect ➪ Last Effect or press Ctrl+Shift+Alt+E (Ô+Shift+Option+E).
Effects aren’t limited to vector-based objects. You can also apply effects to raster images.
New in CS5
Finally, after six versions of effects, Illustrator does not change the appearance of raster-based effects (like
Drop Shadow, Glow, and Feather). In the past, effects would appear smaller as the resolution of the effect
increased. Now, however, the effect appears the same in the same area, just with better resolution.
21_584750-ch15.indd 50221_584750-ch15.indd 502 6/3/10 8:01 PM6/3/10 8:01 PM
Chapter 15: Working with Graphic Styles and Effects
503
Understanding 3-D effects
One of the biggest features in Illustrator is three-dimensional abilities. Because this is such a cool
and intense feature, it’s covered in its own chapter.
Cross-Reference
For more on creating 3-D effects, see Chapter 16.
Using Convert to Shape effects
The Convert to Shape effects take any selected object and fit it into a rectangle, a rounded rectan-
gle, or an ellipse. The Convert to Shape effect puts a frame around your selected object. The frame
is in one of the shapes that you choose (rectangle, rounded rectangle, or ellipse). Convert to Shape
creates a new shape based on the original object’s dimensions. Setting a negative value in the rela-
tive area decreases the size of the frame, and a positive number increases the size of the frame rela-
tive to the original size. To set the new size of the shape, type the height and width values.
Figure 15.10 shows the Shape Options dialog box that opens when you choose any of the Convert
to Shape effects. In this dialog box, you can choose the type of shape that you want to create from
the Shape drop-down list (pop-up menu). You can also choose to create a shape that’s set to a spe-
cific size by clicking the Absolute radio button or a shape that’s resized by clicking the Relative
radio button. The Corner Radius text field is used to specify the amount of corner-rounding for
rounded rectangles.
Figure 15.11 shows an example of applying the Effect ➪ Convert to Shape ➪ Ellipse command to a
star-shaped object. In this example, the Relative option was used, and 18 extra points were added
to both the height and width.
FIGURE 15.10
Use the Shape Options dialog box to specify how the Convert to Shape effects function.
21_584750-ch15.indd 50321_584750-ch15.indd 503 6/3/10 8:01 PM6/3/10 8:01 PM
Part III: Mastering Illustrator
504
FIGURE 15.11
The original shape (left) and the shape that results from applying the Convert to Shape effect (right)
Distorting and transforming effects
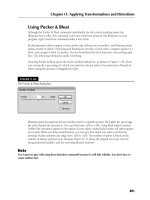
The Distort & Transform effects include Free Distort, Pucker & Bloat, Roughen, Transform,
Tweak, Twist, and Zig Zag. You may wonder why Transform effects appear in the Effect menu
when you can do transformations in the Object menu. The big reason for applying a transforma-
tion under the Effect menu is that you can go back and edit that particular transformation at any
time.
Cross-Reference
For more on distortions and transformations, see Chapter 11.
Creating Path effects
The Path effects that you can apply are Offset Path, Outline Object, and Outline Stroke. As with
the Transform options, the Path options are the same as under the Object menu. The Path effects
under the Effect menu are exactly the same as under the Object menu, except that the effects are
live and editable at any time. This means that you can go back at any time and change any of the
Path effects that you’ve applied.
Cross-Reference
For more on Path effects, see Chapter 6.
21_584750-ch15.indd 50421_584750-ch15.indd 504 6/3/10 8:01 PM6/3/10 8:01 PM
Chapter 15: Working with Graphic Styles and Effects
505
Understanding the Rasterize effect
The Rasterize effect has the same effect as the Object ➪ Rasterize menu command, but when
applied as an effect, you can easily remove it at a later time by using the Appearance panel.
The Photoshop effects are on the bottom half of the Effect menu. These effects can be applied only
to a rasterized image. To use these effects, first choose Effect ➪ Rasterize to display the Rasterize
dialog box, as shown in Figure 15.12.
In the Rasterize dialog box, you can set the resolution (from low to high or set your own). Choose
from white or transparent background and the type of anti-aliasing. Other options are clipping
mask or adding space around the object.
FIGURE 15.12
The Rasterize dialog box allows you to convert objects to raster objects by using an effect that can be
edited later.
21_584750-ch15.indd 50521_584750-ch15.indd 505 6/3/10 8:01 PM6/3/10 8:01 PM
Part III: Mastering Illustrator
506
Stylizing effects
Under the Stylize effects are options that you can use to embellish paths and add effects to objects.
The Stylize options are Add Arrowheads, Drop Shadow, Feather, Inner Glow, Outer Glow, Round
Corners, and Scribble.
Using the Add Arrowheads effect
The Add Arrowheads effect is a boon to technical artists, sign makers, and anyone in need of a
quick arrow. The number one complaint about the Add Arrowheads effect is that Illustrator offers
too many arrowheads from which to choose. Some complaint!
Choose Effect ➪ Stylize ➪ Add Arrowheads to add an arrowhead (or two) to any selected open
path. If more than one path is selected, arrowheads are added to each open path. To use Add
Arrowheads, select an open path and then choose Effect ➪ Stylize ➪ Add Arrowheads to display the
Add Arrowheads dialog box, as shown in Figure 15.13. In this box, you can pick which of the 27
different arrowheads you want to stick on the end of your path. Scale refers to the size of the
arrowhead relative to the stroke weight of the path; you can type any number between 1% and
1000% in this box. Choosing Start places the arrowhead at the beginning of the path (where you
first clicked to draw it); choosing End places the arrowhead at the end of the path (where you last
clicked to draw it); and choosing Start and End places the same arrowhead on both the beginning
and end of the path. Reapplying this effect to the same paths continues to put arrowheads on top
of arrowheads.
Figure 15.14 shows customized arrowheads created in Illustrator.
FIGURE 15.13
Use the Add Arrowheads dialog box to add markers to one or both ends of a path.
21_584750-ch15.indd 50621_584750-ch15.indd 506 6/3/10 8:01 PM6/3/10 8:01 PM