adobe InDesign CS5 Bible for dummies PHẦN 8 docx
Bạn đang xem bản rút gọn của tài liệu. Xem và tải ngay bản đầy đủ của tài liệu tại đây (1.16 MB, 46 trang )
Part VI
Getting Down to
Business
26_614495-pp06.indd 30126_614495-pp06.indd 301 4/2/10 1:46 PM4/2/10 1:46 PM
In this part . . .
M
icrosoft Word, move over. It used to be that a
word processor did all the business-y stuff like
footnotes, tables, tables of contents, indexes, and mail-
merges. Not anymore. Over the years, like a slow-moving
movie monster nonetheless catching up with the terror-
ized teens, more and more of these business functions
have found their way into InDesign. This version, InDesign
CS5, has even more such features, such as tracked
changes.
This part shows you how to suit up your documents. But
relax — you’ll still be a designer at heart!
26_614495-pp06.indd 30226_614495-pp06.indd 302 4/2/10 1:46 PM4/2/10 1:46 PM
Chapter 18
Working with Tabs and Tables
In This Chapter
▶ Working with tabs
▶ Setting up and adjusting tables
▶ Formatting tables directly and with styles
▶ Turning tabbed text to tables, and vice versa
P
erhaps the most common business-oriented formatting done in InDesign
involves tabular material, whether financial tables or simple compara-
tive feature lists. InDesign provides two methods for creating tabular mate-
rial: old-fashioned tabs and more sophisticated tables. Although you can
create tables with tabs, you have less control over the formatting and thus
can create just basic tables when you use tabs. On the other hand, for simple
tables, using tabs is often the faster method. So don’t feel you should never
use tabs — but do be sure that when you mix methods that you don’t let
visual consistency suffer as a result.
Tabs and tables in InDesign work somewhat like the same functions in
Microsoft Word, so if you’re familiar with Word’s tabs and tables, you’ll have
a quick adjustment to InDesign’s, at least for the basic capabilities.
Setting Tabs
To set tabs in InDesign, you use the Tabs panel, which floats above your text
so that you can keep it open until you’re finished experimenting with tabs. To
open the Tabs panel, choose Type➪Tabs (Shift+Ô+T or Ctrl+Shift+T). Figure
18-1 shows the Tabs panel along with a simple table created using one tab
stop.
27_614495-ch18.indd 30327_614495-ch18.indd 303 4/2/10 1:48 PM4/2/10 1:48 PM
304
Part VI: Getting Down to Business
You can also set up tabs in the Tabs pane of the New Paragraph Styles and
Paragraph Style Options dialog boxes, so tabs are consistently applied to all
paragraphs. Chapter 13 covers styles in more detail.
Four buttons — Left, Center, Right, and Align On — on the Tabs panel let
you control how the text aligns with the tab you’re creating. The Align On
option is usually used for decimal tabs, which means that a period in the text
aligns on the tab stop. But you can align on any character, not just periods —
simply specify the align-on character in the Align On field. (If you enter noth-
ing in the Align On field, InDesign assumes that you want to align to periods.)
If the Align On field isn’t visible in the Tabs panel, just widen the panel by
dragging one of its sides so that the field displays.
The X: field of the Tabs panel lets you specify a position for a new tab stop.
You can type a value in this field in 0.01-point increments and then press
Shift+Enter or Shift+Return to create a tab. InDesign positions tabs relative to
the left edge of the text frame or column.
Rather than typing values in the X: field, you can position tabs by clicking at
the desired location on the ruler at the bottom of the Tabs panel. You can
also drag tab stops within the ruler to change their position. And you can
reposition left and right indents and indent hangs using the arrow sliders on
the tab ruler. (The arrow sliders have the same effects as changing indents
using the Paragraph panel or Paragraph Styles panel, as explained in
Chapter 14.)
To have the Tabs panel “snap” to your text frame so that you can see exactly
where the tab stops will be, click the Position Panel Above Text Frame iconic
button (the magnet icon).
If you need a tab flush with the right margin — for example, to position a ding-
bat at the end of the story — press Shift+Tab. You don’t need to use the Tabs
panel.
Figure 18-1:
The Tabs
panel, its
flyout menu,
and a table
created
using tab
settings.
27_614495-ch18.indd 30427_614495-ch18.indd 304 4/2/10 1:48 PM4/2/10 1:48 PM
305
Chapter 18: Working with Tabs and Tables
InDesign lets you specify up to eight characters, including special characters,
that will repeat to fill any white space. These repeating characters are called
leaders. When you set a leader for a tab stop, the leaders actually fill any
space prior to that tab stop (between the preceding text and the tab loca-
tion). To spread out the leader characters, type spaces between the charac-
ters you enter. Don’t enter spaces before and after a single character (unless
that’s the look you’re going for), though, as that will result in two spaces
between the characters when the pattern repeats.
In addition to setting tabs in the Tabs panel, InDesign provides four addi-
tional options through its flyout menu: Clear All, Delete Tab, Repeat Tab, and
Reset Indents.
✓ The Clear All command deletes any tabs you’ve created, and any text
positioned with tabs reverts to the position of the default tab stops.
(You can delete an individual tab stop by dragging its icon off the ruler.)
✓ The Delete Tab command deletes the currently selected tab. (Just click
it in the tab ruler.)
You can also delete tabs by dragging them off the tab ruler using the
mouse.
✓ The Repeat Tab command lets you create a string of tabs across the
ruler that are all the same distance apart. When you select a tab on
the ruler and choose this command, InDesign measures the distance
between the selected tab and the preceding tab (or, if it’s the first tab on
the ruler, the distance between the selected tab and the left indent/text
inset). The program then uses this distance to place new tabs, with the
same alignment, all the way across the ruler. InDesign repeats tabs only
to the right of the selected tab, but it inserts tabs between other tab
stops.
✓ The Reset Indents command removes any changes to the left indent,
right indent, or indent hang settings made in the Tabs panel using the
arrow sliders, and reverts to the indents defined in the paragraph style
currently applied to the text.
Setting Up Tables
You can create tables using tabs, but the more complex the table, the more
work that requires. So make your life easier and use InDesign’s table editor,
which lets you specify almost any attribute imaginable in a table through the
Table panel and the Table menu.
27_614495-ch18.indd 30527_614495-ch18.indd 305 4/2/10 1:48 PM4/2/10 1:48 PM
306
Part VI: Getting Down to Business
InDesign lets you import tables from Microsoft Word, RTF, and Microsoft
Excel files, including some of their cell formatting. Likewise, you can convert
their tables to tabbed text by using the options in the Import Options dialog
box that is accessible when you place a file through the Place dialog box
(File➪Place [Ô+D or Ctrl+D]), as covered in Chapter 11.
You can edit tables’ contents in the Story Editor view (see Chapter 12).
To create a table in InDesign, follow these steps:
1. Create or select a text frame with the Type tool and then choose
Table➪Insert Table (Option+Shift+Ô+T or Ctrl+Alt+Shift+T).
If you select an existing text frame, the table is inserted at the cursor’s
location in the existing text.
The Insert Table dialog box appears.
2. Type the number of body rows and columns and the number of
header and footer rows.
Header and footer rows repeat on each page for tables that go across
multiple pages
3. Click OK to have InDesign create the basic table.
The table is set as wide as the text frame. The depth is based on the
number of rows, with each row defaulting to the height that will hold
12-point text.
You can also apply a table style to the new table by selecting one from the
Table Style pop-up menu. I cover how to create these styles in the “Using
table and cell styles” section, later in this chapter.
With the basic table in place, you now format it using the Table panel and
the Table menu. In both, you can increase or decrease the number of rows
and columns, set the row and column height, set the text’s vertical alignment
within selected cells (top, middle, bottom, and justified), choose one of four
text-rotation angles, and set the text margin within a cell separately for the
top, bottom, left, and right. Note that all the Table panel’s options affect only
the currently selected cells, except for the Number of Rows and Number of
Columns fields. Figure 18-2 shows the Table panel and its flyout menu, as well
as an example table created using these tools.
If you have a smallish monitor, set at 1024 by 768 pixels — the norm for a
17-inch display — the Table, Table Styles, and Cell Styles panels may be shoved
to the bottom of the panel dock, and, when they’re selected, the only things
you see are their panel tab and flyout menu icon. You have a few choices:
27_614495-ch18.indd 30627_614495-ch18.indd 306 4/2/10 1:48 PM4/2/10 1:48 PM
307
Chapter 18: Working with Tabs and Tables
Shorten other panel groups in the dock to make room for them, remove other
panel groups to make room for them, or drag them out of the dock and make
them floating.
Figure 18-2:
The Table
panel and
its flyout
menu, with
an example
table.
You set cell text’s horizontal alignment using the paragraph formatting con-
trols (see Chapter 14). You can apply character formatting to cell text (see
Chapter 15). You can also apply tabs within cells using the Tabs panel covered
in the “Setting Tabs” section, earlier in this chapter.
To add items to a table, you can type text in any cell, paste text or graphics
into a cell, or place text or graphics into a cell by choosing File➪Place (Ô+D
or Ctrl+D). Note that any tabbed text pasted into a cell retains the tabs, with
all the text pasted into the same cell — InDesign doesn’t look at those tabs
and assume that you wanted the tabbed text converted into multiple cells.
To insert a tab character into a table cell, don’t press Tab — that just
advances you to the next cell. Instead, choose Type➪Insert Special
Character➪Other➪Tab.
Adjusting tables
InDesign lets you add and delete rows and columns, as well as split and join
cells using the Insert, Delete, Merge, and Split commands in the Table menu
and in the Table panel’s flyout menu. You can also select rows, columns, and
entire tables using the Table menu. Several shortcuts, shown in Table 18-1,
speed things along if you’re a keyboard-oriented person.
These commands work intuitively, so I won’t bore you with detailed expla-
nations here. For example, to delete a row, select it or a cell within it using
the Type tool and then choose Table➪Delete➪Row. To split a cell vertically,
select the cell and choose Table➪Split Cell Vertically. You get the idea.
27_614495-ch18.indd 30727_614495-ch18.indd 307 4/2/10 1:48 PM4/2/10 1:48 PM
308
Part VI: Getting Down to Business
Table 18-1 Table-Editing Shortcuts
Command Macintosh Shortcut Windows Shortcut
Select cell
Ô+/
Ctrl+/
Select row
Ô+3
Ctrl+3
Select column
Option+Ô+3
Ctrl+Alt+3
Select table
Option+Ô+A
Ctrl+Alt+A
Insert column
Option+Ô+9
Ctrl+Alt+9
Insert row
Ô+9
Ctrl+9
Delete column Shift+Delete Shift+Backspace
Delete row
Ô+Delete
Ctrl+Backspace
Formatting tables
For more sophisticated table attributes, use the Table Options dialog box
and its five panes. (Choose Table➪Table Options and then the desired pane
from the submenu. To go straight to the Table Setup pane, you can also just
press Option+Shift+Ô+B or Ctrl+Alt+Shift+B.) You see the Table Setup pane,
shown in Figure 18-3. If you want to go straight to one of the four other panes,
you can do so by choosing the desired pane in the submenu after choosing
Table➪Table Options.
When formatting tables, take advantage of the Preview option in most dialog
boxes to see the effects of your changes before committing to them.
If you select more than one cell — meaning the entire cell, not just some of its
contents — the Control panel’s options change to display many of the con-
trols available in the Table panel, as well as some cell-oriented controls, such
as setting cell boundary line weights and line types.
Here are some of the basics to keep in mind:
✓ The Table Setup pane lets you change the number of rows and columns,
as well as footer rows and columns. You also can specify the table
border, color, line type, and even tint. Use the Table Spacing options to
have space automatically added before and after a table that is in the
same text frame as other text.
27_614495-ch18.indd 30827_614495-ch18.indd 308 4/2/10 1:48 PM4/2/10 1:48 PM
309
Chapter 18: Working with Tabs and Tables
Figure 18-3:
The Table
Setup pane
of the Table
Options
dialog box.
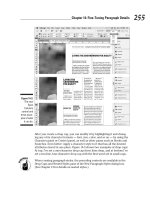
✓ The Row Strokes pane lets you decide how often rows have an alter-
nating pattern of strokes applied to them. For example, you may want
every third row to have a thicker stroke than the first and second rows,
because each set of three rows is related to each other and the third
row marks the end of that set. You choose how many rows you want
the special stroke to skip before being applied in the Alternating Pattern
pop-up menu and then use the rest of the controls to choose the stroke
weight, color, type, and so on.
✓ The Column Strokes pane works just like the Row Strokes pane, except it
lets you alternate the strokes across columns rather than rows.
✓ The Fills pane (shown in Figure 18-4) works like the Row Strokes pane
and Column Strokes pane, except that it applies a fill to the cells in the
specified series of rows or columns. The reason that there is just one
pane for fills but two for strokes is that you can’t have both row fills and
column fills automatically applied to the same table — that would usu-
ally make for a hard-to-read checkerboard. Of course, you can use hori-
zontal fills to accentuate rows and use strokes on columns to help keep
them visually separate.
✓ The Headers and Footers pane lets you change the number of header
and footer rows — just like the Table Setup pane — but it also lets you
control how often the header and/or footer rows repeat: Every Text
Column, Once Per Frame, or Once Per Page.
27_614495-ch18.indd 30927_614495-ch18.indd 309 4/2/10 1:48 PM4/2/10 1:48 PM
310
Part VI: Getting Down to Business
Figure 18-4:
The Fills
pane of
the Table
Options
dialog box.
InDesign also provides formatting controls over cells, using the Cell Options
dialog box. (Choose Table➪Cell Options and then one of the four desired
panes: Text, Strokes and Fills, Rows and Columns, and Diagonal Lines. You
can go straight to the Text pane by pressing Option+Ô+B or Ctrl+Alt+B.)
After you selected the cells you want to format, use the various panes as
desired:
✓ The Text pane works very much like the General pane of the Text Frame
Options dialog box (see Chapter 11). Here, you set how far text is inset
from the cell boundaries, how text is vertically aligned within the cell,
and where the text baseline begins within the cell. Unique to cells, you
can also specify whether the cell grows to fit the text automatically (by
unchecking Clip Contents to Cell) and the degree of text rotation (0, 90,
180, and 270 degrees).
✓ The Strokes and Fills pane, shown in Figure 18-5, lets you set the stroke
and fill for selected cells. You can select which cell boundaries to apply
a stroke to, by selecting the sides from the preview image at the top of
the pane and then choosing the desired options. You can also set the
desired fill color and tint.
✓ The Rows and Columns pane lets you set the row height, including its
maximum for rows that are allowed to expand automatically as speci-
fied in the Text pane, as well as the column width. You also can specify
which rows must be kept together and if certain rows should start at a
new page, frame, or column.
You can also adjust column and row heights by dragging on the row and
column boundaries with the mouse.
27_614495-ch18.indd 31027_614495-ch18.indd 310 4/2/10 1:48 PM4/2/10 1:48 PM
311
Chapter 18: Working with Tabs and Tables
✓ The Diagonal Lines pane lets you place three types of diagonal lines
within cells — upper left to lower right, lower right to upper left, or
both — and then specify the stroke weight, type, color, and tint. You
can also choose whether the diagonal lines overprint the cell contents
or vice versa. To remove a diagonal line, just click the No Diagonal Lines
iconic button.
Figure 18-5:
The Strokes
and Fills
pane of the
Cell Options
dialog box.
Using table and cell styles
To make it easy to apply and update table formatting across a document,
InDesign lets you create and apply table and cell styles. They work like para-
graph, character, and object styles, taking the table formatting features cov-
ered in the preceding section and bringing them together into the New Table
Style and New Cell Style dialog boxes.
To work with table styles, open the Table Styles panel by choosing Window➪
Styles➪Table Styles. To work with cell styles, open the Cell Styles panel by
choosing Window➪Styles➪Cell Styles. Choose New Table Style or New Cell
Style from the appropriate panel’s flyout menu and then use the various
panes to specify the desired formatting. The panes, and their options, are the
same as described in the preceding section, “Formatting tables.” Figure 18-6
shows the New Table Style dialog box’s General pane.
27_614495-ch18.indd 31127_614495-ch18.indd 311 4/2/10 1:48 PM4/2/10 1:48 PM
312
Part VI: Getting Down to Business
Whether creating a new table style or a new cell style, the easiest method is to
format an existing table or cell the way you want it, select it, and then create a
new table or cell style — InDesign picks up the existing formatting for the new
style. Otherwise, you have to specify everything in the New Table Style or New
Cell Style dialog box, where it’s harder to see the effects of your settings.
(Even if you enable the Preview option, the dialog boxes are fairly large and
tend to obscure most of your document.)
Figure 18-6:
The General
pane of the
New Table
Styles dia-
log box.
Keep in mind a few notes about creating table and cell styles — in the
General pane of the New Table Style and New Cell Style dialog boxes — that
you should know before getting too far into them:
✓ You give each style its own name. Choose names that will make sense a
week or a month later so that you know what they’re meant to be used for!
✓ You can base a new table style on an existing one, so changes to the
parent style are automatically reflected in the children styles based on it.
✓ You can assign a keyboard shortcut to styles you use frequently.
When creating table styles, you can also have the table style automati-
cally apply the cell styles of your choosing to the following table elements:
header rows, footer rows, body rows, the leftmost column, and the rightmost
column.
When creating cell styles, you can choose a paragraph style to be automati-
cally applied to text in cells using the style.
To apply styles to selected tables or cells, just choose the desired style from
the Table Style or Cell Style panel. To override existing formatting, use the
options indicated for paragraph and character styles described in Chapter 13.
27_614495-ch18.indd 31227_614495-ch18.indd 312 4/2/10 1:48 PM4/2/10 1:48 PM
313
Chapter 18: Working with Tabs and Tables
Modifying and managing
table and cell styles
To modify styles, double-click the style name in the Table Styles or Cell Styles
panel to open the Table Style Options or Cell Style Options dialog box, which
is identical to the New Table Styles or New Cell Styles dialog box explained in
the preceding section. Make your changes, click OK, and your styles and all
tables and cells using them are instantly updated!
InDesign also lets you manage your styles, such as creating groups of styles
to keep them better organized, and bringing in styles from other documents.
Because these features work the same for paragraph and character styles as
well, I cover them in Chapter 13.
Converting Tabs to Tables (and Back)
Often, you’ll have a table done using tabs — whether imported from a word
processor or originally created in InDesign with tabs — that you want to
convert to a real InDesign table. All you have to do is select the tabbed text
you want to convert using the Type tool and choose Table➪Convert Text to
Table.
In the Convert Text to Table dialog box, you can choose a Column Separator
(Tab, Comma, Paragraph, or a text string you type in the field) or a Row
Separator (same options). Although most textual data uses tabs to separate
columns and paragraphs to separate rows, you may encounter other data
that uses something else. For example, spreadsheets and databases often
save data so that commas, rather than tabs, separate columns. That’s why
InDesign lets you choose the separator characters before conversion.
During the conversion, InDesign formats the table using the standard set-
tings, using the current text formatting and the default cell insets and
stroke types. You can then adjust the table using the tools covered in the
“Formatting tables” section, earlier in this chapter. Note that the conversion
treats all rows as body rows.
You can also convert a table to text by selecting multiple cells or an entire
table and choosing Table➪Convert Table to Text. InDesign presents the same
options as it does in the Convert Text to Table dialog box so that you can
determine how the converted data appears.
27_614495-ch18.indd 31327_614495-ch18.indd 313 4/2/10 1:48 PM4/2/10 1:48 PM
314
Part VI: Getting Down to Business
27_614495-ch18.indd 31427_614495-ch18.indd 314 4/2/10 1:48 PM4/2/10 1:48 PM
Chapter 19
Working with Footnotes,
Indexes, and TOCs
In This Chapter
▶ Keeping track of details with footnotes
▶ Adding indexes
▶ Generating tables of contents
M
any business documents — books, reports, white papers, and so
on — use features traditionally associated with academic book
publishing: footnotes to cite sources, indexes to provide a map to specific
content’s location in the document, and tables of contents (TOCs) to provide
an overview of the document’s structure and contents.
When you’re working on any type of document — a report, a magazine, a
textbook — you can easily spend more time manually creating tables of con-
tents, keeping footnotes updates, and laboriously managing indexes than you
spend designing the publication. InDesign helps reduce this labor while also
ensuring that your footnotes, indexes, and tables of contents stay automati-
cally updated as your document is revised.
You can extend the power of these tools to book-length projects composed of
multiple InDesign documents (see Chapter 21), creating consistent indexing
and tables of contents in one fell swoop.
Adding Footnotes
Many documents, including academic and technical documents, use foot-
notes. InDesign lets you add footnotes to your document with very little fuss.
You can import footnotes from Microsoft Word files (see Chapter 11), or you
can add footnotes directly in InDesign. With the text-insertion cursor in your
text where you want the footnote marker to appear, choose Type➪Insert
Footnote to add a footnote to the bottom of the column that contains the
28_614495-ch19.indd 31528_614495-ch19.indd 315 4/2/10 1:47 PM4/2/10 1:47 PM
316
Part VI: Getting Down to Business
footnote marker, as shown in Figure 19-1. You need to manually enter the text
that will go with each numbered footnote, but InDesign updates the footnote
numbering as you add and delete footnotes.
You can’t insert footnotes into tables. But you can simulate footnotes by
adding a superscripted footnote character in the table text and typing your
footnote text below the table — note this “footnote” isn’t linked to the text,
doesn’t renumber automatically as a real footnote would, and can’t be format-
ted with InDesign’s footnote formatting controls.
Figure 19-1:
Inserting
a footnote
(shown
below the
first
column).
You can control much of the appearance of footnotes by choosing Type➪
Document Footnote Options to open the Footnote Options dialog box, shown
in Figure 19-2.
The Numbering and Formatting pane controls the formatting of the footnote text
and footnote character in the current InDesign document. The Layout pane con-
trols the placement of the footnote relative to the rest of the document.
Among the features you should note in the Numbering and Formatting
pane are
✓ Choose the numbering style — such as 1, 2, 3, 4 … or I, ii, iii, iv … — via
the Style pop-up menu.
✓ Control whether the footnote numbers start anew (such as at the begin-
ning of a section) or continue from the preceding number via the Start
At field.
✓ Control whether numbering automatically resets every page, spread, or
section via the Restart Numbering Every pop-up menu.
✓ Add a prefix and/or suffix to your footnote numbers via the Prefix and
Suffix fields. Note the unnamed pop-up menus that let you add special
characters such as a thin space or bracket.
28_614495-ch19.indd 31628_614495-ch19.indd 316 4/2/10 1:47 PM4/2/10 1:47 PM
317
Chapter 19: Working with Footnotes, Indexes, and TOCs
✓ Use the Position and Character Style options in the Footnote Reference
Number in Text subsection to determine how the footnote characters
appear in text.
✓ Similarly, use the Paragraph Style and Separator options in the Footnote
Formatting subsection to determine how the footnote text appears.
(Note that any Separator options will display after any Suffix options
chosen.)
Figure 19-2:
The
Footnote
Options
dialog box’s
two panes.
Among the features to note in the Layout pane are
✓ Set the preferred spacing for the footnote text in the Spacing Options
section.
✓ Convert Word’s endnotes (which appear at the end of a story) to
InDesign footnotes (which appear in the column or page that the foot-
note reference occurs in) by checking the Place End of Story Footnotes
at Bottom of Text option.
✓ Control whether footnotes can break across columns via the Allow Split
Footnotes option. Enabling this option can improve the layout when you
have long footnotes that otherwise eat up a column of text.
✓ Control the ruling line above footnotes using the Rule Above options.
They work like the paragraph rules (see Chapter 14).
28_614495-ch19.indd 31728_614495-ch19.indd 317 4/2/10 1:47 PM4/2/10 1:47 PM
318
Part VI: Getting Down to Business
To change these settings for future documents, open the dialog box while no
document is open and set your new defaults.
Creating Indexes
When trying to locate information in a book, nothing is as wonderful as a
good index. Once upon a time, book indexing was a labor-intensive process
involving piles of index cards. InDesign makes indexing much easier, while
still allowing you to make key decisions about how the index is formatted.
But be warned: Indexing is complicated business and is, by and large, an
expert feature. I cover just the basics here.
Choosing an indexing style
Before you begin indexing your document, ask yourself the following
questions:
✓ Do you want to initial-cap all levels of all entries, or do you just want
sentence case?
✓ Should index headings appear in boldface?
✓ What type of punctuation will you use in your index?
✓ Will you capitalize secondary entries in the index?
✓ Should the index be nested or run-in style? (A nested index is an
indented list, with each entry on its own line. A run-in index puts all
related entries in one paragraph, separated by semicolons.)
After you make these decisions, making a small dummy index is a good idea.
From the dummy, create a master page for index pages, paragraph styles
for index headings (the letters A, B, C, and so on), paragraph styles for each
level of the index (including indents as appropriate), and character styles for
any special formatting you want on page numbers or cross-reference text.
InDesign doesn’t do any of these tasks for you.
Inside the Index panel
When you want to index a chapter or document, open the Index panel by
choosing Window➪Type & Tables➪Index (Shift+F8). Use this panel to add
words to the index in up to four indent levels, edit or delete index entries, or
create cross-references. The Index panel is shown in Figure 19-3.
28_614495-ch19.indd 31828_614495-ch19.indd 318 4/2/10 1:47 PM4/2/10 1:47 PM
319
Chapter 19: Working with Footnotes, Indexes, and TOCs
Figure 19-3:
Left: The
Index panel
and its fly-
out menu.
Right: The
New Page
Reference
dialog box.
Two radio buttons appear at the top of the Index panel: Reference and
Topic. You use Reference mode to add and edit entries from selected text.
(Although it’s a well-intentioned feature meant to help standardize index
entries, the Topic mode’s use isn’t intuitive, and most indexers simply ignore
it and add entries manually from selected text or type phrases into the Index
panel in Reference mode. You should ignore it, too.)
Select the Book check box if you’re creating an index for multiple chapters in a
book (see Chapter 21). You must have a book open for this option to be avail-
able. If you have a book open and don’t select the Book check box, the index is
saved with the current document and not opened when you open other chap-
ters of the book.
Adding index items via the Index panel
To add entries to the index, be sure the Type tool is active and then choose
New Page Reference from the Index panel’s flyout menu (Ô+7 or Ctrl+7) to
get the dialog box shown in Figure 19-3.
If the Type tool isn’t active when you open the dialog box, the flyout menu
option is called New Cross-Reference instead, letting you add a cross-refer-
ence entry to the index. The resulting New Cross-Reference dialog box is iden-
tical to the New Page Reference dialog box, except the various options default
to ones appropriate for a cross-reference.
Here’s how the controls work:
✓ If you selected text first in your document, the text is entered automati-
cally into Topic Level 1. Otherwise, type the text that you want to add
to the index. In Figure 19-3, you can see that I typed Windows Media
Center. The text is added to the Topic list and to the list of index entries.
28_614495-ch19.indd 31928_614495-ch19.indd 319 4/2/10 1:47 PM4/2/10 1:47 PM
320
Part VI: Getting Down to Business
✓ You can enter text that controls how the entry is sorted in the Sort By
column. For example, if the selected text you’re indexing is The X-Files,
but you want it sorted as if it were X-Files, The (so it appears with the X
entries in the index), enter X-Files, The in the Sorted By column. This
technique is also handy for names, such as indexing Barack Obama as
Obama, Barack by entering Obama, Barack in the Sorted By column.
✓ If you want a more complex index, you may want to use some or all of
the four possible entry levels. You may want an index entry to appear
under a higher-level topic. For example, you may want Border Collies
to appear in the index under Herding Dogs, in which case you’d enter
Herding Dogs in the Topic Level 1 field and Border Collies in the Topic
Level 2 field. Or you may want Collies in the Topic Level 1 field and then
Border in the Topic Level 2 field, because you plan on listing the differ-
ent varieties of collies under one Level 1 index entry, with the varieties
listed within that entry as Level 2 subentries.
✓ Use the Type pop-up menu to determine the page entries for the index
entry. For example, if you select To End of Section, the page numbers for
the selected text in the index cover the range from the index entry to the
end of the section it’s in.
✓ To add just the selected text as an index entry, click Add. (If no text is
selected, the text is added to the Topic list, but no index entry appears
for it.) To add all occurrences of the text in the book, click Add All.
✓ To change previously defined index entries, select an entry and then
choose Page Reference Options in the Index panel’s flyout menu.
✓ At the bottom of the New Page Reference dialog box is a list of letters as
well as the entry Symbols (where entries that begin with numbers and
other nonletter characters will be grouped in the index). You can scroll
through this list of headings to see what is already in the index under
each letter. Although you may think clicking a letter would force the cur-
rent index entry to appear in that letter’s section of the index, it doesn’t.
To quickly add a word or text selection to an index, highlight the text and
press Ô+7 or Ctrl+7 to add the text to the New Page Reference dialog box. To
index a word without opening that dialog box, just press Option+Shift+Ô+[
or Ctrl+Alt+Shift+[. This shortcut adds the text to the index using the index’s
default settings. (You can always edit them later.) And to enter an index entry
such as Barack Obama as a proper name (last name, first name, or Obama,
Barack in this example), use the shortcut Option+Shift+Ô+] or Ctrl+Alt+Shift+].
28_614495-ch19.indd 32028_614495-ch19.indd 320 4/2/10 1:47 PM4/2/10 1:47 PM
321
Chapter 19: Working with Footnotes, Indexes, and TOCs
Polishing and generating the index
The Index panel’s flyout menu has several options useful for generating and
fine-tuning an index:
✓ Duplicate Topic lets you duplicate a topic entry so that you can use the
settings from one entry without having to re-enter those settings in a
new entry.
✓ Delete Topic removes a topic (and any associated entries) from the
index.
✓ Import Topics lets you import topic lists from other InDesign
documents.
✓ Go to Selected Marker causes InDesign to jump to the text that contains
the selected index entry in the Index panel.
✓ Topic Options lets you edit the Level and Sort By settings for topic
entries; these settings affect all index entries that use them.
✓ Capitalize lets you standardize the capitalization of topic entries — you
can choose Selected Topic, Selected Topic and All Subtopics, All Level 1
Topics, and All Topics.
✓ Update Preview updates the index entries in the Index panel to reflect
page-number changes, new occurrences of index text occurrences, and
deleted occurrences of indexed text.
✓ Generate Index creates the index via the dialog box shown in Figure
19-4. In this dialog box, you specify the following: a title for the index,
the paragraph style for that title, whether a selected index is replaced
with the new one, whether an entire book is indexed, whether text on
hidden layers is indexed, whether the index is nested or run-in, whether
empty index headings and sections are included, what paragraph styles
are applied to each level of index entry, what character styles are
applied to different portions of index entries, and which characters will
be used as separators within index entries.
Click the More Options button to see the nested/run-in and later
options, as shown in Figure 19-4. Note that the button changes to Fewer
Options, which if clicked hides those extra options and becomes More
Options again.
After you generate an index, you get the standard InDesign loaded-text
icon (the paragraph icon); click an existing text frame into which you
want to flow the index, or click anywhere else in a document to have
InDesign create the text frame for you and flow the index text into it.
28_614495-ch19.indd 32128_614495-ch19.indd 321 4/2/10 1:47 PM4/2/10 1:47 PM
322
Part VI: Getting Down to Business
Figure 19-4:
The
Generate
Index dialog
box, with
all options
displayed.
Creating Tables of Contents
A table of contents (TOC) is useful in a long document because it helps read-
ers locate information quickly. A TOC is simply a list of paragraphs that are
formatted with the same styles. This dependence on styles means that if
you want to use the table of contents feature, you have to use paragraph
styles. Not only do styles guarantee consistent formatting, but they also tell
InDesign what text you want to include in your TOC.
After you create a book (or even a single document), InDesign can build a
table of contents by scanning pages for the paragraph styles you specify. For
example, if you create a book, you might use paragraph styles named Chapter
Title, Section, and Subsection. Using its table of contents feature, InDesign can
generate a table of contents that includes all three levels.
TOC styles manage the text that you want in a table of contents, the order in
which it appears, how page numbers are added, and how the various TOC
elements are formatted. To create a TOC style, choose Layout➪Table of
Contents Styles.
In the Table of Contents Styles dialog box, click New to create a new TOC
style. You can also edit an existing TOC style via the Edit button, delete one
via the Delete button, and import one from another InDesign document via
the Load button.
Here’s how to create a TOC style after clicking the New button:
1. Enter a name for the TOC style in the TOC Style field (shown in
Figure 19-5).
The default is TOC Style 1.
28_614495-ch19.indd 32228_614495-ch19.indd 322 4/2/10 1:47 PM4/2/10 1:47 PM
323
Chapter 19: Working with Footnotes, Indexes, and TOCs
2. In the Title field, enter a heading for the TOC.
This text appears in your table of contents.
If you don’t want a title, leave the Title field blank, but note that you still
get an empty paragraph at the top of your TOC for this title. You can
always delete that paragraph.
3. Use the Style pop-up menu to choose the paragraph style that this title
will have.
Figure 19-5:
The New
Table of
Contents
Style
dialog box.
4. In the Styles in Table of Contents section, click a paragraph style that
you want to appear in your TOC from the Other Styles list at right.
For example, you might click Chapter Title.
5. Click Add to add it to the Include Paragraph Styles list at left.
Select a style from the Include Paragraph Styles section and click
Remove to remove any paragraph styles you don’t want in the TOC.
6. Repeat Steps 4 and 5 until you have added all the paragraph styles
that you want to include in the TOC.
7. Use the Entry Style pop-up menu to select a TOC level, and then
choose the paragraph formatting for that style.
If the Entry Style, Page Number, and other options don’t display, click
the More Options button to see them.
• Use the Page Number pop-up menu to determine how page num-
bers are handled: After Entry, Before Entry, and No Page Number.
If you want the page numbers to have a character style applied,
choose that style from the Style pop-up menu to the right of the
Page Number pop-up menu.
28_614495-ch19.indd 32328_614495-ch19.indd 323 4/2/10 1:47 PM4/2/10 1:47 PM
324
Part VI: Getting Down to Business
• Use the Between Entry and Number field and pop-up menu to
choose what appears between the TOC text and the page number.
You can enter any characters you want; use the pop-up menu to
select special characters such as bullets and tabs. In most cases,
you should select a tab; the paragraph style selected earlier for
the TOC entry includes leader information, such as having a string
of periods between the text and the number. You can also apply
a character style to the characters between the text and the page
numbers via the Style pop-up menu at right.
• To sort entries at this level alphabetically, such as for a list of
products in a brochure, select the Sort Entries in Alphabetical
Order check box.
• To change the level of the current TOC entry, use the Level pop-up
menu. If you change the level of entries, InDesign correctly sorts
them when it creates the TOC, even if the levels seem out of order
in the Include Paragraph Styles list.
• In the Options section of the dialog box, choose the appropri-
ate options. Check Create PDF Bookmarks if you’re exporting the
document to PDF format and want the PDF TOC file to have book-
marks (a clickable set of TOC links). Check Run-in if you want all
entries at the same level to be in one paragraph. (This option isn’t
common for TOCs, but it’s used in indexes and lists of figures.)
Check Replace Existing Table of Contents if you want InDesign to
automatically replace an existing TOC if the TOC style is changed.
Check Include Text on Hidden Layers if you want to include text
on hidden layers in the TOC. Check Include Book Documents if you
have a book open and want InDesign to generate a TOC based on
all chapters in that book. (InDesign shows the current open book’s
name.) Finally, control whether numbers are included in the
table of contents for numbered paragraphs using the Numbered
Paragraphs pop-up menu.
8. Continue this process for each paragraph style whose text should be
in the TOC.
Note that the order in which you add these styles determines the initial
levels: The first paragraph style added is level 1; the second is level 2,
and so on. But you can change the order by changing the Level setting,
as described in Step 7.
You can also reorder the paragraph styles by dragging them up and
down in the list — but this doesn’t change their levels and thus won’t
change the order in which they are sorted in the TOC. All it does is
change the order you see them in the dialog box.
To make changes to a TOC style, go to the Edit Table of Contents Style dialog
box. Choose Layout➪Table of Contents Styles, select the TOC style to edit,
and click Edit.
28_614495-ch19.indd 32428_614495-ch19.indd 324 4/2/10 1:47 PM4/2/10 1:47 PM
325
Chapter 19: Working with Footnotes, Indexes, and TOCs
With a TOC style in place and your document properly formatted with the
paragraph styles that the TOC style will look for when generating a TOC,
you’re ready to have InDesign create the actual TOC for you.
To generate a TOC, choose Layout➪Table of Contents. You get the Table of
Contents dialog box, which is identical to the New Table of Contents Style
dialog box shown in Figure 19-5. In this dialog box, you can make changes to
the TOC style settings. (If you want to save those TOC style changes, be sure
to click the Save Style button.) Then click OK to have InDesign generate the
TOC. You might also get a dialog box asking whether you want to include
items in overset text (text that didn’t fit in your document after you placed
it) in your TOC. It may take a minute or two for the program to generate the
TOC. (See Chapter 12 for more details on overset text.)
Be sure you allow enough space (a single text frame, a series of linked text
frames, or one or more empty pages) for the TOC before generating a final
TOC because if you end up adding or deleting pages based on the TOC length,
the TOC will display the old page numbers.
If you select a text frame before generating a TOC, InDesign places the TOC
text in it when you generate the TOC. If you don’t select a text frame, you
see the familiar loaded-text icon (the paragraph pointer) that you see when
you place a text file. Click a text frame to insert the TOC text in that frame, or
click in an empty part of your document to create a text frame in which the
TOC text will flow.
To update page numbering after flowing a TOC, simply rebuild the TOC
by selecting one or more text frames holding the TOC and then choosing
Layout➪Update Table of Contents.
The feature that creates a TOC is actually a list generator, and you can use
it to create other kinds of lists. Basically, you can create a list from anything
that is tagged with a paragraph style. For example, if your figure captions all
use their own paragraph style (called Caption Title in this example), you can
generate a list of figures by creating a TOC style that includes just the Caption
Title paragraph style. An InDesign document can have more than one TOC so
that you can include multiple lists in your document.
28_614495-ch19.indd 32528_614495-ch19.indd 325 4/2/10 1:47 PM4/2/10 1:47 PM