Wile Adobe InDesign CS5 Bible phần 5 pptx
Bạn đang xem bản rút gọn của tài liệu. Xem và tải ngay bản đầy đủ của tài liệu tại đây (1.54 MB, 94 trang )
Chapter 5: Working with Pages
143
When you create a gatefold spread of three pages in a facing-page publication, you should always
create them in pairs because, in an actual printed publication, if you add a third page to a two-page
spread, the backside of the page becomes the third page in another three-page spread. Along the
same lines, if you create a four-panel, trifold brochure, both the front and the back have four pan-
els. If this is difficult to visualize, take a look at Figure 5.4.
Tip
You can also create gatefold spreads by adjusting the page size for the specific page, as explained earlier in this
chapter. That can be a better option because it lets you create gatefolds whose folded portions aren’t a full
page wide, which the technique described here can’t do. n
One last word about gatefold spreads: They require special care throughout the production pro-
cess, and they cost you extra at the printer and bindery. If you’re creating a modest, black-and-
white newsletter for a local nonprofit organization, throwing in a three-panel gatefold probably
isn’t an option. On the other hand, if you can find an advertiser with deep pockets, InDesign lets
you create gatefold spreads with up to ten pages.
To create a gatefold spread, first select the pages that you want to make into a gatefold and then
deselect the Allow Selected Pages to Shuffle option from the panel’s flyout menu. Now, drag any of
the pages you just unmarked as Allow Selected Pages to Shuffle to create the gatefold spread; that
is, drag pages to the spread that will contain the multiple pages. A vertical bar indicates where the
page will be placed. When the bar is where you want to place the page, release the mouse button.
To clear a gatefold, select it in the Pages panel and then reselect the Allow Selected Pages to Shuffle
option in the panel’s flyout menu.
Figure 5.4 shows a pair of three-page gatefold spreads in a facing-pages publication.
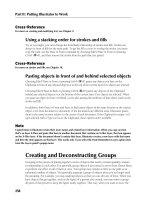
FIGURE 5.4
In this example, pages 2, 3, and 4 are a gatefold, as are pages 5, 6, and 7.
12_607169-ch05.indd 14312_607169-ch05.indd 143 4/22/10 7:48 PM4/22/10 7:48 PM
Part II: Document Fundamentals
144
Tip
You may want to create a section out of the extra pages in a gatefold so that you can number them separately
from the surrounding pages. Sections are covered later in this chapter. n
Working with page numbers
Pages are numbered automatically starting at 1 (or whatever you set in the New Document or
Document Setup dialog boxes) based on the order in which they appear in the Pages panel.
However, you can change the page numbering from Arabic numerals to Roman numerals or let-
ters, as well as change the start page number.
If you want to just change the starting page number, follow the instructions in the “Starting docu-
ments on a left page” section earlier in this chapter; use odd numbers if you want the document or
section to start on a right-hand page and even numbers if you want the document or section to
start on a left-hand page.
If you want to change other page-number attributes, select the first page in the document in the
Pages panel and choose Layout ➪ Page Numbering & Sections or choose Numbering & Section
Options from the Pages panel’s flyout menu. Either way, you get the dialog box shown in Figure 5.5.
(Its name is New Section if the page has no section already applied to it. Otherwise, the name is
Numbering & Section Options.)
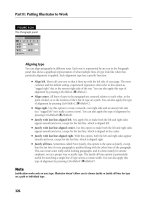
FIGURE 5.5
The New Section dialog box lets you change the starting page number and the types of numerals used.
(This dialog box is named Numbering & Section Options if you are working with a page that was previ-
ously made a section start.)
12_607169-ch05.indd 14412_607169-ch05.indd 144 4/22/10 7:48 PM4/22/10 7:48 PM
Chapter 5: Working with Pages
145
Tip
A quick way to edit an existing section is to double-click its icon — the triangle that appears over the section’s
starting page in the Pages panel. You’ll then get the Numbering & Section Options dialog box. n
To change the initial page number, select the Start Page Numbering At option and type a new
starting page number in its field. To change the page numbering style from the default of Arabic
numerals (1, 2, 3, 4, . . .), use the Style pop-up menu and choose from I, II, III, IV, . . .; i, ii, iii,
iv, . . .; A, B, C, D, . . .; a, b, c, d, . . .; 01, 02, 03, 04, . . .; 001, 002, 003, 004, . . .; and 0001,
0002, 0003, 0004, . .
Cross-Reference
InDesign lets you create automatic page numbers, which lets you add the current page number to a folio or to
automatically update the page number in a cross-reference such as a continued line. Chapter 26 covers this
feature in detail.
It also lets you specify a chapter number for each document for use in book projects so that InDesign can use
the text variables feature to automatically enter the chapter number in text such as folios for you. Chapter 26
covers text variables and Chapter 28 covers books. n
Dividing a document into sections
Some long documents are divided into parts numbered separately from the other parts. For exam-
ple, the page numbers for the front matter of books are often Roman numerals, whereas those for
the body of the book are standard Arabic numerals. If a book has appendixes, a separate number-
ing scheme can be applied to these pages. In InDesign, such independently numbered parts are
referred to as sections.
A multipage document can contain as many sections as you want (a section has to contain at least
one page). If each section of a document uses a different page layout, you probably want to create a
different master page for each section. Here’s how to create a section:
1. If it’s not displayed, open the Pages panel by choosing Window ➪ Pages or pressing
Ô+F12 or Ctrl+F12.
2. Click the icon of the page where you want to start a section.
3. Choose Numbering & Section Options from the panel’s flyout menu. If the page is
not already a section start, the New Section dialog box appears. Otherwise, the identical
Numbering & Section Options dialog box, shown in Figure 5.5, appears. (You can also create
a section starting at the current page in your document by choosing Layout ➪ Numbering &
Section Options.) By default, the Start Section option is selected. Leave it selected.
4. In the Section Prefix field, type up to eight characters that identify the section
in the page number field at the lower-left corner of the document window. For
example, if you type Sec2, the first page of the section is shown as
Sec2:1 in the page
number field.
12_607169-ch05.indd 14512_607169-ch05.indd 145 4/22/10 7:48 PM4/22/10 7:48 PM
Part II: Document Fundamentals
146
5. From the Style pop-up menu, choose the Roman numeral, Arabic numeral, or alpha-
betic style you want to use for page numbers.
6. For Page Numbering, select the Automatic Page Numbering option if you want the
first page of the section to be one number higher than the last page of the previous
section. The new section uses the specified numbering style; the previous section may
use this style or another style.
7. Select the Start Page Numbering at option and type a number in the accompanying
field to specify a different starting number for the section. For example, if a book
begins with a section of front matter, you could begin the body section of a book on page 1
by choosing Start At and typing 1 in the field. If you select Continue from Previous Section,
the first page of the body section would begin one number higher than the Roman numeral
on the last page of the front matter (so if the first section ends at page viii, the new section
begins at 9, I, or ix, based on the numbering style chosen for the new section).
8. In the Section Marker field, type a text string that you can later automatically apply
to pages in the section. You might want to enter something straightforward, such as
Section 2, or, if the section is a chapter, the name of the chapter.
9. Click OK to close the dialog box.
Cross-Reference
The Document Chapter Numbering options in the New Section and Numbering & Section Options dialog box
has no effect on pages, though it does determine the chapter number that you might choose to have automati-
cally inserted on pages. Chapter 28 explains the use of chapter numbers in InDesign’s multidocument, or book,
capability. n
Tip
You can insert the section marker name so that it prints in folios, chapter headings, and story text by choosing
Type
➪ Insert Special Character ➪ Markers ➪ Section Marker. This is a great way to get a chapter name (if you
use it as the section marker) in your folio or to have cross-references in text to a section whose name might
later change. You can also specify a chapter for automatic insertion into folios or other text. Chapter 26
explains both in detail. n
When you create a section, it’s indicated in the Pages panel by a small, black, inverted triangle over
the icon of the first page in the section, as shown at the top of the Pages panel in Figure 5.6, later
in this chapter. (If you position the mouse pointer over the black triangle, the name of the section
appears.) The page-numbering scheme you’ve specified is reflected in the page numbers below the
page icons. When you begin a section, it continues until the end of the document or until you
begin a new section.
Tip
By default, the Pages panel displays section numbers beneath the icons of document pages. To display absolute
page numbers — the first page is page 1 and all other pages are numbered sequentially — choose InDesign ➪
Preferences ➪ General or press Ô+K on the Mac, or choose Edit ➪ Preferences ➪ General or press Ctrl+K in
Windows, and select Absolute Numbering from the View pop-up menu. n
12_607169-ch05.indd 14612_607169-ch05.indd 146 4/22/10 7:48 PM4/22/10 7:48 PM
Chapter 5: Working with Pages
147
If you decide that you want to remove a section, navigate to the page that begins the section,
choose Numbering & Section Options from the Pages panel’s flyout menu, or choose
Layout ➪ Numbering & Section Options, and deselect the Section Start option.
Navigating pages
Moving from page to page in a long document and scrolling around a large or magnified page are
among the most common tasks you perform in InDesign. The more time you spend displaying the
page or page area you want to work on, the less time you have to do the work you need to do. As
with most trips, the less time you spend between destinations, the better.
You can always just go to the page you want, but for navigating through the pages of a document
when you don’t know what page has the content you are seeking, the Pages panel (choose
Depending on the task you’re working on, you may want to use the Pages panel to target a spread or to
select a spread. The choice you make determines the actions you can perform.
A targeted spread is the spread to which copied objects are placed when you choose Edit
➪ Paste or
press Ô+V or Ctrl+V, or to which library objects are placed when you choose Place Items from a library
panel’s flyout menu. The target spread is the one in the center of the document window and is indi-
cated by the page number shown in the page number field at the lower-left corner of the document
window. Only one spread can be the target spread at any one time. At reduced magnifications, it’s pos-
sible to display several spreads in the document window. In this case, the number in the page number
field indicates the target spread.
When you select one or more spreads, you can then perform several page-level modifications, such as
adjusting margin and column guides, applying a master page, or deleting the pages, in a single operation.
There are several ways to target a spread. You can:
l
Modify an object on the spread or its pasteboard.
l
Click a spread or its pasteboard.
l
In the Pages panel, double-click the page numbers below the spread’s page icons. (This also
moves you to the document pages in the spread.)
You also have several options for selecting a page or spread:
l
Click a page icon once to select one page of a spread; click the page numbers to select both
pages. If you click twice, the page or spread is selected and targeted.
l
Click a page icon or spread number and then Shift+click another page icon or spread number
to select a range of pages.
l
Ô+click or Ctrl+click page icons or spread numbers to select multiple, noncontiguous pages.
In the Pages panel, the page numbers of the target spread are shown reversed, white numbers in a black
rectangle, whereas the page icons are highlighted in a light-blue color.
Targeting versus Selecting Spreads
12_607169-ch05.indd 14712_607169-ch05.indd 147 4/22/10 7:48 PM4/22/10 7:48 PM
Part II: Document Fundamentals
148
Window ➪ Pages or press Ô+F12 or Ctrl+F12) offers the fastest ride. For navigating around in a
page, you may want to switch to the quick zoom function, described in Chapter 2.
Navigating by page number
InDesign lets you easily move through pages by just selecting the desired page — if you know its
number, of course. To do so, enter the desired page number in the Page field and then press Enter
or Return, or select the page from the Page pop-up menu, both of which are at the bottom-left side
of the document window, as shown in Chapter 2.
When entering page numbers for page navigation, printing, or other functions, you usually can use
regular numbers, such as 5 for the fifth page. However, there are some occasions where that won’t get
what you want; these occasions involve the use of sections.
A section page number, specified through the Numbering & Section Options dialog box (choose
Layout
➪ Numbering & Section Options or choose Numbering & Section Options in the Pages panel’s
flyout menu) is a customized page number. You use section numbers if your document needs to start on
a page other than 1 — for example, if you’re working on a magazine and each article is saved in a dif-
ferent document, or if you have a preface using Roman numerals (such as iv). A single document can
have multiple sections of page numbers and can use section page numbers to change the format of
numbers to Roman numerals, letters, and so on.
If your sections use different numbering styles such as letters, Roman numerals, and Arabic numerals, you
can go to the desired page as long as the page number you enter is unique: iii, c, and 3 would represent
different pages, and InDesign would know which is which because their numbering is different.
But if your document uses the same page numbers more than once, such as page 51 in two different
sections, you can’t just enter 51 to get to page 51, because InDesign won’t know which page 51 to go
to. That’s where section page numbers come in. To jump to or print a page with a section page number,
you need to indicate what section it is and what page number appears on the page. InDesign provides
a default name for sections, starting at Sec1. When you enter a section page number, you must separate
the section name and the page number with a colon. For example, if you start the page numbering on
page 51, you need to type Sec1:51 in the page number field to jump to that page. Having to include this
undisplayed section information makes this option fairly unappealing, so you may prefer to use abso-
lute page numbers.
An absolute page number indicates a page’s position in the document, such as 1 for the first page, 2 for
the second page, and so on. To specify an absolute page number in the page number field or other
dialog box (such as Print) that involves selecting pages, you type a plus sign before the number that
represents the page’s position. For example, the first page in the document is always +1, the second
page is always +2, and so on. If you don’t type a plus sign, the first page with the number 1 is what
InDesign assumes you mean — although this may not be the first page in the document. For example,
perhaps you have a 5-page section with Roman numerals followed by a 30-page section with Arabic
numerals. Type just 1; this goes to the first page in the Arabic-numbered section, whereas typing +1
goes to the first page in the document (i, in this case).
Understanding Special Page Numbers
12_607169-ch05.indd 14812_607169-ch05.indd 148 4/22/10 7:48 PM4/22/10 7:48 PM
Chapter 5: Working with Pages
149
Tip
Use the shortcut Ô+J or Ctrl+J to open the Go to Page dialog box, where you can enter the desired page number. n
Navigating with the menus and shortcuts
InDesign also offers several menu commands and keyboard shortcuts to quickly navigate your lay-
out, as Table 5.1 details.
TABLE 5.1
Page Navigation Menus and Shortcuts
Navigation Menu Sequence Macintosh Shortcut Windows Shortcut
Go to a specific page
Layout
➪ Go to Page
Ô+J
Ctrl+J
Go to first page
Layout
➪ First Page
Shift+Ô+Page Up
Ctrl+Shift+PgUp
Go back one page
Layout
➪ Previous Page
Shift+Page Up Shift+PgUp
Go forward one page
Layout
➪ Next Page or
Layout
➪ Go Forward
Shift+Page Down or
Ô+Page Down
Shift+PgDn or
Ctrl+keypad PgDn
Go to last page
Layout
➪ Last Page
Shift+Ô+Page Down
Ctrl+Shift+PgDn
Go to last page viewed
Layout
➪ Go Back
Ô+Page Up
Shift+PgUp or
Ctrl+keypad PgUp
Go forward one spread
Layout
➪ Next Spread
Option+Page Up Alt+PgUp
Go back one spread
Layout
➪ Previous Spread
Option+Page Down Alt+PgDn
Navigating with the Pages panel
When the Pages panel appears, you can use it to quickly move from page to page in a multipage
document and to switch between displaying master pages and document pages. To display a par-
ticular document page, double-click its icon. The selected page is centered in the document win-
dow. To display a master spread, double-click its icon in the lower half of the panel.
Tip
You can reverse the order of master pages and regular pages in the Pages panel by choosing Panel Options in the
flyout menu, and then selecting Pages on Top instead of the Default Masters on Top. You can also control whether
pages and master pages appear as preview thumbnails, whether they display vertically or horizontally, whether they
appear in fixed sizes or in proportion to their actual dimensions, and what size their icons should be. n
Tip
The Fit Page in Window command (choose View ➪ Fit Page in Window or press Ô+0 or Ctrl+0) and Fit Spread
in Window command (choose View ➪ Fit Spread in Window or press Option+Ô+0 or Ctrl+Alt+0) let you
enlarge or reduce the display magnification to fit the selected page or spread in the document window. When
you have lots of objects parked on the pasteboard, also useful is choosing View ➪ Entire Pasteboard or pressing
Option+Shift+Ô+0 or Ctrl+Alt+Shift+0. (Note that all the shortcuts use the numeral 0, not the letter O.) n
12_607169-ch05.indd 14912_607169-ch05.indd 149 4/22/10 7:48 PM4/22/10 7:48 PM
Part II: Document Fundamentals
150
Working with specialty page controls
InDesign offers three specialty controls over pages: transparency, rotation, and transitions. The
Panel Options dialog box is where you tell InDesign to highlight whether those controls are in use.
Figure 5.6 shows the Pages panel with indicators for all three, as well as the Panel Options dialog
box. (You also set whether page thumbnails appear and the relative position of document and mas-
ter pages in the Pages panel via this dialog box.) Choose Panel Options from the Pages panel’s fly-
out menu to get this dialog box.
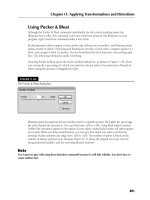
FIGURE 5.6
The Pages panel (at left) has several iconic indicators. The small inverted triangle above a page icon (page
68, here) represents a section start. There are also indicators for pages that have transparent objects, whose
views are rotated, and that have page transitions applied. You control the display of these last three indica-
tors in the Panel Options dialog box (at right). You can also apply color labels to pages as a visual
reminder of whatever you want the colors to mean.
Section start
Color label
Rotated view indicator
Transparency indicator
Page transition indicator
12_607169-ch05.indd 15012_607169-ch05.indd 150 4/22/10 7:48 PM4/22/10 7:48 PM
Chapter 5: Working with Pages
151
Transparency alert
InDesign is a pioneer in the use of transparency for layouts, but that feature can trip up some
printers. To help you identify pages that use transparency, InDesign can automatically add an icon
to the right of the page number in the Pages panel if that page uses transparency — and if the
Panel Options dialog box is set to display the transparency icon (it is turned off by default).
Chapters 12 and 31 cover transparency in detail.
Rotated page views
Sometimes, rotated objects — especially those containing text — can be hard to edit in the regular
view of a page. InDesign thus lets you rotate a spread so that you can view it at 90-, 180-, and
270-degree views — in addition to the standard 0-degree view, of course. Note that the actual
spread isn’t rotated, just its appearance in InDesign; it prints correctly. Figure 5.7 shows an exam-
ple; note the rotation icon that appears in the Pages panel to the right of the rotated spread.
There are two ways to rotate a spread’s view: Choose View ➪ Rotate Spread and then choose the
desired rotation amount from the submenu, or select the desired spread for which to rotate its view
in the Pages panel and then choose Rotate Spread View and the desired rotation amount from the
submenu. To set the view back to normal, choose the Clear Rotation option in the submenu.
FIGURE 5.7
Rotating a spread’s view helps you work on rotated text and other rotated objects.
12_607169-ch05.indd 15112_607169-ch05.indd 151 4/22/10 7:48 PM4/22/10 7:48 PM
Part II: Document Fundamentals
152
Page transitions
InDesign can apply page transitions to pages, such as you would see in a PowerPoint presentation
or video. These transitions have no effect on printed documents, but appear in PDF and Flash files
exported from InDesign.
To apply page transitions, select the pages you want to apply them to and then either choose
Layout ➪ Pages ➪ Page Transitions ➪ Choose or, in the Pages panel’s flyout menu, choose Page
Transitions ➪ Choose. The Page Transitions dialog box, shown in Figure 5.8, appears, and you can
choose the desired transition effect. To apply the effect to all spreads, be sure to select the Apply to
All Spreads option at the bottom of the dialog box.
You can edit page transitions on selected pages by choosing Edit instead of Choose in the above
two menu sequences, which opens the Page Transitions panel shown in Figure 5.8. You can also
open the Page Transitions panel by choosing Window ➪ Interactive ➪ Page Transitions. Here, you
can change not only the transition effect but also control its direction and speed, using the three
pop-up menus. In its flyout menu, you can choose Apply to All Spreads if you hadn’t done so
previously.
Note that the only way to turn off the Apply to All Spreads setting is in the Page Transitions dialog
box — you cannot do so in the Page Transitions panel. To get rid of all page transitions applied,
choose Layout ➪ Pages ➪ Page Transitions ➪ Clear All, or in the Pages panel’s flyout menu choose
Page Transitions ➪ Clear All.
FIGURE 5.8
The Page Transitions dialog box (left) and the Page Transitions panel (right)
Apply to All Spreads
12_607169-ch05.indd 15212_607169-ch05.indd 152 4/22/10 7:48 PM4/22/10 7:48 PM
Chapter 5: Working with Pages
153
Cross-Reference
Part VIII covers the creation of PDF, Flash, and other electronic documents. Chapter 34 covers the page transi-
tions capability in detail. n
Color labels
InDesign CS5 lets you apply color labels to pages; these labels are shown as bars under the page in
the Pages panel, as Figure 5.6 shows earlier in this chapter. You can choose any of 15 colors, as
well as set the color to None or to that of the page’s master-page color label, by Control+clicking or
right-clicking the page in the Pages panel and choosing Color Label, or by selecting a page in the
Pages panel and choosing Color Label in the flyout menu.
Of course, the colors are arbitrary, and their meaning is entirely up to you. InDesign’s page labels
work in the same way as Mac OS X’s ability to apply color labels to folders: You choose a color and
decide what it means, so when you see pages with that color, it reminds you what they are; for
example, you might apply Orange to pages that need further work, Lavender to pages that are
signed off on, and Blue to pages that use nonstandard page sizes.
New Feature
The ability to set color labels on pages is new to InDesign CS5. n
Adjusting page layouts
If you’ve ever created and worked with a document all the way to the finishing touches and then
discovered that the page size was wrong from the beginning, you know the meaning of frustration.
Manually adjusting the size and placement of all the objects in a document is an ugly chore and
one you want to avoid at all costs. However, should the unthinkable happen — you have to mod-
ify the size, orientation, or margins of a document that is partially or completely finished —
InDesign automatically resizes and repositions objects when you change its basic layout.
For example, maybe you’ve created a magazine for an American audience that subsequently needs
to be converted for publication in Europe. Most newsletters in the United States use letter-sized
pages (8
1
⁄2 × 11 inches), whereas in Europe the standard page size for such publications is A4 (210
× 297 mm), which is slightly narrower and slightly taller than U.S. letter size. Of course, you have
to change color to colour, apartment to flat, and so on, but you also have to both squeeze (horizon-
tally) and stretch (vertically) every item on every page to accommodate the A4 page’s dimensions.
The Layout Adjustment command (choose Layout ➪ Layout Adjustment) gives you the option of
turning this chore over to InDesign, which automatically adjusts object shape and position accord-
ing to the new page size, column guides, and margins.
12_607169-ch05.indd 15312_607169-ch05.indd 153 4/22/10 7:48 PM4/22/10 7:48 PM
Part II: Document Fundamentals
154
The Layout Adjustment dialog box lets you turn layout adjustment on or off and specify the rules
used to adjust objects when you change page size or orientation (via the Document Setup dialog
box; choose File ➪ Document Setup or press Option+Ô+P or Ctrl+Alt+P) or margins or columns
(via the Margin and Columns dialog box, accessed by choosing Layout ➪ Margins and Columns).
To adjust a layout:
1. Choose Layout ➪ Layout Adjustment to display the Layout Adjustment dialog box,
shown in Figure 5.9.
2. Select the Enable Layout Adjustment option to turn on the feature; deselect it to
turn it off.
3. In the Snap Zone field, type the distance within which an object edge automatically
snaps to a guideline when layout adjustment is performed. (Chapter 7 covers
guidelines.)
4. Select the Allow Graphics and Groups to Resize option if you want InDesign to
resize objects when layout adjustment is performed. If you don’t select this option,
InDesign moves objects but does not resize them (the preferred option).
5. Select the Allow Ruler Guides to Move option if you want InDesign to adjust the
position of ruler guides proportionally according to a new page size. Generally, ruler
guides are placed relative to the margins and page edges, so you probably want to select
this option. (Chapter 7 covers ruler guides.)
6. Select the Ignore Ruler Guide Alignments option if you want InDesign to ignore
ruler guides when adjusting the position of objects during layout adjustment. If you
think that objects may snap to ruler guides that you don’t want them to snap to during
layout adjustment, select this option. If selected, InDesign still snaps object edges to other
margin and column guides.
7. Select the Ignore Object and Layer Locks option to let InDesign move locked
objects (either objects locked directly by choosing Object ➪ Lock or by pressing
Ô+L or Ctrl+L, or objects that reside on a locked layer). Otherwise, locked objects
are not adjusted. (Chapter 6 covers layers, and Chapter 13 covers object locking.)
8. When you’re done, click OK to close the dialog box.
The Layout Adjustment feature works best when the layout is not complex and does not contain
more than one or two text frames. If you radically change a document that you’ve already done
considerable work on, the Layout Adjustment feature usually creates more work than it saves. For
example, the switch from a U.S. letter-sized page to an A4-sized page is a relatively minor change
and the layout adjustments will probably be barely noticeable; but if you decide to change a tab-
loid-sized poster into a business card in midstream, well, you’re better off starting over.
12_607169-ch05.indd 15412_607169-ch05.indd 154 4/22/10 7:48 PM4/22/10 7:48 PM
Chapter 5: Working with Pages
155
FIGURE 5.9
The Layout Adjustment dialog box (with its default settings)
Here are a few things to keep in mind if you decide to use InDesign’s Layout Adjustment feature:
l
If you change page size, the margin widths (the distance between the left and right mar-
gins and the page edges) remain the same.
l
If you change page size, column guides and ruler guides are repositioned proportionally to
the new size.
l
If you change the number of columns, column guides are added or removed accordingly.
l
If an object edge is aligned with a guideline before layout adjustment, it remains aligned
with the guideline after adjustment. If two or more edges of an object are aligned with
guidelines, the object is resized so that the edges remain aligned with the guidelines after
layout adjustment.
l
If you change the page size, objects are moved so that they’re in the same relative position
on the new page.
l
If you’ve used margin, column, and ruler guides to place objects on pages, layout adjust-
ments are more effective than if you’ve placed objects or ruler guides randomly on pages.
l
Check for text reflow when you modify a document’s page size, margins, or column
guides. Decreasing a document’s page size can cause text to overflow a text frame whose
dimensions have been reduced.
l
Check everything in your document after the adjustment is complete. Take the time to
look over every page of your document. You never know what InDesign has actually done
until you see it with your own eyes.
Tip
If you decide to enable layout adjustment for a particular publication, you may want to begin by using the Save
As command (choose File ➪ Save As or press Shift+Ô+S or Ctrl+Shift+S) to create a copy. That way, if you ever
need to revert back to the original version, you can simply open the original document. n
12_607169-ch05.indd 15512_607169-ch05.indd 155 4/22/10 7:48 PM4/22/10 7:48 PM
Part II: Document Fundamentals
156
Summary
If you’re working on a multipage document, you want to display the Pages panel. It lets you add,
move, and delete document pages as well as adjust the size of individual pages and create multi-
page spreads called gatefold spreads.
If you’re working on a long document with multiple parts and want to number each part sepa-
rately, you can create sections to manage these multiple page-numbering schemes within the docu-
ment. You can also have InDesign automatically add the correct page numbers for folios and
continued lines, as well as section names in folios and other text.
As you work on a long document, you can use the Pages panel to target a specific page or spread in
the document window; to select multiple pages or spreads so that you can move, modify, or delete
them collectively; and to navigate from page to page in a multipage document.
InDesign provides visual indicators that let you know whether pages contain transparent objects,
have their views rotated, or have page transition effects applied. You can also rotate page views and
apply transition effects with the Pages panel and related Layout ➪ Page submenus. A new capability
lets you apply color labels to pages as a mnemonic aid.
If you decide to change the layout of a publication after you’ve started work, you can use the
Layout Adjustment feature to automatically adjust the size and position of objects and guidelines
when you change the document’s page size, margins, or columns.
12_607169-ch05.indd 15612_607169-ch05.indd 156 4/22/10 7:48 PM4/22/10 7:48 PM
157
CHAPTER
Working with Layers
IN THIS CHAPTER
Understanding layers
Creating and managing layers
Working with objects on layers
P
ublishers seem to spend a lot of time doing variations of the same
things: creating several different versions of the same ad for different
markets or flowing text in another language into a design. The goal of
software is to automate the predictable so that you have more time for cre-
ativity. Toward this goal, InDesign provides a method for preserving the time
you put into creating and editing a layout that is used for more than one
purpose: layers.
If you’ve ever seen a series of clear plastic overlays in presentations, under-
standing layers is easy. In one of those old overhead presentations, the
teacher might have started with one overlay containing a graphic and then
added another overlay with descriptive text, and then added a third overlay
containing a chart. Each overlay contained distinct content, but you could
see through each one to the others to get the entire message. InDesign’s lay-
ers are somewhat like this, letting you isolate content on slices of a docu-
ment. You can then show and hide layers, lock objects on layers, rearrange
layers, and more.
Each document contains a default layer, Layer 1, which contains all your
objects until you select and create a new layer. Objects on the default layer —
and any other layer, for that matter — follow the standard stacking order of
InDesign. (The first object you create is the backmost object, the last one you
create is the frontmost, and all the other objects fall somewhere in between.
See Chapter 13 for detailed information about stacking orders.)
As with the clear plastic overlays, the order of the layers also affects the
stacking order of the objects. Objects on the bottom layer are behind other
13_607169-ch06.indd 15713_607169-ch06.indd 157 4/22/10 7:49 PM4/22/10 7:49 PM
Part II: Document Fundamentals
158
objects, and objects on the top layer are in front of other objects. In Figure 6.1, the Default layer
contains the business card’s standard graphics and the main text. Two additional layers contain
different sets of contact information, in separate text frames, for different people.
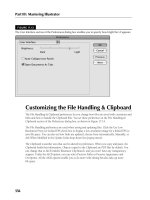
FIGURE 6.1
A business card with different layers for each person’s card. The graphics common to all cards are on their
own layer (Default).
Eye icon (indicates visible layers and objects)
Lock icon (indicates locked layers and objects)
Pen icon (indicates the active layer)
Layer icon (indicates the layer the selected object is on)
Delete Selected Layers
Create New Layer
Object icon (indicates the selected object)
Although layers are often compared to plastic overlays, there’s one big difference: Layers are not
specific to individual pages. Each layer encompasses the entire document, which doesn’t make
much difference when you’re working on a 1-page ad but makes a significant difference when it
comes to a 16-page newsletter. Layers help you enforce the stacking order of your page elements,
making it easier to manage them. Layers are essential to grouping chunks of similar elements that
can be altered quickly.
13_607169-ch06.indd 15813_607169-ch06.indd 158 4/22/10 7:49 PM4/22/10 7:49 PM
Chapter 6: Working with Layers
159
The Layers panel (choose Window ➪ Layers or press F7) is your gateway to creating and manipu-
lating layers. Its controls are mostly iconic, but, as with other panels, when tool tips are turned on
via the Tool Tips pop-up menu in the Interface panel of the Preferences dialog box, you can learn
what controls do by pointing at them. (Choose InDesign ➪ Preferences ➪ Interface or press Ô+K
on the Mac, or choose Edit ➪ Preferences ➪ Interface or press Ctrl+K in Windows.) If you know
what the controls do, you can intuit a great deal of how to work with layers.
The layers feature is one that many users ignore. It’s true that if you never looked at the Layers panel, you
could continue to do your work in InDesign, but that would be a mistake. So take a look at the possibili-
ties and see whether they fit into your workflow. In the long run, using layers can save you time and help
you prevent mistakes that can result when you need to track changes across multiple documents.
Say you’ve created an ad with the same copy in it but a different headline and image for each city
where the ad runs. You can place the boilerplate information on one layer and the information that
changes on other layers. If any of the boilerplate information changes, you only need to change it once.
To print different versions of the ad, you control what layers print.
You might use layers in the following situations:
l
A project with a high-resolution background image: For example, a background such as a
texture might take a long time to redraw. You can hide that layer while designing other ele-
ments and then show it occasionally to see how it works with the rest of the design.
l
A document that you produce in several versions: For example, a produce ad may have dif-
ferent prices for different cities, or a clothing catalog may feature different coats depending
on the climate in each area. You can place the content that changes on separate layers and
then print the layers you need.
l
A project that includes objects you don’t want to print: If you want to suppress printout of
objects for any reason, the only way you can do this is to place them on a layer and hide the
layer. You might have a layer used for nothing but adding editorial and design comments,
which you can delete when the document is final. (Even though InDesign supports nonprint-
ing notes, you can insert them only into text; therefore, having a design-comments layer is
still useful to be able to make annotations for frames, images, and other nontextual elements.)
l
A publication translated into several languages: Depending on the layout, you can place all
the common objects on one layer and then create a different layer for each language’s text.
Changes to the common objects need to happen only once — in contrast to if you created
copies of the original document and flowed the translated text into the copies.
l
To experiment with different layouts of the same document: You can show and hide layers
to present different options to your supervisor or client. This strategy lets you use common
elements, such as the logo and legal information, in several versions of the same design.
continued
When, Where, and Why to Use Layers
13_607169-ch06.indd 15913_607169-ch06.indd 159 4/22/10 7:49 PM4/22/10 7:49 PM
Part II: Document Fundamentals
160
Creating layers
Each document contains a default layer, Layer 1, which contains all the objects you place on mas-
ter pages and document pages — until you create and activate new layers. You can create as many
layers as you need. After you create a new layer, it’s activated automatically so that you can begin
working on it.
New Feature
InDesign CS5’s Layers panel now works like Illustrator’s and Photoshop’s: You can hide and reveal the objects
on each layer, as well as hide and reveal the individual objects within a group on each layer. That lets you
work with individual items in terms of locking and hiding them, as well as moving them among layers. You can
also change individual objects’ stacking order (see Chapter 13) by dragging them within their layer in the
Layers panel. n
The Layers panel (choose Window ➪ Layers or press F7) provides several methods for creating new
layers. It doesn’t matter what document page is open when you create a layer because the layer
encompasses all the pages in the document. To create a layer, do one of the following:
l
To create a new layer above the selected layer, click the Create New Layer iconic button on the
Layers panel to get the New Layer dialog box. The layer gets the default name of Layer x.
continued
l
A complex design with overlapping objects, text wraps, and grouped objects: Imagine the
background of a page consists of a checkerboard pattern made up of filled, rectangular
frames. You don’t want to accidentally select the blocks while you’re working with other
objects. If you isolate complex objects on their own layer, you can show only that layer to
work on it, hide that layer to concentrate on other layers, lock the layer so that you can’t
select objects, and otherwise manipulate the layer.
l
To create bulletproof templates: Locked layers are a great way to decrease the possibility of
items in a template being moved or deleted. Move all the objects you don’t want moved or
deleted on a layer and lock the layer. Although you can unlock the layer, a locked layer
keeps the people who use the template from accidentally moving or removing anything too
quickly.
l
To ensure that folios and the like are never overprinted: Placing folios (the document’s page
numbers, running headings, and so on) on their own layer, uppermost in the layer stack,
ensures that other objects never accidentally obscure them.
l
To help text print properly over transparent elements: Layers are useful to isolate text above
other objects with transparency effects. This avoids the rasterizing of text during output to
plate or film — something that can make the text quality look poor.
When determining whether objects should go on a layer, remember that layers are document-wide and
not page-specific.
13_607169-ch06.indd 16013_607169-ch06.indd 160 4/22/10 7:49 PM4/22/10 7:49 PM
Chapter 6: Working with Layers
161
l
To create a layer below the selected layer, Ô+click or Ctrl+click the Create New Layer iconic
button. The layer gets the default name of Layer x.
l
To create a new layer above the selected layer and customize its name and identifying color,
Option+click or Alt+click the Create New Layer iconic button, or choose New Layer
from the flyout menu. Use the New Layer dialog box to specify options for the layer, as
described shortly. (The New Layer dialog box — set with a custom name and color — is
shown in Figure 6.2.)
l
To create a new layer above all existing layers, Shift+Ô+click or Ctrl+Shift+click the Create
New Layer iconic button.
New Feature
InDesign CS5 changes what the modifier keys such as Ô and Ctrl do when you click the Layers panel’s Create
New Layer iconic button. If you use these modifier keys a lot when working with layers, you need to relearn
what they do in InDesign CS5. n
You can create a layer while a master page is displayed. Objects you create on a layer while a mas-
ter page is displayed are placed on all pages based on that master page. However, the layer is not
specific to that master page. It is available for all document pages — even those based on other
master pages — and you can place objects on it.
FIGURE 6.2
The New Layer dialog box
Tip
To change a layer’s settings, double-click it or choose Layer Options for name of layer from the flyout menu to
display the Layer Options dialog box. n
Whether you’re using the New Layer dialog box shown in Figure 6.2 or the nearly identical Layer
Options dialog box, the customization options work the same:
l
Name field: Type a descriptive name for the layer. For example, if you’re using layers for
multilingual publishing, you might have a U.S. English layer, a French layer, and a
German layer. If you’re using layers so that you can hide background objects while you’re
working, you might have a Background Objects layer.
13_607169-ch06.indd 16113_607169-ch06.indd 161 4/22/10 7:49 PM4/22/10 7:49 PM
Part II: Document Fundamentals
162
l
Color pop-up menu and button: A layer’s color helps you identify what layer an object is
on. The color appears to the left of the layer name in the Layers panel and appears on each
object on that layer. The color is applied to frame edges, selection handles, bounding
boxes, text ports, and text wraps. Note that the display of frame edges is controlled by
choosing View ➪ Extras ➪ Show/Hide Frame Edges or pressing Control+Ô+H or Ctrl+H.
By default, InDesign applies a different color to each new layer, but you can customize it
to something meaningful for your document and workflow. Choose a color from the list
or double-click the color swatch to use from the operating system’s color picker.
Cross-Reference
I cover the other layer manipulation features in these dialog boxes later in this chapter. n
Working with individual objects on layers
Whether you’re designing a magazine template from the ground up or modifying an existing ad,
you can isolate specific types of objects on layers. You can create objects on a layer, move objects
to a layer, or copy objects to a layer.
Keep in mind that a layer (or object) must be visible for you to work on it. If a layer or object is
visible, the eye icon appears in the first column of the Layers panel, as Figure 6.1 shows. If the col-
umn’s box for that layer or object is blank, the layer or object is hidden. Click the box to toggle
between showing and hiding the layer or object.
To work with a layer and its objects, they must not be locked. If a layer or object is locked, a lock
icon appears in the second column in the Layers panel, as Figure 6.1 shows. If the column’s box
for that layer or object is blank, the layer or object is unlocked. Click the box to toggle between
locking and unlocking the layer or object. Note that you cannot lock or unlock individual objects
within a group, just the entire group.
Note
To see the objects (including groups) in a layer, or the objects within a group, click the reveal control (the
right-facing triangle icon to the left of the layer name). It turns into the hide control (the down-pointing
triangle icon), which if clicked hides the layer’s or group’s objects and turns back into the reveal control. n
Tip
You can change the default names assigned to groups and objects by clicking the name in the Layers panel,
waiting for a second, clicking it again, and then entering your preferred name. n
The active layer
The active layer is the one on which you’re creating objects — whether you’re using tools, import-
ing text or graphics, clicking and dragging objects in from a library, or pasting objects from other
layers or other documents. A pen icon to the right of a layer’s name means it’s the active one (refer
to Figure 6.1). Although you can select more than one layer at a time, only one layer can be active.
13_607169-ch06.indd 16213_607169-ch06.indd 162 4/22/10 7:49 PM4/22/10 7:49 PM
Chapter 6: Working with Layers
163
To switch the active layer to another layer, click to the right of the layer name that you want to be
active; the pen icon moves, making that the new active layer.
Note
Regardless of what layer is the active layer, you can select, move, and modify objects on any visible, unlocked
layer. You can even select objects on different layers and manipulate them. n
Selecting objects on layers
The Layers panel helps you work with selected objects in the following ways:
l
To determine to what layer an object belongs, match the color on its bounding box, han-
dles, and so on, to a color to the left of a layer name.
l
To determine what layers contain active objects, look to the right of the layer names. A
small box — the layer icon — next to a layer name (refer to Figure 6.1) indicates that it
contains an active object. (The object icon, also shown in Figure 6.1, indicates what spe-
cific objects are selected.)
l
To select all the objects on a layer, Option+click or Alt+click the layer’s name in the Layers
panel. The layer must be active, unlocked, and visible. (Likewise, Option+click or
Alt+click an object within a group to select all the objects in that group.)
Tip
To select master-page objects as well as document-page objects on a layer, you need to Option+Shift+click or
Alt+Shift+click the layer name. n
Placing objects on layers
To place objects on a layer, the layer must be active as indicated by the pen icon. To place objects
on the layer, use any of these options:
l
Use any tools to create paths and frames.
l
Use the Place command (choose File ➪ Place or press Ô+D or Ctrl+D) to import graphics
or text.
l
Use the Paste command (choose Edit ➪ Paste or press Ô+V or Ctrl+V) to paste objects
from the Clipboard onto the layer.
l
Click and drag objects to the layer from a library or another document.
Note
When you create objects on master pages, they are placed on the default layer and are therefore behind
other objects on document pages. To create objects on master pages that are in front of other objects, place
the objects on a different layer while the master page is displayed. n
13_607169-ch06.indd 16313_607169-ch06.indd 163 4/22/10 7:49 PM4/22/10 7:49 PM
Part II: Document Fundamentals
164
You can cut and paste objects from one page to another but have the objects remain on their origi-
nal layer — without concern about the active layer. To do this, choose Paste Remembers Layers in
the Layers panel’s flyout menu so that a check mark appears to its left before pasting any objects.
(The Paste Remembers Layers setting remains in effect until you choose the flyout menu option
again, which makes the check mark disappear.) You might do this if you’re moving the continua-
tion of an article from one page to another but you want the text to remain on the same layer.
For example, if you’re working on a multilingual document with separate layers for English,
French, and Spanish text, using Paste Remembers Layers ensures that text frames cut or copied
from the French layer are pasted onto the French layer on the new location.
Moving objects to different layers
After an object is on a layer, it isn’t stuck there. You can copy and paste objects to selected layers,
or you can move them using the Layers panel. When you move an object to a layer, it’s placed in
front of all other objects on a layer. To select multiple objects, remember to Shift+click them and
then move them in one of the following ways:
l
Paste objects on a different layer: First cut or copy objects to the Clipboard. Activate the
layer on which you want to put the objects and then use the Paste command (choose
Edit ➪ Paste or press Ô+V or Ctrl+V). This method works well for moving objects that are
currently on a variety of layers.
l
Move objects to a different layer: Click and drag the active objects’ object icon (to the
right of a layer’s name) to another layer. When you use this method, it doesn’t matter
what layer is active. However, you can’t move objects from multiple layers to a single layer
using this method. (If you select multiple objects that reside on different layers, dragging
the icon moves only objects that reside on the first layer on which you selected an object.)
Also, you can’t move individual objects within a group to another layer; you have to move
the group instead.
l
Move objects to a hidden or locked layer: Press and hold Ô or Ctrl while you click and
drag the active objects’ object icon.
l
Copy rather than move objects to a different layer: Press and hold Option or Alt while
you click and drag the active objects’ object icon.
l
Copy objects to a hidden or locked layer: Press and hold Option+Ô or Ctrl+Alt while
you drag the active objects’ object icon.
Tip
After designing a new template, you might realize that it would be easier to work with if you had isolated cer-
tain objects on layers. You can create new layers and then move objects to them at this point. Just make sure
the layers are in the same stacking order as the original objects. n
13_607169-ch06.indd 16413_607169-ch06.indd 164 4/22/10 7:49 PM4/22/10 7:49 PM
Chapter 6: Working with Layers
165
Manipulating entire layers
Using the Layers panel, you can also select and manipulate entire layers, not just individual objects
on them. For example, if you hide a layer instead of a specific object on that layer, all its objects are
hidden; if you move a layer up, all its objects appear in front of objects on lower layers.
Note
When working with the Layers panel, InDesign CS5 gives you much richer control when manipulating entire
layers than the groups and objects within them. In the Layers panel, you can simply hide/unhide, lock/unlock,
and change the stacking order for individual objects, as well as move objects to other layers. When working
with entire layers, you can also merge and delete them. If you want to do more with objects than the Layers
panel permits, see Part III for all the controls available for objects. n
Selecting layers
The active layer containing the pen icon is always selected. You can extend the selection to include
other layers the same way you multiple-select objects: Shift+click for a continuous selection and
Ô+click or Ctrl+click for a noncontiguous selection. When layers are selected, you can move them
within the stacking order of layers, modify attributes in the Layer Options dialog box, merge them,
or delete them.
Hiding layers
When you hide a layer, none of the objects on that layer displays or prints. You might hide layers
for a variety of reasons, including to speed screen redraw by hiding layers containing high-resolution
graphics, to control what version of a publication prints, and to simply focus on one area of a
design without the distraction of other areas. To show or hide layers using the Layers panel, do one
of the following:
l
Click the eye icon in the first column to the left of a layer’s name. When the eye icon is
blank, you just see an empty square in the column, and the layer is hidden. Click the
empty square to show the layer; the eye icon appears in that square. (This technique also
works for selected groups and individual objects if you click their individual eye squares
instead of the layer’s.) You can also double-click a layer and select or deselect the Show
Layer option in the Layer Options dialog box.
l
If no layers are hidden, you can show only the active layer by choosing Hide Others from
the flyout menu.
l
Regardless of the state of other layers, you can show only one layer by Option+clicking or
Alt+clicking in the first column next to its name. All other layers are hidden.
l
If any layers are hidden, you can show all layers by choosing Show All Layers from the
flyout menu. You can also Option+click or Alt+click twice in the first column to show
all layers.
13_607169-ch06.indd 16513_607169-ch06.indd 165 4/22/10 7:49 PM4/22/10 7:49 PM
Part II: Document Fundamentals
166
The Suppress Text Wrap When Layer Is Hidden option in the flyout menu prevents text wrapping
around the layer’s objects when the layer is hidden. Be sure to select this option when you use
multiple layers for variations of the same content — such as multilingual text or different contacts
for business cards. Otherwise, your layer’s text cannot appear because it is wrapping around a hid-
den layer with an object of the same size in the same place.
Locking layers
When you lock a layer, you cannot select or modify objects on it — even if the locked layer is
active. You might lock a layer containing boilerplate text or a layer containing a complex drawing
that you don’t want altered. Locking and unlocking layers is easy, so you might lock one layer
while focusing on another, and then unlock it. To lock or unlock layers using the Layers panel, do
one of the following:
l
Click the blank square in the second column to the left of a layer’s name. When the lock
icon appears in the square, the layer is locked. Click the lock icon to unlock the layer; the
square becomes blank. (This technique also works for groups and individual objects if you
click their individual lock squares.) You can also double-click a layer and select or dese-
lect the Lock Layer option in the Layer Options dialog box.
l
If no layers are locked, you can lock all but the active layer by choosing Lock Others from
the flyout menu.
l
If any layers are locked, you can unlock all layers by choosing Unlock All Layers from the
flyout menu.
l
You can toggle between Lock Others and Unlock All Layers by Option+clicking or
Alt+clicking the blank box or the lock icon.
Note
When you lock an object to a page (choose Object ➪ Lock or press Ô+L or Ctrl+L), as described in Chapter 13,
the object’s position stays locked regardless of its layer’s lock status. n
Preventing layers from printing or exporting
InDesign lets you designate layers as nonprinting, separately from being hidden. Select the layers
you don’t want to print or export and then choose Layer options from the Layers panel’s flyout
menu and deselect Print Layer. Layers that won’t print show their names in italic in the Layers
panel. (In addition, hidden layers also do not print.)
Cross-Reference
When you do print or export to PDF, you can override layers’ nonprinting status, as explained in Chapters 31
and 32. n
13_607169-ch06.indd 16613_607169-ch06.indd 166 4/22/10 7:49 PM4/22/10 7:49 PM
Chapter 6: Working with Layers
167
Rearranging layers
Each layer has its own front-to-back stacking order, with the first object you create on the layer
being its backmost object. You can modify the stacking order of objects on a single layer using the
Arrange commands in the Object menu, as explained in Chapter 13, or — new to InDesign CS5 —
by dragging the objects within the layers in the Layers panel (you can also move an individual
object to another layer within the Layers panel by dragging the object itself, rather than its layer).
Objects are further stacked according to the order in which the layers are listed in the Layers panel.
The layer at the top of the list contains the frontmost objects, and the layer at the bottom of the list
contains the backmost objects.
If you find that all the objects on one layer need to be in front of all the objects on another layer,
you can move that layer up or down in the list. In fact, you can move multiple-selected layers up
or down, even if the selection is noncontiguous. To move layers, click the selection and drag it up
or down in the Layers panel. When you move layers, remember that layers are document-wide, so
you’re actually changing the stacking order of objects on all the pages.
Tip
You might be accustomed to moving objects to the front of the stacking order to make them easily editable.
Working this way, you might be tempted to bring a layer up to the top of the layer stacking order so that you
can edit it easily and then move it back to its original location. Try to get out of that habit, though, and into the
habit of simply showing the layer you need to work on and hiding the others. n
Merging layers
If you decide that all the objects on one layer belong on a different layer — throughout the docu-
ment — you can merge the layers. When you’re learning about the power of layers, it’s easy to cre-
ate a document that is unnecessarily complex (for example, you might have put each object on a
different layer and then realized that the document has become difficult to work with). The good
news is that you can also merge all the layers in a document to flatten it to a single layer. To flatten
all layers:
1. Select the target layer (where you want all the objects to end up) by clicking it.
2. Select the source layers (which contain the objects you want to move) in addition to
the target layer. Shift+click, or Ô+click or Ctrl+click, to add the source layers to the
selection.
3. Make sure the target layer displays the pen icon and that the target and source lay-
ers are all selected.
4. Choose Merge Layers from the Layers panel’s flyout menu. All objects on the source
layers are moved to the target layer, and the source layers are deleted.
13_607169-ch06.indd 16713_607169-ch06.indd 167 4/22/10 7:49 PM4/22/10 7:49 PM