Wile Adobe InDesign CS5 Bible phần 6 pps
Bạn đang xem bản rút gọn của tài liệu. Xem và tải ngay bản đầy đủ của tài liệu tại đây (1.85 MB, 94 trang )
Chapter 17: Importing Text Files
425
It’s clear why you’d avoid text-only files in most cases — they carry no formatting. (That can be a
useful feature when you have a document full of formatting that you don’t want; saving to text-
only format dumps it all.)
However, how do you choose between Word and RTF formats? For most InDesign users, they are
equivalent, supporting all the formatting you’re likely to want to bring into your InDesign layouts.
The real difference involves their capabilities in your word processor. The RTF format supports
fewer features than Word; the one that matters to most people is that an RTF file cannot have
tracked-changes information, whereas a Word file can. If your editing workflow depends on
tracked changes, saving to RTF is not an option.
Chances are, though, that if tracked changes is a concern for you, you’re using Microsoft Word
anyhow, for which the Word file is native. If you’re using an alternative word processor, chances
are very high that you’ll get the same formatting whether you save as RTF or Word.
Preserving special features in text files
Today’s word processors let you do much more than type and edit text. You also can create special
characters, tables, headers and footers, and other document elements. Some of these features work
when imported into a publishing program, but others don’t.
InDesign imports the following Word formatting (from Mac version 98 and later and from
Windows version 97 and later):
l
All caps
l
Boldface
l
Bulleted lists
l
Color
l
Column breaks
l
Condensed/expanded spacing
l
Double strikethrough
l
Double underlines
l
Drop caps
l
Font
l
Footnotes and endnotes
l
Indents
l
Index and table-of-contents text
l
Inline graphics (if in an InDesign-supported format)
l
Italic
l
Numbered lists
27_607169-ch17.indd 42527_607169-ch17.indd 425 4/22/10 7:58 PM4/22/10 7:58 PM
Part V: Text Fundamentals
426
l
Outline
l
Page breaks
l
Paragraph and character style sheets
l
Point size
l
Redlining/revisions tracking (for use in InCopy, not InDesign)
l
Small caps
l
Strikethrough
l
Subscripts and superscripts
l
Tables
l
Text boxes, including any follow-me links to them
l
Underline options
l
Underlines
Cross-Reference
Support for automatic bulleted and numbered lists is covered in Chapter 21; support for Word’s various under-
line options is covered in Chapters 21 and 22, and support for tracked changes is covered in Chapter 24.
n
The following formats are partially supported or are converted during import:
l
Embossed text (made into paper color, usually white)
l
Engraved text (made into paper color, usually white)
l
Word-only underline (converted to single underlines, including for spaces and
punctuation)
The following formats are not supported, and any text using them is imported as plain text:
l
Highlighting
l
Shadow
l
Text effects, such as blinking and Las Vegas Lights
The following formats are not supported, and any text using them is removed during import:
l
Annotations and comments
l
Hidden text (deleted during import)
l
Section breaks
l
Subscribed/OLE items
l
Text-wrapping breaks
27_607169-ch17.indd 42627_607169-ch17.indd 426 4/22/10 7:58 PM4/22/10 7:58 PM
Chapter 17: Importing Text Files
427
Tables
Word processors have developed very capable table editors, letting you format tabular information
quickly and easily, and often rivaling dedicated spreadsheet programs. InDesign can import tables
created in Word or Excel, as well as tables in RTF documents.
Cross-Reference
Chapter 25 covers tables in depth.
n
Headers and footers (folios)
Headers and footers — called folios in publication layouts @md are a layout issue, not a text issue,
so there is no reason to include these elements in your word processor document. Because page
numbers change based on your InDesign layout, there’s no point in putting the headers and footers
in your word processor document anyway. Note that if you do use them, they do not import into
InDesign.
Cross-Reference
Chapter 5 explains how to add folios to your layout.
n
Footnotes and endnotes
If you use a word processor’s footnote or endnote feature and import the text file, InDesign cor-
rectly places footnotes at the bottom of the column and endnotes at the end of the imported text.
The superscripted numerals or characters in the notes usually translate properly as well.
Hyperlinks
Modern word processors, such as Word, let you include hyperlinks in their text, so when you
export to HTML or PDF formats, the reader can click the link and jump to a Web page or to
another PDF or eBook file. When you import text files with such hyperlinks, InDesign retains their
visual formatting — hyperlinks usually appear as blue underlined text — as well as the actual link.
Cross-Reference
InDesign retains hyperlinks for documents exported as PDF, EPUB, Flash, or HTML files. Part VIII covers such
documents in more detail.
n
Inline graphics and text boxes
Modern word processors typically support inline graphics, letting you import a graphic into your
word processor document and embed it in text. Word, for example, lets you import graphics, and
InDesign, in turn, can import the graphics with your text, as long as InDesign supports their for-
mats. But graphics embedded in your word processor document through Mac OS 9’s Publish and
Subscribe or through OLE (Object Linking and Embedding, available in both Windows and Mac
OS) do not import into InDesign — both technologies are rare these days, so don’t worry about
them except for very old documents.
27_607169-ch17.indd 42727_607169-ch17.indd 427 4/22/10 7:58 PM4/22/10 7:58 PM
Part V: Text Fundamentals
428
InDesign does import text boxes from a Word file (these are usually used for sidebars, captions,
and pull-quotes) as separate text frames. If those Word text boxes are tied to a specific piece of text
so that they flow with that text, InDesign honors those follow-me links and lets you adjust them.
Cross-Reference
Chapter 13 covers follow-me links and related anchoring features in more detail.
n
Avoiding text-file pitfalls
Sometimes, issues not related to the contents of a word processor file can affect how files are
imported into InDesign.
Fast save
Several programs (notably Microsoft Word) offer a fast-save feature, which adds information to the
end of a word processor document. The added information notes what text has been added and
deleted and where the changes occurred. You can use this feature to save time because the pro-
gram doesn’t have to write the entire document to disk when you save the file. When you use the
fast-save feature, however, text import into publishing programs — including InDesign —
becomes problematic.
I suggest that you turn off fast save, at least for files you import into InDesign. With today’s speedy
hard drives, the time you gain by using fast save is barely noticeable anyway. The vast majority of
file corruption problems and bugs in Word are related to the fast-save feature, and its use makes
file recovery in the event of a crash problematic at best. To disable fast save in most versions of
Word, choose Word ➪ Preferences on the Mac or Tools ➪ Options in Windows, go to the Save
pane, and deselect the Allow Fast Saves option.
Microsoft Word has a default setting that converts two hyphens to an en dash (–) rather than an em dash
(—), which is simply wrong typographically.
To solve this problem, I recommend that you turn off Word’s automatic conversion of two hyphens to
a dash (choose Tools
➪ AutoCorrect ➪ AutoFormat as You Type and then deselect the Symbols option).
Instead of using the incorrect automatic conversion, go to the AutoCorrect pane, type two hyphens in
the Replace field, put an em dash (shortcut Option+Shift+– [hyphen] on the Mac or Alt+0151 in
Windows) in the With field, and then click Add. This causes Word to substitute the correct dash when
you type two consecutive hyphens.
Fixing Microsoft Word’s Bad Dashes
27_607169-ch17.indd 42827_607169-ch17.indd 428 4/22/10 7:58 PM4/22/10 7:58 PM
Chapter 17: Importing Text Files
429
Software versions
Pay attention to the version number of the word processor you use. This caution may seem obvious,
but the issue still trips up a lot of people. Usually, old versions (two or more revisions old) or new
versions (newer than the publishing or other importing program) cause import problems. The import
filters either no longer recognize the old format (something has to go to make room for new formats)
or were written before the new version of the word processor was released. InDesign supports
Microsoft Word for Windows versions 97, 2000, 2002/XP, 2003, and 2007, and Microsoft Word for
Mac versions 98, 2001, X, 2004, and 2008, as well as the same-numbered versions of Excel.
Adding Text
No matter where your text originates — in your mind, in e-mail, on the Web, or in a word proces-
sor — you can add it to an InDesign publication easily. You can type text directly in InDesign,
paste it, drag and drop it, or import it.
InDesign works with text inside frames — holders for the copy — that you can create in advance
or let InDesign create for you when you import text. (Chapter 18 covers these frames in detail.)
Caution
If you click a frame that holds text or a graphic when importing text, the text replaces the existing text or
graphic.
n
Cross-Reference
All the text you import may not fit in the selected text frame. Chapter 18 explains how to make it flow to other
text frames.
n
Using the Type tool
You can’t do anything with text without the Type tool. After you select the Type tool, you can click
in an existing block of text or click and drag to create a new text frame. You can even click in any
empty graphics frame or unassigned frame with the Type tool to convert it to a text frame.
You can’t click in master text frames — text frames placed on the page by the master page in use —
and simply start typing. To select a master text frame and add text to it, Shift+Ô+click or
Ctrl+Shift+click it. (For more on master pages, see Chapter 7.)
Note
What you can’t do is simply click in your document and begin typing; any text must be in a frame. Fortunately,
you can create that frame just by clicking and dragging with the Type tool.
n
From this point, start typing to enter text, or bring text in from other programs (as covered in the
following sections). If you want to add placeholder text — random text that you might use to try
27_607169-ch17.indd 42927_607169-ch17.indd 429 4/22/10 7:58 PM4/22/10 7:58 PM
Part V: Text Fundamentals
430
out formatting on, for example — choose Type ➪ Fill with Placeholder Text. InDesign adds fake
Latin text to the text frame until it is filled.
When you type new text, it takes on whatever style attributes are set for [Basic Paragraph Style], a
predefined style in InDesign. You can modify this predefined style as you can any style you create.
Cross-Reference
Chapter 19 covers styles in more detail.
n
Pasting text
When text is on the Mac or Windows Clipboard and the Type tool is active in InDesign, you can
paste the text at the location of the cursor (text-insertion pointer) or replace highlighted text with
it. If no text frame is active, InDesign creates a new rectangular text frame to contain the pasted
text.
InDesign uses standard menu commands and keyboard commands for cutting and copying text to
the Clipboard and for pasting text. On the Mac, press Ô+X to cut, Ô+C to copy, and Ô+V to
paste. In Windows, press Ctrl+X to cut, Ctrl+C to copy, and Ctrl+V to paste.
If you’re new to professional publishing, you have a few things to learn about the difference between
typing on a typewriter or into a word processor and entering text for a high-end publication:
l
Remember that you don’t need to type two spaces after a period or colon (in either your word
processor or InDesign). In fact, doing so causes awkward spacing and perhaps even text-flow
issues. So get out of the two-space habit.
l
Don’t enter extra paragraph returns for space between paragraphs, and don’t enter tabs to
indent paragraphs — you accomplish both more consistently with paragraph attributes (see
Chapter 21).
l
When you need to align text in columns, don’t enter extra tabs; place one tab between each
column and then align the tabs (see Chapter 25).
To see where you have tabs, paragraph breaks, spaces, and other such invisible characters, use the
command Option+Ô+I or Ctrl+Alt+I, or choose Type
➪ Show Hidden Characters, or choose Hidden
Characters from the View Options iconic popup menu in the application bar. Chapter 23 shows the
icons for each character.
Keep Characters to a Minimum
27_607169-ch17.indd 43027_607169-ch17.indd 430 4/22/10 7:58 PM4/22/10 7:58 PM
Chapter 17: Importing Text Files
431
By default, pasted text retains any formatting, such as boldface and font size, that it had in
InDesign and in most other programs. (A few programs don’t preserve that formatting when you
paste text from them.) However, InDesign lets you control whether pasted text retains its format-
ting as follows:
l
When pasting text from InDesign, you can strip out its formatting by choosing File ➪ Paste
without Formatting (or pressing Shift+Ô+V or Ctrl+Shift+V).
l
When pasting text from outside InDesign, you have the same Paste without Formatting
option as when pasting text from InDesign and an option to always strip formatting auto-
matically. To enable this automatic formatting removal, go to the Clipboard Handling
pane of the Preferences dialog box (choose InDesign ➪ Preferences ➪ Clipboard Handling
or press Ô+K on the Mac, or choose Edit ➪ Preferences ➪ Clipboard Handling or press
Ctrl+K in Windows) and select the Text Only radio button for the Paste setting.
l
To ensure that formatting is retained in text copied from other applications, select the All
Information (Index Marker, Swatches, Styles, and so on.) radio button.
Also, when you paste text, InDesign is smart enough to know to remove extra spaces or add them
around the pasted text. You can disable this by deselecting the Adjust Spacing Automatically When
Cutting and Pasting Words option in the Type pane of the Preferences dialog box.
Dragging and dropping text
You can also drag and drop text selected in another frame or document into a text frame in your
current document. If you press and hold Option or Alt while dragging, you drag a copy of the
selected text rather than move the original text.
By default, InDesign allows drag and drop within the Story Editor. To enable drag and drop in
your layout, go to the Type pane of the Preferences dialog box (choose InDesign ➪ Preferences ➪
Type or press Ô+K on the Mac, or choose Edit ➪ Preferences ➪ Type or press Ctrl+K in Windows)
and select the Enable in Layout View option. You can also drag and drop within the Story Editor
by selecting the Enable in Story Editor option.
Cross-Reference
The Story Editor is covered in Chapter 19.
n
You can also drag text from external sources into InDesign:
l
You can drag the icon of a text file or a supported word processing file directly from the
Windows Explorer (desktop or folder) or from the Mac Finder (desktop or folder) onto an
InDesign page.
l
You can drag highlighted text from a document created with another program (Microsoft
Word, for example) into an InDesign document window.
27_607169-ch17.indd 43127_607169-ch17.indd 431 4/22/10 7:58 PM4/22/10 7:58 PM
Part V: Text Fundamentals
432
In both cases, a new text frame is created, and any styles in the source files are also brought into
InDesign. Unlike importing a file through the Place command (covered later in this chapter), you
have no control over how this formatting is imported; instead, all formatting is imported or none
of it is, based on your InDesign preference settings.
Note
You can drag in only files that are in one of the supported formats (Word, Excel, InCopy, RTF, and text-only).
n
As with copy and paste, InDesign lets you control whether formatting is retained in dragged text:
l
When dragging text within InDesign, press and hold Shift to remove the text’s formatting.
The text then takes on the formatting of the text it is dragged into.
l
When dragging text from outside InDesign, use the Text Only option in the Clipboard
Handling pane of the Preferences dialog box, as described in the previous section, to strip
out formatting for all dragged text.
Importing text with the Place dialog box
The Place dialog box (choose File ➪ Place, or press Ô+D or Ctrl+D) gives you the most control
over how text is imported.
Text imported via the Place dialog box is placed according to your current selection:
l
If the cursor (text-insertion pointer) is active within text in a text frame, the text is inserted
at that location.
l
If a text frame is selected but you have not clicked within the frame’s text, the text is
imported into the frame, replacing any existing text.
l
If two or more text frames are selected, a loaded-text icon appears. Chapter 18 explains
the various forms this icon can take, but the basic form is of a paragraph icon with the
first few words of the text shown under it.
l
If no text frames are selected, a loaded-text icon lets you draw a rectangular text frame to
contain the text, click in an existing empty frame, or click any empty area in your layout
to create a text frame there with the text.
To place text, follow these steps:
1. Choose File ➪ Place or press Ô+D or Ctrl+D.
2. Locate the text files you want to import.
3. Determine the desired import options for the text files.
l
If you want to specify how to handle current formatting in the file, select the Place dia-
log box’s Show Import Options option and click Open. Doing so opens the appropri-
ate Import Options dialog box for the text file’s format. Then click OK to import the
graphic. (The Import Options dialog box is covered a little later in this section.) If you
27_607169-ch17.indd 43227_607169-ch17.indd 432 4/22/10 7:58 PM4/22/10 7:58 PM
Chapter 17: Importing Text Files
433
don’t select the Show Import Options option, clicking Open imports the graphic using
default settings.
l
If you have selected a text frame or have selected a range of text and want to replace it
with the placed text, select the Replace Selected Item option.
l
Ignore the Create Static Captions option; it applies only to graphics, and is explained
in Chapter 13.
Tip
If you prefer memorizing keyboard commands to selecting boxes, press Shift while you open the file to display
the import options.
n
4. If you had not selected a frame before starting the text import, specify where to
place the text by clicking and dragging the loaded-text icon to create a rectangular
text frame, clicking in an existing frame, or clicking in any empty frame.
You can select multiple files — text and/or graphics — in the Place dialog box by Shift+clicking a
range or by Ô+clicking or Ctrl+clicking multiple files one by one. InDesign lets you place each file
in a separate frame. Just click once for each file imported, or Shift+Ô+click or Ctrl+Shift+click to
have InDesign place all files on the page in separate frames. If you place more than one file at the
same time, the loaded-text icon displays the number of files to be placed, as well as a mini-preview
of each file, as Chapter 18 details.
Tip
When you place multiple files at one time, you can place them in any order. Just move among them using the
keyboard ← and → keys. You can also place them in a grid of text frames, as Chapter 18 explains.
n
To cancel the entire text import, just select a different tool. To cancel a specific file in a multiple-
file import, press Esc when that file’s mini-preview appears. (The other files are still available to be
placed.)
Import options for Microsoft Word and RTF files
InDesign offers a slew of options for controlling how Word and RTF files are imported through the
Place dialog box. There are so many options that you can actually save your import preferences as
a preset file for repeat use.
Figure 17.1 shows the Import Options dialog box for Microsoft Word. It has four groups of
options. (The import options for RTF files are identical.)
At the top of the pane is the Preset pop-up menu, which lets you select from saved sets of import
options. If you change any options in this dialog box, the popup menu shows [Custom], so you
know that any selected preset’s settings have been altered for this specific file import. You can save
settings by clicking Save Preset, and you can set a preset as the default import behavior by clicking
Set as Default; these settings are used for all Word file imports unless you choose a new default or
make changes in this dialog box. This feature lets you avoid using the Import Options dialog box
for your routine imports.
27_607169-ch17.indd 43327_607169-ch17.indd 433 4/22/10 7:58 PM4/22/10 7:58 PM
Part V: Text Fundamentals
434
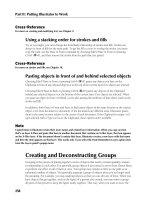
FIGURE 17.1
The Microsoft Word Import Options dialog box
The next section, Include, lets you strip out specific types of text from the Word file: Table of
Contents Text, Index Text, Footnotes, and Endnotes. Any selected items are imported. It’s com-
mon not to import table of contents or index text because you typically create your table of con-
tents and indexes in InDesign.
The third section, Options, has just one option: Use Typographer’s Quotes. If selected, it converts
keyboard quotation marks (' and ") to the curly typographer quotation marks (‘, ’, “, and ”).
Note that InDesign does not convert two consecutive hyphens into an em dash, as some other
programs do.
The fourth section, Formatting, is fairly complex.
To remove text formatting during import so that you have fresh text to which you can apply your
InDesign styles, select the Remove Styles and Formatting option from Formatting section. Two
additional controls become available if you select this option:
l
Preserve Local Overrides: Selecting this option retains local formatting such as italic and
boldface while ignoring the paragraph style attributes. You’d usually want this selected so
that meaning-related formatting is retained.
27_607169-ch17.indd 43427_607169-ch17.indd 434 4/22/10 7:58 PM4/22/10 7:58 PM
Chapter 17: Importing Text Files
435
l
Convert Tables To: You can use this pop-up menu to choose how tables are unformatted
during import. The Unformatted Tables menu item retains the table’s cell structure but
ignores text and cell formatting, whereas the Unformatted Tabbed Text menu item con-
verts the table to tabbed text (with a tab separating what used to be cells and a paragraph
return separating what used to be rows) and strips any formatting. If you intend to keep
tables as tables but format them in InDesign, choose Unformatted Tables.
To retain text formatting during import so that the InDesign document at least starts out using the
settings done in Word, select the Preserve Styles from Text and Tables option. There are two rea-
sons to select this option. The most common reason is that you are using style sheets in Word with
the same names as in InDesign. Doing so saves your designers from having to manually apply the
correct styles when working on layouts. (The editors basically do it in Word when editing.) The
other reason is that your Word file is really a rough template of your eventual InDesign file, so you
want to keep all that Word effort and use it as the basis for refinement in InDesign.
The Preserve Styles from Text and Tables option has several controls:
l
Manual Page Breaks: This popup menu lets you retain page breaks entered in Word,
convert them to column breaks, or strip them out. The break option you choose depends
on how your layout is structured compared to the Word file’s layout.
l
Import Inline Graphics: This option, if selected, imports graphics placed in the Word
text. (Chapter 13 covers inline graphics in more detail.)
l
Import Unused Styles: This option, if selected, loads all Word style sheets into InDesign,
rather than just the ones you actually applied to text in the file. You normally would not
want to import all of Word’s styles because the program has dozens of predefined styles
that could clog up your InDesign Paragraph Styles and Character Styles panels.
l
Track Changes: This option, if selected, saves all changes tracked by Word and makes
them available to InCopy and InDesign users who work on the InDesign file (see Chapter
24).
l
Convert Bullets & Numbers to Text: This option, if selected, removes any automatic
bullet and numbering lists in Word, converting the bullets and numbers into the actual
characters. If you select this option and insert an item in an imported numbered list, the
list doesn’t renumber automatically, as it would if you leave this unselected. (In previous
versions of InDesign, bullets and numbers were converted, eliminating the automatic
aspect.)
l
Style Name Conflicts: If InDesign detects that the Word file has styles with the same
name as styles in your InDesign document, it notes how many duplicate style names it
finds to the right of the Style Name Conflicts label. You then have two ways of handling
these conflicts, with separate pop-up menus for paragraph styles and character styles:
l
If you select the Import Styles Automatically option, you get three options for both
paragraph and character styles, using the two separate pop-up menus (Paragraph Style
Conflicts and Character Style Conflicts). The Use InDesign Style Definition menu item
preserves the current InDesign styles and applies them to any text in Word that uses a
27_607169-ch17.indd 43527_607169-ch17.indd 435 4/22/10 7:58 PM4/22/10 7:58 PM
Part V: Text Fundamentals
436
style sheet of the same name. This is the most common option because it lets your edi-
tors indicate what styles to use in InDesign but relies on InDesign’s more precise typo-
graphic settings.
If you choose the Redefine InDesign Style menu item, the Word style sheet’s format-
ting permanently replaces that of InDesign’s style. If you choose the Auto Rename
menu item, the Word file’s style sheet is renamed and added to the Paragraph Styles
or Character Styles panel. This preserves your existing InDesign styles while also pre-
serving the ones imported from the Word file.
l
If you select the Customize Style Import option, you can decide what specific
InDesign styles override same-name Word styles, what Word styles override same-
name InDesign styles, and what Word styles are renamed during import to prevent
any overriding. Click Style Mapping to open the Style Mapping dialog box shown in
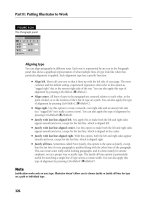
Figure 17.2, where you make these decisions. You can also click Auto-rename
Conflicts in that dialog box to rename all conflicting Word styles to new names.
(Choosing this option is the same as choosing Auto Rename in the Import Styles
Automatically popup menus.)
FIGURE 17.2
The Style Mapping dialog box
Import options for text-only files
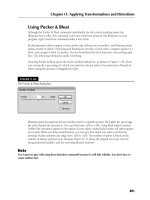
The options for text-only (ASCII) files are much simpler, as Figure 17.3 shows:
l
Character Set popup menu: This menu lets you change the encoding type for the text
file. The menu has 33 options, mainly for various languages and language groups such as
Chinese, Central European, Turkish, Greek, Baltic, and Japanese. In most cases, you leave
the menu at its default of Macintosh Roman (for North American Macs) or ANSI or one
of the UTF formats (for North American PCs). Choose another option only if you know
that the file is encoded in something else.
27_607169-ch17.indd 43627_607169-ch17.indd 436 4/22/10 7:58 PM4/22/10 7:58 PM
Chapter 17: Importing Text Files
437
l
Platform popup menu: This menu lets you choose between Macintosh and Windows.
Choose whichever is appropriate for the source file. The biggest differences are in how
paragraph returns are specified and in some supported special characters.
l
Set Dictionary To popup menu: This menu lets you assign the default spelling and
hyphenation dictionary language. Unless you’re publishing in multiple languages or
regions (such as in English for use in the U.K., Canada, and the United States), you can
leave this at the default setting, which is based on the language you selected when you
installed InDesign.
l
Extra Carriage Returns section: In this section, you can control how carriage returns are
handled. Select the Remove at End of Every Line option if the source file has a return at
the end of each line (often the result of copying text from the Web or from a PDF file).
Select the Remove Between Paragraphs option if the source file uses two hard returns to
indicate new paragraphs. You can select neither, one, or both as appropriate to your
source file.
l
Formatting section: In this section, you can select the Replace option to have several con-
secutive spaces converted to a tab (you specify the minimum number of spaces in the field
that follows). You can also select the Use Typographer’s Quotes option to convert key-
board quotation marks (' and ") to the curly typographer quotation marks (‘, ’, “, and ”).
This option is normally selected.
FIGURE 17.3
Left: The Text Import Options dialog box for a text-only file. Right: The Microsoft Excel
Import Options dialog box.
27_607169-ch17.indd 43727_607169-ch17.indd 437 4/22/10 7:58 PM4/22/10 7:58 PM
Part V: Text Fundamentals
438
InCopy files
There are no options when importing InCopy files. Because they contain formatting applied as part
of an InDesign layout, InDesign imports them as is.
Import options for Microsoft Excel files
When importing Excel spreadsheets, you have several options, as Figure 17.3 shows. In the
Options section, you can control the following settings:
l
Sheet popup menu: You can choose what sheet in an Excel workbook to import. The
default is the first sheet, which is usually named Sheet1 unless you renamed it in Excel. (If
you want to import several sheets, you need to import the same spreadsheet several times,
choosing a different sheet each time.)
l
View popup menu: You can import custom views you have defined in Excel for that
spreadsheet. If the Excel document has custom views, you can ignore custom views by
choosing [Ignore View] from the popup menu. If you have no custom views, this popup
menu is grayed out.
l
Cell Range popup menu: You can specify a range of cells using standard Excel notation
Sx:Ey, where S is the first row, x the first column, E the last row, and y the last column,
such as A1:G89. You can type a range directly in the popup menu, which also acts as a
text-entry field, or you can choose a previously entered range from the popup menu.
l
Import Hidden Cells Not Saved in View: By selecting this option, you import any hid-
den cells. Be careful when doing so because they’re usually hidden for a reason (typically,
they show noncritical data sources or interim calculations).
Unfortunately, you can’t export text from InDesign into the Word word processor format. Your only
options are RTF, InDesign Tagged Text, InCopy Document, InDesign Markup Language (IDML), and
text-only formats. The best option is RTF if you want to send the file to someone using a word proces-
sor, and it’s Tagged Text if you want to send it to another InDesign user with all InDesign settings
retained.
After you click in a text frame with the Type tool, you export text by choosing File
➪ Export, which pro-
vides a dialog box very much like the Save As dialog box. Here, you choose the file format, file name,
and file location. If you have selected a range of text in a text frame, only that text is exported; other-
wise, the entire story is exported.
Be aware that if you export highly formatted InDesign files to RTF and then later reimport those RTF
files into the same InDesign layout, you may get some odd effects, particularly around style names.
That’s because of how InDesign handles style names in groups versus how they are named during RTF
export. The bottom line is that you may end up with several copies of the same style, perhaps with dif-
ferent settings, when you reimport that RTF file.
Exporting Text
27_607169-ch17.indd 43827_607169-ch17.indd 438 4/22/10 7:58 PM4/22/10 7:58 PM
Chapter 17: Importing Text Files
439
In the Formatting section, you can control the following settings:
l
Table popup menu: You choose the Formatted Table menu item, which imports the
spreadsheet as a table and retains text and cell formatting; the Unformatted Table menu
item, which imports the spreadsheet as a table but does not preserve formatting; or the
Unformatted Tabbed Text menu item, which imports the spreadsheet as tabbed text (tabs
separate cells and paragraphs separate rows) with no formatting retained.
l
Table Style popup menu: Here, you can choose an InDesign table style to apply to the
imported table, or leave it alone (by choosing [No Table Style]).
l
Cell Alignment popup menu: You can tell InDesign how to align text within the cells.
You can retain the spreadsheet’s current alignments by choosing Current Spreadsheet or
override them by choosing Left, Right, or Center.
l
Include Inline Graphics: If selected, this option enables you to import any graphics
placed in the Excel cells. (Chapter 13 covers inline graphics in more detail.)
l
Number of Decimal Places to Include: In this field, type how many decimal places to
retain for numbers. For example, if you type
4 in this field and have a cell that contains
the value for π, InDesign imports the numeral 3.1415, even though the Excel spreadsheet
displays 10 decimal places (3.1415926535). Note that InDesign does not import any for-
mulas, just their numeric or textual results.
l
Use Typographer’s Quotes: Select this option to convert keyboard quotation marks
(' and ") to the curly typographer quotation marks (‘, ’, “, and ”). This option is normally
selected.
As part of the CS Live optional online services (covered in Chapter 1), InDesign CS5 can place files from
Adobe’s Buzzword shared-editing service. To place a file from Buzzword, first be sure you have an
active Internet connect, then choose File
➪ Place from Buzzword. If you’re not already signed in via the
Access CS Live panel, a dialog box appears, asking you to sign in to your CS Live account using your
Adobe ID. Once signed in, you can choose a Buzzword document and have it placed like any other
text file in InDesign. (In the Access CS Live panel, you can also export an InDesign story to the Buzzword
service so others can work on it.)
However, I don’t recommend using Buzzword with InDesign. Why? Because it does not support styles,
so all your text formatting is applied as local formatting. Worse, if you transfer a story from InDesign to
Buzzword, all InDesign styles are stripped out, and your fonts are changed to the handful of fonts that
Buzzword supports. (Note that other online shared-editing tools such as Google Docs have the same
issues in not supporting styles.)
The amount of reformatting required to make Buzzword files work effectively in InDesign layouts and
with InDesign’s text-formatting tools is simply too much to justify using Buzzword. You’re better off
sharing a Word or RTF file among collaborators.
Using Buzzword Text
27_607169-ch17.indd 43927_607169-ch17.indd 439 4/22/10 7:58 PM4/22/10 7:58 PM
Part V: Text Fundamentals
440
Import options for Tagged Text files
InDesign offers a text-file format of its own: Adobe InDesign Tagged Text. Tagged Text actually is
ASCII (text-only) text that contains embedded codes to tell InDesign what formatting to apply. You
embed these codes, which are similar to macros, as you create files in your word processor.
Cross-Reference
Chapter 4 explains how to export Tagged Text files. For a list of the Tagged Text codes themselves, check out
the documentation that comes on the InDesign installation disc.
n
When importing Tagged Text files, you have a few options if you select the Show Import Options
check box in the Place dialog box:
l
Use Typographer’s Quotes: If selected, it converts keyboard quotation marks (' and ") to
the curly typographer quotation marks (‘, ’, “, and ”).
l
Remove Text Formatting: If selected, all text formatting, including styles, is removed
from the text.
l
Resolve Style Conflicts Using: With this popup menu, choose Publication Definition or
Tagged Text Definition. The former applies the document’s style formatting to any
imported text that uses styles with the same names, overriding the formatting saved with
the Tagged Text file; the latter applies the Tagged Text file’s style definitions to any
imported text that uses styles with the same names, overriding the formatting specified in
the document.
l
Show List of Problem Tags Before Place: If selected, this option displays a dialog box
listing any style sheets in the imported file whose names conflict with those in the
document.
Cross-Reference
See Chapter 26 for details on how to use the Tagged Text format to automate the creation of catalogs and
other database-generated documents.
n
Summary
Because today’s word processors are so powerful, people are tempted to do a lot of sophisticated,
layout-oriented formatting in them before bringing the files into a layout program like InDesign.
But don’t. No word processor has the typographic or layout capability of InDesign, and doing a lot
of work in your word processing file is simply a waste of time; you’d need to do it over again in
InDesign in the context of your layout anyhow.
Focus on the meaning-oriented formatting in your word processor: use of style sheets to indicate
headlines, bylines, quotation blocks, and so on, as well as local formatting such as italic, super-
scripts, and font changes.
27_607169-ch17.indd 44027_607169-ch17.indd 440 4/22/10 7:58 PM4/22/10 7:58 PM
Chapter 17: Importing Text Files
441
When you’re done preparing your text, be sure to save it in a format compatible with InDesign.
Even if your word processor format is not compatible with InDesign, chances are it can save in one
that is.
InDesign provides a variety of methods for getting text into your documents, including importing
files through the Place dialog box, dragging and dropping files generated in a word processor, and
pasting text from other sources.
You can export text from InDesign for use in a word processor or another InDesign user. Your
options are RTF, InDesign Tagged Text, InCopy, and text-only.
27_607169-ch17.indd 44127_607169-ch17.indd 441 4/22/10 7:58 PM4/22/10 7:58 PM
27_607169-ch17.indd 44227_607169-ch17.indd 442 4/22/10 7:58 PM4/22/10 7:58 PM
443
CHAPTER
Flowing Text through
a Document
IN THIS CHAPTER
Creating text frames on master
pages
Linking frames and flowing
text through them
Breaking and rerouting text
flow
Specifying and adjusting
columns
Managing text-frame spacing
and alignment
Creating forced breaks
Working with overset text
I
t doesn’t take much experience with InDesign to discover that all your
text doesn’t fit into the finite space individual frames provide. Consider
these scenarios:
l
If you’re laying out a newsletter, you might receive an article in the
form of a Microsoft Word document that you need to flow into sev-
eral columns across a spread.
l
A magazine might have an article that starts on page 20 and then
continues on page 198, with the text originating in Apple iWork
Pages and saved as Rich Text Format (RTF) for import into
InDesign.
l
With catalogs, you might have a continuous file exported from a
database that contains different product descriptions positioned
below the items’ pictures.
l
In book publishing, each chapter may be imported as a separate
word processing file and flowed continuously through many pages.
l
The text of a simple advertisement, delivered by a client via e-mail,
might flow through several text frames.
In all these cases, the benefits of frames — the ability to size, resize, reshape,
and place them with precision — seem limiting. When the text doesn’t fit in
a frame, what are you supposed to do? Well, don’t resort to cutting and past-
ing text into different frames. You need to keep the imported text together
and link the frames that will contain the text. InDesign refers to the process
of linking frames as threading and considers linked frames to be threaded.
28_607169-ch18.indd 44328_607169-ch18.indd 443 4/22/10 7:58 PM4/22/10 7:58 PM
Part V: Text Fundamentals
444
You can link frames on a single page, from one page to another no matter how many pages are in
between, and automatically to quickly flow text while adding new pages with frames.
The text flowing through one or more threaded frames is considered a story. When you edit text in
a story, the text reflows throughout the columns and threaded frames. You can also spell-check
and do search and replace for an entire story even though you have just one text frame active on-
screen. Similarly, you can select all or some of the text in the story and change its formatting, copy
it, or delete it.
Cross-Reference
Chapter 9 explains how to create frames, and Chapter 17 describes what kind of text can be imported. Chapter
19 shows you how to select, spell-check, and search and replace text. Chapters 20 through 22 explain how to
format text.
n
Working with Text Frames
On a simple layout such as a business card or advertisement, you might simply create text frames as
you need them. In a newsletter, you might drag text frames for an article in from a library, but with a
book or even a text-heavy magazine, text frames are usually placed on master pages — a template for
document pages — so they automatically appear on document pages. Many publications can com-
bine master frames, individual frames, and threaded frames, as shown in Figure 18.1.
Cross-Reference
For detailed information about using libraries and master pages, see Chapters 6 and 7.
n
Creating text frames on master pages
Master pages — predesigned pages that you can apply to other pages to automate layout and
ensure consistency — can contain several types of text frames. You can have the following:
l
Text frames containing standing text such as a magazine’s folio.
l
Text frames containing placeholder text for elements such as figure captions or headlines.
l
An automatically placed text frame for flowing text throughout pages. The automatically
placed text frame is called the master text frame and is created in the New Document dia-
log box (choose File ➪ New ➪ Document or press Ô+N or Ctrl+N).
Creating a master text frame
A master text frame is an empty text frame on the default master page that lets you automatically
flow text through a document. When you create a new document, you can create a master text
frame, which fits within the margins and contains the number of columns you specify. Here’s how
it works:
28_607169-ch18.indd 44428_607169-ch18.indd 444 4/22/10 7:58 PM4/22/10 7:58 PM
Chapter 18: Flowing Text through a Document
445
1. Choose File ➪ New ➪ Document or press Ô+N or Ctrl+N.
2. Select the Master Text Frame option at the top of the New Document dialog box.
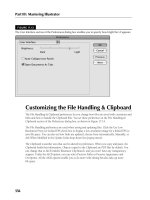
FIGURE 18.1
In this book spread, the folios at the top and bottom are on a master page. The main body text is in a mas-
ter text frame, which is threaded to other master text frames as needed on subsequent pages. The images
and their captions are placed in graphics and text frames created on the document page.
Cross-Reference
Chapter 4 provides more detail on this dialog box.
n
3. Use the Page Size area to set the size and orientation of the pages; select the Facing
Pages option if your pages have a different inside and outside margin (as a book
would).
4. Specify the size and placement of the master text frame by typing values in the Top,
Bottom, Inside, and Outside fields (or the Left and Right fields if Facing Pages is
deselected). InDesign places guides according to these values and places a text frame
within the guides. The text frame fits within the boundaries of these values and the
guides on the master page.
28_607169-ch18.indd 44528_607169-ch18.indd 445 4/22/10 7:58 PM4/22/10 7:58 PM
Part V: Text Fundamentals
446
5. Type a value in the Number field in the Columns area to specify the number of
columns in the master text frame. To specify the amount of space between the col-
umns, type a value in the Gutter field. InDesign places guides on the page to indicate
the columns.
6. Click OK to create a new document containing a master text frame.
After you create a document with a master text frame, you see guides on the first document page;
these guides indicate the placement of the frame.
Modifying master text frames
Although you set up the master text frame in the New Document dialog box, you’re not confined
to those settings. As you design a publication, you may need to change the size, shape, and/or
number of columns in the master text frame. To display the master page, choose Window ➪ Pages
or press Ô+F12 or Ctrl+F12. In the Pages panel that appears, double-click the master page’s icon.
(That icon is usually in the upper portion of the panel; the default master page is called A-Master.)
Cross-Reference
Chapter 5 covers the Pages panel in depth.
n
Use the Selection tool to click the master text frame within the guides and modify it using the fol-
lowing options:
l
The Control panel and Transform panel let you change the placement of a selected master
text frame using the X and Y fields, the size using the W and H fields, the angle using the
Rotation field, and the skew using the Shear X Angle field. You can also type values in the
Scale fields to increase or decrease the width and height of the text frame by percentages.
You can also use the mouse to resize and reposition the text frame.
l
The Text Frame Options dialog box (choose Object ➪ Text Frame Options or press Ô+B
or Ctrl+B), shown in Figure 18.2, lets you change the number of columns and the space
between them, specify how far text is inset from each side of the frame, specify how text
aligns vertically within the frame, and specify the placement of the baseline grid. If you
don’t want text within this box to wrap around any items in front of it, select the Ignore
Text Wrap option at the bottom of the dialog box.
l
Paragraph styles, character styles, object styles, Story panel settings, and other text attri-
butes are applied in the master text frame to the document text you flow into that frame.
You can always override those attributes by applying other styles or formatting to the
flowed text on your master text page.
l
The Direct Selection tool lets you drag anchor points on the frame to change its shape.
28_607169-ch18.indd 44628_607169-ch18.indd 446 4/22/10 7:58 PM4/22/10 7:58 PM
Chapter 18: Flowing Text through a Document
447
FIGURE 18.2
To change the properties of a master text frame, select it on the master page and use the
General pane (left) and Baseline Options pane (right) of the Text Frame Options dialog
box. (You can use this dialog box to change settings for any text frame, not just master
text frames.)
Drawing additional text frames
The master text frame is helpful for containing body text that flows through a document. You’re
likely to need plenty of other text frames on both master pages and document pages. Generally,
these are smaller text frames intended to hold headlines, captions, or short paragraphs of descrip-
tive copy.
Creating text frames on master pages
If you intend to add text frames to a master page for repeating elements such as headers and foot-
ers, you need to display the master page. Choose Window ➪ Pages or press Ô+F12 or Ctrl+F12 to
display the Pages panel, and then double-click the desired master page’s icon.
Any text frames you add to master pages appear on document pages based on that master page. To
switch back to the document and view the text frames, double-click a page icon in the upper por-
tion of the Pages panel.
Creating rectangular and variable-shaped text frames
To create rectangular text frames on document pages or master pages, select the Type tool. Click
and drag to create text frames, and use the Control panel or Transform panel to fine-tune the
placement and dimensions.
28_607169-ch18.indd 44728_607169-ch18.indd 447 4/22/10 7:58 PM4/22/10 7:58 PM
Part V: Text Fundamentals
448
Before you start threading text frames, you need to understand what a text frame is trying to tell you
about its text. To get the message, you need to select the text frames with one of the selection tools;
when the Type tool is selected, all you can see is overset text. The text frame provides the following
indicators, as shown in the figure:
l
In port (empty): A small white square on the upper-left corner of a text frame is the in port,
indicating where a story enters the frame.
l
In port (with arrow): Within a chain of threaded text frames, the in port might contain a
right-facing arrow indicating that the story is continuing into this frame from elsewhere.
l
Out port (empty): A small white square on the lower-right corner of a text frame is the out
port, indicating that the story fits comfortably within the frame.
l
Out port (with arrow): Within a chain of threaded text frames, the out port might contain a
right-facing arrow indicating that the story is continuing into another frame.
l
Out port (with plus sign): A small red plus sign in the out port indicates that more of the story
exists than can fit in the text frame and that there is no subsequent text frame for the text to
flow into.
l
Threads: When you choose View ➪ Show Text Threads (or press Option+Ô+Y or Ctrl+Alt+Y),
you can view threads, or lines, indicating the direction in which frames are threaded. (To see
multiple text chains, Shift+click to select text frames from different threads.)
Text Frame Anatomy
28_607169-ch18.indd 44828_607169-ch18.indd 448 4/22/10 7:58 PM4/22/10 7:58 PM
Chapter 18: Flowing Text through a Document
449
For variable-shaped text frames such as circles or Bézier shapes, use the Pen tool, Pencil tool,
Ellipse tool, or Polygon tool to create an empty frame. Then convert the frame to a text frame by
clicking it with the Type tool or a loaded-text icon, or by choosing Object ➪ Content ➪ Text. (You
get the loaded-text icon when you place a text file or when you flow text from an existing frame,
which is described later in this chapter.)
Tip
If you’re working on a document page and want to type in a text frame placed on the page by a master page,
select the Type tool and Shift+Ô+click or Ctrl+Shift+click the frame.
n
Cross-Reference
You can also edit an existing rectangular text frame with the Direct Selection tool as if it were a free-form
shape, as described in Chapter 16.
n
Threading Text Frames
InDesign provides four options for threading (or linking) text frames: manual, semiautoflow, auto-
flow, and array. Each has its own icon, as shown later. The method you choose depends on how
much text you’re dealing with and the size and quantity of your text frames:
l
You might use the manual method, in which you click the first text frame’s out port and
then the second text frame to link two text frames across several pages for an article
continuation.
l
The semiautoflow method lets you click a series of text frames to flow text. It works well
for linking a succession of text frames in something such as a catalog layout.
l
The autoflow method adds text frames and pages as you import text and is intended for
flowing long text files such as a book chapter or annual report. A variation of it doesn’t
add new pages.
Note
To see or hide text threads in your document, choose View ➪ Extras ➪ Show/Hide Text Threads or press
Option+Ô+Y or Ctrl+Alt+Y.
n
In the figure, the top text frame’s in port (at the upper-right corner of the frame) is empty, indicating that
the text starts in this frame rather than flows from another frame. An arrow icon in its out port (at the
lower left of the frame) shows that the text flows elsewhere, and the thread from its out port shows that
it flows to the frame below. That lower frame’s in port shows an arrow icon, indicating that text is flow-
ing to it. The out port of the lower frame shows the overset text icon (the red + symbol), indicating that
all the text doesn’t fit.
28_607169-ch18.indd 44928_607169-ch18.indd 449 4/22/10 7:58 PM4/22/10 7:58 PM