Wile Adobe InDesign CS5 Bible phần 7 pptx
Bạn đang xem bản rút gọn của tài liệu. Xem và tải ngay bản đầy đủ của tài liệu tại đây (1.98 MB, 94 trang )
Chapter 21: Specifying Paragraph Attributes
519
Caution
There is a risk with using Indent Here: You can have inconsistent hanging indents if the lead-in characters or
space differs in your paragraphs, or if tracking or kerning of text before the indent-to-here characters varies
from paragraph to paragraph.
n
Setting column spans
InDesign CS5 lets you override the number of columns set in a text frame (see Chapter 19) at a
paragraph level. That means you can have a headline and its body text in the same text frame, with
the text flowing into, say, two columns within the frame but the headline going across the full
frame width, as the top of Figure 21.3 shows. This type of layout is extremely common in newslet-
ters, newspapers, and magazines.
The Span Columns control is not all-or-nothing. Instead, it lets you specify how many columns the
paragraph spans:
l
All columns
l
Two columns
l
Three columns
l
Four columns
The easy part of creating first-line indents and hanging indents is using the software. The hard part can
be deciding how much space to use. For example, how do you decide how deep to make a first-line
indent? Amateur publishers or designers, who are likely to be thinking in inches rather than points or
picas, are likely to use too much space. They’re tempted to use 0.25", 0.125", or another nice dividend
of an inch for spacing rather than a more appropriate value such as 6 points. When deciding on spac-
ing, consider the following:
l
First-line indents that indicate new paragraphs should generally be one or two em spaces
wide. The width of an em space is equal to the point size in use — so 10-point text should
have a 10- or 20-point first-line indents. Opt for less space in narrower columns to avoid
awkward space and more space in wider columns so that the spacing is evident.
l
As you remember from grade-school outlines, indents help organize information, with deeper
indents indicating more detail about a topic. Professional publications, though, have many
organizational options — such as headlines, subheads, and run-in heads — so they rarely
have a need for more than two levels of indents. You might use indents on lengthy quotes,
bulleted lists, numbered lists, kickers, and bylines. If you do, stick to the same amount of
indent for each so that the readers’ eyes don’t wander.
Although these values give you a good starting point, you might need to modify them based on the
typeface, font size, column width, design, and overall goals of the publication.
Spacing Guidelines for Indents
31_607169-ch21.indd 51931_607169-ch21.indd 519 4/22/10 8:00 PM4/22/10 8:00 PM
Part V: Text Fundamentals
520
For example, if you have a four-column text frame and set Span Columns to Span 2 for the head-
line, the headline stretches across the first two columns of the frame, with the text in those col-
umns appearing below the headline, but the text in the other two columns is not affected, as the
middle of Figure 21.3 shows.
The Span Columns control also lets you split text within its column. For example, if you choose a
split of 2, the text is split into two columns within its text column. The bottom of Figure 21.3
shows an example.
FIGURE 21.3
The new Span Columns control lets you set text to break across columns in a text frame, such as text for
headlines and pull-quotes. At the top, setting a headline to span the entire text frame. In the middle, setting
a headline to span two columns in a four-column text frame. At bottom, setting a headline to split into two
columns in a two-column text frame.
31_607169-ch21.indd 52031_607169-ch21.indd 520 4/22/10 8:00 PM4/22/10 8:00 PM
Chapter 21: Specifying Paragraph Attributes
521
New Feature
The Span Columns controls are new to InDesign CS5. Before, you had to place the multicolumn-spanning
headlines in separate text frames.
n
Controlling Paragraph Spacing
InDesign lets you adjust spacing for paragraphs in two ways — between lines of text and between
paragraphs — and it provides three mechanisms for doing so.
Using leading
Leading (rhymes with sledding, not heeding), or the space between lines in a paragraph, is treated by
InDesign as a character format through the Character panel or Control panel, even though it’s tra-
ditionally an attribute of the paragraph. However, you can override InDesign’s character-oriented
approach so that it works like all other layout programs.
To ensure that leading changes affect entire paragraphs, select the Apply Leading to Entire
Paragraphs option in the Type pane of the Preferences dialog box (choose InDesign ➪ Preferences ➪
Type or press Ô+K on the Mac, or choose Edit ➪ Preferences ➪ Type or press Ctrl+K in Windows).
Cross-Reference
For more details on how to apply leading using the Character panel or Control panel, see Chapter 20.
n
Note
When creating paragraph styles, you set leading in the Basic Character Formats pane of the New Paragraph
Styles dialog box.
n
Adding space between paragraphs
When you choose Show Options from the Paragraph panel’s flyout menu, four additional fields
appear, as shown earlier in Figure 21.1. They’re also always in the Control panel. Two of these
fields let you insert space before and/or after paragraphs.
When you need to format a lengthy chunk of text with multiple paragraphs, there are two ways to
indicate a new paragraph. You can:
l
Indent the paragraph’s first line (by specifying a First-Line Left Indent value).
l
Insert some extra space between the new paragraph and the preceding one.
31_607169-ch21.indd 52131_607169-ch21.indd 521 4/22/10 8:00 PM4/22/10 8:00 PM
Part V: Text Fundamentals
522
Note
There’s no rule that says you can’t use both spacing methods, but generally you’ll use one or the other. What
you don’t want to do is insert extra returns between a paragraph, which is what was done in the days of
typewriters.
n
To insert space before selected paragraphs, type a value in the Space Before field in the Paragraph
panel or Control panel. You can also use the up and down nudge buttons next to the fields, and
you can use the ↑ and ↓ keys. (Just be sure you’ve selected the Space Before field first.) Each click
of the nudge button or press of the ↑ or ↓ key increases the Space Before value by 1 point. If you
press and hold Shift while using the nudge buttons or ↑ and ↓ keys, InDesign makes the spacing
the nearest multiple of 10 points and then continues to increment your Space Before value 10
points at a time as long as you hold Shift.
The Space After field works the same as the Space Before field but inserts space below selected
paragraphs. Generally, you use Space Before or Space After to separate paragraphs. Combining
both can be confusing.
Locking text to the baseline grid
Every document includes a grid of horizontal lines, called the baseline grid, which can be shown or
hidden (choose View ➪ Grids & Guides ➪ Show/Hide Baseline Grid or press Option+Ô+' or
Ctrl+Alt+') and used to help position objects and text baselines. A document’s baseline grid is
established in the Grids pane of the Preferences dialog box (choose InDesign ➪ Preferences ➪ Grids
or press Ô+K on the Mac, or choose Edit ➪ Preferences ➪ Grids or press Ctrl+K in Windows).
Generally, a document’s baseline grid interval is equal to the leading value applied to the body text.
You can ensure that lines of text align across columns and pages by locking their baselines to the
baseline grid. To do so, click the Align to Baseline Grid iconic button in the Paragraph panel (the
rightmost button on the bottom). To prevent such locking to the baseline, click the Do Not Align
to Baseline Grid iconic button. These same buttons also exist on the right side of the Control pan-
el’s Paragraph (¶) pane.
You can also set individual baseline grids for specific text frames. You do so in the Baseline Options
pane of the Text Frame Options dialog box (choose Object ➪ Text Frame Options or press Ô+B or
Ctrl+B). This is particularly handy for multicolumn text frames. InDesign aligns a paragraph to its
text frame’s baseline grid if it has one and to the document’s baseline grid if not — assuming, of
course, that the Align to Baseline Grid option is selected.
Cross-Reference
Chapter 10 covers how to set up baseline grids in more detail.
n
Although you can use InDesign’s Lock to Baseline Grid feature to align text baselines across col-
umns and pages (or within text frames), you can produce the same results by combining uniform
body text leading with other paragraph formats (Space Before and Space After). Some designers
like the certainty and simplicity of the Lock to Baseline Grid feature; others prefer to control text
alignment across columns themselves. Whichever works best for you is fine.
31_607169-ch21.indd 52231_607169-ch21.indd 522 4/22/10 8:00 PM4/22/10 8:00 PM
Chapter 21: Specifying Paragraph Attributes
523
Note
Keep in mind that when paragraphs are aligned to the baseline grid, the applied leading values are ignored.
n
InDesign provides a way to change how the Lock to Baseline Grid feature works. Normally, every
line in your text is aligned to the baseline grid when the feature is selected, but in some cases you
want only the first line of a paragraph to align to the baseline grid. For example, it’s common to
align just the first line in a multiline subhead to the baseline grid, letting the extra lines fall natu-
rally based on the paragraph’s leading. InDesign gives you a control to get this behavior: The Only
Align First Line to Grid option in the Paragraph panel’s and Control panel’s flyout menus. You can
use this option for any paragraph that you want to be the reset point if your text gets off the base-
line grid, without forcing every line to align to the grid. (Otherwise, every line in the subhead
would be aligned to the baseline grid, essentially overriding your leading.)
Another option, Balance Ragged Lines, in the Paragraph panel’s and Control panel’s flyout menus
ensures that the rag is balanced, which means that the lines of text alternate between short and
long when possible, rather than fall in a seemingly random pattern. The purpose of this option is
to make headlines and other large copy, such as in ads, more visually pleasing. You wouldn’t use
this option for body text; the use of small text size and the need for efficient spacing in body text
make this feature irrelevant. Unfortunately, this setting also forces hyphenation to achieve the bal-
anced rag, which may be contrary to your intent.
Using Initial Caps
A common layout technique meant to embellish key paragraphs is the use of initial caps. An initial
cap is an oversized first letter often dropped into the paragraph (and thus called a drop cap), but
InDesign also supports several variations of this technique.
Applying basic drop caps
A drop cap is created by notching a paragraph’s first letter or letters into the upper-left corner of the
paragraph. Drop caps are often used to embellish the first paragraph of a story, to draw attention
to paragraphs, and to interrupt the grayness in columns of text.
In the Paragraph panel or Control panel, InDesign lets you specify the number of letters you want
to include in a drop cap and the number of lines you want to notch them.
To add one or more drop caps to selected paragraphs, type a number in the Drop Cap Number
field in the Paragraph panel or Control panel. That’s how many characters will be made into drop
caps. To specify the number of lines a drop cap extends into a paragraph, type a value in the Drop
Cap Depth field.
If the first character in a paragraph is a quotation mark (“ or ‘), it can look odd as a one-character
drop cap. If you don’t like this look, you have a couple of options: You can either delete the open-
ing quotation mark, an acceptable but potentially confusing practice, or you can use the first two
31_607169-ch21.indd 52331_607169-ch21.indd 523 4/22/10 8:00 PM4/22/10 8:00 PM
Part V: Text Fundamentals
524
characters in the paragraph as drop caps instead. Some publications simply prefer not to start para-
graphs with quotes, preventing the problem from the editorial side.
After you create a drop cap, you can modify it by highlighting it and then changing any of its char-
acter formats — font, size, color, and so on — using a character style, the Character panel or
Control panel, and other panels (such as Stroke and Swatches). Figure 21.4 shows some examples
of drop caps.
FIGURE 21.4
The first (leftmost) drop cap has a one-character drop cap three lines deep. In the second example, the font
size of a one-letter, four-line drop cap has been enlarged to raise it above the first line of text. In the third
example, a Left Indent value combined with a negative First-Line Left Indent value produced the one-
character, three-line drop cap’s hanging indent. The fourth (rightmost) example is of a two-line, four-
character drop cap.
Using special initial cap techniques
The three-line, single-letter drop cap is used so often that it’s almost a cliché. Serviceable, yes, but
very commonplace. But you can create all sorts of initial caps — large first letters such as drop caps
and raised caps — in InDesign, as Figure 21.5 shows.
Creating raised caps
Raised caps are an alternative to drop caps, created by enlarging and raising the first few characters
of the paragraph above the first line in the paragraph. Creating raised caps is simple — highlight
the characters you want to raise with the Type tool and enlarge them using the Font Size field
in the Character panel (choose Type ➪ Character or press Ô+T or Ctrl+T) or in the Character pane
of the Control panel (press the A iconic button).
If you raise a word or phrase, you might need to track the raised words to tighten them. You also
might need to kern between the raised text and the remainder of the line. Other options for raised
caps include changing the font, color, and scale of the characters. If you plan to repeat the raised-
cap formatting, save it as a character style.
You can also create partially raised caps by creating a drop cap and then enlarging the drop cap
using the Character panel, the Character pane of the Control panel, or a character style.
31_607169-ch21.indd 52431_607169-ch21.indd 524 4/22/10 8:00 PM4/22/10 8:00 PM
Chapter 21: Specifying Paragraph Attributes
525
FIGURE 21.5
Examples of special initial caps. From left to right: a raised cap, a drop cap created by converting a charac-
ter into a graphic and then applying special effects to it, and a drop “cap” made up of a graphic.
Converting text to outlines for initial caps
You can convert drop caps, raised caps, or any character in any font to a graphic (actually, it’s a
frame, but you can work with it as if it were a graphic). You can then resize, scale, shear, fill, and
stroke the character-shaped frame — even import a graphic into it. To do this, highlight the char-
acters with the Type tool and then choose Type ➪ Create Outlines or press Shift+Ô+O or
Ctrl+Shift+O. Frames are based on the size and outlines of the font in use and are automatically
anchored in the paragraph so that they flow with the text.
Note that when you convert text to outlines, the characters no longer exist as text. If you converted
part of a word, the remaining portions of the word may be flagged during a spelling check. If you
need to edit the converted text, delete the outlines, retype the word, and convert the characters
again.
Using graphics as initial caps
Rather than use text for initial caps, you can use graphics. You can purchase clip art collections
that consist of nothing but ornate capital letters to use as initial caps. To use a graphic as an initial
cap, first delete the character you will replace with a graphic. Then, use the Place command
(choose File ➪ Place or press Ô+D or Ctrl+D) to import the graphic.
Size the graphic as appropriate and then place it behind the paragraph, next to the paragraph, or
anchored in the text of the paragraph. To anchor a graphic in text, select it with the Selection tool
and choose Edit ➪ Cut or press Ô+X or Ctrl+X. Select the Type tool and click at the beginning of
the paragraph; then, choose Edit ➪ Paste or press Ô+V or Ctrl+V. The graphic is now anchored to
the text, and you can apply InDesign’s Drop Cap settings to it as if it were text. Similarly, you can
resize it to create a raised cap from it. (Chapter 13 covers anchoring in more detail.)
In addition to importing graphics for use as initial caps, you can create your own graphics in
InDesign. For example, you can place the initial cap character in its own text frame and create
reverse type from it, as explained in this chapter, or you can shade the character and place it
slightly behind the paragraph.
31_607169-ch21.indd 52531_607169-ch21.indd 525 4/22/10 8:00 PM4/22/10 8:00 PM
Part V: Text Fundamentals
526
Adding Automatic Bullets and Numbered
Lists
Word processors have long been able to add automatic bullets and numbering to paragraphs. So it
makes sense that a layout program can, too. In InDesign, automatic bullets and numbering are
available as a paragraph-level format, accessed in the Paragraph panel’s and Control panel’s flyout
menus by choosing Bullets and Numbering Options.
The simplest way to use these is to select the paragraphs that you want to be bulleted or num-
bered, then click the appropriate button in the Paragraph (¶) pane of the Control panel. As you
would expect, InDesign offers more than basic controls, which you can access via the Bullets &
Numbering option in the Paragraph panel’s flyout menu or via the submenu options when choos-
ing Type ➪ Bulleted & Numbered Lists.
This bullets-and-numbering feature is most useful when coupled with a paragraph style; otherwise,
you have to apply these settings for each selection of paragraphs you want to make into a list.
Cross-Reference
Chapter 22 covers the setup, customization, and application of bullets and numbering in more detail.
n
Controlling Hyphenation and Justification
Hyphenation is the placement of hyphens between syllables in words that don’t completely fit at
the end of a line of text — a signal to the reader that the word continues on the next line. InDesign
gives you the option to hyphenate or not hyphenate paragraphs, and if you choose to hyphenate,
you can customize the settings that determine when and where hyphens are inserted.
As noted earlier, justification is the addition or removal of space between words and/or letters that
produces the flush-left/flush-right appearance of justified paragraphs. InDesign’s justification con-
trols let you specify how space is added or removed when paragraphs are justified.
If your pages contain columns of text, you have to decide whether to use left-aligned or justified
paragraphs and whether you want to hyphenate words that don’t entirely fit at the end of a line. As
mentioned earlier, if you justify paragraphs, you almost certainly want to hyphenate them, too. If
you opt for left-aligned paragraphs, whether to hyphenate is a personal choice.
InDesign offers two hyphenation methods: manual and automatic.
Manual hyphenation
If you want to break a particular word differently from the way InDesign would normally break the
word, you can place a discretionary hyphen in the word. If the word falls at the end of a line in a
hyphenated paragraph, InDesign uses the discretionary hyphen to split the word if the first syllable
31_607169-ch21.indd 52631_607169-ch21.indd 526 4/22/10 8:00 PM4/22/10 8:00 PM
Chapter 21: Specifying Paragraph Attributes
527
fits on the line. To insert a discretionary hyphen, press Shift+Ô+– or Ctrl+Shift+– in the text where
you want the hyphen to appear, or choose Type ➪ Insert Special Character ➪ Hyphens and
Dashes ➪ Discretionary Hyphen.
You can prevent a particular word from being hyphenated either by placing a discretionary hyphen
in front of the first letter or by highlighting the word and choosing No Break from the flyout menu
of the Control panel or Character panel. (You need to select the A iconic button in the Control
panel to get this option in its flyout menu.) But be careful: If you select more than a line’s width of
text and apply No Break, InDesign may not display the rest of the story’s text.
Tip
If you place a discretionary hyphen in a word, InDesign breaks the word only at that point (or does not break it
at all). However, you can place multiple discretionary hyphens within a single word; InDesign uses the one
that produces the best results.
n
InDesign uses discretionary hyphens only if you select the Hyphenate option in the Paragraph
panel or in the Control panel. If Hyphenate is not selected, neither manual nor automatic hyphen-
ation is applied.
Likewise, if you want to force a hyphen that cannot be broken (meaning it cannot fall at the end of
a line), insert the nonbreaking hyphen character (choose Type ➪ Insert Special Character ➪
Hyphens and Dashes ➪ Nonbreaking Hyphen or press Option+Ô+– or Ctrl+Alt+–).
Automatic hyphenation
To automatically hyphenate selected paragraphs, all you have to do is select the Hyphenate option
in the Paragraph panel or Control panel. (The Hyphenate option appears only if you choose Show
Options from the flyout menu.)
If you choose to hyphenate paragraphs, you can control how hyphenation is accomplished through
the Hyphenation option in the flyout menu. When you choose Hyphenation, the Hyphenation
Settings dialog box appears.
Here’s a brief description of each option:
l
Hyphenate: This is a duplicate of the Hyphenate option in the Paragraph panel and
Control panel. If you didn’t select it before opening the Hyphenation dialog box, you can
select it here.
l
Words with at Least ___ Letters: Here, you specify the number of letters in the shortest
word you want to hyphenate. For example, if you specify four letters, mama can be
hyphenated, but any can’t be.
l
After First ___ Letters: Here, you specify the minimum number of characters that can
precede a hyphen. If you type 2, for example, the word atavistic can be broken after at. If
you specify 3, atavistic cannot be broken until after ata.
31_607169-ch21.indd 52731_607169-ch21.indd 527 4/22/10 8:00 PM4/22/10 8:00 PM
Part V: Text Fundamentals
528
l
Before Last ___ Letters: This field is similar to After First ___ Letters, but it determines
the minimum number of characters that can follow a hyphen.
l
Hyphenation Limit ___ Hyphens: Specify the number of consecutive lines that can be
hyphenated in this field. Some designers limit the number of consecutive hyphens to two
or three because they believe that too many consecutive hyphens produces an awkward,
ladder-like look. If the Hyphenation Limit value you enter prevents hyphenation in a line
that would otherwise be hyphenated, the line may appear more spaced out than sur-
rounding lines.
l
Hyphenation Zone: This field applies only to nonjustified text and only when the Adobe
Single-Line Composer option is selected (in the Paragraph panel’s or Control panel’s fly-
out menu). A hyphenation point must fall within the distance specified in this field to be
used. Otherwise-acceptable hyphenation points that do not fall within the specified
hyphenation zone are ignored. You can also click and drag the slider below the field to
select a value rather than type a value in this field.
l
Hyphenate Capitalized Words: Select this option to break capitalized words, such as
proper names and the first word of sentences. If you don’t select this check box, a capital-
ized word that would otherwise be hyphenated gets bumped to the next line, possibly
producing excessive spacing in the previous line.
l
Hyphenate Last Word: Select this option to break the last word in a paragraph.
Otherwise, InDesign moves the entire word to the last line and spaces the preceding text
as necessary. Some typographers don’t like having a word fragment as the last line, argu-
ing that breaking a word in two is not necessary because there is clearly enough space to
keep it together. I’m not so dogmatic.
l
Hyphenate across Column: Select this option to let text hyphenate at the end of a column.
When you’re done specifying hyphenation settings in the Hyphenation Settings dialog box, click
OK to close the dialog box and return to your document.
Justification controls
InDesign provides three options for controlling how justification is achieved:
l
Condense or expand the width of spaces, or spacebands, between words.
l
Add or remove space between letters.
l
Condense or expand the width of characters, or glyphs.
The options in the Justification dialog box let you specify the degree to which InDesign adjusts
normal word spaces, character spacing, and character width to achieve justification. You access this
dialog box through the flyout menu in the Control panel or in the Paragraph panel, or by pressing
Option+Shift+Ô+J or Ctrl+Alt+Shift+J. Although you can use the Justification controls on selected
paragraphs, in most cases you specify Justification settings when you create styles, particularly your
body-text styles.
31_607169-ch21.indd 52831_607169-ch21.indd 528 4/22/10 8:00 PM4/22/10 8:00 PM
Chapter 21: Specifying Paragraph Attributes
529
Note
When creating paragraph styles, all the justification controls are available in the Justification pane of the New
Paragraph Styles dialog box.
n
Here’s a brief description of each option:
l
Word Spacing: Type the percentage of a spaceband character that you want to use when-
ever possible in the Desired field. (The default value is 100%, which uses a font’s built-in
width.) Type the minimum acceptable percentage in the Minimum field; type the maxi-
mum acceptable percentage in the Maximum field. The smallest value you can enter is
0%; the largest is 1000%. Some designers are adamant that only word spaces — not letter
spaces — should be adjusted when justifying text. Others allow small adjustments to let-
ter spacing as well.
l
Letter Spacing: The default value of 0% in this set of three fields uses a font’s built-in let-
ter spacing. In the Desired field, type a positive value to add space (in increments of 1% of
an en space) between all letter pairs; type a negative value to remove space. Type the mini-
mum acceptable percentage in the Minimum field; type the maximum acceptable percent-
age in the Maximum field.
l
Glyph Scaling: The default value of 100% uses a character’s normal width. In the Desired
field, type a positive value to expand all character widths; type a negative value to con-
dense character widths. Type the minimum acceptable percentage in the Minimum field;
type the maximum acceptable percentage in the Maximum field. Some designers ada-
mantly contend that scaling characters is even more unacceptable than letter spacing,
whereas others see no harm in scaling characters, as long as it’s kept to a minimum. If you
do apply glyph scaling, keep it to a range of 97 to 103 percent at most.
Consider changing the After First ___ Letters hyphenation setting to 2 if you have narrow columns or
large text. Although many typographers object to two-letter hyphenation — as in ab-dicate or ra-dar —
it often looks better than text with large gaps caused by the reluctance to hyphenate such words.
Hyphenation also makes sense for many words that use two-letter prefixes such as in-, re-, and co
Although I advocate two-letter hyphenation at the beginning of a word, I prefer three-letter hyphenation
at the end (set through Before Last ___ Letters). Except for words ending in -ed and sometimes -al, most
words don’t lend themselves to two-letter hyphenation at the end of the word. Part of this is functional
because it’s easy for readers to lose two letters beginning a line. I prefer two-letter hyphenations at the
end of a word only when the alternative is awkward spacing. As with all typography, this ultimately is
a personal or house-style choice.
Although the use of two versus three letters is debated, everyone agrees that words broken using mini-
mum settings of 1 look awful. They also go against reader expectations because the norm is to have
several letters after a hyphen. Never use a minimum setting of 1 for After First ___ Letters. If you do, you
get hyphenations such as A-sia, a-typical, and u-niform that simply look terrible in print. They also don’t
provide enough context for the reader to anticipate the rest of the word. Likewise, never use a minimum
of 1 for Before Last ___ Letters because you get hyphenations such as radi-o.
How Many Characters?
31_607169-ch21.indd 52931_607169-ch21.indd 529 4/22/10 8:00 PM4/22/10 8:00 PM
Part V: Text Fundamentals
530
I suggest 85 percent minimum, 100 percent optimum, and 150 percent maximum for word spac-
ing; and –5 percent minimum, 0 percent optimum, and 10 percent maximum for letter spacing. I
prefer minimum settings that are less than the optimum because they help text fit more easily in
narrow columns. These settings work well for most newsletters and magazines output on an
imagesetter. At the same time, I usually leave the maximum word spacing at 150 percent.
Note
When specifying values in the Justification dialog box, Minimum values must be smaller than Desired values,
which in turn must be smaller than Maximum values.
n
The Auto Leading field in the Justification dialog box lets you specify a custom value for Auto
Leading. In InDesign, this is a character-level format, even though it rightfully should be a para-
graph format. Although it’s great that InDesign also makes it available in this paragraph-oriented
dialog box, it’s a bit hidden here. Plus, it’s too bad that you can’t specify an actual number of
points (such as +2 to indicate 2 points of leading more than the text size), which is how leading is
traditionally calculated.
Cross-Reference
Leading is covered in detail in Chapter 20.
n
InDesign also lets you control what happens to words that end up taking a full line’s width. In the
Single Word Justification pop-up menu, you would normally keep the default Full Justification
option, which spaces the word to fill the line. You could also choose Align Left, Align Center, or
Align Right to avoid spacing out the word to fit, but that’s a cure worse than the problem: Having a
line of a different width than the others looks like either a new paragraph or a mistake, and both
appearances are sure to confuse readers.
If you use the Adobe Paragraph Composer option (explained in the next section) for justified para-
graphs, specifying a narrow range between minimum and maximum Word Spacing, Letter
Spacing, and Glyph Scaling generally produces good-looking results. However, if you choose the
Adobe Single-Line Composer option, a broader range between Minimum and Maximum gives the
Word spacing — the space between words — is another important contributor to the aesthetics of a
document. Think about it: If the words in a sentence are too close to one another, comprehension may
be affected because of the difficulty in telling where one word ends and another begins. If the words are
too far apart, the reader might have a difficult time following the thought being conveyed.
Here’s a design rule I like to follow: The wider the column, the more space you can add between
words. This is why books tend to have more word spacing than magazines. Like all other typographic
issues, there’s a subjective component to picking good word spacing. Experiment to see what works
best in your documents.
About Word Spacing
31_607169-ch21.indd 53031_607169-ch21.indd 530 4/22/10 8:00 PM4/22/10 8:00 PM
Chapter 21: Specifying Paragraph Attributes
531
composer more leeway in spacing words and letters and hyphenating words and can produce better-
looking results. The best way to find out what values work best for you is to experiment with
several settings. Print hard copies and let your eyes decide what values produce the best results.
Note
A paragraph’s justification settings are applied whether the paragraph is justified or not. However, for nonjusti-
fied paragraphs, only the Desired values for Word Spacing, Letter Spacing, and Glyph Scaling are used.
n
Composing text
The Paragraph panel’s — as well as the Control panel’s — flyout menu offers two choices for
implementing the hyphenation and justification settings you’ve established: the Adobe Single-Line
Composer and the Adobe Paragraph Composer. (These are also available in the Justification dialog
box covered in the previous section.)
Adobe Single-Line Composer
Old-school programs such as QuarkXPress and PageMaker use single-line composition methods to
flow text. This method marches line by line through a paragraph and sets each line as well as pos-
sible using the applied hyphenation and justification settings. The effect of modifying the spacing
of one line on the lines above and below is not considered in single-line composition. If adjusting
the space within a line causes poor spacing on the next line, tough luck.
InDesign offers this traditional approach to composing text; just choose Adobe Single Line
Composer in the Justification dialog box’s Compose popup menu. When you use the Adobe
Single-Line Composer, the following rules apply:
l
Adjusting word spacing is preferred over hyphenation.
l
Hyphenation is preferred over glyph scaling.
l
If spacing must be adjusted, removing space is preferred over adding space.
Adobe Paragraph Composer
InDesign’s Adobe Paragraph Composer (called the Multi-Line Composer in some earlier versions)
is enabled by default. It takes a broader approach to composition by looking at the entire para-
graph at one time. If a poorly spaced line can be fixed by adjusting the spacing of a previous line,
the Paragraph Composer reflows the previous line. The Paragraph Composer is governed by the
following principles:
l
The evenness of letter spacing and word spacing is the highest priority. The desirability of
possible breakpoints is determined by how much they cause word and letter spacing to
vary from the Desired settings.
l
Uneven spacing is preferred to hyphenation. A breakpoint that does not require hyphen-
ation is preferred over one that does.
l
All possible breakpoints are ranked, and good breakpoints are preferred over bad ones.
31_607169-ch21.indd 53131_607169-ch21.indd 531 4/22/10 8:00 PM4/22/10 8:00 PM
Part V: Text Fundamentals
532
The paragraph-level composer is more sophisticated than the single-line option, offering generally
better overall spacing because it sacrifices optimal spacing a bit on one line to prevent really bad
spacing on another, something the single-line method does not do.
However, dealing with the paragraph-level composer has one frustration: When you try to edit text
or play with tracking to get rid of an orphan or widow, the Paragraph Composer keeps adjusting
the text across several lines, often counteracting your nips and tucks. The Single-Line Composer
doesn’t do that.
Note
When creating paragraph styles, the composition controls are available in the Justification pane of the New
Paragraph Styles dialog box.
n
Setting Other Paragraph Formats
The Paragraph panel’s and Control panel’s flyout menus contain two additional paragraph-
formatting options:
l
Keep Options: This option lets you determine how and when paragraphs can be split
when they fall at the bottom of a column or page.
l
Paragraph Rules: This option lets you place a horizontal line in front of or after a para-
graph. Lines placed using the Paragraph Rules feature become part of the text and move
along with surrounding text when editing causes text reflow.
Keep Options
A widow is the last line of a paragraph that falls at the top of a column (the poor thing has been cut
off from the rest of the family). An orphan is the first line of a paragraph that falls at the bottom of a
column (it, too, has become separated from its family). InDesign’s Keep Options feature lets you
prevent widows and orphans; it also lets you keep paragraphs together when they would otherwise
be broken at the bottom of a column.
When you choose Keep Options from the Paragraph panel’s or Control panel’s flyout menu — or
when you use the shortcut Option+Ô+K or Ctrl+Alt+K — the Keep Options dialog box appears.
The Keep Options dialog box provides several options for how paragraphs are managed as text
breaks across columns and pages:
l
Keep with Next ___Lines: This option applies to two consecutive paragraphs. Specify the
number of lines of the second paragraph that must stay with the first paragraph if a col-
umn or page break occurs within the second paragraph. This option is useful for prevent-
ing a subhead from being separated from the paragraph that follows.
31_607169-ch21.indd 53231_607169-ch21.indd 532 4/22/10 8:00 PM4/22/10 8:00 PM
Chapter 21: Specifying Paragraph Attributes
533
l
Keep Lines Together: Select this option to prevent paragraphs from breaking and to con-
trol widows and orphans. When this box is selected, the two options below it become
available. (The radio buttons present an either/or choice. One must be selected; At Start/
End of Paragraph is selected by default.)
l
All Lines in Paragraph: Select this option to prevent a paragraph from being broken at the
end of a column or page. When a column or page break occurs within a paragraph to which
this setting has been applied, the entire paragraph moves to the next column or page.
l
At Start/End of Paragraph: Select this option to control widows and orphans. When this
option is selected, the two fields below it become available:
l
Start ___ Lines: This field controls orphans. The value you type is the minimum
number of lines at the beginning of a paragraph that must be placed at the bottom of a
column when a paragraph is split by a column ending.
l
End ___ Lines: This field controls widows. The value you type is the minimum num-
ber of lines at the end of a paragraph that must be placed at the top of a column when
a paragraph is split by a column ending.
Caution
Keep in mind that when you eliminate an orphan or widow using Keep Options, the line that precedes the
widow line is bumped to the next column or page, which can produce uneven column endings on multicolumn
pages.
n
l
Start Paragraph: From this popup menu, choose In Next Column to force a paragraph to
begin in the next column; choose In Next Frame to force a paragraph to begin in the next
frame; or choose On Next Page to force a paragraph to begin on the next page (such as for
chapter headings). Your other choices are similar: On Next Odd Page and On Next Even
Page. Choose Anywhere to let the paragraph begin where it would fall naturally in the
sequence of text (no forced break).
Note
When creating paragraph styles, all the above controls are available in the Keep Options pane of the New
Paragraph Styles dialog box.
n
Paragraph rules
Usually, the easiest way to create a horizontal line is to use the Line tool, but if you want to place a
horizontal line within text so that the line moves with the text when editing causes the text to
reflow, you need to create a paragraph rule. A paragraph rule looks much like a line created with
the line tool but behaves like a text character. Paragraph rules have many uses. For example, you
can place one above or below a subhead to make it more noticeable or to separate the subhead
from the paragraph that precedes or follows it. You can also place paragraph rules above and below
a pull-quote so that the rules and the pull-quote text move if editing causes text reflow.
31_607169-ch21.indd 53331_607169-ch21.indd 533 4/22/10 8:00 PM4/22/10 8:00 PM
Part V: Text Fundamentals
534
Here’s how to place a paragraph rule:
1. Select the paragraphs to which you want to apply a rule above and/or a rule below
and then choose Paragraph Rules from the Paragraph panel’s or Control panel’s fly-
out menu or press Option+Ô+J or Ctrl+Alt+J. You can also specify this as part of a
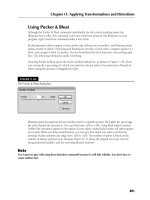
paragraph style. The Paragraph Rules dialog box, shown in Figure 21.6, appears.
FIGURE 21.6
The Paragraph Rules dialog box
2. Choose Rule Above or Rule Below and then select the Rule On option. You can add a
rule above, below, or both. If you want to add rules above and below, you must select
Rule On for both options and specify their settings separately. If you want to see the rule
as you create it, select the Preview option.
3. For Weight, choose a predefined thickness from the popup menu or type a value in
the field.
4. Choose a rule type from the Type popup menu. Typically, you’d use just a simple line,
but InDesign offers 17 types of lines, including dashed, striped, dotted, and wavy. Any
custom stroke styles you create (see Chapter 12) also show up as options in the Type
pop-up menu.
5. Choose a color from the Color popup menu, which lists the colors shown in the
Swatches panel (choose Window ➪ Color ➪ Swatches or press F5). If you choose
(Text Color), InDesign automatically uses the color applied to the first character in the
paragraph. If your ruling line is not a plain line, you can also choose the Gap Color to
determine what color goes between dashes, stripes, dots, and so on in your line. For both
the Color and Gap Color options, you can specify a corresponding tint (shade) with the
Tint and Gap Tint popup menus, respectively.
6. From the Width popup menu, choose an option. Choose Column if you want the rule
to extend from the left edge of the column to the right edge of the column; choose Text if
you want the rule to extend from the left edge of the frame or column to the line ending
on the right.
31_607169-ch21.indd 53431_607169-ch21.indd 534 4/22/10 8:00 PM4/22/10 8:00 PM
Chapter 21: Specifying Paragraph Attributes
535
7. To indent the rule from the left and/or right edges, type values in the Left Indent
and/or Right Indent fields.
8. To control the vertical position of the rule, type a value in the Offset field. For a rule
above, the offset value is measured upward from the baseline of the first line in a para-
graph to the bottom of the rule; for a rule below, the offset is measured downward from
the baseline of the last line in a paragraph to the top of the rule.
9. Click the Overprint Stroke option if you want to print a rule on top of any underly-
ing colors. This ensures that any misregistration during printing does not result in white
areas around the rule where the paper shows through. You typically use this for black or
other dark colors. A similar Overprint Gap option exists for lines that have a Gap Color.
10. To ensure that a rule over a paragraph at the top of a frame appears within the text
frame, select the Keep in Frame option.
11. Click OK to close the dialog box, implement your changes, and return to your
document.
To remove a paragraph rule, click in the paragraph to which the rule is applied, choose Paragraph
Rules from the Paragraph panel’s flyout menu, deselect the Rule On option, and then click OK.
Tip
You can use the Paragraph Rules feature to place a band of color behind text by specifying a line thickness at
least 2 points larger than the text size and offsetting the rule so that it moves up behind the text.
n
Note
When you’re creating paragraph styles, all the preceding controls are available in the Paragraph Rules pane of
the New Paragraph Styles dialog box.
n
Optical margin override
Additionally, the Paragraph panel’s flyout menu contains a third option not available in the panel
itself: Ignore Optical Margin, which tells InDesign not to apply optical margin alignment for spe-
cific paragraphs in a story that has optical margin alignment applied.
Cross-Reference
Chapter 22 explains this feature in depth.
n
You can also control optical margin alignment as a paragraph style setting, so any paragraphs with
a certain style applied ignore the optical margin alignment set for the story. To do so, select the
Ignore Optical Margin check box in the Indents and Spacing pane of the New Paragraph Style or
Paragraph Style Options dialog box.
Cross-Reference
Chapter 7 explains how to create and edit styles.
n
31_607169-ch21.indd 53531_607169-ch21.indd 535 4/22/10 8:00 PM4/22/10 8:00 PM
Part V: Text Fundamentals
536
Summary
Just as character formats let you control how selected characters look, InDesign’s paragraph for-
mats let you control the appearance of selected paragraphs. For example, you can control a para-
graph’s alignment and specify left, right, and/or first-line indents, and you can use drop caps to
add space between paragraphs. If you want to hyphenate a paragraph, you can add hyphenation
points manually to individual words, or you can have InDesign automatically hyphenate words as
appropriate.
If you choose to use InDesign’s justification controls to specify how space is added or removed
between characters and/or words to achieve justification, you also have two options for composing
text (controlling the spacing approach): the full-paragraph composition method that looks at sev-
eral lines of text at one time and the single-line method that looks at each line in isolation.
31_607169-ch21.indd 53631_607169-ch21.indd 536 4/22/10 8:00 PM4/22/10 8:00 PM
537
CHAPTER
Creating Special Text
Formatting
IN THIS CHAPTER
Working with bulleted and
numbered lists
Formatting fractions
Creating reverse type
Adding sidebars and
pull-quotes
Specifying optical margin
alignment
Applying end-of-story markers
Creating custom underlines
and strikethroughs
Converting text to graphics
Running text along a path
A
fter you learn the basics of typefaces, character formats, and para-
graph formats, you can achieve just about any look with text. The
trick is combining and applying the skills you’ve learned to produce
special effects that not only look professional but also enhance the meaning
of the text.
Glance at any professional publication — a national magazine, direct-mail
catalog, cookbook, or product brochure — and you see typographic tech-
niques that set the publication apart from anything that can be easily pro-
duced in a word processor. (Even when word processors do offer a feature,
they often lack the control necessary to really fine-tune an effect.) Skilled
designers use these effects with a purpose — special bullet characters
emphasize a theme, drop caps draw readers in, and pull-quotes tantalize the
audience, for example.
Throughout this chapter, you learn how InDesign can produce special typo-
graphic effects and, more important, when to use them.
You can apply all sorts of formatting to text beyond those described here.
For example, by using InDesign’s object transformation tools, as covered in
Chapter 11, you can change the look of entire text blocks such as through
rotation and scaling.
By applying special object effects such as transparency and embossing —
covered in Chapter 12 — you can really jazz up your layouts. InDesign’s
text-wrap feature (covered in Chapter 13) also lets you make text interact
with surrounding objects.
32_607169-ch22.indd 53732_607169-ch22.indd 537 4/22/10 8:00 PM4/22/10 8:00 PM
Part V: Text Fundamentals
538
And for text selections, you can apply color (see Chapter 8), strokes (see Chapter 12), and various
character and paragraph formatting (see Chapters 20 and 21).
Using Bulleted and Numbered Lists
Automatic bullets and numbering are available as a paragraph-level format in InDesign, accessed in
the Paragraph panel’s and Control panel’s flyout menus by choosing Bullets and Numbering
Options. (Figure 22.1 shows the resulting dialog box.) The Type menu has additional bullet and
number controls. You can also apply these lists via paragraph styles.
Defining lists
The process for setting automatic bullets and numbered lists is almost identical; only the top part
of the Bullets and Numbering dialog box differs, based on whether you select Bullets or Numbers
from the List Type popup menu. (Choose None to remove the automatic bullets or numbers.)
FIGURE 22.1
Note that in the Bullets and Numbering dialog box, the top part changes based on whether you are format-
ting bullets (left) or numbered lists (right).
Follow these steps to set up a list (select the Preview option if you want to see the results of your
choices before you finalize them):
1a. For a bulleted list, choose a bullet character from the Bullet Character area. The area
shows bullet characters available for the current font; you can change the selection by
changing the selected font or by clicking Add, which opens a dialog box similar to the
Glyphs panel (see Chapter 23).
32_607169-ch22.indd 53832_607169-ch22.indd 538 4/22/10 8:00 PM4/22/10 8:00 PM
Chapter 22: Creating Special Text Formatting
539
1b. For a numbered list, choose a numbering style in the Format popup menu and go
through the following options.
i. Specify the number’s formatting in the Number field (you can select special characters
and placeholder numbers in the popup menu to its right) and choose whether the
numbers continue or start anew at this paragraph through the Mode popup menu
(your choices are Continue from Previous Number and Start At).
ii. In the Format popup menu, your options are 1, 2, 3, 4 . . .; 01, 02, 03, 04 . . .; I, II,
III, IV . . .; i, ii, iii, iv . . .; A, B, C, D . . .; a, b, c, d . . .; 001, 002, 003, 004 . . .; and
0001, 0002, 0003, 0004 . . . .
iii. If you are using defined lists (covered later in this section), select the appropriate list
type from the List Type popup menu. You can also choose New List to create a new
list type.
iv. If you are using sublists, also called nested lists, specify the current paragraph’s list
level by entering a value between 1 and 9 in the Level field. (This paragraph is part of
a sublist under the paragraph 1b in the main list.) If you do use sublists, select the
Restart Numbers at This Level After check box and enter a level — it must be higher
than the current level — in the adjacent field or choose the Any Previous Level option
from the adjacent popup menu to reset the numbering if this paragraph is at a differ-
ent numbering level from previous ones in the list. Specifying a specific level means
that the numbering restarts only if the previous numbered paragraph was at the speci-
fied level. Choosing Any Previous Level resets the numbering if the previous num-
bered paragraph was at any other level than this paragraph’s.
v. In the Number field, you can insert all sorts of special spaces and characters, giving
you broad control, through the Insert Special Characters submenu, over how numbers
appear. You can also choose number placeholders, which tell InDesign what numbers
to insert in the list. For simple lists, choose Current Level from the Insert Number
Placeholder popup submenu — the default. The other levels are used when you have
sublists within lists. You can also choose Chapter Number to insert the chapter’s num-
ber as part of the list item’s placeholder number. (See Chapter 28 for more on specify-
ing the chapter number.)
2. Set the font settings for the bullet or numbers using the Character Style popup
menu to choose a character style. The default setting of [None] uses the paragraph’s
current formatting. Note that the look of the numerals is more a design decision than an
editorial decision. If numerals are in a different typeface and/or in a different color, a
period following the numeral might just look cluttered. If you don’t have a character style
defined, choose New Character Style to open the New Character Style dialog box, where
you can define the bullets’ or numbers’ character style.
3. In the Bullet or Number Position section of the dialog box, set the indents for the
list. Using the Alignment popup menu, choose Left, Center, or Right to determine where
the bullet or numeral is positioned within its tab. You can set the hanging indent amount
and the bullet’s or number’s overhang by using the Left Indent, First Line Indent, and
Tab Position fields.
4. Click OK when you are done with the settings.
32_607169-ch22.indd 53932_607169-ch22.indd 539 4/22/10 8:00 PM4/22/10 8:00 PM
Part V: Text Fundamentals
540
InDesign gives you even more control over bulleted and numbered lists through the options you
get by choosing Type ➪ Bulleted & Numbered Lists:
l
The Apply/Remove Bullets and Apply/Remove Numbers submenu options quickly let you
turn on or off the bullets or numbering for selected paragraphs. You can also use the
iconic buttons for these controls on the Control panel.
l
The Restart/Continue Numbering option is a handy way to control what paragraphs are
numbered, such as when you have an unnumbered paragraph within a list. (This option is
also available in the flyout menu of the Paragraph panel and Control panel.)
l
The Convert Bullets to Text and Convert Numbering to Text options remove the auto-
matic bullets or numerals in a paragraph but leave an actual bullet character or numeral at
the beginning of the paragraph for you to do with as you please. (These options are also
available in the flyout menu of the Paragraph panel and Control panel.)
A more advanced option is the Define Lists option (available in three places: by choosing
Type ➪ Bulleted & Numbered Lists ➪ Define Lists, by choosing Define Lists from the Paragraph
panel’s flyout menu, or by choosing New List in the List Type popup menu in the Bullets and
Numbering dialog box). Here, you create list types with just two options: Continue Numbers
across Stories and Continue Numbers from Previous Document in a Book. You access these list
The easy part of creating bulleted lists and numbered lists in InDesign is using the software. The hard
part can be deciding how much space to use. For example, how much space goes between a bullet and
the text following it? Amateur publishers or designers, who are likely to be thinking in inches rather
than points or picas, are likely to use too much space. They’re tempted to use 0.25", 0.125", or another
nice fraction of an inch for spacing rather than a more appropriate value such as 6 points. When decid-
ing on spacing, consider the following:
l
In bulleted lists, use a hanging indent for a succession of two- or three-line bulleted para-
graphs in wider columns. If your bulleted items are five or six lines long, especially in narrow
columns, it might work better to use run-in heads to break up the information.
l
Generally, the amount of space between a bullet and its text is equal to half the point size of
the text. So if you’re working with 11-point text, place 5.5 points between the bullet and text.
l
When it comes to numbered lists, you need to decide whether you’re going to include a
period or other punctuation after the number and whether you’ll ever have two-digit num-
bers. Numerals in most typefaces are the width of an en space, and they should be followed
by the same amount of space that the numbers and their punctuation take up. If you have a
two-digit numeral, the numbers take up one em space and so should be followed by one em
space.
Although these values give you a good starting point, you might need to modify them based on the
typeface, font size, column width, design, and overall goals of the publication.
Spacing Guidelines for Lists
32_607169-ch22.indd 54032_607169-ch22.indd 540 4/22/10 8:00 PM4/22/10 8:00 PM
Chapter 22: Creating Special Text Formatting
541
types when you create or edit paragraph styles using the style dialog boxes’ Bullets and Numbering
pane, or when you apply bullets and numbering through the Paragraph panel’s or Control panel’s
flyout menu. (Either way, choose the appropriate style in the List Type popup menu.)
When you select Continue Numbers across Stories, InDesign continues numbering text based on the
last number used in the previous story rather than restart the numbering at each story (the normal
behavior). When you select Continue Numbers from Previous Document in a Book, InDesign contin-
ues numbering text based on the last number used in the previous chapter of a book (see Chapter 28
for more on books) rather than start over again with this document (the normal behavior).
Applying lists
When you specify numbered or bulleted list settings in the Paragraph panel, these settings are
immediately applied to any selected paragraphs. Likewise, any list settings specified in paragraph
styles are automatically applied to any paragraphs using those styles.
However, you can quickly default bulleted or numbered lists to selected paragraphs using these
techniques:
l
Click the Bulleted List or Numbered List iconic button in the Control panel.
l
Choose Type ➪ Bulleted & Numbered Lists ➪ Apply Bullets, or choose Type ➪ Bulleted &
Numbered Lists ➪ Apply Numbers.
You can also unapply (remove) a bulleted list or numbered list from selected paragraphs by using
the preceding formatting commands. For example, to make a bulleted list normal (no bullets or
numbers), click the Bulleted List iconic button or choose Type ➪ Bulleted & Numbered
Lists ➪ Apply Bullets. These commands act as toggles, turning the lists off and on.
New Feature
InDesign CS5 now properly aligns bulleted and numbered lists when the left side of the text frame they are in
wraps around another object. In earlier versions, InDesign’s bulleted and numbered lists improperly aligned in
text wraps.
n
Working with imported lists
Chances are you’re not writing the bulk of your text in InDesign. Instead, the text was delivered in
the form of a word-processing file, and the writer or editor made some decisions about bullets or
numerals. A lot of times, writers simply type an asterisk followed by a space to indicate a bullet, or
maybe an editor typed a numeral followed by a parenthesis in front of each step. Other times, writ-
ers or editors use their word processor’s automatic bullet or numbering feature.
If the writer used manual numerals or bullets, that’s what you get. If the writer used automatic bul-
lets or numbers, that’s also what you get, unless you told InDesign to override them, as covered in
Chapter 17.
32_607169-ch22.indd 54132_607169-ch22.indd 541 4/22/10 8:00 PM4/22/10 8:00 PM
Part V: Text Fundamentals
542
Formatting Fractions
Creating fractions that are formatted correctly can be handy. Compare the left fraction in Figure
22.2, which is not formatted appropriately, to the other fractions in the figure, which are correctly
formatted. Although InDesign doesn’t provide an automatic fraction maker, you can use OpenType
typefaces, expert typefaces, or character formats to achieve professional-looking fractions.
Applying a fraction typeface
Some expert typefaces include a variation, appropriately called Fractions, that includes a number of
common fractions, such as
1
⁄2,
1
⁄3,
1
⁄4, and
3
⁄4. Adobe has Expert Collection variants for many of its
popular Type 1 PostScript fonts; these collections include true small caps, true fractions, and other
typographic characters. You can also use a symbol font, though the numerals may not exactly
match the appearance of numerals in the rest of your text because symbol fonts typically use plain
fonts such as Helvetica as their basis.
OpenType fonts also typically contain these special symbols (called glyphs), with the convenience
that they aren’t separate fonts from the “regular” alphanumeric characters, so it’s easier to access
them in InDesign.
To use a true fraction from an Expert Collection or OpenType font, choose Type ➪ Glyph, select
the font and face from the popup menus at the bottom of the panel shown in Figure 22.2, and
then select the fraction you want to use.
Although you may not know what they’re called, you’re used to seeing en bullets, the small round bul-
let (•) included in most typefaces, but you’re not limited to using this character. You can use any char-
acter in the body text font, or you can switch to a symbol or pi font and choose a more decorative
character.
Zapf Dingbats and Wingdings are the most common symbol fonts, offering an array of boxes, arrows,
crosses, stars, and check marks. These can be cute and effective, but cute isn’t always a good thing. If
you opt for a different bullet character, make sure you have a reason and that it works well with the rest
of the design. Check mark bullets in an election flyer might make sense; bulky square bullets in a to-do
list for a wedding caterer might not make sense.
Note that you might want to reduce the size of the symbol slightly and that you might need to use dif-
ferent spacing values than you would use with an en bullet.
Don’t limit yourself to these two common fonts either. You can purchase many different symbol fonts
to support different content. For example, you might see leaf-shaped bullets in an herb article and paw-
print bullets in a pet training article. To use your own drawing or a logotype as a bullet, convert the
drawing to a font using a utility such as FontLab Studio (see the companion Web site
www.
InDesignCentral.com
for links to this and other font utilities).
Bullet Character Options
32_607169-ch22.indd 54232_607169-ch22.indd 542 4/22/10 8:00 PM4/22/10 8:00 PM
Chapter 22: Creating Special Text Formatting
543
FIGURE 22.2
From left to right: The
7
⁄8 fraction unformatted, formatted via OpenType, formatted via an Expert Collection
font, and formatted manually. Note that the rightmost fraction uses a regular slash, whereas the middle two
use virgules. Also shown is the Glyph panel used to select the Expert Collection symbol.
If you have OpenType fonts, the process can also be automated: Be sure that the Fraction option is
enabled for the selected text, either as part of its character or paragraph style or by highlighting the
text and adjusting the OpenType options directly:
l
For styles, go to the OpenType Features pane when creating or modifying a paragraph or
character style and select Fractions.
l
For local formatting, highlight the text containing the fraction and then choose
OpenType ➪ Fraction from the flyout menu of the Character panel or Control panel —
and be sure that Fraction is selected in the menu (choose it if not).
Note
These OpenType options have no effect on non-OpenType fonts.
n
Cross-Reference
Chapter 20 covers the various options available in OpenType fonts.
n
Formatting fractions manually
If you’re dealing with a wide range of fractions in something like a cookbook, you probably won’t
find all the fractions you need in your Expert Collection font. Regular Type 1 Postscript and
TrueType fonts certainly don’t have the desired fractions; and although OpenType fonts have the
necessary characters to create almost any fraction, many fonts are not available in OpenType for-
mat — and even when they are available, many publishers have not spent the money to replace
them all. Therefore, most organizations opt for formatting all the fractions manually. However, if
you are a frequent fraction user, I strongly encourage you to switch to OpenType fonts.
The built-in fractions in expert fonts and the fractions generated by OpenType fonts are approxi-
mately the same size as a single character in that font; this size should be your goal in formatting a
fraction manually. Usually, you achieve this by decreasing the size of the two numerals (perhaps by
using the subscript and superscript formats), raising the numerator (the first, or top, number in the
fraction) using the baseline shift feature, and kerning on either side of the slash as necessary.
(Chapter 20 covers these controls.)
32_607169-ch22.indd 54332_607169-ch22.indd 543 4/22/10 8:00 PM4/22/10 8:00 PM