wiley adobe dreamweaver cs5 bible phần 4 ppsx
Bạn đang xem bản rút gọn của tài liệu. Xem và tải ngay bản đầy đủ của tài liệu tại đây (3.3 MB, 135 trang )
368
Part II: Designing and Crafting Basic Pages
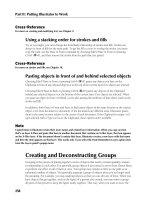
12. In the Property inspector, choose imageLeft from the Style drop-down list.
13. You can also simply drag images directly onto the page from the Files panel. In the panel, expand
the images folder and drag under_contruction_02.jpg to the left of the third heading, Room
to grow.
14. If the Image Tag Accessibility Attributes dialog box appears, enter Under construction in the
Alternative Text field.
15. In the Property inspector, choose imageRight from the Style drop-down list.
Each of the methods demonstrated works well; use the one you’re most comfortable with when
adding graphics to a page.
Optimizing and altering images
It’s the rare graphic that integrates into the Web page design unaltered. Digital photographs often
need to be cropped and almost always need to be reduced — either in dimensions, file size, or
both. Other images may need to be sharpened to achieve an immediate effect or lightened to fit
better into the page palette. Dreamweaver provides several pathways to the perfect Web image:
Image editing within Dreamweaver:
L
Without even leaving Dreamweaver, you can
crop, resample, sharpen, and alter brightness and contrast of any selected GIF or JPG
graphic. You don’t even have to have a graphics editor such as Adobe Photoshop or
Fireworks installed. You’ll see how shortly.
continued
369
Chapter 8: Inserting Images
Graphic optimization within Dreamweaver:
L
For more sophisticated image opera-
tions — without full-scale editing — choose Edit Image Settings. A dialog box opens
within Dreamweaver where you can compare different outcomes before committing to a
scaling, resampling, or conversion operation. You explore this option a little later in the
“Employing the Optimize Image Settings Command” section.
Round-trip editing from Dreamweaver to your graphics editor:
L
For the most com-
plex image modifications, use an external graphics editor such as Adobe Photoshop or
Fireworks. Dreamweaver sends files to the editor of your choosing.
Cross-Reference
If you’ve inserted a Photoshop PSD file as your image, changes made in Photoshop are automatically updated
in Dreamweaver. For more details, see Chapter 24.
n
The route you take depends on the depth of the modifications required. A key difference among
these three different types of operations (one that you’ll want to factor into your image-editing
decision) is that the tools within Dreamweaver work on the actual graphic exported for Web
use. After the page containing the image is saved, changes cannot be reversed. If Fireworks is
your graphics editor, both the Optimize and Graphics Editor options can utilize the source files
and create the exported file. The main advantage to using source graphics is that you have much
greater control and flexibility; many types of changes can be done and undone as many times
as needed. The primary disadvantage is that not all Web designers have the option to alter the
source graphics.
Regardless of which route you choose, you’ll find it’s easy to get there. Dreamweaver has central-
ized access to all of the graphic tools in the most appropriate place — the Image Property inspec-
tor (see Figure 8-4).
Figure8-4
Dreamweaver includes a range of image-editing tools right on the Image Property inspector.
Edit Image SettingsEdit
Crop
Resam
p
le Bri
g
htness and Contrast
Sharpen
Begin your tour of Dreamweaver image altering options by looking at the built-in tools first.
370
Part II: Designing and Crafting Basic Pages
Cropping graphics
If you want to show only part of a photograph in the real world, you’d use a pair of scissors to
crop off what you don’t want. With digital graphic tools, no scissors are needed. Images are cropped
for two main reasons: to focus attention on a particular area or to reduce file size. Often these
reasons work hand-in-glove because a cropped image is always smaller than the original in both
physical dimensions and file size.
Dreamweaver’s cropping tool is both powerful and easy to use. When you choose to crop a graphic,
a shaded border appears within the graphic. The edges of the border can be dragged to determine
how the image should be trimmed. The region outside the border is darkened, but you can still
see the full image so you can be sure a vital part of the graphic is not inadvertently cut.
To crop an image, follow these steps:
1. Select the image you want to crop.
2. In the Property inspector, click the Crop button.
3. Dreamweaver displays an alert to warn you that the cropping operation changes the
selected image; click OK to clear the dialog. A shaded border appears within the selected
image (see Figure 8-5).
4. Drag the selection handles that appear in the middle of each side to crop the image in a
single direction; the cursor changes to a two-headed arrow when in the correct position
to crop a side.
5. To move the entire cropping area, drag the highlighted rectangle into the desired posi-
tion; you can move the cropping area when the cursor is shown as a four-headed arrow.
Figure8-5
A repositionable, shaded border appears so that you can crop your images onscreen.
371
Chapter 8: Inserting Images
6. To cancel the cropping operation, click anywhere outside the graphic.
7. Complete the crop by double-clicking within the image.
After cropping, you can reverse the effect by choosing Edit ➪ Undo — but only until the page is
saved or sent to an external graphics editor.
Resampling after resizing
Finding the perfect size for an image is often a matter of trial and error: It’s important that a
graphic work together with the entire page layout for maximum effect. Dreamweaver makes it
easy to resize an image — just drag the sizing handles to the desired location. (You can find a
complete discussion of Dreamweaver’s resizing features later in this chapter in the “Adjusting
height and width” section.) However, resizing an image in Dreamweaver is not the same as
rescaling it in a graphics program; Dreamweaver merely draws the image to fit the chosen dimen-
sions, much as a browser would. It doesn’t actually re-create the graphic.
To get the cleanest, clearest representation of a resized graphic, you must resample the image.
Resampling refers to the process of adding or subtracting pixels when the image is resized. If a
graphic’s dimensions are increased, pixels are formulaically added; make the image small and
pixels are removed according to a similar algorithm. Dreamweaver includes a resampling option,
which becomes available when an image is resized, either by dragging the sizing handles or
changing the values in the Width and Height fields of the Property inspector.
Resampling in Dreamweaver is a one-click affair — no parameters are set. Just choose the resized
image and click the Resample button on the Property inspector. As with the other built-in tools,
an alert informs you that the graphics file is being changed (unless you’ve selected the Don’t
Show Me This Message Again option).
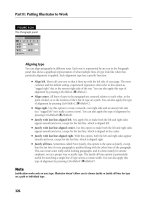
How the image resamples really depends on the image itself and the difference between the origi-
nal image size and the new size. Sometimes, resampling in either direction results in satisfactory
images (see Figure 8-6). Typically, I find that small differences work far better than large ones;
if you’re making a major change in image size, it’s often better to use a dedicated graphics editor
such as Fireworks or Photoshop.
Figure8-6
These three images demonstrate how an image can be resampled after it has been reduced or increased
in size.
Original Image Scaled Down Scaled Up
372
Part II: Designing and Crafting Basic Pages
Affecting brightness and contrast
Digital photography has opened the floodgates for posting images on the Web. Unfortunately,
not all images look as good as they might. If you want to make the graphic lighter or darker or
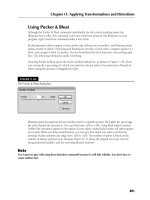
perhaps use a little more contrast, Dreamweaver has just the tool you need. The Brightness and
Contrast command offers independent control over the two interlinked aspects of an image. Best
of all, the Brightness/Contrast dialog box offers a Preview option, as shown in Figure 8-7, so that
you can see the changes to the image in real time.
Figure8-7
Preview the changes when using the Brightness and Contrast control to make sure you’re getting the effect
you want.
To alter the brightness and/or contrast of an image, follow these steps:
1. Select the image you want to modify.
2. Click the Brightness and Contrast button on the Property inspector. Dreamweaver dis-
plays the Brightness/Contrast dialog box.
3. Make sure the Preview box is selected to see the changes applied as you move the
controls.
4. Drag the Brightness slider to the left or right. Dragging the slider to the left lowers the
brightness; dragging it to the right increases brightness. Alternatively, you can enter a
value directly in the Brightness field. Acceptable values are from –100 to 100, with 0
being the default.
5. Move the Contrast slider to the right to increase the contrast or to the left to decrease it.
Alternatively, you can enter a value between –100 and 100 in the Contrast field.
6. When you’re finished, click OK.
Although Brightness and Contrast is most frequently associated with photographic JPEG images,
it can also be used for GIFs. However, be careful if your GIF has a transparent area; altering the
brightness and/or contrast too much could make the transparent area visible.
Sharpening graphic lines
In Web applications, fuzzy logic is generally sought after, but fuzzy photos are not. You can clear
up blurry images with Dreamweaver’s Sharpen command found on the Property inspector.
373
Chapter 8: Inserting Images
The Sharpen command examines the edges found within a graphic and programmatically
increases the contrast of the related pixels. Flat areas of color are left unaffected. The Sharpen
dialog (see Figure 8-8) offers a sliding scale from 0 to 10 where 10 represents the maximum
amount of sharpening available in one operation. As with the Brightness/Contrast dialog, you
can select the preview option.
Figure8-8
Bring your images into focus with Dreamweaver’s Sharpen feature.
Note
If you’re using Fireworks and need more sharpening power than Dreamweaver offers, try applying the
Unsharp Mask in Fireworks. Despite the name, this filter is terrific for sharpening blurry images and, when
applied as a Live Filter from the Property inspector, is totally reversible in a Fireworks native PNG file.
n
Employing the Optimize Image command
Not all images are Web-ready — especially those that are used in other media such as printing.
To provide the best online experience, Web graphics must balance appearance and file size. You
want your images to look as good as possible at the lowest possible file size because a small file
is quicker to download. The process of achieving the balance between the image quality and file
size is called optimizing. You can optimize your images without leaving Dreamweaver by run-
ning the Optimize command.
The Optimize command actually opens a dialog box that originated in Fireworks as the Image
Preview dialog. Exporting from Fireworks is a major step and a lot of options are at your finger-
tips during the process. Here’s just a little of what’s possible:
Switch formats from GIF to JPEG or vice versa. Other formats include animated GIF
L
and PNG.
Alter the palette depth (the number of colors) or transparency in GIF images.
L
Change the JPEG compression quality.
L
Rescale an image by an exact percentage or to a specific width or height.
L
374
Part II: Designing and Crafting Basic Pages
Crop a figure visually.
L
Control the frame rate for animated GIF as well as the looping options.
L
Visually compare up to four different optimized images at the same time (see
L
Figure 8-9).
Figure8-9
Get the best Web image possible at the lowest file size through the Image Preview dialog box, opened by
the Optimize Image command.
If you choose an image imported from Fireworks, when you first launch Optimize Image — either by
clicking the Edit Image Settings button on the Property inspector or choosing the Optimize Image
command from the Commands menu — Dreamweaver presents a dialog that asks whether you’d
like to edit the source PNG file or the current file. When you choose the source file, Dreamweaver
automatically re-exports the file and stores the changes when you’re done.
375
Chapter 8: Inserting Images
Cross-Reference
For a full explanation of all that’s possible through the Optimize Image command, see Chapter 24.
n
Editing images
Although Dreamweaver includes some tools for cropping, sharpening, and otherwise revising
images in your Web pages, it is not a full-featured graphics editor. Certain tasks — such as slicing
a larger graphic into sections or adding text to an image — are beyond Dreamweaver’s scope. You
can, however, set up your graphics editor of choice to work hand-in-hand with Dreamweaver.
Specify your primary graphics editor for each type of graphic in the File Types/Editors category
of Preferences.
ChangingGraphics
Dreamweaver’s built-in graphics functions are perfect for low-level quick fixes when an image needs
to be cropped or resampled. In this Dreamweaver Technique, you have an opportunity to adjust one
picture in a number of ways.
1. Open the images_start.htm file worked on in the last Dreamweaver Technique.
2. Select the second image on the page, next to the “Big house, big garage” heading. As you see, this
image has a few problems in the outer part of the picture; with Dreamweaver, you can crop those
right out of view.
3. On the Property inspector, click Crop.
continued
376
Part II: Designing and Crafting Basic Pages
4. Dreamweaver alerts you that taking this action will affect the selected image; click OK to continue.
5. Move the cropping handles on the top and left to exclude the white patches; move the cropping
handles on the right and bottom to the outer edge of the images.
6. When you’ve moved the cropping handles to the correct position, double-click in the center of the
image to confirm your changes. The image is still a bit too big; you can use the built-in Rescale tool
to make a simple adjustment.
7. Select the image again and drag the lower-right sizing handle inward to reduce the image size; press
the Shift key while dragging to constrain the width/height ratio.
8. Stop resizing the image when the Width attribute in the Property inspector is 215 pixels. While the
image appears to be resized, it now needs to be resampled so that it is actually reduced in file size.
9. On the Property inspector, click Resample. You’ll notice that the image file size shown in the
Property inspector is reduced from 14K to 10K.
10. Dreamweaver again alerts you that taking this action will affect the selected image; click OK to
continue.
11. When you’re done, save your page.
Although you will always need to work with a graphics editor such as Photoshop or Fireworks for
major image modifications, Dreamweaver does a great job on last-minute fixes all by itself.
After you’ve picked an image editor, clicking the Edit button in the Property inspector opens
the application with the current image. After you’ve made the modifications, just save the file in
your image editor and switch back to Dreamweaver. The new, modified graphic has already been
included in the Web page. If you change the image size, you can click the Reset Size button on
the Image Property inspector to see your changes.
Cross-Reference
If you are using either Photoshop or Fireworks as your image editor, here is some good news: Dreamweaver
works very closely with both Photoshop and Fireworks, enabling you to create and modify images with round-
trip ease. Find out more in Chapter 24.
n
Modifying image attributes
When you insert an image in Dreamweaver, the image tag, <img>, is inserted into your HTML
code. The
<img> tag takes several attributes; the most commonly used can be entered through
the Property inspector. Code for a basic image looks like the following:
<img src=”images/myimage.gif” width=”172” height=”180”>
Dreamweaver centralizes all its image functions in the Property inspector. The Image Property
inspector, shown in Figure 8-10, displays a small thumbnail of the image as well as its file size.
continued
377
Chapter 8: Inserting Images
Dreamweaver automatically inserts the image filename in the Src text box (as the src attribute).
To replace a currently selected image with another, click the folder icon next to the Src text box,
or double-click the image itself. Either sequence opens the Select Image Source dialog box. When
you’ve selected the file, Dreamweaver automatically refreshes the page and corrects the code.
Figure8-10
The Image Property inspector gives you total control over the HTML code for every image.
Filename
Thumbnail
File size
Src folder icon
If the Image Property inspector is open when you insert your image, you can begin to modify the
image attributes immediately.
Naming your image
When you first insert a graphic into the page, the Image Property inspector displays a blank text
box next to the thumbnail and file size. Fill in this box with a unique name for the image, to be
used in JavaScript and other applications.
Adjusting height and width
The width and height attributes are important because browsers build Web pages faster when
they know the size and shape of the included images. Dreamweaver reads these attributes when
the image is first loaded. The width and height values are initially expressed in pixels and are
automatically inserted as attributes in the HTML code.
Browsers can dynamically resize an image if its height and width on the page are different from
the original image’s dimensions. For example, you can load your primary logo on the home
page and then use a smaller version of it on subsequent pages by inserting the same image with
reduced height and width values. Because you’re only loading the image once and the browser is
resizing it, download time for your Web page can be significantly reduced.
Note
Resizing an image just means changing its appearance onscreen; the file size stays exactly the same. To
reduce a file size for an image, you need to scale it down in a graphics program such as Fireworks or, once
you’ve resized it in Dreamweaver, click Resample in the Property inspector.
n
378
Part II: Designing and Crafting Basic Pages
To resize an image in Dreamweaver, select the image and type the desired number of pixels in the
Property inspector’s H (height) and W (width) fields. With Dreamweaver, you can also visually
resize your graphics by using the click-and-drag method. A selected image has three sizing handles
located on the right, bottom, and lower-right corners of its bounding box. Click any of these
handles and drag it out to a new location — when you release the mouse, Dreamweaver resizes
the image. To maintain the current height/width aspect ratio, hold down the Shift key after start-
ing to drag the corner sizing handle.
If you alter either the height or the width of an image, Dreamweaver displays the Property
inspector values in bold in their respective fields. You can restore an image’s default measure-
ments by clicking the H or the W independently — or you can click the Reset Size button to
restore both values.
Caution
If you elect to enable your viewer’s browser to resize your image on-the-fly using the height/width values you
specify, keep in mind that the browser is not a graphics-editing program and that its resizing algorithms are
not sophisticated. View your resized images through several browsers to ensure acceptable results.
n
Using margins
You can offset images with surrounding whitespace by using the margin attributes. The amount
of whitespace around your image can be designated both vertically and horizontally through the
vspace and hspace attributes, respectively. These margin values are entered, in pixels, into
the V Space and H Space text boxes in the Image Property inspector.
The V Space value adds the same amount of whitespace along the top and bottom of your image;
the H Space value increases the whitespace on the left and right sides of the image. These values
must be positive; HTML doesn’t allow images to overlap text or other images (outside of AP ele-
ments). Unlike in page layout, negative whitespace does not exist.
Note
The hspace and vspace attributes are deprecated in HTML 4.0. This means that, although the attributes
are currently still supported, another preferred method achieves the same effect in newer browsers. In most
cases, the margins should be implemented using Cascading Style Sheets, described in Chapter 6.
n
Adding image descriptions
It’s easy for Web designers to get caught up in the visual design of their Web pages; after all,
designers can devote hours to creating a single graphic or to perfectly positioning a graphic on
the page relative to other information. Remember, however, that graphics aren’t the most effective
communication method in every circumstance. Luckily, the
<img> tag includes two attributes
that enable you to describe your image using plain text:
alt and longdesc.
379
Chapter 8: Inserting Images
The alt attribute gives you a means to include a short description of a graphic. It is used in
many ways:
As a page is loading over the Web, the image is first displayed as an empty rectangle if
L
the <img> tag contains width and height information. Some browsers display the alt
description in this rectangle while the image is loading, offering the waiting user a writ-
ten preview of the forthcoming image.
In many browsers, the
L
alt text displays as a tooltip when the user’s pointer passes over
the graphic.
A real benefit of
L
alt text is providing input for browsers that don’t show graphics.
Remember that text-only browsers are still in use, and some users, interested only in
content, turn off the graphics to speed up the text display.
The W3C is working toward standards for browsers for the visually impaired, and the
L
alt text can be used to describe the image.
For all these reasons, it’s good coding practice to associate an
alt description with all your
graphics. In Dreamweaver, you can enter this alternative text in the Alt text box of the Image
Property inspector.
Tip
If the <img> tag does not contain an alt attribute, some screen readers read the filename when they
encounter the image, which slows down how quickly visually impaired users can get to the real information
on your page. For images that are purely visual and don’t contribute to the meaning of your content, such as
bullets or spacer images, include a blank alt attribute. To do this, open the Image Property inspector and
select <empty> from the Alt drop-down list.
n
Currently, the alt attribute is the most valuable tool you have for providing a textual descrip-
tion of your images. However, some images are just too complicated to describe in a few words
and are too important to gloss over. For these situations, the latest HTML specification includes
the
longdesc attribute. Although none of the major browsers currently support this attribute,
Dreamweaver is anticipating the future by enabling you to specify a
longdesc for your images.
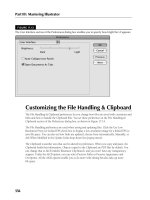
In Dreamweaver, choose Edit ➪ Preferences (Dreamweaver ➪ Preferences), and, in the
Accessibility category, select the Images checkbox. When you add a new image to your page,
the Image Tag Accessibility Attributes dialog box appears, as shown in Figure 8-11. In the Long
Description text box, click the folder icon to navigate to an HTML file that contains a textual
description of the image.
380
Part II: Designing and Crafting Basic Pages
Figure8-11
The Image Tag Accessibility Attributes dialog box appears when you select the Images option in the
Accessibility Preferences.
Caution
The Image Tag Accessibility Attributes dialog box is not displayed if you add a new image by dragging it
from the Files panel. It does appear, however, if you drag the image from the Assets panel, or use the Insert
panel or Insert menu to add the image.
n
Bordering a graphic
When you’re working with thumbnails (small versions of images) on your Web page, you may
need a quick way to distinguish one from another. The
border attribute enables you to place a
one-color rectangular border around any graphic. To turn on the border, enter the desired width
of the border, measured in pixels, in the Border text box located on the lower half of the Image
Property inspector. Entering a value of
0 explicitly turns off the border.
Note
A preferred method for adding a border to an image is to use Cascading Style Sheets, described in Chapter 6.
Note that Cascading Style Sheets are not supported in older browsers.
n
One of the most frequent cries for help among beginning Web designers results from the sudden
appearance of a bright blue border around an image. Whenever you assign a link to an image,
HTML automatically places a border around that image; the color is determined by the Page
Properties Link color, where the default is bright blue. Dreamweaver intelligently assigns a
0 to
the
border attribute whenever you enter a URL in the Link text box. If you’ve already declared a
border value and enter a link, Dreamweaver won’t zero-out the border. You can, of course, over-
ride the no-border option by entering a value in the Border text box.
Specifying a lowsrc
Another option for loading Web page images, the lowsrc attribute, displays a smaller version of
a large graphics file while the larger file is loading. The
lowsrc file can be a grayscale version of
381
Chapter 8: Inserting Images
the original, or a version that is physically smaller or reduced in color or resolution. This option
is designed to significantly reduce the file size for quick loading.
Select your
lowsrc file by clicking the file icon next to the Low Src text box in the Image Property
inspector. The same criteria that apply to inserting your original image also apply to the
lowsrc
picture.
Tip
One handy lowsrc technique first proportionately scales down a large file in a graphics-processing program.
This file becomes your lowsrc file. Because browsers use the final image’s height and width information for
both the lowsrc and the final image, your visitors immediately see a blocky version of your graphic, which is
replaced by the final version when the picture is fully loaded.
n
Working with alignment options
Using CSS, images can be aligned to the left, right, or center — or rather, the line the images are
on can be so adjusted. In fact, images have much more flexibility than text in terms of alignment.
In addition to the same horizontal alignment options, you can align your images vertically in
nine different ways. You can even turn a picture into a floating image type, enabling text to wrap
around it.
Horizontal alignment
When you change the horizontal alignment of a line — from left to center or from center to
right — the entire paragraph moves. Any inline images that are part of that paragraph also move.
Likewise, selecting one of a series of inline images in a row and realigning it horizontally causes
all the images in the row to shift.
In Dreamweaver, the horizontal alignment of an inline image is changed in exactly the same
way that you realign text — with CSS. To change the alignment of an image, select it and then,
through the CSS Styles panel, change the text-align property to left, right, or center.
Vertical alignment
Because you can place text next to an image — and images vary so greatly in size — HTML
includes a variety of options for specifying just how image and text line up. As you can see from
the chart shown in Figure 8-12, a wide range of possibilities is available.
To change the vertical alignment of any graphic in Dreamweaver, open the Align drop-down list
in the Image Property inspector and choose one of the options. Dreamweaver writes your choice
into the
align attribute of the <img> tag. The various vertical alignment options are listed in
Table 8-1, and you can refer to Figure 8-12 for examples of each type of alignment.
382
Part II: Designing and Crafting Basic Pages
Figure8-12
You can align text and images in one of ten different ways.
Table8-1
Vertical Alignment Options
Option Result
Browser Default
No alignment attribute is included in the <img>
tag. Most browsers use the baseline as the
alignment default.
Baseline The bottom of the image is aligned with the
baseline of the surrounding text.
Top The top of the image is aligned with the top of the
tallest object in the current line.
Middle The middle of the image is aligned with the
baseline of the current line.
383
Chapter 8: Inserting Images
Option Result
Bottom The bottom of the image is aligned with the
baseline of the surrounding text.
Text Top The top of the image is aligned with the tallest
letter or object in the current line.
Absolute Middle The middle of the image is aligned with the middle
of the tallest text or object in the current line.
Absolute Bottom The bottom of the image is aligned with the
descenders (as in y, g, p, and so forth) that fall
below the current baseline.
Left The image is aligned to the left edge of the browser
or table cell, and all text in the current line flows
around the right side of the image.
Right The image is aligned to the right edge of the
browser or table cell, and all text in the current line
flows around the left side of the image.
The last two alignment options, Left and Right, are special cases; details about how to use their
features are covered in the following section.
Wrapping text
Most browsers support wrapping text around an image on a Web page — long a popular design
option in conventional publishing. As noted in the preceding section, the Left and Right align-
ment options turn a picture into a floating image type. This type is so called because the image
can move depending on the amount of text and the size of the browser window.
Tip
Using both floating image types (Left and Right) in combination, you can actually position images flush-left
and flush-right, with text in the middle. Insert both images side by side and then set the leftmost image to
align left and the rightmost one to align right. Insert your text immediately following the second image.
n
Your text wraps around the image depending on where the floating image is placed (or anchored).
If you enable the Anchor Points for Aligned Elements option in the Invisible Elements category
of Preferences, Dreamweaver inserts a Floating Image Anchor symbol to mark the floating
image’s place. Note that the image itself may overlap the anchor, hiding the anchor from view.
Figure 8-13 shows two examples of text wrapping: a left-aligned image with text flowing to the
right, and a right-aligned image with text flowing to the left.
384
Part II: Designing and Crafting Basic Pages
Figure8-13
Aligning an image left or right enables text to wrap around your images.
The Floating Image Anchor is not just a static symbol. You can click and drag the anchor to a new
location and cause the paragraph to wrap in a different fashion. Be careful, however. If you delete
the anchor, you also delete the image it represents.
You can also wrap a portion of the text around your left- or right-aligned picture and then force
the remaining text to appear below the floating image. However, Dreamweaver cannot currently
insert the HTML code necessary to do this task through the Image Property inspector. You have
to force an opening to appear by inserting a break tag, with a special
clear attribute, where you
want the text to break. This special
<br> tag has three forms:
<br
L
clear=left> — Causes the line to break and the following text to move down
vertically until no floating images are on the left
<br
L
clear=right> — Causes the line to break and the following text to move down
vertically until no floating images are on the right
<br
L
clear=all> — Moves the text following the image down until no floating images
are on either the left or the right
A quick way to add the
clear attribute is to position your cursor where you want the text to
break, and press Shift+Enter. Next, in Code view, right-click the
<br> tag and select Edit Tag
<br> from the context menu. The Tag Editor dialog box displays; select the appropriate Clear
option and click OK.
385
Chapter 8: Inserting Images
Adding Background Images
In this chapter, you’ve learned about working with the surface graphics on a Web page. You can
also place an image in the background of an HTML page. This section covers some of the basic
techniques for incorporating a background image in your Dreamweaver page.
Add an image to your background either by using the CSS Styles panel or by modifying the
Appearance (CSS) category of the Page Properties. Either technique adds a
background-image
property to a CSS rule.
Cross-Reference
If you aren’t familiar with Cascading Style Sheets, you may want to read Chapter 6 before trying the following
procedure. That chapter gets you started with general CSS concepts and outlines specific options for imple-
menting background images.
n
To implement a background image using the CSS Styles panel, follow these steps:
1. Choose Window ➪ CSS Styles.
2. On the CSS Styles panel, click Edit Styles and then click the New CSS Rule button.
3. In the New CSS Rule dialog box, choose Tag from the Selector Type list, and in the
Selector name drop-down list, select Body. These selections create a background image
for the entire document. You can also select a different tag or choose the Make a Custom
Style option to assign a background image to a single element on the page, such as a
table cell or paragraph.
4. Specify whether you want to save the style definition in an external style sheet or in the
current document, and then click OK.
5. In the CSS Style Definition dialog box, select the Background category.
6. In the Background Image field, type the path and filename for the image file, or click
Browse to navigate to the file.
7. Designate any other background options, and then click OK.
To specify a background image using the Page Properties, choose Modify ➪ Page Properties or
select Page Properties from the Property inspector. In the Page Properties dialog box, choose
the Appearance (CSS) category. Select a graphic by clicking the Browse button next to the
Background Image text box. You can use any file format supported by Dreamweaver — GIF,
JPEG, or PNG. Choose your tiling options from the Repeat list.
Note
Although you can set background images (and colors) as a property of an HTML tag through the Appearance
(HTML) category of the Page Properties dialog box, it’s not recommended for standards-based Web design.
n
Two key differences exist between background images and the foreground inline images dis-
cussed in the preceding sections of this chapter. First and most obvious, all other text and
386
Part II: Designing and Crafting Basic Pages
graphics on the Web page are superimposed over your chosen background image. This capability
can bring extra depth and texture to your work; unfortunately, you have to make sure the fore-
ground text and images work well with the background.
Basically, you want to ascertain that enough contrast exists between foreground and background.
You can set the default text and the various link colors using Cascading Style Sheets or through
the Page Properties dialog box, shown in Figure 8-14. When trying out a new background pat-
tern, you should set up some dummy text and links. Then click the Apply button on the Page
Properties dialog box to test different color combinations.
Figure8-14
If you’re using a background image, be sure to check the default colors for text and links to make sure
enough contrast exists between background and foreground.
TilingImages
Web designers use the tiling property of background images to create a variety of effects with very low
file-size overhead. The columns typically found on one side of Web pages are a good example of tiling.
Columns are popular because they enable the designer to place navigational buttons in a visual context.
An easy way to create a column that runs the full length of your Web page is to use a long, narrow
background image.
In the following figure, the background image is 45 pixels high, 800 pixels wide, and only 6KB in size.
When the browser window is set at 640 × 480 or 800 × 600, the image is tiled down the page to create
the vertical column effect. You could just as easily create an image 1,000 pixels high by 40 pixels wide
to create a horizontal column.
387
Chapter 8: Inserting Images
When using Cascading Style Sheets to implement your background image, you can control whether the
image tiles horizontally, vertically, in both directions, or not at all.
The second distinguishing feature of background images is that the viewing browser completely
fills either the browser window or the area behind the content of your Web page — whichever is
larger. Suppose you have created a splash page with only a 200 × 200 foreground logo, and you’ve
incorporated an amazing 1,024 × 768 background that took you weeks to compose. A user can’t see
the fruits of your labor in the background — unless he resizes his browser window to 1,024 × 768.
On the other hand, if your background image is smaller than either the browser window or what
the Web page content needs to display, the browser and Dreamweaver repeat (tile) your image to
make up the difference.
Tip
With Cascading Style Sheets, you not only can attach a background image to a page, but you can also attach a
background image to an individual element on a page, such as a single paragraph. Cascading Style Sheets also
enable you to designate whether the background image should scroll with the foreground text, or if it should
remain stationary while the foreground text scrolls over the background.
n
Dividing the Web Page with Horizontal Rules
HTML includes a standard horizontal line that can divide your Web page into specific sections.
The horizontal rule tag,
<hr>, is a good tool for adding a little diversion to your page without
adding download time. You can control the width (either absolutely or relative to the browser
window), the height, the alignment, and the shading property of the rule. These horizontal
rules appear on a line by themselves; you cannot place text or images on the same line as a
horizontal rule.
388
Part II: Designing and Crafting Basic Pages
To insert a horizontal rule in your Web page in Dreamweaver, follow these steps:
1. Place your cursor where you want the horizontal rule to appear.
2. From the Common category of the Insert panel, click the Horizontal Rule button or
choose Insert ➪ HTML ➪ Horizontal Rule. Dreamweaver inserts the horizontal rule;
and the Property inspector, if visible, shows the attributes that you can change for a
horizontal rule (see Figure 8-15).
Figure8-15
The Horizontal Rule Property inspector controls the width, height, and alignment for these HTML lines.
3. To change the width of the line, enter a value in the Property inspector width (W) text
box. You can insert either an absolute width in pixels or a relative value as a percentage
of the screen:
To set a horizontal rule to an exact width, enter the measurement in pixels in the
L
width (W) text box and press the Tab key. If it is not already showing, select Pixels
in the drop-down list.
To set a horizontal rule to a width relative to the browser window, enter the percent-
L
age amount in the width (W) text box, press the Tab key, and select the percent
sign (%) in the drop-down list.
4. To change the height of the horizontal rule, type a pixel measurement in the height (H)
text box.
389
Chapter 8: Inserting Images
5. To change the alignment from the default (centered), open the Align drop-down list and
choose another alignment.
6. To disable the default embossed look for the rule, clear the Shading checkbox.
7. If you intend to reference your horizontal rule in JavaScript or in another application,
you can give it a unique name. Type the name in the unlabeled text box located directly
to the left of the H text box.
Note
The HTML 4.0 standard lists the align, noshade, width, and size attributes of the <hr> tag as depre-
cated. However, current browsers still support these attributes.
n
To modify any inserted horizontal rule, simply click it. (If the Property inspector is not already
open, you have to double-click the rule.) As a general practice, size your horizontal rules using
the percentage option if you are using them to separate items on a full screen. If you are using the
horizontal rules to divide items in a specifically sized table column or cell, use the pixel method.
Tip
The Shading property of the horizontal rule is most effective when your page background is a shade of gray.
The default shading is black along the top and left, and white along the bottom and right. The center line is
generally transparent (although Internet Explorer enables you to assign a color attribute). If you use a differ-
ent background color or image, be sure to check the appearance of your horizontal rules in that context.
n
Many designers prefer to create elaborate horizontal rules; in fact, custom rules are an active area
of clip art design. These types of horizontal rules are regular graphics and are inserted and modi-
fied as such.
Including Banner Ads
Banner ads have become an essential aspect of the World Wide Web; for the Web to remain,
for the most part, freely accessible, advertising is needed to support the costs. Banner ads have
evolved into the de facto standard. Although numerous variations exist, a banner ad is typically
an animated GIF of a particular width and height, within a specified file size.
The Standards and Practices Committee of the Interactive Advertising Bureau (IAB) established
a series of standard sizes for banner ads. Although no law dictates that these guidelines have to
be followed, the vast majority of commercial sites adhere to the suggested dimensions. The most
common banner sizes (in pixels) and their official names are listed in Table 8-2; additional ban-
ner guidelines are available at the IAB Web site (
www.iab.net).
Acceptable file size for a banner ad is not as clearly specified, but it’s just as important. The last
thing a hosting site wants is for a large, too-heavy banner to slow down the loading of its page. Most
commercial sites have an established maximum file size for any given banner ad. Generally, ban-
ner ads are around 30–40KB. The lighter your banner ad, the faster it loads and — as a direct
result — the more likely Web page visitors stick around to see it.
390
Part II: Designing and Crafting Basic Pages
Table8-2
IAB Advertising Banner Sizes
Dimensions Name
300 x 250 Medium Rectangle
250 x 250 Square Pop-up
240 x 400 Vertical Rectangle
336 x 280 Large Rectangle
180 x 150 Rectangle
300 x 100 3:1 Rectangle
720 x 300 Pop-Under
468 × 60
Full Banner
234 × 60
Half Banner
88 × 31
Micro Bar
120 × 90
Button 1
120 × 60
Button 2
120 × 240
Vertical Banner
125 × 125
Square Button
728 × 90
Leaderboard
160 × 600
Wide Skyscraper
120 × 600
Skyscraper
300 × 600
Half Page Ad
Note
Major sites often have additional criteria for using rich media in banner ads, such as Flash animations or
JavaScript. These may include file size, length of animation, behavior when the ad is clicked, and so on.
n
Inserting a banner ad on a Web page is very straightforward. As with any other GIF file, ani-
mated or not, all you have to do is insert the image and assign the link. As any advertiser can tell
you, the link is as important as the image itself, and you should take special care to ensure that it
is correct when inserted. Advertising links are often quite complex because they not only link to
a specific page, but may also carry information about the referring site. Several companies moni-
tor how many times an ad is selected — the clickthru rate — and often a CGI program is used
391
Chapter 8: Inserting Images
to communicate with these companies and handle the link. Here’s a sample URL from CNet’s
News.com site:
;
clickid=00001e145ea7d80f00000000&adt=003:10:100&edt=cnet&cat=1:1002:&site=CN
Obviously, copying and pasting such URLs is highly preferable to entering them by hand.
Advertisements often come from an outside source, so a Web page designer may have to allow
space for the ad without incorporating the actual ad. Some Web designers create a plain rectan-
gular image of the appropriate size to serve as a placeholder, until the actual image is ready. In
Dreamweaver, placeholder ads can easily be maintained as Library items and placed as needed
from the Assets panel, as shown in Figure 8-16.
Cross-Reference
See Chapter 29 for information on creating and using Dreamweaver Library items.
n
Figure8-16
Use the Library to store standard banner ad images for use as placeholders.
If you’d prefer not to use placeholder graphics as just described, you can instead insert a plain
<img> tag — with no src parameter. When an <img> tag without an src attribute is in the
code, Dreamweaver displays a plain rectangle that can be resized to the proper banner ad dimen-
sions in the Property inspector.
392
Part II: Designing and Crafting Basic Pages
You can insert a placeholder image by clicking the Image Placeholder button on the Insert panel,
or by choosing Insert ➪ Image Objects ➪ Image Placeholder. In the resulting Image Placeholder
dialog box, you can enter an image name, dimensions, color, and alternate text. When the real
graphics file is ready, use the Src text box on the Property inspector to specify the new file. The
image name and alternate text remain unchanged when you assign the new file, but the dimen-
sions automatically change to match those of the actual image.
Inserting Rollover Images
Rollovers are among the most popular of all Web page effects. A rollover (also known as a mouse-
over) occurs when the user’s pointer passes over an image and the image changes in some way. It
may appear to glow or change color and/or shape. When the pointer moves away from the graphic,
the image returns to its original form. The rollover indicates interactivity and attempts to engage
the user with a little bit of flair.
Rollovers are usually accomplished with a combination of HTML and JavaScript. Dreamweaver
was among the first Web-authoring tools to automate the production of rollovers through its
Swap Image and Swap Image Restore behaviors. Later versions of Dreamweaver make rollovers
even easier with the Rollover Image object. With the Rollover Image object, you just pick two
images to make a rollover.
Cross-Reference
If you use Fireworks as your image-editing tool, refer to Chapter 24 to learn another method for creating roll-
over images.
n
Technically speaking, a rollover is accomplished by manipulating an <img> tag’s src attribute.
Recall that the
src attribute is responsible for providing the actual filename of the graphic to be
displayed; it is, quite literally, the source of the image. A rollover changes the value of
src from
one image file to another. Swapping the
src value is analogous to having a picture within a frame
and changing the picture while keeping the frame.
Note
The picture frame analogy is appropriate on one other level: It serves as a reminder of the size barrier inher-
ent in rollovers. A rollover changes only one property of an <img> tag, the source — it cannot change any
other property, such as height or width. For this reason, both your original image and the image displayed
during the rollover should be the same size. If they are not, the alternate image is resized to match the dimen-
sions of the original image.
n
Dreamweaver’s Rollover Image object automatically changes the image back to its original source
when the user moves the pointer off the image. Optionally, you can elect to preload the images
with the selection of a checkbox. Preloading is a Web page technique that reads the intended file
or files into the browser’s memory before they are displayed. With preloading, the images appear
on demand, without any download delay.