beginning Ubuntu Linux phần 8 pps
Bạn đang xem bản rút gọn của tài liệu. Xem và tải ngay bản đầy đủ của tài liệu tại đây (1.43 MB, 67 trang )
C H A P T E R 21
■ ■ ■
443
Understanding Linux Users and
File Permissions
Most modern operating systems work with user accounts to grant people access to the system, and
Ubuntu is no exception. You might not have noticed this—if during installation or when you
personalized your system you selected the option to allow automatic logins, you are taken directly
to your desktop when you boot your PC, thus masking the fact that a user is actually logging into
the system.
So, whether you’re aware of it or not, you always have a user account inside Ubuntu. Your user
account will have a defined set of attributes that will distinguish it from other user accounts: for
example, a name and a Home folder. But it also will be a member of a group. Being a member of certain
groups allows access to portions of the system that would be otherwise hidden, because groups can
enable permissions to access and manipulate files on your hard disks. And, since all configuration in
Ubuntu is stored in files (see Chapter 10), those permissions will allow it to change the system itself.
Understanding User and Group Accounts
We’ve already stated that to interact with Ubuntu you need a user account. However, there’s more to the
story than that. For example, there are situations in which you might need more than one user account.
Either in the office or at home there may be more than one person that uses the computer, and you
surely will want to keep your personal configuration and data separate from theirs. That’s when the need
for additional user accounts arises. This section will explain what a user account is, how to create it, and
how to work with groups.
Users and Groups
Each person who wishes to log into Ubuntu must have a user account. This will define what that user
can and cannot do on the system, with specific reference to files and folders. Because Ubuntu is
effectively one large file system (even hardware devices are files; see Chapter 10), user permissions lie at
the heart of controlling the entire system. They can limit which user has access to which hardware and
software, and therefore control access to various PC functions.
Each user also belongs to a group. Groups have the same style of permissions as individual users.
File or folder access can be denied or granted to a user, depending on that person’s group membership.
CHAPTER 21 ■ UNDERSTANDING LINUX USERS AND FILE PERMISSIONS
444
■ Note As in real life, a group can have many members and can be based around various interests. In a business
environment, this might mean that groups are created for members of the accounting department and the human
resources department. By changing the permissions on files created by the group members, each group can have
files that only the group members can access (although, as always, anyone with superuser powers can access
all files).
On a default Ubuntu system with just a handful of users, the group concept might seem somewhat
redundant. However, the concept of groups is fundamental to the way Ubuntu works and cannot be
avoided. Even if you don’t use groups, Ubuntu still requires your user account to be part of one.
In addition to actual human users, the Ubuntu system has its own set of user and group accounts.
Various programs that access hardware resources or particular sets of files are part of these groups.
Setting up system users and groups in this way makes the system more secure and easier to administer.
Root User
On most Linux systems, the root user has power over the entire system. Root can examine any file and
configure any piece of hardware. Root typically belongs to its own unique group, also called root.
Ubuntu is different from most Linux distributions in that the root account isn’t used by default.
Instead, certain users—including the one set up during installation—can “borrow” root-like, or
superuser, powers by simply typing their login password. This is done by preceding commands with
sudo or gksu at the command-line prompt, or as needed when using GUI programs that affect system
settings. For some programs, including Users and Groups (System
➤ Administration ➤ Users and
Groups), you need to click an Unlock button to gain superuser powers. Until you unlock the Users and
Groups program, most of the buttons are grayed out and unusable.
If you wish, you can activate the root user account on your system for administration purposes. To
activate the root account, use the following command in a terminal window (see Appendix A for details
on issuing commands in a terminal window):
Sudo passwd root
After typing your own login password, you’ll be invited to define a password for the root user.
Because of its power, the root user can cause a lot of accidental damage, so by default Ubuntu prevents
you from logging in as root. Instead, you can switch to being the root user temporarily from an ordinary
user account by using the Switch From option in the Shutdown menu. This will leave your session open
while letting you open an additional session as any user (e.g., root).
You will be prompted for the root password and then given root powers for as long as you need.
When you’ve finished, log out and return to your ordinary user account.
■ Tip You can tell when you’re logged in as the root user because in the Me menu your name is “root.” This
should be seen as a warning that you now have unrestricted control over the system, so be careful what you type,
and double-check everything before pressing Enter!
Download from Wow! eBook <www.wowebook.com>
CHAPTER 21 ■ UNDERSTANDING LINUX USERS AND FILE PERMISSIONS
445
If you enable the root password in the name of security, it might be a sensible precaution to then
disable sudo, thus preventing nonadmin users from playing with things they shouldn’t. To do this, you’ll
need to edit the file /etc/sudoers. There will be a line (shown in Figure 21-1) that reads as follows:
%admin ALL=(ALL) ALL
Comment this out with a # sign and save the file. This, of course, will all need to be done using root
privileges, so use gksudo gedit in the Run Applications dialog box (accessible by pressing Alt+F2) to
launch the text editor, and then navigate to and open the file. Also make sure you’ve set up the root
password, as shown earlier, before you do this.
Figure 21-1. Be very cautious when editing these files.
Users and File Permissions
The concepts of users and permissions are as important to Ubuntu as the idea of a central and all-
encompassing file system. In fact, the two are implicitly linked.
When initially installing Linux, you should have created at least one user account. By now, this will
have formed the day-to-day login that you use to access Linux and run programs.
Although you might not realize it, as a user you also belong to a group. In fact, every user on the
system belongs to a group. Under Ubuntu, ordinary users belong to a group based on their usernames
(under other versions of Linux, you might find that you belong to a group called users).
CHAPTER 21 ■ UNDERSTANDING LINUX USERS AND FILE PERMISSIONS
446
■ Note Groups are yet another reminder of Ubuntu’s UNIX origins. UNIX is often used on huge computer systems
with hundreds or thousands of users. Putting each user into a group makes the system administrator’s job a lot
easier. When controlling system resources, the administrator can control groups of users rather than hundreds of
individual users. On most home user PCs, the concept of groups is a little redundant because there’s typically a
single user, or at most two or three. However, the concept of groups is central to the way that Linux handles files.
A standard user account under Ubuntu is typically limited in what it can do. As a standard user,
you can save files to your own private area of the disk, located in the /home directory, but usually
nowhere else. You can move around the file system, but some directories are strictly out of bounds. In a
similar way, some files are read-only, so you cannot save changes to them. All of this is enforced using
file permissions.
Every file and directory is owned by a user. In addition, files and directories have three separate
settings that indicate who within the Linux system can read them, who can write to them, and, if the files
in question are runnable (usually programs or scripts), who can run (execute) them. In the case of
directories, it’s also possible to set who can browse them, as well as who can write files to them. If you try
to access a file or directory for which you don’t have permission, you’ll be turned away with an “access
denied” error message.
Root vs. Sudo
Most versions of Linux have two types of user accounts: standard and root. Standard users are those who
can run programs on the system but are limited in what they can do. The root user has the complete run
of the system, and as such, is often referred to as the superuser. The root user can access and/or delete
whatever files it wants. It can configure hardware, change settings, and so on.
Most versions of Linux create a user account called root and let users log in as root to perform
system maintenance. However, for practical as well as security reasons, most of the time the user should
be logged in as a standard user.
Ubuntu is different in that it doesn’t allow login as the root user. Instead, it allows certain users,
including the one created during installation, to temporarily adopt root-like powers. You will already
have encountered this when configuring hardware. As you’ve seen, all you need to do is type your
password when prompted in order to administer the system.
This way of working is referred to as sudo, which is short for superuser do. Most applications that
require root privileges will ask you for your password if you are a sudoer (i.e., a standard user with
permission to act as root in specific circumstances). Other applications might not require that you have
root privileges, but you might want to open them as root from time to time. Good examples of this are
Nautilus and gedit—maybe you want to completely remove a deleted user’s Home folder and you can’t
do that as a standard user. For this you use Gksudo, which is a graphical front end to the sudo command
(which will let you adopt root powers at the shell prompt—simply preface any command with sudo and
type your password when prompted in order to run it with root privileges). If you open the Run
Application dialog box (press Alt+F2) and type gksudo Nautilus, you will be able to browse the file
system as root. Or, if you want to edit a file to which only root has write privileges, run gksudo gedit.
Ubuntu remembers when you last used sudo, too, so it won’t annoy you by asking you again for your
password within 15 minutes of its first use.
In some ways, the sudo system is arguably slightly less secure than using a standard root account.
But it’s also a lot simpler. It reduces the chance of serious errors too. Any command or tweak that can
cause damage will invariably require administrative powers, and therefore requires you to type your
password or preface the command with gksudo or sudo. This serves as a warning and prevents mistakes.
CHAPTER 21 ■ UNDERSTANDING LINUX USERS AND FILE PERMISSIONS
447
UIDs and GIDs
Although we talk of user and group names, these are provided only for the benefit of humans. Internally,
Ubuntu uses a numerical system to identify users and groups. These are referred to as user IDs (UIDs)
and group IDs (GIDs), respectively.
Under Ubuntu, all the GID and UID numbers below 1,000 are reserved for the system. This means
that the first nonroot user account created during installation will probably be given a UID of 1000. In
addition, any new groups created after installation are numbered from 1,000. The first user you add has
a UID of 1000 and a GID of 1000, the second user a UID of 1001, and so on.
■ Note UID and GID information isn’t important during everyday use, and most commands used to administer
users, groups, and file permissions understand the human-readable names. However, knowing about UIDs and
GIDs can prove useful when you’re undertaking more complicated system administration, such as setting up a
restricted system for children or scripting.
Adding and Deleting Users and Groups
The easiest and quickest way to add a new user or group is to use the Users and Groups tool under the
System
➤ Administration menu. Of course, you can also perform these tasks through the command line.
Adding and Deleting Users
To add a new user, choose System ➤ Administration ➤ Users and Groups. Next, click Add. In the
authentication window, supply your password and click Authenticate. You’ll see the Create New User
dialog box, as shown in Figure 21-2.
CHAPTER 21 ■ UNDERSTANDING LINUX USERS AND FILE PERMISSIONS
448
Figure 21-2. Adding new users and groups is easy with the Users and Groups program.
Fill out the fields on the Account tab, and optionally the Contact, User Privileges, and Advanced
tabs, as follows:
Create a new user: As during initial installation (see Chapter 5), you’re invited to enter a username as
well as a real name. The username is how the user is identified to the system, while the real name is
how the user will be identified to other users. By default they are set to the same. Press OK when
done.
Changing user password for: You can set the user’s password by hand or let the system generate a
random password for you. In either case, make sure to remember the password to give it to the
person that will use the user account. You can also select the option to let the user to log into his
session without entering the password. Press OK when finished.
Once the user has been created, you can set additional settings by selecting the user from the list
and clicking the various options at the left of the User Settings window.
Account type: You can select the profile you want the user to have: Administrator, Desktop User, or
Custom. Users with the Administrator profile can use sudo or gksu to administer the system.
Although desktop users can’t use these commands, they do have access to most other system
resources. For most users, the Desktop User profile is a good choice. You cannot select the Custom
profile for a user account, but if you manually change its privileges (more about this shortly), this
profile is selected automatically.
Password: An initial password for the user is required, but you can change it any time you want with
the Users and Groups tool (as long as you have the required privileges). You can enter it in the text
box (and confirm it below) or let the system generate a random password from letters and numbers,
but this may be harder for the user to remember.
CHAPTER 21 ■ UNDERSTANDING LINUX USERS AND FILE PERMISSIONS
449
If you click the Advanced Settings button, more options will be available, as follows:
Contact Information: Here you can enter contact information for the user. This is not obligatory.
User Privileges: The settings on this tab offer much more control over what a user can and cannot do
on the system. Here you can prevent users from using certain hardware, such as the 3D capabilities
of graphics cards, or modems. You can also control whether the user is able to administer the
system. Simply put a check alongside any relevant boxes.
Advanced: Here you can alter additional settings, if you wish, relating to the technical setup of the
account on the system. If you’re not sure about these parameters, it’s best to leave the default
settings alone. You can disable the account from here, and it will no longer be available for login.
You might like to change the main group for the user as well. By default, the user will belong to a
newly created group based on the user’s own username. For example, if you add the user john, he
will be added to the group john. This private group approach enforces a more stringent policy
regarding personal file access. Alternatively, you could create a single group and assign several
users to that group for file-sharing purposes. We’ll discuss adding and removing groups in the
next section.
■ Caution Many groups are listed in the Main Group drop-down list. Nearly all of these relate to the way the Linux
operating system works and can be ignored (you can see the list of groups in Table 21-1). You should never delete
any of these groups or add new users to them. This may make the system unstable and/or insecure.
Deleting a user is simply a matter of highlighting the username in the list within the main Users and
Groups window and clicking the Delete button. Note that you can choose to either delete the user’s
Home folder or to keep the files. You might want to access the files yourself and make a backup of them
before completely removing the Home folder.
Creating and Deleting Groups
Adding a group is simply a matter of clicking the Manage Groups button in the Users and Groups
program window (System
➤ Administration ➤ Users and Groups). After clicking the Add button, you’ll
be prompted to give the group a name. The GID will be filled in for you automatically, but you could
choose a different number if you have good reason to do so. (Remember to use a number above 1,000 to
keep in line with the way Ubuntu operates.)
It isn’t essential that you add users to the group then and there, but a list of users is provided at the
bottom of the dialog box. Put a check alongside any user to grant that user access to your group.
■ Note Bear in mind that users can be members of more than one group, although all users have a main group
that they belong to, from which the GID is assigned to files they create.
As with user accounts, deleting a group is simply a matter of highlighting it in the list and clicking
the Delete button. You should ensure that the group no longer has any members before doing this,
CHAPTER 21 ■ UNDERSTANDING LINUX USERS AND FILE PERMISSIONS
450
because Ubuntu won’t prevent you from removing a group that has members (although it will warn you
that this is a bad thing to do).
■ Note Ubuntu appears to offer protection against the havoc caused by deleting a group that is the main group of
users on your system. When we deleted an entry that was the main group of a different user and then logged in as
that user, the group was automatically re-created! You shouldn’t rely on this kind of protection, however, and
should always check before deleting a group.
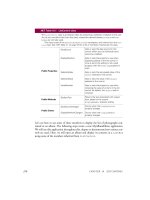
Table 21-1. System Groups Within Ubuntu
Group Definition
adm Used for system logging
dialout Required for use of serial port devices, such as older modems
cdrom Allows the user to access the CD/DVD-ROM
plugdev Allows the user access to removable storage, such as card readers, digital cameras, and
so on
lpadmin Allows the user to administer the printer
admin Gives the user system administration abilities (superuser powers)
sambashare Facilitates sharing files with others across the network
As you might have guessed, to manually add a user under Ubuntu, not only must you create a group
and then add the user to it, but you must also add that user to the required selection of supplementary
groups. Some are considered mandatory for effective use of the computer, such as plugdev, while others
are optional, depending on how much freedom you want to afford the new user.
Adding and Changing Passwords
On a default Ubuntu installation, ordinary users are able to change their own passwords by using the
Users and Groups tool. Select your user account from the list and click the Change button next to the
Password field. You will be prompted with the Change User Password window, shown in Figure 21-3, in
which you must enter your current password and select the new one, with the same options as when you
originally created the account.
CHAPTER 21 ■ UNDERSTANDING LINUX USERS AND FILE PERMISSIONS
451
Figure 21-3. The Change User Password window
You need root privileges to change other users’ passwords, but the procedure is the same. For
obvious security reasons, Ubuntu won’t allow blank passwords. (It might allow you to set a blank
password, but then it won’t let that user log in—this is an interesting way of disabling a user account).
You can enter just about anything as a password, but you should bear in mind some common-sense
rules. Ideally, passwords should be at least eight characters long and contain letters, numbers, and even
punctuation symbols. You might also want to include both uppercase and lowercase letters, because
that makes passwords harder to guess.
■ Tip You can temporarily switch into any user account by using the Switch From option on the Shutdown menu.
In this way your session will be kept open. If you log out, on the other hand, the session will be closed and you’ll
need to save your open documents to keep them for future use.
CHAPTER 21 ■ UNDERSTANDING LINUX USERS AND FILE PERMISSIONS
452
Understanding File and Folder Permissions
One of the main reasons why users and groups exist is manage different permissions for different
people. Each file and folder on your disk has permissions associated with it, along with a user and group
who own it. Without permissions, a user cannot do anything to a file.
Viewing Permissions
Within Nautilus, is easy to see the users and groups who own a file or folder and the permissions
associated with it. Simply select the List view; then select the View
➤ Visible Columns option from the
menu and check the Owner, Group, and Permissions boxes. Here’s an example of one line of a file listing
from our test PC:
Name Owner Group Permissions
Myfile ubuntu - Ubuntu ubuntu -rw-r r
In the Permissions column are the permissions for the file or folder. The permission list
usually consists of the characters r (for read), w (for write), x (for execute), and/or — (meaning none
are applicable).
The Owner column lists the owner of the file (ubuntu in this example) and the group that has
permission to access the file (in this case, Ubuntu).
The file permissions part of the listing might look confusing, but it’s actually quite simple. To
understand what’s going on, you need to split it into four groups, as illustrated in Figure 21-4.
Figure 21-4. The file permissions part of a file listing can be broken down into four separate parts.
The four groups are as follows:
Type of file: This character represents the file type. A standard data file is indicated with a hyphen (-
). Most files on your system fall into this category. A d shows that the entry is not a file, but a
directory. Table 21-2 lists the file type codes.
User permissions: Next come the permissions of the person who owns the file. The three characters
indicate what the person who owns the file can do with it. The owner of a file is usually the user who
created it, although the owner can be changed later on. In this example, rw- is shown. This means
that the owner of the file can read (r) and write (w) to the file. In other words, she can look at it and
CHAPTER 21 ■ UNDERSTANDING LINUX USERS AND FILE PERMISSIONS
453
also save changes to it. However, there’s a hyphen after the rw, which indicates that the user cannot
execute the file. If this were possible, there would be an x in this spot instead.
Group permissions: After the owner’s permissions are the permissions given to the specified group
that the file is assigned to. This is indicated by another three characters in the same style as those for
user permissions. In the example, the group’s permission is r , which means that the members of
the specified group can read the file but don’t have permission to write to it, because there’s a
hyphen where the w would normally appear. In other words, as far as they’re concerned, the file is
read-only.
Everyone else’s permissions: The last set of permissions indicates the permissions of everyone else on
the system (other users in other groups). In the example, they can only read the file (r); the two
hyphens that follow indicate that others cannot write to or execute the file.
Table 21-2. File Type Codes
Code File Type
- Standard file
d Standard directory
l Symbolic link (a shortcut to another file)
p Named pipe (a file that acts as a conduit for data between two programs)
s Socket (a file designed to send and receive data over a network)
c Character device (a hardware device driver, usually found in /dev)
b Block device (a hardware device driver, usually found in /dev)
As with Windows, programs are stored as files on your hard disk, just like standard data files. On
Linux, program files need to be explicitly marked as being executable. This is indicated in the permission
listing by an x. Therefore, if there’s no x in a file’s permissions, it’s a good bet that the file in question
isn’t a program or script (although this isn’t always true for various technical reasons).
To make matters a little more confusing, if the entry in the list of files is a directory (indicated by a
d), then the rules are different. In this case, an x indicates that the user can access that directory. If
there’s no x, the user’s attempts to browse to that directory will be met with an “access denied” message.
File permissions can be difficult to understand, so let’s look at a few real-world examples. These
examples assume that you’re logged into Linux as the user ubuntu.
Typical Data File Permissions
Here’s the first example:
Name Owner Group Permissions
myfile2 ubuntu - Ubuntu Ubuntu -rw-rw
CHAPTER 21 ■ UNDERSTANDING LINUX USERS AND FILE PERMISSIONS
454
You know that this file is owned by user ubuntu because that username appears in the Owner
column. Also notice that the group Ubuntu has access to the file, although precisely how much depends
on the permissions.
From left to right, the initial file permission character is a hyphen, which indicates that this is an
ordinary file and has no special characteristics. It’s also not a directory.
After that is the first part of the permissions, rw These are the permissions for the owner of the file,
ubuntu. You’re logged in as that user, so this file belongs to you, and these permissions apply to you. You
can read and write to the file but not execute it. Because you cannot execute the file, you can infer that
this is a data file, not a program (there are certain exceptions to this rule, but we’ll ignore them for the
sake of simplicity).
Following this is the next part of the file permissions, rw This tells you what members of the group
Ubuntu can do with the file. It’s fairly useless information if you’re the only user of your PC, but for the
record, it tells you that anyone else belonging to the group Ubuntu can also read and write the file but not
execute it. If you’re not the only user of a computer, group permissions can be important. The “Altering
Permissions” section, coming up shortly, describes how to change file permissions to control who can
access files.
Finally, the last three characters tell you the permissions of everyone else on the system. The three
hyphens ( ) mean that they have no permissions at all regarding the file. There’s a hyphen where the r
normally appears, so they cannot even read it. The hyphens afterward tell you they cannot write to the
file or execute it. If they try to do anything with the file, they’ll get a “permission denied” error.
Permissions on a User’s Directory
Here’s another example:
Name Owner Group Permissions
mydirectory ubuntu - Ubuntu ubuntu drwxr-xr-x
The list of permissions starts with d, which tells you that this isn’t a file but a directory. After this is
the list of permissions for the owner of the directory (ubuntu), who can read files in the directory and also
create new ones there. The x indicates that you can access this directory, as opposed to being turned
away with an “access denied” message. You might think being able to access the directory is taken for
granted if the user can read and write to it, but that’s not the case.
Next are the permissions for the group members. They can read files in the directory but not write
any new ones there (although they can modify files already there, provided the permissions of the
individual files allow this). Once again, there’s an x at the end of their particular permission listing,
which indicates that the group members can access the directory.
Following the group’s permissions are those of everyone else. They can read the directory and
browse it, but not write new files to it, as with the group users’ permissions.
Permissions on a Directory Owned by Root
Here’s the last example:
Name Owner Group Permissions
root root - root root drwx
Download from Wow! eBook <www.wowebook.com>
CHAPTER 21 ■ UNDERSTANDING LINUX USERS AND FILE PERMISSIONS
455
You can see that the file is owned by root. Remember that in this example, you’re logged in as
ubuntu and your group is Ubuntu.
The list of permissions starts with a d, so you can tell that this is actually a directory. After this, you
see that the owner of the directory, root, has permission to read, write, and access the directory.
Next are the permissions for the group: three hyphens. In other words, members of the group called
root have no permission to access this directory in any way. They cannot browse it, create new files in it,
or even access it.
Following this are the permissions for the rest of the users. This includes you, because you’re not the
user root and don’t belong to its group. The three hyphens mean you don’t have permission to read,
write, or access this directory. In other words, it’s out of bounds to you, probably because it contains files
that only the root user should access!
Altering Permissions
You can easily change permissions of files and directories within Nautilus. You must be the owner of a
file to change its permissions (or you can be root, of course; remember to use Gksudo in the Run
Applications dialog box to open Nautilus with root privileges). Just right-click a file and select Properties.
Figure 21-5 shows the Permissions tab of a file. You can set permissions for the owner, group, or
everybody else. The available permissions are None (no access), Read-Only, and Read and Write.
The permissions are applied automatically when you select them; if you keep your Nautilus windows
open and visible behind the file properties window, you will see this, as the permissions get updated
almost instantly.
Figure 21-5. The file Permissions tab
CHAPTER 21 ■ UNDERSTANDING LINUX USERS AND FILE PERMISSIONS
456
You can enable the Execute permission by checking the “Allow executing file as program” check
box. It applies for the owner, group, and other users alike.
The permissions on a folder are somewhat more complicated, as shown in Figure 21-6.
Figure 21-6. The folder Permissions tab allows you to change its files’ permissions as well.
You can change the group of the folder by selecting the one you want in the Group drop-down list.
There are three levels of folder access that you can set at any particular folder for the owner, the
group, and everybody else: List Files Only (which really allows read access to the folder), Access Files
(which allows read and execute access), and Create and Delete Files (which allows read, write, and
execute access). You can also change the permissions applied to the files contained in the folder by
selecting the appropriate level in each of the “File access” dialog boxes: Read-Only or Read and Write.
Check the “Allow executing file as program” box to set the Execute permission on contained files. Click
the Apply Permissions to Enclosed Files button to propagate the changes down into the hierarchy.
To change the ownership of a file or folder, you need to have root privileges, so make sure you open
Nautilus with Gksudo. In the Owner field, select the user.
CHAPTER 21 ■ UNDERSTANDING LINUX USERS AND FILE PERMISSIONS
457
■ Tip Directory permissions are rather strange in that it’s easy to set confusing and even illogical permissions.
Generally speaking, the day-to-day rules you should follow are simple. If you wish to stop a particular user from
accessing a directory, remove all permissions—Read, Write, and Execute (
rwx). If you wish to make a directory
read-only, leave the Read and Execute permissions in place, but remove the Write permission (
r-x). It’s even
possible to make a directory write-only, by leaving the Write and Execute permissions in place and removing the
Read permission (
-wx). However, it’s rare that you would want to do this.
NUMERIC FILE PERMISSIONS
In this chapter, we’ve discussed file permissions exclusively in terms of their abbreviations: r for Read, w
for Write, and
x for Execute. This is known as symbolic notation, and its goal is to make file permissions
intuitive and easy for the user to understand. However, UNIX and Linux file permissions are traditionally
expressed as octal notation. File permissions are expressed as a series of three numbers ranging from 0 to
7, each of the three numbers representing the Read, Write, and Execute permissions for user, group, and
other assignations of the file or directory.
For example, a file with a permission listing of
-rwxr-xr can be expressed as 754 in octal notation, and
a file permission of
-rwxrwxrwx can be expressed as 777.
This sounds more complicated than it is. It’s enough to know that Read permissions have a value of
4,
Write permissions have a value of
2, and Execute permissions have a value of 1. Permissions can be
“added together” to make a larger number: Read and Write permissions have a value of
6, for example
(
4 + 2). The “full” file permission setting (rwx) has a value of 7 (4 + 2 + 1).
In fact, octal notation can consist of four digits, because—as with symbolic notation—a total of four
permission groups can be set: Read, Write, and Execute, and also special file permissions such as the
sticky bit, SetUserID, and SetGroupID. However, in most cases octal notation file permissions are
expressed as three digits.
It should be kept in mind that, for most tasks, it’s not necessary to use octal notation. Symbolic notation is
usually enough, and has the added bonus of being less likely to induce a migraine. However, when
changing some system settings (e.g., the
umask variable that controls what permissions newly created
files have), it’s often necessary to specify an octal value. Additionally, some Linux and UNIX technical
documentation prefers to specify octal notation instead of the more modern symbolic notation.
■ Tip You can view the octal notation by adding the column in Nautilus. Select View ➤ Visible Columns, and check
the box next to Octal Permissions.
CHAPTER 21 ■ UNDERSTANDING LINUX USERS AND FILE PERMISSIONS
458
CREATING FILE SHORTCUTS
We touched on the idea of file system shortcuts in Chapter 9, when we discussed creating launchers
on the GNOME desktop. The problem with launchers is that they are recognized only within GNOME.
In other words, they mean nothing when you’re using the command prompt (or virtually any other
program that loads/saves files, with the exception of some programs created specially for the GNOME
desktop environment).
The Ubuntu file system offers two types of genuine shortcuts, which it refers to as file links. They are
symbolic links and hard links.
Symbolic links are the most commonly used. A symbolic link is similar to a Windows shortcut in that a
small file is created that “points toward” another file. Unlike a Windows shortcut, however, the symbolic
link isn’t a real file—it exists at the file system level, so it can’t be viewed in a text editor, for example.
You can spot a symbolic link in a file listing in Nautilus because it has a small arrow pointing upward and
to the right, and if you are in List view, the Type column indicates that it is a link to a file. If you right-click
the link and open its Properties window, you can see on the Basic tab the field link target to find out which
is the original file.
A hard link is more complex and requires some understanding of how files work. In simple terms, all files
consist of a pointer and actual data. As you might expect, the pointer tells the file system where on the
disk to find the data. Creating a hard link effectively creates an additional pointer to the data that has
exactly the same attributes as the original pointer, except with a different name. Performing any operation
on the linked file will perform that operation on the original file. Additionally, there will be no obvious sign
that the hard link isn’t a genuine file, apart from the fact that the link count—a property of files—will be
greater than 1. This indicates that more than one file links to the data. Maybe now you can see why people
prefer to use the more obviously detectable symbolic links!
To create a symbolic link, just right-click a file and select the option Make Link. You can move the link
wherever you want; it will still point to the correct file.
The new link has odd file permissions. It claims to have Read/Write/Execute permissions for everybody
(
rwxrwxrwx), but actually, because it’s a link, it mirrors the permissions of the file it links to. So if you
attempt to access a shortcut that links to a file you don’t have permission to access, you’ll see the
appropriate error message.
Summary
In this chapter you got to know two important elements of the Ubuntu experience, largely derived from
its UNIX and Linux predecessors: users and permissions. These are important concepts that lay the
foundation of the security implemented in Ubuntu. Through users, people can have their own
experiences, configurations, data, and permissions. An important characteristic is that every user
account can have its own files and set permissions on them. What files a user can change determines in
brief what that user can do with the system.
We discussed the differences between root and standard users, and how to allow temporary access
to root’s privileges. We showed you the steps to create users and group accounts, and investigated the
sometimes puzzling notation for file and folder permissions. Once you’ve mastered the basics, you
should be ready to set permissions on your own.
C H A P T E R 22
■ ■ ■
459
Optimizing Your System
You’ll soon find out that Ubuntu offers great performance and relatively few stability problems,
especially as compared to some other operating systems. (For instance, Linux file systems generally
don’t need to be defragmented, unless you have NTFS or FAT32 partitions to take care of). But you
can always make it even better. If you still run into any performance issues, or if you simply want to
get the most out of your system, this chapter is for you. You don’t have to apply the topics it discusses;
by default Ubuntu already works great without applying any optimizations to it, so you can skip it if
you’re satisfied with how your system runs. More often than not, the chapter discusses hacks—clever
methods of making things work in a nonstandard fashion. But as your experience of Ubuntu might
have already taught you, such hacks are the lifeblood of Linux. One of the strengths of Linux is the
ability to delve under the hood and change absolutely any aspect of the way it works. So even if the
topics in this chapter are not essential, we recommend that you read the chapter carefully and consider
applying its tips.
Speeding Up Booting
Since Ubuntu 6.10 (Edgy Eft), Ubuntu has been using a boot routine called Upstart that effectively
optimizes itself. Upstart is responsible for starting services and has been greatly enhanced with the
release of 10.04. You can learn more about Upstart at http://upstart. ubuntu.com. However, you can
still tweak performance by enabling startup scripts to run in parallel instead of one after the other. This
works well for multithreaded, multicore processors like Intel’s Core 2 Duo and AMD’s Athlon 64 X2. It
won’t make the computer start instantly, but it will save a few seconds each time you boot.
To configure running startup scripts in parallel, you need to edit the /etc/init.d/rc file. You can
load this file into the Gedit text editor by typing the following in a terminal window:
gksu gedit /etc/init.d/rc
Look for the line that begins with CONCURRENCY near the top of the file, as shown in Figure 22-1, and
change the value from none to shell. Save the file and reboot the computer. If you see no improvement
in boot speed, you can change this value back to CONCURRENCY=none if you want.
CHAPTER 22 ■ OPTIMIZING YOUR SYSTEM
460
Figure 22-1. Parallel execution of scripts in the boot process can be enabled by editing the /etc/init.d/rc
file.
Reducing the Boot Menu Delay
Getting rid of the Grub boot menu delay can save some waiting around in the early stages of the boot
process. The delay can be reduced to 1 second or even eradicated completely. Of course, if you do that
you won’t be able to choose which kernel you want to load—or which operating system if you’re dual-
booting with Windows (but why would you want to?). Even if Ubuntu is the only OS on your computer,
without the boot menu delay, you won’t have the chance to boot into recovery mode or a previously
installed Linux kernel from the Grub menu. So you need to consider whether this is a worthwhile time-
saving measure.
The boot menu delay is stated in the /etc/default/grub file. You can load this into the Gedit text
editor by typing the following in a terminal window:
gksu gedit /etc/default/grub
Look for the line that begins with GRUB_TIMEOUT and change the value to whatever you want. The
units are counted in seconds, so a value of 3 equates to 3 seconds. A value of 0 (zero) will mean the boot
menu won’t appear at all, which is not recommended, for the reasons just mentioned. Generally
speaking, a delay of 1 second (1) gives you just enough time to press a key at the appropriate time. This
will cancel the countdown, meaning the boot menu will stay on your screen until you select an option.
CHAPTER 22 ■ OPTIMIZING YOUR SYSTEM
461
■ Note When you’ve finished, save the file and quit Gedit.
Managing GNOME Sessions
Under Windows, you might be used to controlling which programs start up at the same time as the
Desktop, by adding or deleting entries in the Start menu’s Startup program group. When running
Ubuntu, you can control which system applets are started automatically, as well as your personal choice
of Desktop applications.
To control which programs start up with the GNOME Desktop, use the Startup Applications
Preferences dialog box (gnome-session-properties). To run the program, click System Preferences
Startup Applications.
Clicking the Startup Programs tab shows the programs that start when GNOME does. You can
disable a startup program in the list by unchecking the check box beside it. You definitely should have a
thorough look at the applications that are started by default, as it is quite likely that you’ll find some that
are of no use to you at all.
You should see most or all of the following entries, though our test system had some additional
elements added by other applications and services.
Bluetooth Manager: This program is responsible for the Bluetooth applet that can be used to send
and receive files, browse other Bluetooth devices, set up Bluetooth services, and manage Bluetooth
service settings. You can disable this applet if your system is not Bluetooth-enabled or if you just
don’t want to use Bluetooth at all.
Certificate and Key Storage: When using secured tools on a local network or the Internet, you’ll often
receive a certificate that is used to prove the identity of the remote host. You’ll receive encryption
keys as well. This applet allows you to store all those items in a secure place. So you had better leave
it on.
Check for New Hardware Drivers: This tool scans your hardware devices and checks whether new
third-party proprietary drivers can be used with them. If a new driver is compatible, this tool
provides a facility to download, install, and configure the driver in your computer. If your hardware
devices are working perfectly without third-party drivers, or you’re uncomfortable using proprietary
software, it is safe to disable this program. Otherwise, keep the tool enabled so you can receive
driver bug fixes and updates.
Disk Notifications: Your hard disk by default is monitored by the SMART utility. If the current disk
state is degrading, SMART will tell you about it. So it makes sense to leave the Disk Notifications
option on to make sure that you are updated as soon as something goes wrong on your hard drive.
And if you want to switch this option off, use System Administration Disk Utility on a regular
basis to monitor the current state of your hard disks.
Evolution Alarm Notifier: As its name suggests, this utility ties into Evolution’s calendar function in
order to notify you of events, such as an appointment that you don’t want to forget. If you don’t use
Evolution or don’t use its calendar function, this applet can be disabled.
GNOME Login Sound: As you might have guessed, this plays the Ubuntu welcome music that you
hear whenever the GNOME Desktop appears. It can be disabled without causing any problems.
Network Manager: This applet manages your wi-fi, Ethernet, and VPN connections. This is useful for
laptop users who connect to several wi-fi networks on the go, as discussed in Chapter 8. You should
not disable this program.
CHAPTER 22 ■ OPTIMIZING YOUR SYSTEM
462
NVidia X Server Setting: This program helps you to configure settings for an Nvidia graphics card. As
you would have guessed, this program can only be used for Nvidia graphics cards. If you leave it on,
you can use this program to change graphics display settings in a convenient way. This is in
particular useful if you have to change graphics display settings often—for example, if you regularly
use your computer with an external projector.
Personal File Sharing: This application allows users to enable file sharing with other users. This is a
convenient program that makes it easy to work together with other users, but at the same time it’s
also a potential security risk. For that reason, you might want to switch this program off unless you
really need it.
Power Manager: This program controls all aspects of GNOME’s power management, including the
useful hibernate feature that can save the contents of the system’s RAM to provide quicker startup.
If your computer is a notebook, this tool should be considered essential. If you have a desktop PC
and are looking to save power by using hibernate, suspend, or screen blanking after a period of
inactivity, you won’t want to disable Power Manager. Disabling it will remove the Suspend and
Hibernate options from the System Quit dialog box. So better not switch it off.
Print Queue Applet: This applet provides an interface for you to cancel or repeat printer jobs. It is
also responsible for automatically setting up a printer for use when you plug in a printer. You can
disable this applet if you will never print from your computer.
Remote Desktop: This background service allows other computers to connect to your computer,
after an invitation has been issued (see Chapter 33). If you have no intention of remotely accessing
your computer, this service can be disabled.
Secret Storage Service: This is a background component necessary for the application that generates
and stores encryption keys. If you do not encrypt files and/or e-mails, this service can be disabled.
Ubuntu One: This item gives access to Ubuntu One, the Ubuntu cloud solution offered by
Canonical. Switch it on if you intend to use this service.
Update Notifier: This is the Update Manager tool. You shouldn’t disable this applet, because it
performs the essential task of checking whether any system updates are available. It runs in the
background after it is started and hardly impacts startup time at all. However, if you absolutely must
prune valuable milliseconds from startup, you can disable it. You can then check for updates
manually, whenever you desire, by clicking System Administration Update Manager.
User Folders Update: This tool pops up during the start of your session if you have recently changed
the default language (System Administration Language Support) of your computer. The tool
gives you an option to translate the folder names Desktop, Templates, Public, Documents, Music,
Pictures, and Videos in your /home directory to the new default language. You can disable this tool if
you don’t change your language settings.
Visual Assistance: This utility runs assistive technologies such as the Orca screen reader, magnifier,
and Braille application if these tools were enabled in the Assistive Technologies Preferences window
(System Preferences Assistive Technologies). If you are not using assistive technologies, you can
disable this applet.
The Options tab contains a single item labeled Automatically Remember Running Applications
When Logging Out, and this is designed to get you back exactly where you started next time you launch
the computer. The system has been problematic in previous versions of Ubuntu, but the developers
appear to have sorted things out. The exception is W
ine-based Windows applications. These didn’t seem
to automatically start on our test system, but everything else, including KDE applications, worked fine.
CHAPTER 22 ■ OPTIMIZING YOUR SYSTEM
463
■ Tip The Startup Programs tab of the Startup Applications Preferences dialog box contains an Add button, which
lets you add any program you like to the GNOME startup. You could add Evolution, for example, so that it starts
automatically whenever you log in. But it’s easier to add currently running applications by using the option on the
Options tab.
STOP WAITING FOR AN ADDRESS
If you use an Ethernet or wi-fi connection to access your network, you might find that Ubuntu spends a few
seconds during each boot acquiring an Internet address. This is characterized by a long pause while
nothing seems to be happening. Therefore, one way to provide an instant speed boost is to give your
computer a static IP address. Chapter 8 explains how to configure your network interface.
However, to assign a static address, you’ll need to find out what IP address range your router (or other
DHCP server) uses. You can discover this by looking at the router’s configuration software. Sometimes this
is accessed via a web browser. Look for the section of the web interface called DHCP Configuration or
something similar.
■ Note Before you start assigning a static IP address, bear in mind that static IP addresses are cool if you
don’t connect to other networks frequently. If you do want to switch easily between networks, don’t apply
this tip.
Normally, IPv4 local area network addresses are in the 192.168.x.x range, where x.x can be any series of
numbers from 0.0 to 255.255. For instance, you may find that your router uses the 192.168.1.2-255
range. In this case, assigning a static IP address that will work with the router is simply a matter of
choosing an IP address in this range. However, this router may hand out addresses sequentially from 2
upward, so it’s best to choose an address it’s unlikely to reach, even if you happen to have many
computers connected to the network. Starting at 50 is a good idea, so you could assign the address
192.168.1.50.
Don’t forget that when defining static IP addresses, you need to manually supply the gateway, subnet, and
DNS addresses. In the example, the gateway would be 192.168.1.1 (the address of the LAN interface on
the router), and the subnet would be 255.255.255.0. The DNS address on a small home network will
probably be the same as the gateway address, because the router will usually be set to forward DNS
requests by default. This isn’t always the case, though, so be sure to check.
CHAPTER 22 ■ OPTIMIZING YOUR SYSTEM
464
BUILD YOUR OWN READAHEAD PROFILE
Ubuntu includes a feature called readahead, which is able to order the list of files to be loaded during
bootup by their locations on the hard disk. A default readahead list is installed on a standard Ubuntu
installation. This is created on a generic PC, but you can build your own version of the list, customized for
your own computer.
Here are the steps to create your own readahead list:
1. Reboot Ubuntu, and at the boot menu, highlight the Ubuntu entry and press E. If
Ubuntu is the only operating system on your computer (that is, your computer
doesn’t dual-boot with Windows), you might need to press Shift to see the boot
menu when prompted.
2. Highlight the line, beginning with the word
linux and press E again.
3. Using the right-arrow key, move the cursor to the end of the line. Insert a space
and type profile. The following is how the entire line read on our test PC; yours
may be slightly different (note that the beginning of the line was cropped off
because of the resolution of the screen):
< quiet splash profile
4. Press Control-X to boot the computer. This boot will take longer than usual,
because the boot profile is being rebuilt. When the computer has booted up, and
all disk activity has stopped (which might take a minute or two after the Desktop
has appeared), reboot your computer. You should find that bootup is faster.
Prelinking
A lot of Ubuntu software relies on other pieces of code to work. These are sometimes referred to as
libraries, which is a good indicator of their purpose: to provide functions that programs can check in and
out whenever they need them, as if they were borrowing books from a library.
Whenever a program starts, it must look for these other libraries and load them into memory so
they’re ready for use. This can take some time, particularly with larger and more-complicated programs.
Because of this, the concept of prelinking was invented. By a series of complicated tricks, the prelink
program makes each bit of software you might run aware of the libraries it needs, so that memory can be
better allocated.
Prelinking claims to boost program startup times by up to 50 percent or more, but the problem is
that it’s a hack—a programming trick designed to make your system work in a nonstandard way.
Because of this, some programs are incompatible with prelinking. In fact, some might simply refuse to
work unless prelinking is deactivated. At the time of this writing, such programs are in the minority.
However, keep in mind that prelinking can be easily reversed if necessary. Alternatively, you might want
to weigh whether it’s worth setting up prelinking in the first place.
Download from Wow! eBook <www.wowebook.com>
CHAPTER 22 ■ OPTIMIZING YOUR SYSTEM
465
Configuring Prelinking
If you decide to go ahead with prelinking, you’ll need to download the relevant software from the
Ubuntu software repositories. Open the Ubuntu Software Center and type prelink into the search box.
Click Install.
Before you can run a prelinking sweep of your system, you need to enable it in one of its
configuration files. To do this, type the following in a terminal window:
gksu gedit /etc/default/prelink
Change the line that reads PRELINKING=unknown to PRELINKING=yes. Then save the file and quit Gedit.
To run a prelinking scan of your system, simply issue this command:
sudo prelink -a
This will prelink practically all the binary files on your system and may take some time to complete.
You may also see some error output, but you don’t need to pay attention to it.
Prelinking was automatically added as a daily cron job when you installed it, so any new programs
you add will be automatically prelinked.
Deactivating Prelinking
If you find that prelinking makes a particular application malfunction or simply stop working, you can
try undoing prelinking. To do this, find out where the main binary for the program resides and issue the
prelink command with the undo command option. For example, to remove prelinking from the Gedit
text editor program, you could type the following:
whereis gedit
This command will show that the gedit binary is found at the location /usr/bin/gedit in the file
system. Next, attempt to undo prelinking on the binary:
sudo prelink undo /usr/bin/gedit
However, this may not work, because some programs might rely on additional binaries on the
system. Therefore, the solution might be to undo prelinking for the entire system, which you can do by
typing the following:
sudo prelink -ua
After this, you should remove the prelink package, via the Ubuntu Software Center, to stop it from
running again in the future (or manually remove its cron entry).
■ Caution Prelinking is dangerous, as services and programs may stop working if you use it. If it works, your
computer will be faster. But be prepared to do some additional manual work to undo prelinking for some of the
programs on your computer.
CHAPTER 22 ■ OPTIMIZING YOUR SYSTEM
466
OPTIMIZING THE KERNEL
You can download the Linux kernel source code and compile your own version of it. This gives you total
control over the kernel configuration, so you can leave out parts you don’t want in order to free memory.
On current kernels however, you won’t often need to compile your own kernel. The Linux kernel is
modular; so it just won’t load components that are not going to be needed. But still, you can compile your
kernel to leave out certain components completely.
By recompiling, you can also set certain optimization settings, such as creating a version of the kernel
specifically built for your model of CPU. On the other hand, the mere fact of recompiling your kernel allows
you to learn a lot about the way it works. So even if it’s not really useful for better performance, it may give
you a better understanding of the way Linux works.
Although compiling a kernel is a simple procedure, you’ll need to answer many complex questions and
have an in-depth knowledge of the way Linux works. You could also have a model of a working kernel
to crib from, which is a great way to avoid some growing pains while teasing out optimal kernel
compilation settings.
In addition, compiling your own kernel brings with it several issues. The first is that it may not work with
any binary modules that you have installed, such as graphics cards or wireless drivers. You can opt to
update these yourself, but this adds to the complexity.
The second problem is that Ubuntu is built around precompiled kernels. Several software packages expect
to work with the precompiled kernel, and in addition, Ubuntu may occasionally download an updated
prepackaged kernel automatically as part of the system update feature and override the one you’ve
created. If there are any security problems with the kernel version you compiled, you’ll need to recompile a
new kernel from scratch (or patch the one you have). This means you’ll have to keep an eye on the
security news sites and take action when necessary.
Your customized kernel may also fail to automatically detect newly supported hardware, meaning you’ll
have to acquire and load the drivers manually.
That said, compiling a kernel is an excellent way of learning how Linux works, and if it all goes well, the
sense of achievement is enormous.
Some people choose to download the kernel source code from the official Linux kernel site,
www.kernel.org. However, it makes more sense to download the official Ubuntu release, because this
will be tailored for the way your system works. Using the Synaptic Package Manager, simply search for
linux-source.
You can find several guides to compiling your own kernel online, but we recommend the following posting
on the Ubuntu forums web site, which looks at compiling a kernel under Ubuntu:
Optimizing the Kernel
Whereas precompiling the kernel is not really the way to make your system faster, optimization of the
kernel does help. In the file system of your computer, you’ll find lots of files in the /proc/sys and the
/sys directories. The /proc/sys directory relates to kernel settings, while the /sys directory is more to do